![]()
![]()
![]()
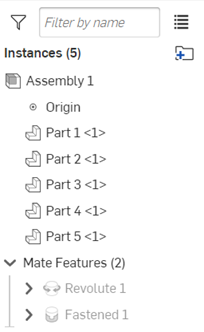
Assembly 分頁中的組合件清單包含了所有為組合件定義的零件實例、群組、結合連接器、結合與關係的清單。使用環境選單來在這些項目上執行操作。
使用資料夾來管理組合件的「實例」與「結合特徵」清單。資料夾提供一個抑制、取消抑制、隱藏、顯示、與篩除清單內容的快速方法。
有兩種方法可建立組合件資料夾。第一個方法是按一下「實例」清單上方的「建立新資料夾」圖示。命名資料夾然後接受。這樣會將資料夾放置在清單的底部。拖曳實例並將其放置在資料夾中來加入實例。將資料夾拖曳到清單中的其他地方來重新定位。
第二個方法是先選擇實例。然後按一下「建立新資料夾」圖示,或是在所選實例上按右鍵,然後選擇 [將選取項目加入至資料夾]。命名資料夾然後街後。這樣會根據第一個選取項目的位置來決定資料夾於清單中的位置。
在建立資料夾之後,有好幾個選項可用。使用眼睛圖示來隱藏或顯示資料夾中的所有實例。 使用資料夾的環境選單來執行其他的動作。
「重新命名」來變更資料夾的名稱。「隱藏/顯示」來切換內容的顯示與否。「抑制/取消抑制」來切換抑制狀態。「刪除」會從「實例」清單中移除資料夾與其內部的所有項目。「拆開資料夾」會移除資料夾但保留實例。
若要在「結合特徵」清單中加入資料夾,請選擇一或多個結合,接著在選取項目上按右鍵,然後選擇 [將選取項目加入至資料夾]。
命名資料夾然後接受。在建立資料夾之後,使用與組合件資料夾相同的拖放方式來在資料夾中加入或移除結合。結合資料夾有與組合件資料夾相同的環境選單選項。
Assembly 分頁中的組合件清單包含了所有為組合件定義的零件實例、群組、結合連接器、結合與關係的清單。使用環境選單來在這些項目上執行操作。
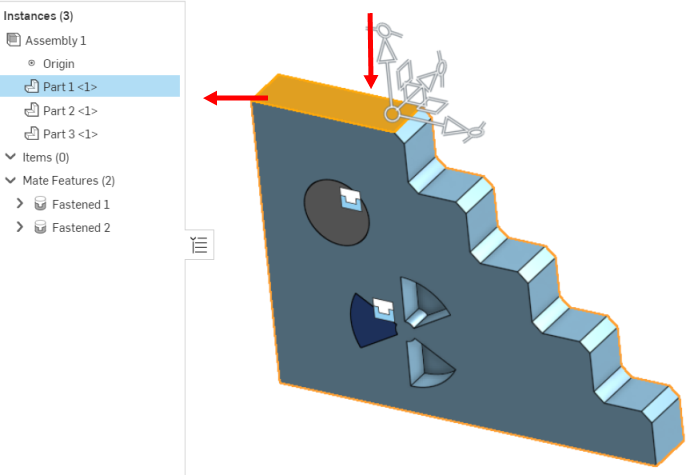
若要在組合件清單中找出某一物件,您可以在圖形區域中按一下該物件。清單會自動捲動至所選的物件並強調顯示 (下方圖形中藍色箭號所指)。如果選取的物件並未在清單中展開,請在圖形區域中於物件上按右鍵,然後選擇前往清單中的項目。如果物件已顯示並於清單中展開,則此功能表指令不會出現。
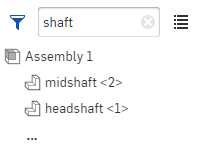
您也可以在「搜尋」方塊中尋找。請輸入部分名稱來篩選包含這些字元的特徵清單:
輸入部分特徵名稱或或其他篩選選項來顯示相符的組合件內容。 使用特殊命令 (以英文冒號 :為前置) 來進一步控制搜尋,或按一下篩選器圖示來選擇一個篩選器:
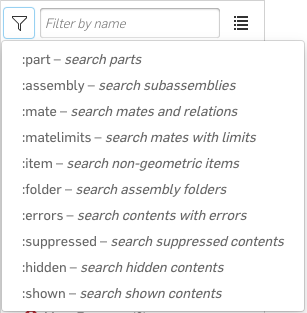
- :part 篩選零件,以及選擇性地根據名稱篩選
- :assembly 篩選次組合件,以及選擇性地根據名稱篩選
- :mate 篩選結合,以及選擇性地根據名稱篩選
- :matelimits - 僅篩選出已套用一或多個限制的結合,以及選擇性地根據名稱篩選。
- :item 篩選非幾何項目,以及選擇性地根據名稱篩選
- :folder 篩選資料夾,以及選擇性地根據名稱篩選
- :errors 根據錯誤篩選
- :suppressed 篩選受抑制的內容
- :hidden 篩選隱藏的內容
- :shown 篩選顯示的內容
您可以合併篩選器來獲得更詳細的結果,譬如:
-
:mate :errors 找出所有有錯誤的結合,可選擇性地包括結合的名稱
-
:part :hidden 找出所有隱藏的零件,以及選擇性地包括名稱來精細篩選
有多種可操作組合件清單的方式:
- 實例列出插入至組合件中的所有零件實例。會根據名稱排列,並在尖括號中顯示實例數量 <2>。例如,已將零件 (Housing) 插入至組合件中兩次,會列出 Housing <1> 與 Housing <2>。如果您在 Part Studio 中改變零件名稱,則變更也會反映在組合件中。如果開啟這個功能,實例的零件編號、修訂版與狀態屬性都會出現在右側的「實例」清單中。若要開啟這個功能,按一下頁面右上角的使用者,再點按 [我的帳戶],然後按一下 [喜好設定]。核取「組合件設定」之下「顯示實例清單屬性」旁的方塊。
- 結合特徵包括:
- 結合連接器 - 在零件上指定點以於組合件中定位零件。
- 結合 - 指定兩個結合連接器之間的自由度。
- 群組 - 嚴格地集合在一起的實例。
如果啟用了顯示實例清單屬性設定 (詳細資訊請參考屬性 > 組合件設定),清單屬性會顯示在實例的右側:
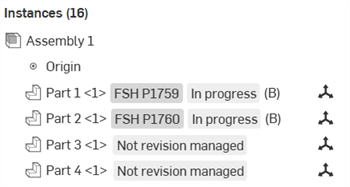
組合件「實例」清單中顯示清單屬性 (「進行中」與「非修訂版管理的」)
不論顯示「實例清單屬性」的設定為何,如果實例是非修訂版管理的,您也可以在 BOM 表格中新增欄位來顯示實例的狀態。
組合件清單環境選單
在組合件清單中的實例上按右鍵以存取環境選單:
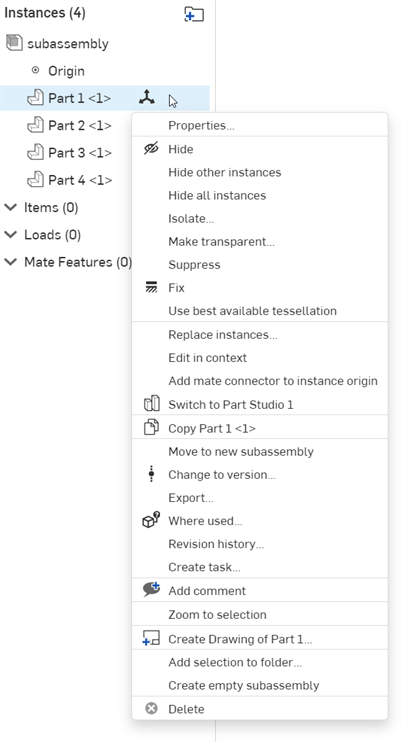
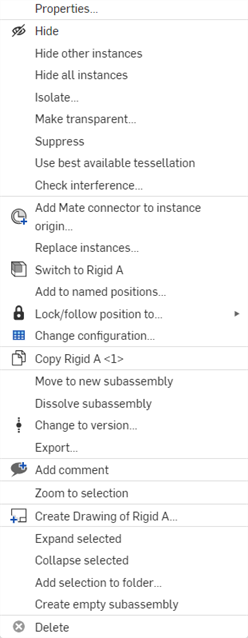
零件實例 (第一個圖片),次組合件實例 (第二個圖片),與最上層組合件 (第三個圖片) 的環境選單。
-
屬性 - 開啟目前所選實例或組合件的零件屬性對話方塊 (以供檢視與編輯屬性)。
-
編輯 - 僅適用於以剛性插入的 Part Studio 實例。可讓您編輯 Part Studio 實例。請參考編輯插入的剛性 Part Studio。
-
顯示/隱藏實例清單屬性 - 可從組合件環境選單中存取,這會顯示或隱藏組合件清單中的零件編號、修訂版與狀態屬性。
-
重新命名 - 可讓您重新命名目前所選的組合件。
-
解除固定全部 - 於最上層組合件或次組合件的環境選單中提供,這會解除所選次組合件、資料夾、參數式 Part Studio、複製排列、與仿製間所有固定實例的固定。
-
新增爆炸視圖 - 在組合件環境選單中提供,會在組合件中建立一個新的爆炸視圖。詳細資訊請參考建立爆炸視圖。
-
發行 - 開啟「選擇發行工作流程」,您可於其中為選取的組合件開始一個新的發行。詳細資訊請參考發行管理。
- 隱藏/顯示 - 若要更清楚地檢視零件與其結合連接器,您可以隱藏檔住了其他零件的零件。於特徵清單中的實例上按右鍵,然後按一下 [隱藏],或在實例名稱上暫留然後按一下
 。
。 -
隱藏其他實例 - 隱藏除了所選實例外的所有組合件實例。
-
隱藏所有實例 - 隱藏組合件中的所有實例。
-
隔離顯示 - 開啟「隔離顯示」對話方塊,將目前選取的實例與其他實例隔離顯示。所有其他的實例會變為透明。詳細資訊請參考隔離顯示零件。
-
設為透明 - 開啟「設為透明」對話方塊。這是與「隔離顯示」相反的指令。系統會將目前選取的實例變為透明。如果您需要查看在顯示上被另一或多個零件擋住的零件以便執行某些操作,這是相當有用的。詳細資訊請參考將零件設為透明。
- 結合限制指標 - 如果結合上套用有一或多個限制,則在「結合特徵」清單中的結合右側會有結合限制指標圖示
 。可查看清單中那些結合有套用的限制,而無需開啟相關的「結合」對話方塊。
 - Suppress - Suppress a mate, part instance, or subassembly through the Feature list context menu or the context menu available on the feature in the graphics area. When a part or assembly is suppressed, all mates associated with that part or assembly become inactive. When a seed instance is suppressed, all assembly patterns and replicates will also become inactive.
- 固定 - 就地固定一個零件,在實例名稱上按右鍵,然後按一下 [固定] (要移除固定,再次按右鍵並按下 [解除固定])。當實例是固定的時,這個圖示會出現在清單中的實例旁:
 。當次組合件中有固定的實例時,這個圖示會出現在清單中的實例旁:
 。
。 -
使用可用的最佳鑲嵌化 / 使用自動的鑲嵌化設定 - 在最佳可用與自動的鑲嵌化設定間切換。詳細資訊請參考下方提示的部分以及指定零件的鑲嵌品質。
-
檢查干涉 - 偵測與檢視組合件中實例間的干涉。詳細資訊請參考干涉偵測。
-
取代實例 - 開啟「取代實例」對話方塊,您可於其中置換選取的目前實例。詳細資訊請參考取代實例。
-
在關聯中編輯 - 開啟目前選取的實例以在關聯中編輯實例。詳細資訊請參考在關聯中建構模型。
-
將結合連接器加入至實例原點 - 將結合連接器加入至實例的原點上 (來自實例 Part Studio 的原點)。在加入時,「結合連接器」對話方塊會開啟,您可於其中進一步編輯結合連接器。當接受時,結合連接器會列在「結合特徵」清單中。
-
切換至 [Part Studio] - 切換至衍生出目前所選實例的 Part Studio。
-
複製 [零件] - 複製目前選取的實例。
-
加入至命名位置 - 將次組合件加入至新的命名位置。
-
鎖住/追隨位置至 - 將目前的次組合件鎖在目前的位置,或是將次組合件追隨至命名位置 (如果有存在的話)。當啟用時,次組合件的結合位置是凍結的,因此可藉由減少次組合件結合的解出與重新生成的時間來改善效能。詳細資訊請參考鎖住目前次組合件的位置或追隨至次組合件的命名位置。
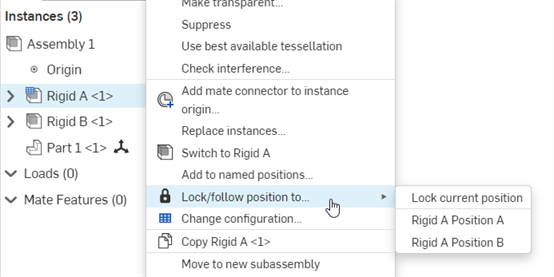
-
變更組態 - 將次組合件轉換至一個不同的組態 (如果有的話)。請參考組態。
-
移動到新的次組合件中 - 將目前所選實例移動到新的次組合件中。
-
解散次組合件 - 解散次組合件 (或一次解散多個次組合件) 會將所有次組合件實例與其結合連接器從次組合件移動到父組合件中。系統不會刪除次組合件分頁,但內容現在會是空的。請參考解散次組合件。
-
變更至版本 - 開啟「參考管理員」,您可於其中將目前所選實例更新至新的版本。詳細資訊請參考更新參考。
-
匯出 - 開啟「匯出」對話方塊,您可於其中將目前所選實例和/或組合件匯出 (下載) 到您裝置的一個檔案 (或個別檔案) 中。詳細資訊請參考匯出檔案。
-
使用處 - 開啟「使用處」面板,您可於其中查看在那些其他 Part Studio、組合件與工程圖中使用了目前的實例與組合件。詳細資訊請參考使用處。
-
修訂歷程記錄 - 開啟目前所選實例或組合件的的修訂歷程記錄。
-
建立工作 - 開啟「建立工作」對話方塊,可於其中指派新的工作並與所選的實例或組合件建立關聯。詳細資訊請參考監測發行與工作。
-
新增評論 - 開啟「評論」面板,您可於其中加入對目前所選實例或組合件的評論。詳細資訊請參考評論。
-
縮放至選取範圍 - 縮放目前所選的實例。
-
建立 [零件] 的工程圖 - 開啟新的工程圖分頁,可於其中將準備就緒的實例放置在工程圖上。詳細資訊請參考工程圖。
-
展開 - 在任何有可摺疊箭頭的特徵上按右鍵,然後移動游標在展開選項上暫留以存取展開所選項目或全部展開選項。
-
摺疊 - 在任何有可摺疊箭頭的特徵上按右鍵,然後移動游標在摺疊選項上暫留以存取摺疊所選項目或全部摺疊選項。
-
將選取項目加入至資料夾 - 將目前選取的實例加入至資料夾中。如果沒有資料夾存在,系統會開啟「資料夾名稱」以讓您建立新的資料夾。
-
建立空的次組合件 - 在組合件清單中建立一個新的空白次組合件。
-
刪除 - 刪除目前選取的實例。
拖曳來將「特徵」清單中的零件實例名稱或次組合件名稱移動到清單中的新位置上。
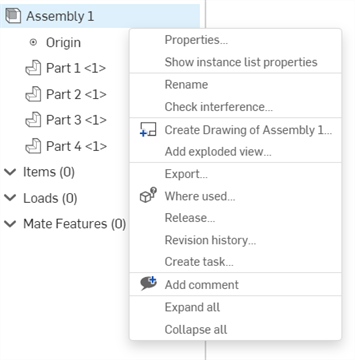
您可以點按實例清單上方的組合件名稱來選擇整個組合件 (下圖中藍色箭頭的右邊)。
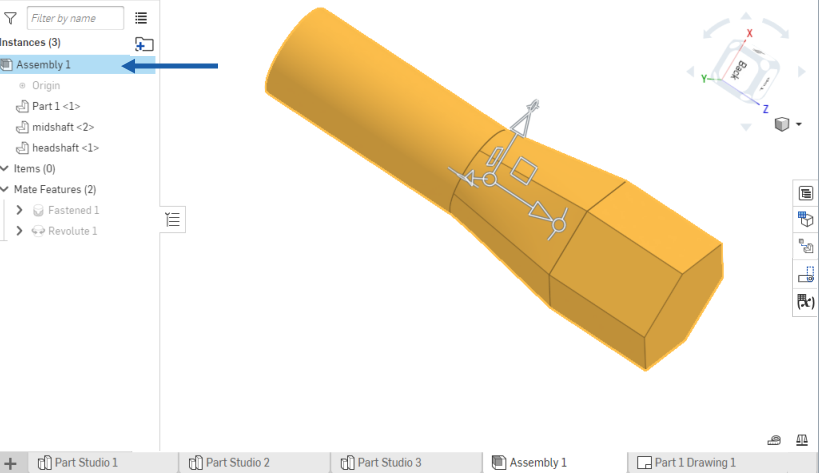
- 您也可以在「實例」清單中的組合件名稱上按右鍵來開啟環境選單:
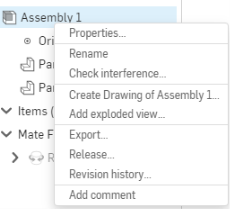
環境選單可讓您執行這些動作:
- 屬性 - 編輯所選項目的屬性。
- 重新命名 - 變更所選項目的名稱。
- 檢查干涉 - 檢查以查看組合件中的零件是否與其他零件有干涉。
- 建立工程圖 - 建立所選項目的 Onshape 工程圖。
- 新增爆炸視圖 - 建立組合件的爆炸視圖。
- 匯出 - 匯出所選的項目。
- 發行 - 建立所選項目的發行候選。
- 修訂歷程記錄 - 檢視所選項目的修訂歷程記錄。如果沒有任何修訂歷程記錄存在,則會顯示相關的訊息。
- 新增評論 - 在所選項目上加入評論,並在評論中標記項目。
- 您可以在次組合件或零件上按滑鼠右鍵來存取環境選單。
從這個功能表中可執行的動作之一是複製一個次組合件或零件,然後貼入圖形區域中。
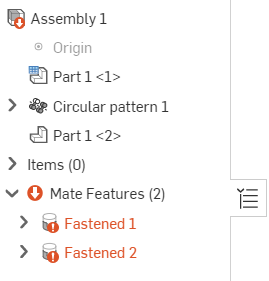
- 如果您的組合件中有錯誤,會在實例清單中附上紅色圖示顯示這些錯誤 (如下所示):
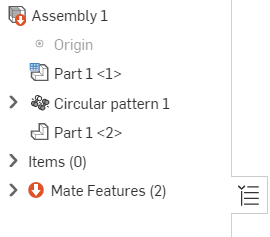
按一下錯誤圖示左邊的下拉箭頭來查看錯誤的位置:
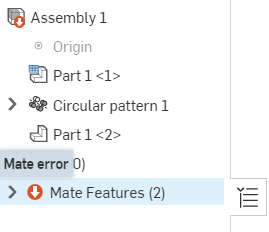
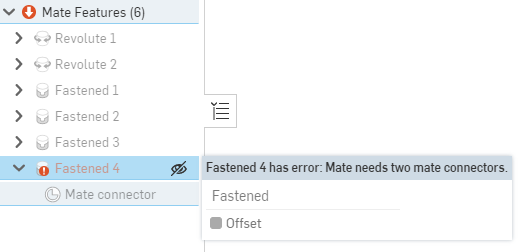
若要取得關於錯誤的詳細資訊,請將游標移動至錯誤上暫留:
按一下組合件清單右側的「實例與結合」圖示 ![]() (下圖中紅色箭頭的左邊) 來完全摺疊清單。再按一下圖示即可重新開啟清單。
(下圖中紅色箭頭的左邊) 來完全摺疊清單。再按一下圖示即可重新開啟清單。
![]()
組合件清單資料夾
點按新資料夾 ![]() 圖示來在組合件清單內建立資料夾。這樣會開啟資料夾名稱對話方塊。請提供資料夾的名稱,系統即會將這個空白資料夾加入組合件清單的底部。您也可以在現有的資料夾中建立新的資料夾來產生嵌套式的資料夾。
圖示來在組合件清單內建立資料夾。這樣會開啟資料夾名稱對話方塊。請提供資料夾的名稱,系統即會將這個空白資料夾加入組合件清單的底部。您也可以在現有的資料夾中建立新的資料夾來產生嵌套式的資料夾。

僅能在桌機版本中建立與操控資料夾。不過,您可以在 iOS 與 Android 系統中檢視、開啟與關閉資料夾。
選擇一或多個零件,然後拖曳零件並放置到新資料夾中。系統會更新資料夾名稱右側的零件計數 (在括弧中)。
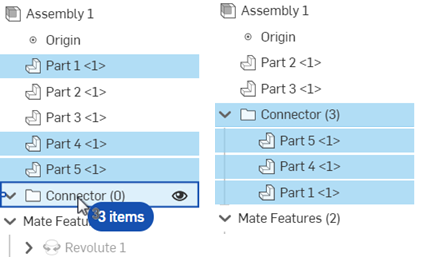
選擇 3 個零件並將其加入空白的資料夾中 (左圖)。零件移入資料夾中,並已更新資料夾的零件計數 (右圖)。
在資料夾上按右鍵來存取其他選項的清單:
![在資料夾上按右鍵並從環境選單中選擇 [拆開資料夾]](Resources/Images/assembly/assembly-folder-04.png)
-
重新命名 - 可讓您直接在組合件清單中重新命名資料夾。
-
隱藏/顯示 - 隱藏或顯示資料夾中的所有實例。
- 隱藏其他實例 - 隱藏不在所選資料夾中的所有實例。
- 隱藏/顯示所有實例 - 隱藏或顯示在組合件清單中的所有實例。
- 隔離顯示 - 僅顯示在所選資料夾中的零件;組合件中的所有其他實例仍會出現以供參考,但是沒有顏色也不能被選取。
- 設為透明 - 將所選資料夾中的所有零件設為透明以讓您查看在視覺上被擋住的零件。
-
抑制 - 抑制資料夾內的所有零件實例。當零件受到抑制時,與該零件或組合件相關聯的所有結合會變為停用的。
- 將選取項目加入至資料夾 - 將一或多個選取項目加入至現有或新的資料夾中。
-
展開 - 在任何有可摺疊箭頭的特徵上按右鍵,然後移動游標在展開選項上暫留以存取展開所選項目或全部展開選項。
-
摺疊 - 在任何有可摺疊箭頭的特徵上按右鍵,然後移動游標在摺疊選項上暫留以存取摺疊所選項目或全部摺疊選項。
-
刪除 - 刪除資料夾。系統會刪除資料夾中的所有零件。
-
拆開資料夾 - 將所有零件送至組合件的根目錄並移除 (刪除) 資料夾。
您可以拖曳資料夾並將其拖曳到新位置來在組合件清單中移動資料夾至不同的位置。
結合與結合連接器
選擇一或多個結合或結合連接器,然後按一下組合件清單最上方的「新資料夾」![]() 圖示來在「結合特徵」清單中建立資料夾。另一個方法是,在一或多個所選結合或結合連接器上按右鍵,然後按一下 [將選取項目加入至資料夾] (下方中第一個圖片所示)。不論使用那一個方法,都會開啟「資料夾名稱」對話方塊 (下方中第二個圖片所示)。提供資料夾的名稱,系統即會將這個空白資料夾加入至「結合特徵」清單中 (下方中第三個圖片所示)。任何時候您移動游標至結合或結合連接器上暫留時,會看到關於結合或結合連接器的唯讀資訊。若要編輯結合或結合連接器,請在清單上連按兩下。
圖示來在「結合特徵」清單中建立資料夾。另一個方法是,在一或多個所選結合或結合連接器上按右鍵,然後按一下 [將選取項目加入至資料夾] (下方中第一個圖片所示)。不論使用那一個方法,都會開啟「資料夾名稱」對話方塊 (下方中第二個圖片所示)。提供資料夾的名稱,系統即會將這個空白資料夾加入至「結合特徵」清單中 (下方中第三個圖片所示)。任何時候您移動游標至結合或結合連接器上暫留時,會看到關於結合或結合連接器的唯讀資訊。若要編輯結合或結合連接器,請在清單上連按兩下。
![「結合特徵」清單中的 [將選取項目加入至資料夾]](Resources/Images/assembly/mate-features-list-folder-01.png)

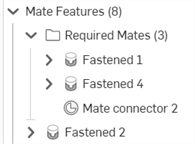
您不能在「結合特徵」清單中建立嵌套式資料夾。
若要將結合或結合連接器加入至資料夾中,請選擇該項目,然後將其從「特徵」清單中拖出並置放在資料夾名稱上以放在該資料夾中。系統會更新資料夾名稱右側的資料夾計數 (在括弧中)。
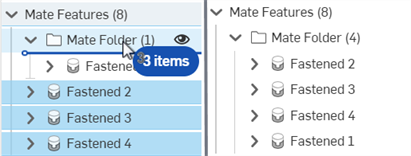
選擇 3 個結合並將其加入內有 1 個結合的現有資料夾中 (左圖)。系統會將結合移入資料夾中,並將資料夾的計數更新為 4 (右圖)。
若要將結合或結合連接器移出資料夾,請選擇該項目,然後將其從資料夾中拖出並放置在資料夾的上方或下方,或將其放置在「結合特徵」清單中任何其他項目的上下方。您也可以將項目放置在另一個資料夾名稱上來將項目從一個資料夾移動到另一個。
若要移動一個資料夾,請選擇資料夾,然後將其從一個位置拖曳到「結合特徵」清單中的另一位置 (在「結合特徵」清單的項目之上或之下)。如同結合與結合連接器,您無法將資料夾移出「結合特徵」清單之外。
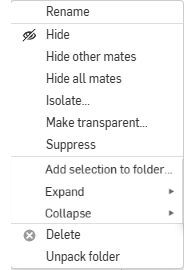
在資料夾上按右鍵來存取其他的選項:
-
重新命名 - 可讓您在「結合特徵」清單中直接重新命名資料夾。
-
隱藏/顯示 - 隱藏或顯示資料夾與其所有內容。系統會隱藏資料夾中的結合與結合連接器。
- 隱藏其他結合 - 隱藏不在所選資料夾中的所有結合。
- 隱藏/顯示所有結合 - 隱藏或顯示在「特徵」清單中的所有結合。
- 隔離顯示 - 僅顯示在所選資料夾中的零件;組合件中的所有其他實例仍會出現以供參考,但是沒有顏色也不能被選取。
- 設為透明 - 將所選資料夾中的所有零件設為透明以讓您查看在視覺上被擋住的零件。
-
抑制 - 抑制資料夾中的所有結合與結合連接器。資料夾中的所有結合與結合連接器都會變為變為非啟用的。
- 將選取項目加入至資料夾 - 將一或多個選取項目加入至現有或新的資料夾中。
- 展開 - 在任何有可摺疊箭頭的特徵上按右鍵,然後移動游標在展開選項上暫留以存取展開所選項目或全部展開選項。
-
摺疊 - 在任何有可摺疊箭頭的特徵上按右鍵,然後移動游標在摺疊選項上暫留以存取摺疊所選項目或全部摺疊選項。
-
刪除 - 刪除資料夾與其所有內容。系統會刪除資料夾中所有的結合與結合連接器。
-
拆開資料夾 - 將所有結合與結合連接器送至「結合特徵」清單的根目錄並移除 (刪除) 資料夾。
下方的表格扼要地敘述組合件清單圖示與其說明。「組合件」清單中的每個結合與特徵在其相對應的標籤左側同時會有圖示。這些並未於下方概述:
| 圖示 | 說明 |
| 組合件與實例圖示 | |
|
|
表示是一個組合件或次組合件。 |
|
|
表示是一個實例。 |
|
|
表示實例是匯入的 (衍生的)。 |
|
|
表示是已組態的實例。 |
|
|
表示是一個已組態的組合件或次組合件 |
| 固定 (剛性) 組合件圖示 | |
|
|
表示組合件與原點是緊扣的。 |
|
|
結合限制指標。表示已套用有一或多個限制至相對應的結合上。 |
|
|
表示相對應的實例是就地固定的。 |
|
|
表示次組合件有一個固定的實例。 |
|
|
表示實例不是固定的並有自由度。 |
|
|
表示在組合件或次組合件中的所有實例都是固定的 (完全剛性)。 |
|
|
表示在已組態組合件或次組合件中的所有實例都是固定的 (完全剛性)。 |
|
|
表示次組合件是鎖住於目前最上層組合件的位置或是追隨次組合件的命名位置 (如果有的話)。詳細資訊請參考鎖住目前次組合件的位置或追隨至次組合件的命名位置。 |
| 已連結文件圖示 | |
|
|
表示是已發行的項目 (在發行管理工作流程中)。 |


|
表示參考的更新。關於參考更新圖示與其意涵的完整清單,請參考更新參考。 |
| 關聯中圖示 | |
|
|
表示是在關聯狀態中的主實例。 |
|
|
表示是在啟用關聯狀態中的主實例 (如果有多個關聯中狀態存在)。 |
|
|
表示是在關聯狀態中的先前主實例 (如果有的話)。 |
| 其他圖示 | |
|
|
顯示/隱藏相對應的組合件清單項目。 |
|
|
表示已為組合件或次組合件啟用了鑲嵌。 |
|
|
表示有組合件錯誤。 |
- 您可以拖曳與置放任何組合件實例到另一個組合件中 (或拖出組合件中),或將其拖曳到結構中的最上層。
- 您可以在組合件實例上按右鍵來執行更多操作,包括重新建構的指令:
- 移動到新的次組合件中來建立新的組合件分頁並自動將這個組合件插入其中
- 建立空白次組合件會在這個 Assembly 分頁中建立一個空白的次組合件,並同時建立一個新的 (且是空白) 的 Assembly 分頁;系統會將您在新 Assembly 分頁中建立的任何組合件自動插入至 (更新) 在原始 Assembly 分頁中建立的組合件內
- 改善鑲嵌品質,或降低鑲嵌品質以改善效能 - 您可以使用環境選單來使用可用的最佳鑲嵌化以改善零件的渲染品質,並保守地使用自動的鑲嵌化設定來允許系統基於平衡效能的目的來選擇鑲嵌品質。這可在 Part Studios 中透過外觀編輯器來指定。
請注意,鑲嵌品質是在 Part Studio 中決定的,然後在組合件中使用。如果需要,組合件可能會使用較低的鑲嵌品質來提高效能,但絕不會使用比在 Part Studio 中設定更高的品質。
在實例清單中開啟鑲嵌精度的零件或組合件會以這個圖示
 表示,例如:
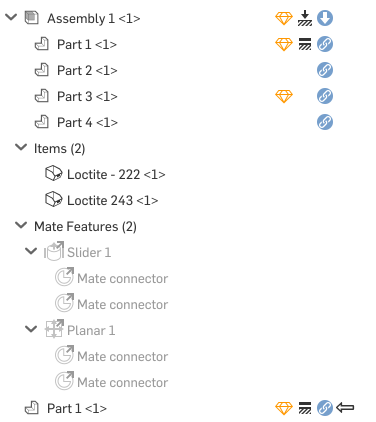
-
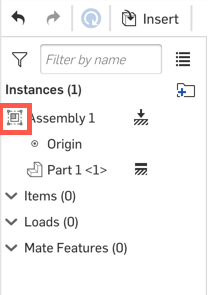
當組合件中的所有零件間有零自由度,且其中一個零件是固定時,組合件會自動變為固定的,系統會以固定圖示
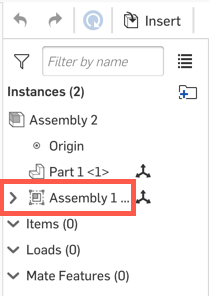
 表明 (下方第一個圖片中以輪廓線框出)。當該固定組合件是最上層組合件內的次組合件時,固定的圖示會明確的出現在該次組合件旁 (如下方第二個圖片所示):
-
當次組合件或實例在其所在的組合件清單內不是固定的情況下,會有自由度的圖示
 出現在次組合件或實例的右側:
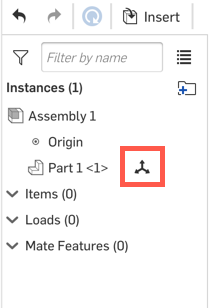
在大型組合件內有固定的次組合件可改善組合件的效能。
次組合件內的非剛性次組合件與實例不會顯示自由度的資訊。
Assembly 分頁中的組合件清單包含了所有為組合件定義的零件實例、群組、結合連接器、結合與關係的清單。使用環境選單來在這些項目上執行操作。
![]()
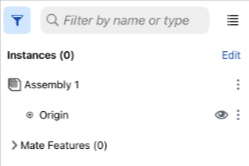
- 輕觸「實例」清單控制點來將「實例」清單以預設的寬度開啟。
- 輕觸並垂直或水平拖曳控制點來設定「實例」清單的大小 (高度或寬度)。在較小的螢幕中 (例如,智慧型手機),可以將寬度或高度展開至全螢幕大小。
- 輕觸控制點來關閉實例清單,再次輕觸則會開啟為之前設定的寬度。
- 輕觸篩選器圖示來開啟實例搜尋篩選器:
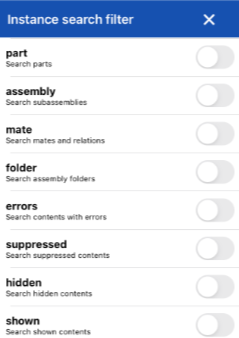
輕觸篩選器來開啟。使用 X 來關閉這個篩選器對話方塊,然後使用「搜尋」欄位來在選取的篩選器中根據名稱篩選。
當實例清單開啟時,工作區仍是啟用的。
有多種可操作組合件清單的方式:
- 實例列出插入至組合件中的所有零件實例。會根據名稱排列,並在尖括號中顯示實例數量 <2>。例如,已將零件 (Housing) 插入至組合件中兩次,會列出 Housing <1> 與 Housing <2>。如果您在 Part Studio 中改變零件名稱,則變更也會反映在組合件中。如果開啟這個功能,實例的零件編號、修訂版與狀態屬性都會出現在右側的「實例」清單中。若要開啟這個功能,請至文件頁面中您帳戶的下拉清單,按一下 [我的帳戶],然後按一下 [喜好設定]。核取「組合件設定」之下「顯示實例清單屬性」旁的方塊。
- 結合特徵包括:
- 結合連接器 - 在零件上指定點以於組合件中定位零件。
- 結合 - 指定兩個結合連接器之間的自由度。
- 群組 - 嚴格地集合在一起的實例。
- 條件關係 - 限制結合之間的自由度。
- 您可以用下列的方式在實例與結合特徵上執行操作:
- 隱藏/顯示 - 要更清楚地檢視零件與其結合連接器,您可以隱藏檔住了其他零件的零件。在實例清單中的實例右邊輕觸溢位功能表的圖示,然後輕觸隱藏或輕觸
 。
。 - 固定 - 就地固定一個零件,輕觸實例名稱右邊的溢位功能表圖示,然後輕觸固定 (要移除固定,請再次輕觸溢位功能表,然後輕觸解除固定)。
- 抑制 - 藉由使用「實例」清單的溢位功能表,或圖形區域中特徵的環境選單來抑制一個結合、零件實例或次組合件。當零件或組合件受到抑制時,與該零件或組合件相關聯的所有結合會變為停用的。
- 拖曳 - 將「實例」清單中的零件實例名稱或次組合件名稱移動到清單中的新位置上:輕觸「實例」清單右上角的編輯,然後輕觸並拖曳您要移動實例或次組合件右邊的圖示。
- 隱藏/顯示 - 要更清楚地檢視零件與其結合連接器,您可以隱藏檔住了其他零件的零件。在實例清單中的實例右邊輕觸溢位功能表的圖示,然後輕觸隱藏或輕觸
- 您可以按一下次組合件或零件旁的三點功能表來存取環境選單。
從這個功能表中可執行的動作之一是複製一個次組合件或零件,然後貼入圖形區域中。
- 將實例與結合特徵群組至資料夾中 - 在「實例」清單中選擇您要群組在一起的實例或結合特徵。不能在一個資料夾中將實例與結合特徵群組在一起。
輕觸清單中最上方選取項目旁的溢位功能表,然後選擇將選取項目加入至資料夾。一個新資料夾對話方塊出現,其中強調顯示新資料夾名稱。輸入資料夾的名稱,然後按一下 建立 按鈕。資料夾的名稱會出現在「實例」清單中,並附有可展開資料夾的箭頭以查看內容。
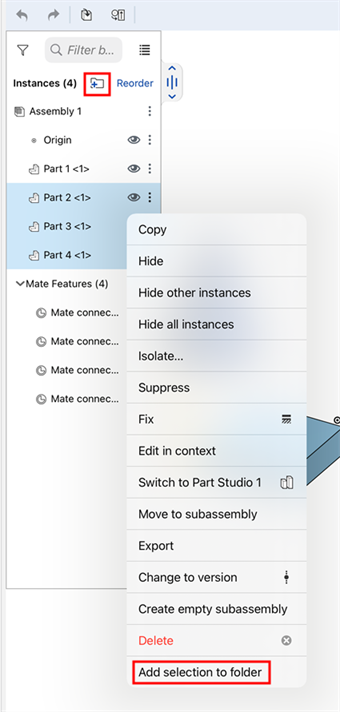
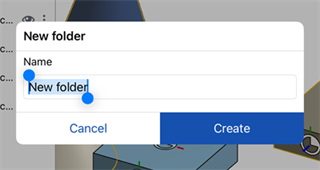
- 輕觸資料夾的溢位功能表 (在未做出其他選擇的情況下),然後選擇拆開資料夾來移除資料夾並將項目歸還為「實例」清單中單獨列出的。
- 輕觸資料夾的溢位功能表 (在未做出其他選擇的情況下),然後選擇抑制來在沒有所選項目資料夾的情況下視覺檢視模型。在特徵或資料夾受抑制時,與受抑制項目相關的所有特徵會變為非啟用的。
- 您也可以選擇項目,然後輕觸「特徵」清單上方的資料夾圖示 (上圖中所示的
 ) 來建立資料夾。
 - 您可以將實例或結合特徵重新排列至資料夾之上、之下、或資料夾內。按一下資料夾圖示右方的重新排序連結。
當在「重新排序」模式中時,如果資料夾是摺疊的,可以將特徵重排至資料夾之上或之下,但不能在資料夾之中。
若要重新排列資料夾中的特徵,請先展開資料夾來使其為開啟的。然後您可以在資料夾內重新排序實例或結合特徵。
當完成重新排序實例或結合特徵時,按一下資料夾圖示旁的 完成 按鈕。
您可以在現有的資料夾中建立新的資料夾來產生嵌套式的資料夾。
- 您可以拖曳與置放任何組合件實例到另一個組合件中 (或拖出組合件中),或將其拖曳到結構中的最上層。
- 您也可以輕觸來選擇一個組合件實例,然後用兩指輕觸或輕觸環境選單圖示 (三垂直點) 來叫出環境選單以執行更多的操作,包括重組的指令:
- 移動到新的次組合件中來建立新的組合件分頁並自動將這個組合件插入其中
- 建立新次組合件來將這個組合件再次插入相同的組合件中
Assembly 分頁中的組合件清單包含了所有為組合件定義的零件實例、群組、結合連接器、結合與關係的清單。使用環境選單來在這些項目上執行操作。
![]()

- 輕觸「實例」清單控制點來將「實例」清單以預設的寬度開啟。
- 輕觸並拖曳「實例」清單邊框的右下角來設定實例清單的大小 (高度或寬度)。
- 輕觸控制點來關閉「實例」清單,再次輕觸則會開啟為之前設定的寬度。
- 輕觸篩選器圖示來開啟實例搜尋篩選器:

輕觸篩選器來開啟。使用 X 來關閉這個篩選器對話方塊,然後使用「搜尋」欄位來在選取的篩選器中根據名稱篩選。
當實例清單開啟時,工作區仍是啟用的。
有多種可操作組合件清單的方式:
- 實例清單列出插入至組合件中的所有零件實例。會根據名稱排列,並在尖括號中顯示實例數量 <2>。例如,已將零件 (Housing) 插入至組合件中兩次,會列出 Housing <1> 與 Housing <2>。如果您在 Part Studio 中改變零件名稱,則變更也會反映在組合件中。
- 結合特徵包括:
- 結合連接器 - 在零件上指定點以於組合件中定位零件。
- 結合 - 指定兩個結合連接器之間的自由度。
- 群組 - 嚴格地集合在一起的實例。
- 條件關係 - 限制結合之間的自由度。
- 您可以用下列的方式在實例與結合特徵上執行操作:
- 隱藏/顯示 - 要更清楚地檢視零件與其結合連接器,您可以隱藏檔住了其他零件的零件。在實例清單中的實例右邊輕觸溢位功能表的圖示,然後輕觸隱藏或輕觸
 。
。 - 固定 - 就地固定一個零件,輕觸實例名稱右邊的溢位功能表圖示,然後輕觸固定 (要移除固定,請再次輕觸溢位功能表,然後輕觸解除固定)。
- 抑制 - 抑制一個結合、零件實例或次組合件。可以使用「實例」清單的溢位功能表,或在圖形區域中特徵上提供的環境選單。
- 拖曳 - 將「實例」清單中的零件實例名稱或次組合件名稱移動到清單中的新位置上:輕觸「實例」清單右上角的圖示,然後輕觸並拖曳您要移動實例或次組合件右邊的圖示。
- 隱藏/顯示 - 要更清楚地檢視零件與其結合連接器,您可以隱藏檔住了其他零件的零件。在實例清單中的實例右邊輕觸溢位功能表的圖示,然後輕觸隱藏或輕觸
- 您可以按一下次組合件或零件旁的三點功能表來存取環境選單。
從這個功能表中可執行的動作之一是複製一個次組合件或零件,然後貼入圖形區域中。
另一個您可以從這個功能表執行的動作是將目前所選實例更新至一新的版本。詳細資訊請參考更新參考。
- 您可以拖曳與置放任何組合件實例到另一個組合件中 (或拖出組合件中),或將其拖曳到結構中的最上層。
- 您也可以輕觸來選擇一個組合件實例,然後用兩指輕觸或輕觸環境選單圖示 (三垂直點) 來叫出環境選單以執行更多的操作,包括重組的指令:
- 移動到新的次組合件中來建立新的組合件分頁並自動將這個組合件插入其中
- 建立新次組合件來將這個組合件再次插入相同的組合件中