![]()
![]()
![]()
在一特定零件 (或所選零件群組)、特徵或草圖上使用環境選單,您不僅可以自訂圖元色彩,也可以指定材料 (因而會有密度)。當您需要因考慮效能速度或精確性而控制鑲嵌 (渲染零件影像的細微性) 時,請使用這個「外觀」對話方塊。
在 Part Studio 中您可以自訂整個零件以及個別面與特徵的色彩。您也可以指定零件的材料 (因此有密度)。
預設色彩
Onshape 有預先決定好的調色盤,以及建立零件時色彩分配的順序 (您也可以如所下方所說明的來指定零件的自訂色彩)。
當建立零件時,會以八個色彩順序來渲染零件影像,如下從左到右所示。會在第九個零件重新開始色彩順序:

當刪除一個零件時,色彩順序保持不變,現有的零件仍維持原來的色彩:

「外觀」編輯器可讓您編輯特定零件 (或所選零件群組) 的外觀。如果您需要因考慮效能速度或精確性而控制鑲嵌 (渲染零件影像的細微性) 時也可以使用這個編輯器。若要將外觀指定給零件,請在零件上按右鍵,然後選擇 [編輯外觀]。選擇一個色彩或指定所選色彩的 RGB 值或十六進位值。選擇性地使用色彩「混合器」分頁來微調色彩。當您有要儲存的色彩規格時,按一下「自訂色彩」下方的加號。若要移除一個自訂色彩,請在色彩圖磚上按右鍵,然後選擇 [刪除]。您也可以用另一個色彩來更新自訂的色彩:在色彩圖磚上按右鍵,然後選擇 [更新色彩]。使用零件透明度滑桿來控制透明度 (從 0 - 1 的比例尺上;使用滑桿來指定一個值)。 完成時,按一下綠色核取記號來退出對話方塊並接受零件的新外觀。
Onshape「外觀」編輯器讓您可以手動指定特定的色彩給特定的零件、面與特徵。一旦指定色彩之後即不會改變,直到您再次變更色彩。
使用外觀編輯器,您也可以指定出現在 Part Studios 與組合件中的特定零件是半透明的。當嘗試參考被其他零件所隱藏的零件時,這是相當有用的。在 Part Studio 中設定透明度,同時在組合件中查看做為實例的零件的改變。
- 在零件清單中的零件名稱上按右鍵來存取環境選單。
請注意,您也可以從圖形區域或零件清單中選擇多個零件,以一次同時指定多個零件的外觀特色。
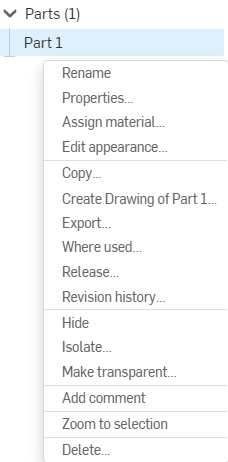
- 選擇編輯外觀。
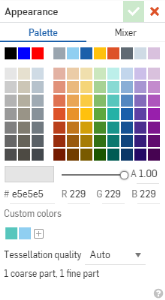
- 選擇一個色彩,或指定 RGB 值,或是指定所需色彩的十六進位值。
選擇性地使用色彩混合器分頁來微調色彩。
當您有要儲存色彩的調配規格時,按一下「自訂色彩」下方的加字號。要移除一個自訂色彩,在色彩圖磚上按右鍵,然後選擇 [刪除]。您也可以用另一個色彩來更新自訂的色彩:在色彩圖磚上按右鍵,然後選擇 [更新色彩]。
- 使用零件透明度滑桿來控制透明度 (從 0 - 1 的比例尺上;使用滑桿來指定一個值)。
當透過「外觀」對話方塊將零件設定為透明,且您需要選擇透明項目下方的零件、邊線或面時,請於選取時按下 Alt 鍵。
- 請見下方來設定鑲嵌品質。
- 接受
 。
。
與自訂零件外觀一般,您也可以自訂特定面或甚至特徵的色彩。選取面 (在圖形區域中) 或特徵 (在特徵清單中),按右鍵然後從環境選單中選擇 [新增外觀] (或 [新增外觀至特徵上] )。
環境選單同時會有 [編輯 <零件名稱外觀] 的指令。選擇該指令來變更整個零件的色彩。選擇 [新增外觀至 <所選的面上> 來變更您預選面的色彩。
同樣地,已套用有外觀的特徵的環境選單也會有可編輯特徵外觀的指令。選擇該指令來變更由特徵所產生面的色彩。
選擇 [新增外觀 <至所選的面上> 來變更您已預選面與特徵的色彩。

「面外觀」對話方塊開啟:
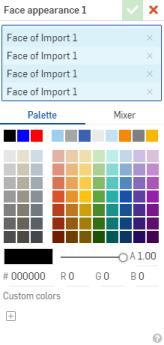
在選取項目欄位中 (上圖中的藍色區域) 會列出所選的面。使用 x 來從清單中移除選取項目;在圖形區域中選擇面來加入到清單中。
使用「調色盤」來選擇一個現有的色彩,或使用「色彩混合器」分頁來自訂一個色彩。按一下「自訂色彩」下的加號來新增一個色彩。
當您對所做選擇滿意時,按一下核取記號來套用色彩。
複製排列零件與面
當複製排列零件時,同時會複製任何外觀的變更。所有的外觀都會列在「外觀」面板中。
組態設定面色彩
您可以用組態零件或特徵其他特點的方式來設定面色彩。關於組態設定零件與零件屬性的詳細資訊,請參考組態。
匯入面外觀
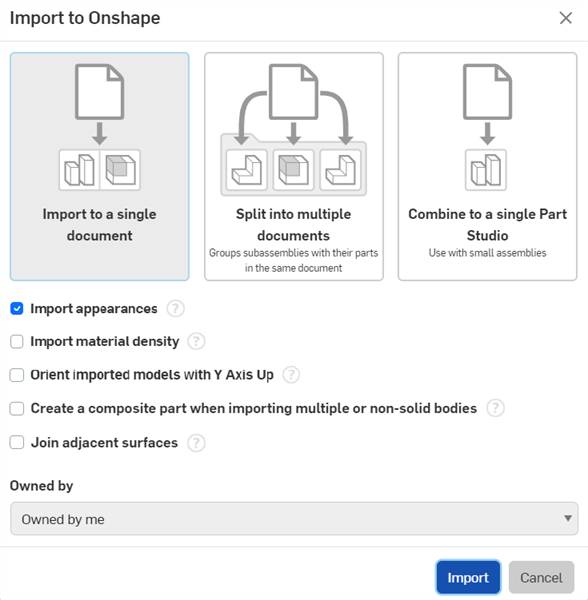
根據預設,當匯入 CAD 檔案時同時會匯入面外觀。這是「匯入至 Onshape」對話方塊中的一個選項。若要於匯入時移除面外觀,按一下「匯入外觀」選項:
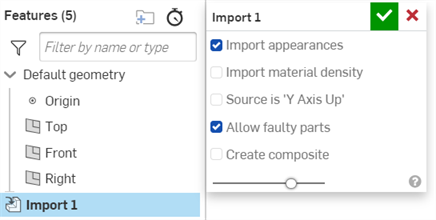
在匯入時,無論「匯入外觀」選項是啟用或停用的,您可以在匯入之後選擇啟用或停用外觀。從文件的 Part Studio 分頁中開啟「匯入」特徵,然後核取或取消核取「匯入外觀」:
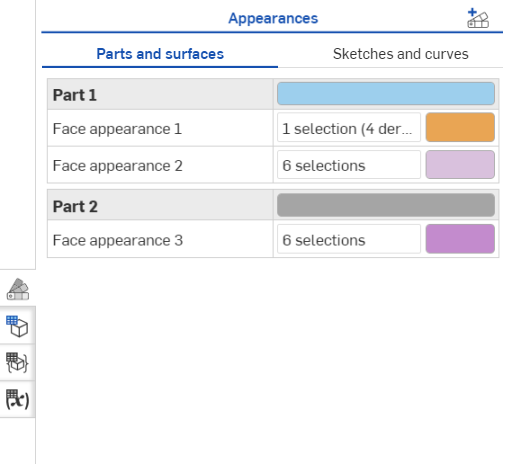
在啟用「匯入外觀」後,面外觀會顯示在「外觀」面板中:
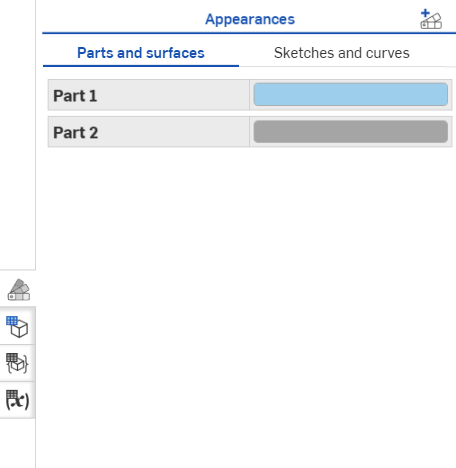
當停用「匯入外觀」時,系統會移除面外觀,僅保留零件的外觀:
關於匯入選項的詳細資訊,請參考處理 CAD 檔案。
與自訂零件、面與特徵外觀一樣,您也可以自訂草圖外觀。在特徵清單中選擇草圖,按右鍵,然後從環境選單中選擇 [編輯草圖外觀]。草圖「外觀」對話方塊隨即開啟:
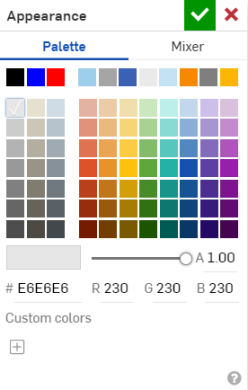
使用「調色盤」分頁來選擇一個現有的色彩,或使用「色彩混合器」分頁來自訂一個色彩。按一下「自訂色彩」下的加號來新增一個色彩。
按一下對話方塊上方的核取記號以套用變更。
就像您可以自訂零件、面和特徵外觀一樣,您也可以自訂曲線外觀。
- 在「曲線」清單中的曲線上按右鍵,然後從功能表中選擇 [編輯外觀]。「外觀」對話方塊隨即開啟。
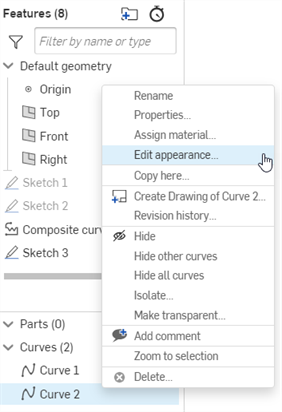
- 使用「調色盤」分頁來選擇一個現有的色彩,或使用「色彩混合器」分頁來自訂一個色彩。按一下「自訂色彩」下的加號來新增一個色彩。
- 按一下對話方塊上方的核取記號以套用變更。
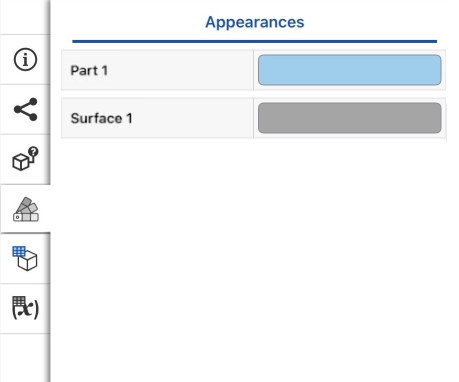
包含零件、曲面或草圖的 Part Studio 會在圖形區域的右側顯示「外觀面板」圖示 ![]() 。按一下來開啟「外觀」面板:
。按一下來開啟「外觀」面板:
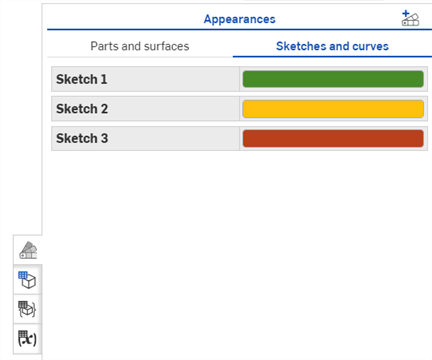
會在這個面板中列出其外觀曾被修改過的面。您可以在這個面板中執行下列的動作:
- 編輯列於面板中的現有面、特徵面、零件、曲線與草圖的外觀:
- 在面板中的列上連按兩下,「外觀」對話方塊隨即開啟。進行變更,然後點按核取記號來接受並關閉對話方塊。
- 對於零件,當對話方塊開啟時,您僅能編輯該特定零件的色彩;您無法新增或移除零件。
- 對於面,當對話方塊開啟時,您可以同時編輯面的選取項目以及色彩的選取項目。
- 對於曲線和草圖,當對話方塊開啟時,按一下「草圖與曲線」分頁來編輯所選草圖或曲線的外觀。
- 按一下面板上方的「新增面外觀」圖示
 來開啟「面外觀」對話方塊以加入新的外觀定義:
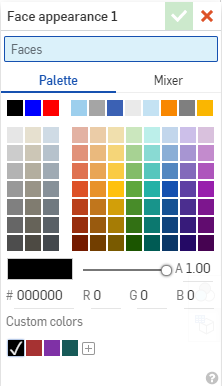
您可以預先選擇面,系統會將這些選取項目先填入對話方塊的「面」欄位中。您也可以新增與移除選取的項目。
複製排列零件與面
當複製排列零件時,同時會複製任何外觀的變更。所有的外觀都會列在「外觀」面板中。
組態設定面色彩
您可以用組態零件或特徵其他特點的方式來設定面色彩。關於組態設定零件與零件屬性的詳細資訊,請參考組態。
為求達到最佳效能,Onshape 有時會使用較低的鑲嵌品質,以在使用者介面中改進零件渲染的速率,但可能會因此犧牲一些鑲嵌顆粒度。當您需要使用較精細的鑲嵌時,可以用兩種方式來設定:
- 在 Part Studio 中 - 針對選取的零件,在零件清單中的零件名稱上按右鍵,然後選擇 [編輯外觀]。在「外觀」對話方塊中,使用「鑲嵌品質」下拉清單來選擇一個品質等級:
- 自動 - (預設),由系統在兼顧效能與品質的情況下決定品質。
- 粗略
- 中等
- 精細
- 極精細 - 系統不會自動選擇這個選項;這個設定必須由使用者選擇
注意到當您選擇較精細的鑲嵌品質時,Onshape 的效能可能會減緩,直到鑲嵌完成為止。
- 在組合件中 - 於要改進鑲嵌品質的零件上按右鍵,然後選擇使用可用的最佳鑲嵌化。同樣地,若要將鑲嵌品質改回自動設定,請在零件上按右鍵並選擇使用自動的鑲嵌化設定。
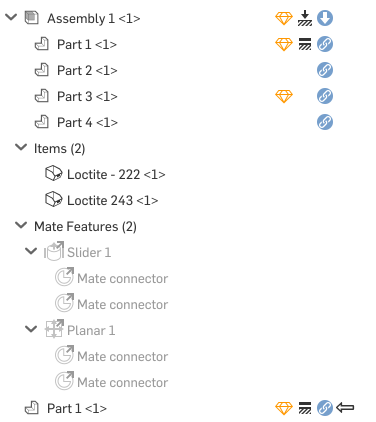
在實例清單中開啟鑲嵌精度的零件或組合件會以這個圖示 ![]() 表示,例如:
表示,例如:
目前在 iOS 中僅以有限的形式提供這個功能。
Onshape 外觀編輯器讓您可以手動指定特定的色彩給特定的零件。一旦指定色彩之後即不會改變,直到您再次變更色彩。
使用外觀編輯器,您也可以指定出現在 Part Studio 與組合件中的特定零件是半透明的。當嘗試參考被其他零件所隱藏的零件時,這是相當有用的。在 Part Studio 中設定透明度,同時在組合件中查看做為實例的零件的改變。
使用外觀編輯器:
- 在「零件」清單中選擇零件名稱右邊的
 來存取溢位功能表。
 - 從功能表中選擇外觀來開啟外觀編輯器。
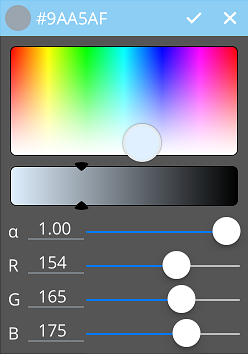
- 拖曳選擇器來選擇一個色彩。會根據您的選擇調整 RGB 的值。
- 向左或向右滑動箭頭來調整色彩的濃度。
- 使用滑桿來調整不透明度,或是輕觸 ɑ 右側的值來使用數字鍵盤輸入。
- 使用滑桿來調整 RGB 值,或是輕觸值來開啟數字鍵盤並輸入值。
Onshape 外觀編輯器讓您可以手動指定特定的色彩給特定的零件。一旦指定色彩之後即不會改變,直到您再次變更色彩。
使用外觀編輯器,您也可以指定出現在 Part Studios 與組合件中的特定零件是半透明的。當嘗試參考被其他零件所隱藏的零件時,這是相當有用的。在 Part Studio 中設定透明度,同時在組合件中查看做為實例的零件的改變。
使用外觀編輯器:
- 在「零件」清單中選擇零件名稱右邊的
 來存取溢位功能表。
 - 從功能表中選擇外觀來開啟外觀編輯器。
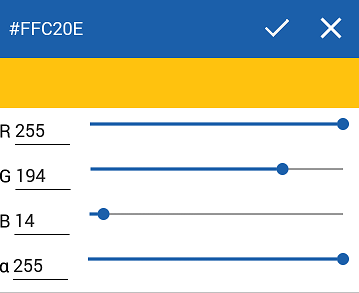
- 使用滑桿來調整不透明度,或是輕觸 ɑ 右側的值來使用數字鍵盤輸入。
- 使用滑桿來調整 RGB 值,或是輕觸值來開啟數字鍵盤並輸入值。
當您根據自己的喜好調整滑桿時,在圖形區域中的零件外觀會自動改變。
