匯入檔案
![]()
![]()
![]()
您可以匯入 (上傳) 任何類型的檔案到 Onshape 中,可以將其匯入至一現有開啟的文件,或匯入成一個自己的文件 (從文件頁面中)。關於支援檔案的清單,請參考支援的檔案格式。您可以從桌機匯入檔案,也可以從整合的 Dropbox、Google Drive 或 Microsoft OneDrive 帳戶匯入檔案。關於將雲端裝置與 Onshape 帳戶整合的詳細資訊,請參考整合。
匯入您的檔案之後,請參考操作匯入的 CAD 來獲得進一步的資訊。
Onshape 上傳大小的限制是每個檔案 4GB。
從其他系統匯入的 CAD 檔案在 Onshape 中不會有特徵樹狀結構;Onshape 會提供可在簡單實體上執行參數式特徵的工具。詳細資訊請參考操作匯入的 CAD 與 Making Supplier Models Work for You 這篇部落格文章。
將資料匯入至 Onshape 中時,有兩件需要考慮的事項:
- 資料的來源
- 要將資料放置在 Onshape 中的何處
Onshape 匯入您資料的地方取決於您從何處開始匯入的過程:
- 將資料匯入至一個新文件中,從文件頁面匯入 - 建立一或多個新的 Onshape 文件,其中有來自所匯入檔案的適當分頁。檔案名稱會變為新文件的名稱。文件會列在文件頁面中,並會自動建立一個版本。請參考從文件頁面匯入。
- 將資料匯入至一現有的文件中,從開啟的文件內匯入 - 在啟用的文件中建立一個新的 Onshape 分頁。檔案名稱會變為新分頁的名稱,並會在新分頁圖示中顯示檔案類型。請參考從文件內匯入。
資料的來源與格式會影響 Onshape 轉譯資料的方式:
- 大多數系統的資料會透過通用格式匯入,像是 ACIS、JT、STEP、IGES、Parasolid、OBJ、或 STL。
- 對於 AutoCAD 實體,最佳的匯入格式是 ACIS,所有的 2D 資料會匯入為 DWG 或 DXF。
當 Onshape 將匯入的檔案辨識為 CAD 檔案 (根據檔案副檔名) 時,Onshape 會自動提供處理的選項。Onshape 會為支援的組合件檔案檢查組合件檔案名稱是否與 zip 檔案名稱相同。當壓縮組合件檔案來匯入至 Onshape 時,您可以選擇個別壓縮檔案或壓縮整個目錄。
下列的 CAD 檔案可以作為 zip 檔案匯入:
-
SOLIDWORKS
-
Inventor
-
Pro/Engineer
-
Creo/PVZ
-
NX
-
Catia
-
Parasolid
準備 SOLIDWORKS 組合件檔案 (隨身攜帶)
在 SOLIDWORKS 中:
-
選擇「展開至單一資料夾」。壓縮檔案並給定與最上層組合件完全相同的名稱。檔案名稱與最上層組合件不可以包含任何特殊的字元。
-
如果您的組合件使用組態或輕量抑制零組件,請在匯入之前先執行這些步驟:
- 按一下組合件分頁。
- 在組合件樹狀結構中的根檔案上按右鍵,然後選擇 [設定輕量抑制為解出]。
- 在組合件樹狀結構中的根檔案上按右鍵,然後選擇 [儲存時重新計算的標記] > [爲所有模型組態加入標記]。
- 儲存根檔案。
準備任何其他支援的組合件檔案
- 建立您最上層組合件的 .zip 檔案。
- 請確定檔案名稱沒有包含任何特殊字元。
- Zip 檔案必須有與最上層組合件同樣的名稱 (不包括副檔名),且您不能重新命名 zip 檔案。請確定副檔名就僅是 .zip,且沒有包括舊的副檔名 (像是 .sldasm.zip 或 .asm.zip)。
- 包括所有零件與次組合件。
- 展平檔案結構來使得 .zip 檔案中沒有資料夾。
- 請確定最上層組合件與 .zip 檔案有相同的名稱。
- 匯入整個 .zip 檔案到 Onshape 中。
Onshape 與 SOLIDWORKS 都在 Parasolid 模型建構核心上執行。將 SOLIDWORKS 組合件儲存為 Parasolid (.x_t) 檔案是將其匯入至 Onshape 的另一種方式。
準備零件檔案
並不需要特別的準備工作。當 Onshape 匯入對話方塊提示時,選擇一個零件檔案。
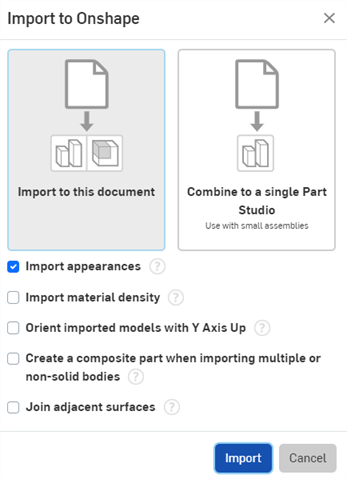
當將 CAD 檔案匯入至 Onshape 時,您有下列的處理選項:
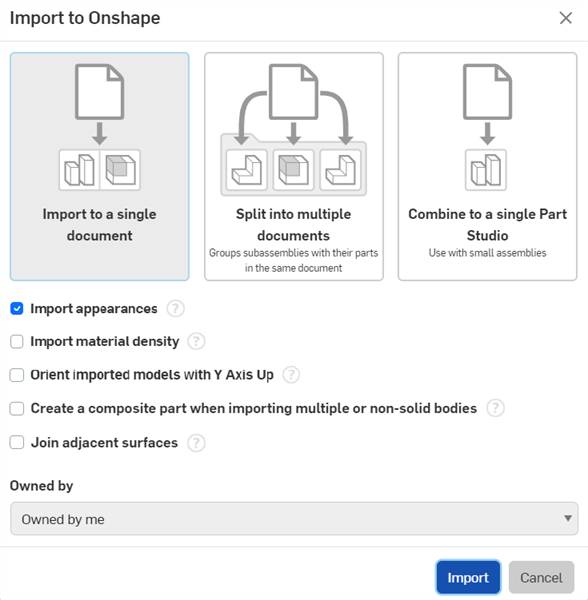
- 匯入至單一文件中 - 取決於匯入檔案的內容,會根據需要建立 Part Studio 與組合件,同時會根據所匯入檔案的名稱來命名。
- 分成多個文件 - 這個選項會建立一個文件與數個包含相關零件、組合件與次組合件的子文件。如果一個組合件包含多於 100 個的獨特零件 (在組合件層級),則系統會為這些零件建立有 Part Studio 的額外文件。
會有一個核取方塊選項可將每個零件或組合件匯入至個別文件中。系統會將這些個別的文件放置在以匯入檔案命名的資料夾中,保留資料的結構與其連結。當操作大型組合件時不建議使用這個選項,因為匯入可能會建立為數眾多的文件而難以管理。
在下方的所有案例中,最上層的組合件僅有下載的選項。其他連結的零件文件同時有更新與下載的選項。
如果檔案僅包含多個零件 (沒有組合件),系統會將各個零件放在自己的文件中,並會建立一個連結這些零件的最上層組合件。
如果組合件沒有任何次組合件,系統會將組合件匯入至單一的文件中。
如果組合件有次組合件,則最上層的組合件與每個次組合件都會有自己獨立的文件。
- 合併為單一的 Part Studio - 如果檔案是一個組合件,或包含一個組合件,您有將其僅匯入為一個 Part Studio 的選項。在這樣的狀況下,會將組合件以一組的零件儲存在單一的 Part Studio 中。當零件被當做實例多次產生時,則會有重覆的零件。請注意,僅應在小型組合件的情況下使用這個選項,否則效能會受到影響。
無論您在上方所做的選擇為何,Onshape 允許匯入有問題的零件。如果零件並未通過 Onshape 的有效驗證,仍可以與問題一起匯入。有問題的項目在特徵清單與零件清單上會以紅色名稱標示,同時會出現在通知訊息中。 請注意,如果所匯入零件的幾何有問題,則接下來的操作可能會失敗。
如果 Onshape 偵測到零件在匯入時可能被折斷,則在匯入的過程中,屬於相同 (折碎) 本體的曲面與曲線會被自動轉變為單一的封閉複合零件。
其他選項:
-
匯入外觀 - 根據預設,系統會匯入在模型定義上的面外觀。取消核取來在匯入時移除面外觀。
在匯入時,無論「匯入外觀」選項是啟用或停用的,您可以在匯入之後選擇啟用或停用面外觀。從文件的 Part Studio 分頁中開啟「匯入」特徵,然後核取或取消核取「匯入外觀」:
- 匯入材料密度 - 核取這個選項以將來自某些 CAD 系統的材料密度匯入至 Onshape 中。在文件中材料密度會以自訂的材料顯示,使得可以計算匯入零件中的某些屬性 (例如質量)。可以從下列檔案類型中匯入材料密度:
SolidWorks
Solid Edge
CatiaV5
Pro/Engineer
Creo
NX
- 以 Y 軸朝上來定位匯入的模型 - Onshape 的朝上軸是 Z 軸。在取消核取時,系統會以 Z 軸朝上來匯入模型。對於來自朝上軸是 Y 軸系統的 CAD 檔案,核取這個方塊可以 Y 軸朝上來匯入模型。除了 Autodesk (.ipt) 與 CATIA (.catpart) 以外,Onshape 支援所有其他系統/檔案的 Y 軸朝上選項
也可於匯入之後變更朝上軸。從文件的 Part Studio 中開啟「匯入」特徵,然後核取「來源是 'Y 軸朝上'」。
- 匯入多本體或非實體本體時建立複合零件 - 如果核取,匯入由多個非實體本體組成的中性 CAD 檔案 (例如,.step 或 .x_t) 時會手動建立複合零件。不論零件是否屬於相同的本體,在已匯入 Part Studio 中的所有零件會變為一個單一封閉複合零件。選取了合併為單一的 Part Studio 時無法使用。
也可於匯入之後建立複合零件。在 Part Studio 中開啟「匯入」特徵,然後核取「建立複合」。
- 接合相鄰曲面 - 當選取這個選項時,Onshape 會嘗試將相鄰曲面與零件接合。
- IGES postprocessing - (IGES imports only) When checked, this option repairs issues with linear edge translation. Note that checking this option can increase processing time by 50%.
自動處理僅針對 Onshape 可以轉譯的檔案提供,所有其他的檔案則會匯入至分頁中。
- 上傳一個檔案:
- 按一下 建立 按鈕。
若要從您的硬碟匯入,按一下匯入檔案 (
 )。若要從經整合的應用程式中匯入,按一下匯入來源 (
 )。
)。 如果您已整合您的應用程式,請點按您的雲端來源。如果您尚未整合設定雲端來源,請按一下連線服務...;然後會有精靈導引您完成整合的過程。詳細資訊請參考整合。
- 選擇要匯入的一或多個檔案。
如果您隸屬於一個公司計畫,Onshape 會提示您指定文件的擁有者:請選擇您本人或公司。
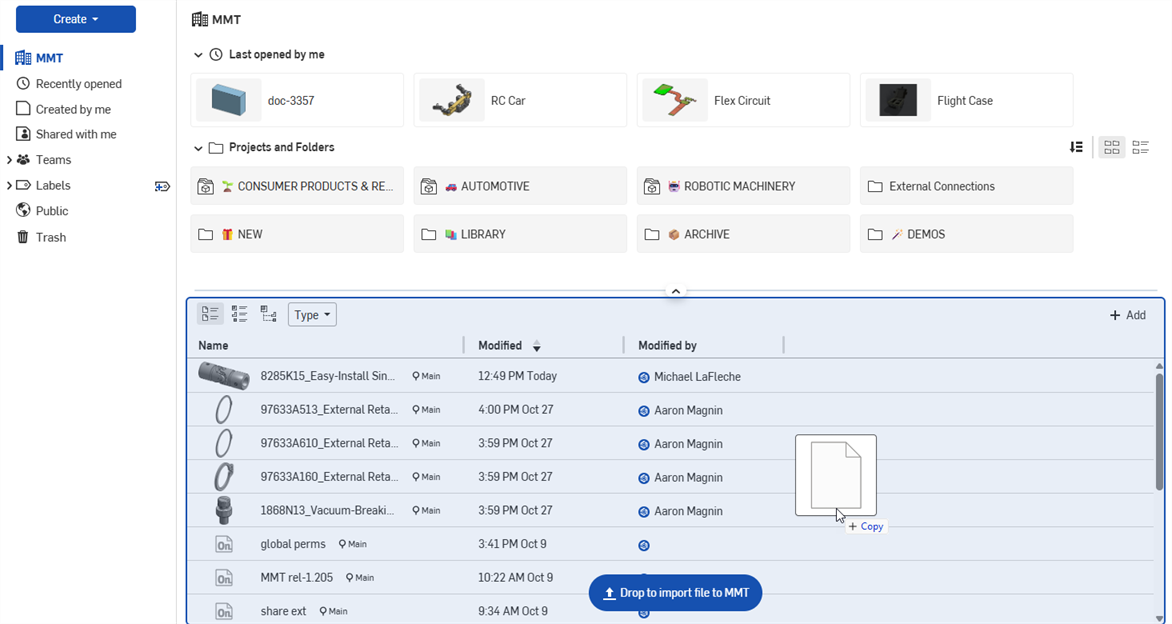
- 若要拖放檔案,請將其拖曳至文件清單中,然後在藍色匯入輪廓線出現時放下檔案。
- 選擇您想要的處理選項。關於每個選項的資訊,請參考處理 CAD 檔案的部分。

- 按一下 匯入 按鈕來開始匯入。
自動處理僅針對 Onshape 可以轉譯的檔案提供,所有其他的檔案則會匯入至分頁中。
- 現在您可以:
- 在匯入清單中按一下檔案名稱來馬上在 Onshape 中檢視檔案,會自動為檔案建立文件。
- 在移動游標暫留時,按一下「匯入」清單右側的 X 來關閉清單並回到文件的頁面中。剛建立的文件會列在文件頁面中。
同時可以將未包含任何 CAD 資料的檔案匯入至 Onshape 中:PDF、圖片檔案等幾乎各種檔案。Onshape 會以處理 CAD 檔案同樣的方式來處理這些檔案:當您從文件頁面中匯入時,會將匯入的檔案放置在新文件中;當您在文件內匯入時,會將匯入的檔案放置在文件內的一個分頁上。在沒有資料可顯示的情況下,Onshape 會顯示關於檔案的此類資訊,像是:
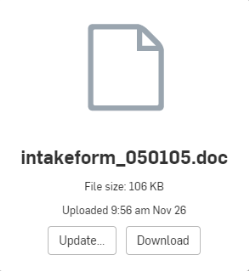
如果檔案在您匯入至 Onshape 後有所變更,請使用 [更新] 的按鈕來更新檔案。如果您要下載檔案,請使用 [下載] 的按鈕。
使用通知按鈕 ![]() 來檢視匯入的佇列並查看匯入進度,包括錯誤或警告。按一下重試來重新開始失敗的匯入。
來檢視匯入的佇列並查看匯入進度,包括錯誤或警告。按一下重試來重新開始失敗的匯入。
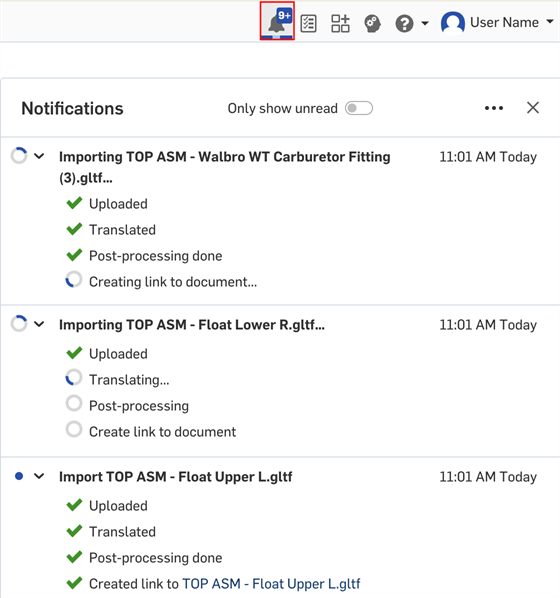
匯入佇列的通知
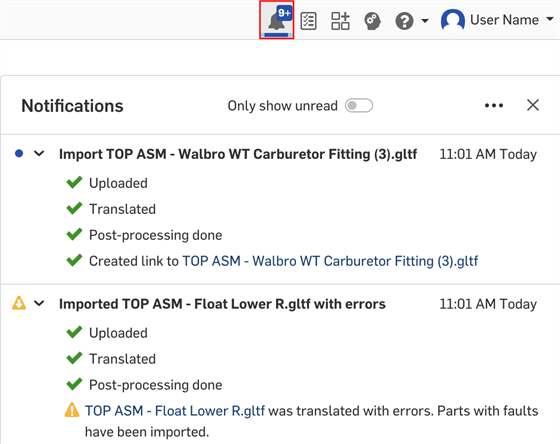
有警告的成功匯入
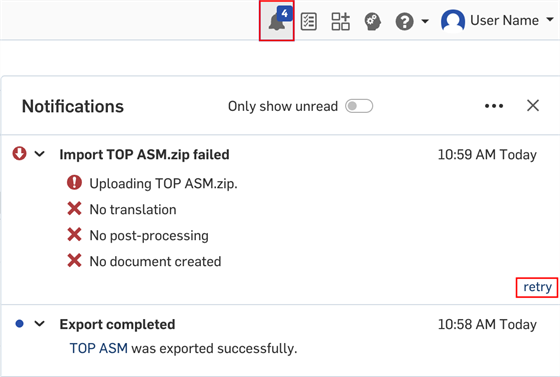
有錯誤的匯入
您可以匯入 (上傳) 任何類型的檔案到 Onshape 中,可以將其匯入至現有的開啟文件內,或匯入成獨立的文件 (從文件頁面中)。關於支援檔案的清單,請參考支援的檔案格式。
Onshape 行動裝置版本目前僅支援從雲端來源匯入檔案。在您的行動裝置上必須安裝有要使用的雲端儲存服務應用程式,且您必須要登入才能與 Onshape 整合使用。
Onshape 處理您匯入檔案的方式取決於您從何處開始匯入的過程:看是從「文件」頁面或是在文件之中
建立一個新的 Onshape 文件與適當的分頁;會將文件與分頁取名為與您匯入檔案相同的名稱。
步驟:
- 輕觸文件頁面右下角的匯入按鈕。

- 選擇要匯入檔案的來源。
Onshape 支援從雲端式來源匯入檔案,像是 iCloud 與 Dropboxas,同時支援從您裝置的攝影機與照片圖庫匯入。
- 匯入的檔案會在文件頁面中以一個文件出現。指定文件是私有或公共的,如果匯入的是 CAD 檔案,請指定匯入的設定。詳細資訊請參考下方的匯入設定。
- 匯入的檔案在您的文件清單中以新文件的形式出現。新文件的名稱與您匯入檔案的名稱相符。
如果您沒有看到想要使用的雲端來源,請輕觸更多並查看下方的設定。
取決您要從何處匯入檔案,可能需要在您裝置的設定中手動啟用從裝置的儲存處匯入的功能。
匯入對話方塊不會重新整理檔案。您必須到雲端儲存服務的應用程式中來查看更新的檔案清單。
在啟用的文件中建立新的 Onshape 分頁;分頁的名稱會反映檔案的名稱。
步驟:
- 在文件中開啟建立分頁功能表,然後選擇「匯入...」。
![有 [匯入] 選項的分頁功能表](Resources/Images/m-UI/ImportiOS4.jpg)
- 選擇要匯入檔案的來源:「匯入檔案」、「從攝影機匯入」與「從照片圖庫匯入」。
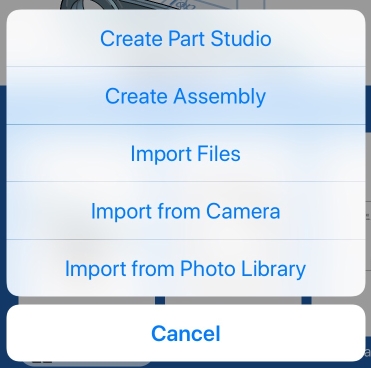
「匯入檔案」可讓您從裝置與像是 iCloud 與 Dropbox 的雲端式來源匯入。
如果您沒有看到想要使用的雲端來源,請輕觸更多並查看下方的設定。
- 匯入的檔案會在文件中以一個分頁出現。指定文件是私有或公共的,如果匯入的是 CAD 檔案,請指定匯入的設定。詳細資訊請參考下方的匯入設定。
- 匯入的檔案在您的文件中以適當的分頁出現。新分頁的名稱與您匯入檔案的名稱相符。
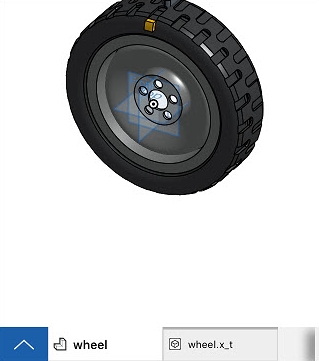
如果匯入的是 CAD 檔案且其成功地轉譯為 Onshape 格式,則會爲其建立第二個分頁。
每個匯入至 Onshape 的檔案會有自己的分頁,使用原始的檔案名稱來命名。如果檔案是 CAD 檔案,同時會建立適當的 Part Studio 和/或組合件分頁。
匯入 SOLIDWORKS 隨身攜帶檔案的提示
在 SOLIDWORKS 中:
-
選擇「展開至單一資料夾」。壓縮檔案並給定與最上層組合件完全相同的名稱。檔案名稱與最上層組合件不可以包含任何特殊的字元。
- 如果您的組合件使用組態或輕量抑制零組件,請在匯入之前先執行這些步驟:
- 按一下組合件分頁。
- 在組合件樹狀結構中的根檔案上按右鍵,然後選擇 [設定輕量抑制為解出]。
- 在組合件樹狀結構中的根檔案上按右鍵,然後選擇 [儲存時重新計算的標記] > [爲所有模型組態加入標記]。
- 儲存根檔案。
匯入 CAD 檔案
當匯入 CAD 檔案時,您有下列的處理選項:
- 以 'Y 軸向上' 的座標匯入模型 - 如果檔案是在 Y 軸向上定位的系統中建立的,根據預設,會以反轉的座標系統將模型帶入至 Onshape (Z 軸向上的系統) 中。切換這個選項來重新定向軸向系統以與 Onshape 的系統相符,並以您預期的座標系統顯示模型。
- 僅匯入檔案至 Part Studios 中 (平階化) - 如果檔案是一個組合件,或包含一個組合件,您可以開啟平階化選項來僅將其匯入為一個 Part Studio。在這樣的狀況下,會將組合件在 Part Studio 中平階化為一系列的零件。當零件被當做實例多次產生時,則會有重覆的零件。
- 允許匯入有問題的零件 - 如果零件並未通過 Onshape 的有效驗證,仍可以與問題一起匯入。有問題的項目在特徵清單與零件清單上會以紅色的名稱標示,同時會出現在通知訊息中。出現這個選項並不表示偵測到問題。
- 匯入多本體或非實體本體時建立複合零件 - 當核取這個選項時,不論零件是否屬於相同的本體,在已匯入 Part Studio 中的所有零件會變為一個單一封閉複合零件。系統會合併本體來形成複合件 (一個單一零件)。系統會合併本體來形成複合件 (一個單一零件)。
如果您在匯入的過程中錯過了這個選項,可以在匯入之後於 Part Studio 中連按兩下 [匯入] 功能,然後選擇「建立複合」來於此時產生複合零件。
-
單位 - 當匯入 .stl 與 .obj 檔案時,您可以選擇匯入當下要使用的單位:釐米、英呎、英吋、米、毫米或英碼。
如果切換開啟「允許匯入有問題的零件」,匯入的特徵在特徵清單中會顯示有錯誤存在,但仍允許您匯入並參考錯誤的幾何。但是因為幾何有錯誤,所以後續的操作有可能會失敗。
自動處理僅針對 Onshape 可以轉譯的檔案提供,所有其他的檔案則會匯入至分頁中。
當 Onshape 將匯入的檔案辨識為 CAD 檔案 (根據檔案副檔名) 時,Onshape 會自動提供處理的選項。您也可以為整個 Part Studio (包括隱藏的零件) 或為從零件清單中選擇的某一零件從環境選單中選擇匯出為另一個格式。Onshape 會為支援的組合件檔案檢查組合件檔案名稱是否與 zip 檔案名稱相同。當壓縮組合件檔案來匯入至 Onshape 時,您可以選擇個別壓縮檔案或壓縮整個目錄。請注意,當壓縮整個目錄時,zip 檔案必須有與組合件同樣的名稱 (不包括副檔名),且您不能重新命名 zip 檔案。
詳細資訊請參考「匯出檔案」。
您可以匯入 (上傳) 任何類型的檔案到 Onshape 中,可以將其匯入至現有的開啟文件內,或匯入成獨立的文件 (從文件頁面中)。關於支援檔案的清單,請參考支援的檔案格式。
Onshape 行動裝置版本目前僅支援從雲端來源匯入檔案。在您的行動裝置上必須安裝有要使用的雲端儲存服務應用程式,且您必須要登入才能與 Onshape 整合使用。
Onshape 處理您匯入檔案的方式取決於您從何處開始匯入的過程:看是從「文件」頁面或是在文件之中
建立一個新的 Onshape 文件與適當的分頁;會將文件與分頁取名為與您匯入檔案相同的名稱。
步驟:
- 輕觸文件頁面右下角的加號按鈕,然後輕觸「匯入」按鈕:


- 選擇要匯入檔案的來源。
Onshape 支援從雲端來源匯入檔案,像是 DropBox、Google Drive 與 One Note (任何提供執行 Storage Access Framework 的供應商)。
- 選擇您要匯入檔案的方式,輕觸影像下方匯入至單一文件中右側的下拉箭頭:
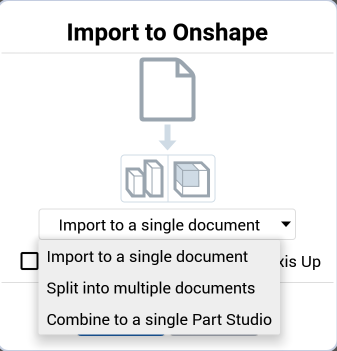
匯入至單一文件中 - 取決於匯入檔案的內容,會根據需要建立 Part Studio 與組合件,同時會根據所匯入檔案的名稱來命名。
分成多個文件 - 如果檔案是一個組合件,這個選項會建立使用檔案名稱的資料夾,其中包含一組數個文件。每個文件會包含一個次組合件與屬於該次組合件的最上層零件。在文件中的每個零件會有自己的 Part Studio,可讓您在組合件中輕鬆編輯零件。如果組合件包含多於 100 個獨特的零件 (組合件階層),則系統會建立額外的文件,其中並會有這些零件的 Part Studio。每個次組合件會與包含最上層組合件的文件連結。建議在操作大型組合件時使用這ˇ個匯入方法以獲得最佳的效能。
如果檔案僅包含零件 (沒有組合件), 系統會將每個零件放在同一文件的各自 Part Studio 中,並會建立一個最上層的組合件來包含這些零件。
如果您要讓匯入項為每個零件與組合件建立一個文件,系統提供有一個可選用的核取方塊。當操作大型組合件時不建議使用這個選項,因為會建立為數眾多的文件而難以管理。
合併為單一的 Part Studio - 如果檔案是一個組合件,或包含一個組合件,您有將其僅匯入為一個 Part Studio 的選項。在這樣的狀況下,會將組合件以一組的零件儲存在單一的 Part Studio 中。當零件被當做實例多次產生時,則會有重覆的零件。請注意,僅應在小型組合件的情況下使用這個選項,否則效能會受到影響。
- 選擇是否要以 Y 軸朝上來定位匯入的模型 - 如果檔案是在 Y 軸向上定位的系統中建立的,根據預設,會以反轉的座標系統將模型帶入至 Onshape (Z 軸向上的系統) 中。切換這個選項來重新定向軸向系統以與 Onshape 的系統相符,並以您預期的座標系統顯示模型。
- 匯入的檔案在您的文件清單中以新文件的形式出現。新文件的名稱與您匯入檔案的名稱相符。
取決您要從何處匯入檔案,可能需要在您裝置的設定中手動啟用從裝置的儲存處匯入的功能。
匯入對話方塊不會重新整理檔案。您必須到雲端儲存服務的應用程式中來查看更新的檔案清單。
在啟用的文件中建立新的 Onshape 分頁;分頁的名稱會反映檔案的名稱。
步驟:
- 在文件中輕觸螢幕底部的圖示。

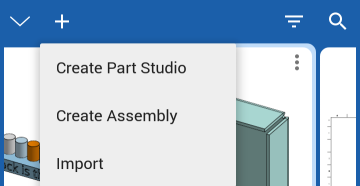
- 輕觸加號圖示來開啟「建立分頁」功能表,然後選擇「匯入」。
-
選擇要匯入檔案的來源。Onshape 支援從雲端來源匯入檔案,像是 Google Drive,也可匯入下載至您裝置中的檔案。
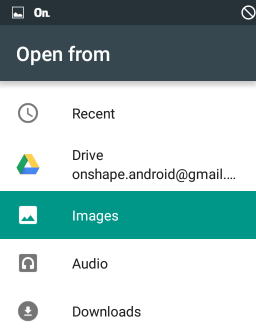
- 選擇要匯入的檔案。
- 系統會在文件內建立一個「CAD 匯入」的資料夾。匯入的檔案在資料夾中會有一個分頁。所匯入的資料在您的文件中會以適當的分頁出現。新分頁的名稱與您匯入檔案的名稱相符。

如果匯入的是 CAD 檔案且其成功地轉譯為 Onshape 格式,則會爲其建立第二個分頁。
如果您匯入非 CAD 類型的檔案 (像是 PDF、JPEG 或其他種二進位檔內容),在來源檔案改變的情況下,請使用分頁環境選單中的 [更新] 指令來更新文件中的檔案。
每個匯入至 Onshape 的檔案會有自己的分頁,使用原始的檔案名稱來命名。如果檔案是 CAD 檔案,同時會建立適當的 Part Studio 和/或組合件分頁。
匯入 SOLIDWORKS 隨身攜帶檔案的提示
在 SOLIDWORKS 中:
-
選擇「展開至單一資料夾」。壓縮檔案並給定與最上層組合件完全相同的名稱。檔案名稱與最上層組合件不可以包含任何特殊的字元。
- 如果您的組合件使用組態或輕量抑制零組件,請在匯入之前先執行這些步驟:
- 按一下組合件分頁。
- 在組合件樹狀結構中的根檔案上按右鍵,然後選擇 [設定輕量抑制為解出]。
- 在組合件樹狀結構中的根檔案上按右鍵,然後選擇 [儲存時重新計算的標記] > [爲所有模型組態加入標記]。
- 儲存根檔案。
匯入 CAD 檔案
當匯入 CAD 檔案時,您有下列的處理選項:
- 以 'Y 軸向上' 的座標匯入模型 - 如果檔案是在 Y 軸向上定位的系統中建立的,根據預設,會以反轉的座標系統將模型帶入至 Onshape (Z 軸向上的系統) 中。切換這個選項來重新定向軸向系統以與 Onshape 的系統相符,並以您預期的座標系統顯示模型。
- 僅匯入檔案至 Part Studios 中 (平階化) - 如果檔案是一個組合件,或包含一個組合件,您可以開啟平階化選項來僅將其匯入為一個 Part Studio。在這樣的狀況下,會將組合件在 Part Studio 中平階化為一系列的零件。當零件被當做實例多次產生時,則會有重覆的零件。
- 允許匯入有問題的零件 - 如果零件並未通過 Onshape 的有效驗證,仍可以與問題一起匯入。有問題的項目在特徵清單與零件清單上會以紅色的名稱標示,同時會出現在通知訊息中。出現這個選項並不表示偵測到問題。
- 匯入多本體或非實體本體時建立複合零件 - 當核取這個選項時,不論零件是否屬於相同的本體,在已匯入 Part Studio 中的所有零件會變為一個單一封閉複合零件。系統會合併本體來形成複合件 (一個單一零件)。系統會合併本體來形成複合件 (一個單一零件)。
如果您在匯入的過程中錯過了這個選項,可以在匯入之後於 Part Studio 中連按兩下 [匯入] 功能,然後選擇「建立複合」來於此時產生複合零件。
如果切換開啟「允許匯入有問題的零件」,匯入的特徵在特徵清單中會顯示有錯誤存在,但仍允許您匯入並參考錯誤的幾何。但是因為幾何有錯誤,所以後續的操作有可能會失敗。
自動處理僅針對 Onshape 可以轉譯的檔案提供,所有其他的檔案則會匯入至分頁中。
關於「學習中心」的其他資源,請參照此處的技術簡報文章:Importing Data (需要有 Onshape 帳戶) 與 Bulk Import Process (需要有 Onshape 帳戶)。
