在關聯中建構模型
![]()
![]()
![]()
可讓使用者在組合件的其他零件關聯中於 Part Studio 內選擇與編輯零件。無法在 Part Studio 中編輯未選取的零件,且這些零件會是透明的。
無法在關聯中編輯修訂版參考實例。請使用一個版本參考或的工作區參考允許的實例。
若要進一步了解在關聯中的設計,您可用自己的步調跟著 Managed In-Context Design (需要有 Onshape 帳戶) 的課程操作。
在環繞零件的關聯中建構零件是一種功能強大的由上而下設計方式。Onshape 提供數種由上而下設計零件的方式。每個方式各有其優點,所以您可能會要在不同的設計情境中使用不同的方法:
- 當您有一或多個預先存在的零件與 Part Studio,請使用在關聯中建構模型 (於本主題中說明)。當互有關係的零件是在個別的 Part Studios 內建立,或零件需要存在於不同 (連結的) 文件中的情況下使用。
當幾何條件關係是取決於組合件位置時,這也是一個好的選項。此種案例通常發生在組合件已經存在,而您需要對其中的零件做出關聯中編輯的情況下。對於僅使用一個參數歷程來驅動所有零件是不可行的大型組合件,此種方法也相當適合。
- 如果您有一個組合件並希望在關聯中於新的 Part Studio 內建立新的零件,請使用建立關聯中的 Part Studio 工具。
- 當您在設計過程的開端即完全掌握設計意圖,並要使用單一參數歷程來驅動數個相關零件的情況下,可使用 Onshape 多零件 Part Studios 的設計方式。
編輯組合件關聯中的 Part Studio 是從組合件中開始的:
- 在組合件中,插入來自一或多個 Part Studio 的零件並根據需要加入結合與條件關係來定位零件,或是使用三向操控器。
- 從「實例」清單或圖形區域中,於您要編輯的零件上按右鍵 (叫做主要實例),然後:
- 如果這個零件沒有相關的關聯,請選擇在關聯中編輯。
- 如果這個零件已經有一或多個相關的關聯,請選擇一現有關聯或是從「在關聯中編輯」子功能表中選擇建立新的關聯:

- The Part Studio containing that part opens. The other assembled parts are shown transparently around the primary instance in the same spacial relationship as in the assembly.
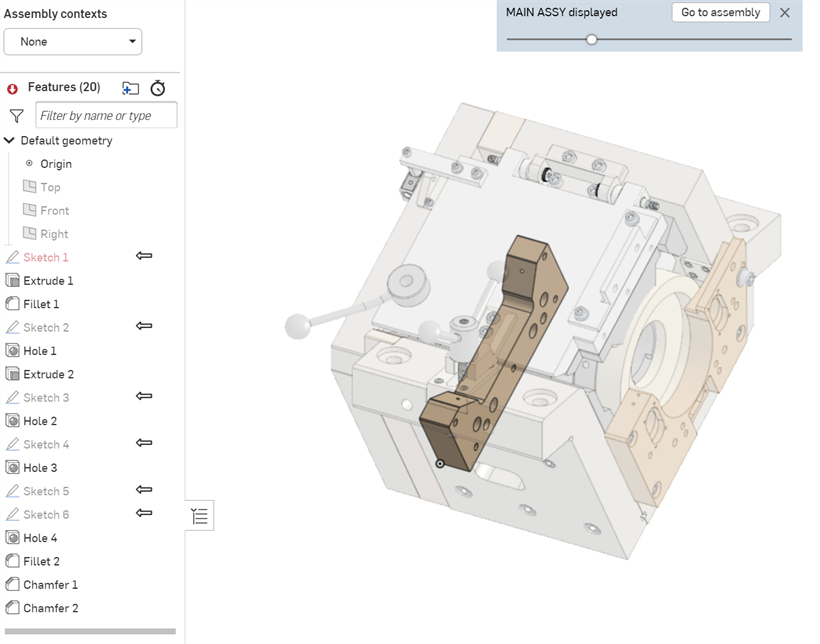
- 當您編輯時,選擇組合件中另一零件 (不是主要實例) 上的參考點會導致下列情況的發生:
- 建立一個組合件關聯 (快照)。
- 會在組合件中擷取零組件的所有幾何與位置 (資訊會存放在組合件關聯快照中)。
- 如果這是第一個在這個 Part Studio 中建立的組合件關聯,會在 Part Studio 的「特徵」清單上方建立組合件關聯清單 (快照所在處)。如果不是,則會將目前的關聯加入到這個組合件關聯清單中。
- 做出想要的編輯,根據需要參考面、邊線、或組合件的零件 (請注意,不會自動更新任何項目。如果需要,您可以手動更新 Part Studio 或組合件。請參考下方的更新關聯)。
您也可以在多個明確的位置建立同一組合件的多個關聯,然後在 Part Studio 或組合件中手動更新關聯。您也可以在關聯間切換與重新命名關聯。
- 當完成編輯時,請使用下列方法之一回到組合件中:
- 按一下圖形區域上方的 [前進至組合件]。
- 選擇視窗底部的組合件分頁。
- 在空白處按右鍵並選擇 [前進至組合件]。
例如,如果您繞著來自組合件的虛影零件的軸旋轉主實例,當選取虛影零件的軸時,它會做為關聯的參考點,然後會建立一個新的組合件關聯。
您可以根據需要使用任意數量的參考點 (會以紫色強調顯示所選的參考點)。ˋ這些參考永遠不會遺失或損壞,所以您的零件絕對不會失敗。
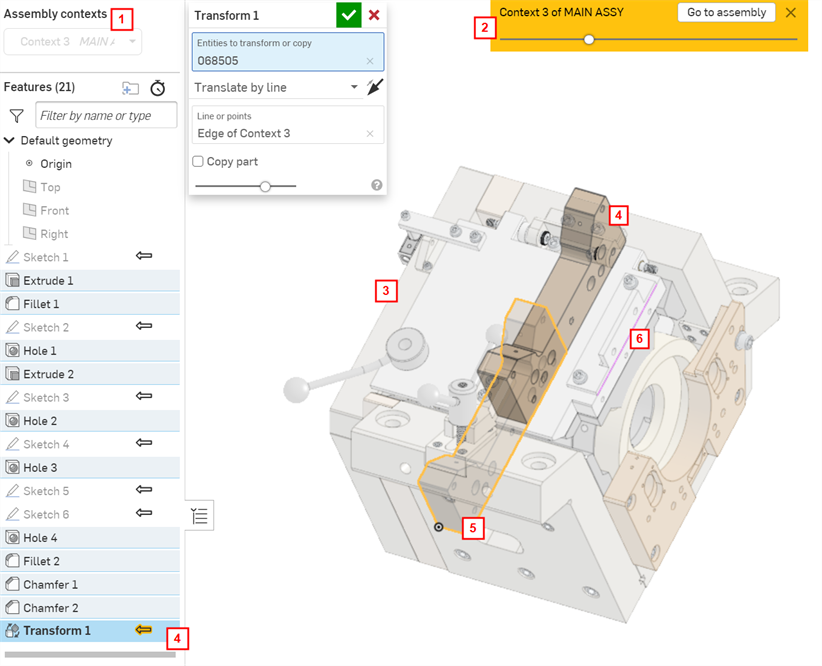
| 1 | 在這個 Part Studio 中關聯物件的清單 |
| 2 | 回到組合件中的按鈕 (「前進至組合件」);使用滑桿來增加或減少以透明顯示零件的不透明度 |
| 3 | 在開始「在關聯中編輯」時牽涉在組合件中的虛影零件 |
| 4 | 參考經組裝零件直線的新建特徵 (Transform) (同時出現在圖形區域與「特徵」清單中) |
| 5 | 當在關聯中編輯時,您可以對組合件中的零件做出任意數量的參考 – 您可以放心,這些參考並不會遺失或斷開,因此您的零件絕不會失敗。 |
| 6 | 用於「變換 (Transform)」特徵的虛影零件的參考線 |
所做的編輯現在會顯示在組合件中。
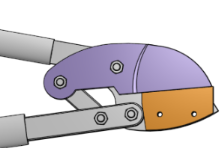
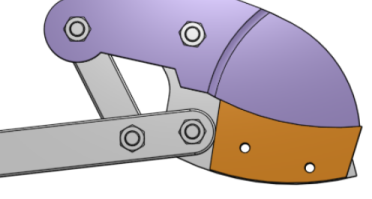
出現在主要組合件中的剪具與把手是在個別的 Part Studios 中定義的。注意到刀片與限制板並未相觸:
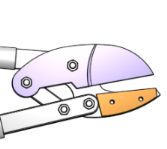
使用刀片來做為擠出特徵的參考點以擠出至該面:
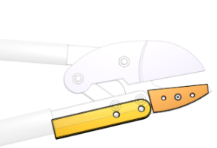
回到組合件中 (按一下前進至組合件) 並於該處查看所做的編輯。
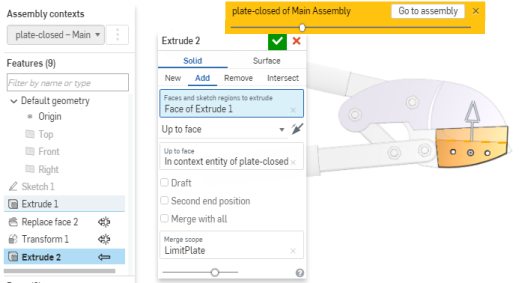
如果一開始的設計意圖就十分明確,是可以在單一 Part Studio 中設計所有的零件。此處的範例假定已建立了組合件,但零件是來自不同的 Part Studios 之中,因此在關聯中編輯是最佳的選項。
您可以使用建立關聯中的 Part Studio 組合件工具來以目前組合件的關聯建立新的 Part Studio。
您可以使用建立關聯中的 Part Studio組合件工具來以目前組合件的關聯建立新的 Part Studio。
- 您可以隨時在「特徵」清單上的組合件關聯清單中選擇 [無] 來關閉關聯,以做出不相關的編輯。
- 建立的零件若沒有參考在關聯中編輯的零件,則不會被自動插入至組合件中。
- 最佳實踐是馬上以有意義的名稱重新命名關聯;可以為單一的 Part Studio 建立多個關聯物件。
- 在下列的情況下請於關聯中編輯並選擇一個現有的關聯:
- 您需要加入額外的幾何條件關係
- 您需要編輯現有的幾何條件關係
若要在關聯中編輯並選擇現有的關聯:請開啟關聯功能表,選擇您要編輯現有關聯的名稱,然後選擇「在關聯中編輯」。

-
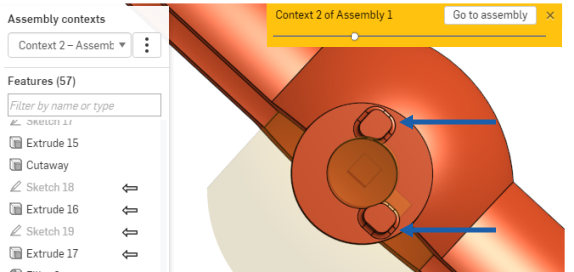
如果有多個關聯存在,當從左上角的組合件關聯下拉清單中選擇一個關聯時,會以黃色強調顯示的關聯中箭號圖示標出與關聯相關的特徵。在下方的範例中,當從下拉清單中選擇 Context 1 時,會以黃色強調顯示 Extrude 2 特徵的箭號圖示,表示其是與這個關聯有關的。當從下拉清單中選擇 Context 2 時,會以黃色強調顯示 Extrude 3 特徵的箭號圖示。

-
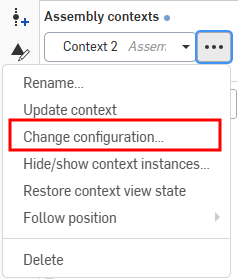
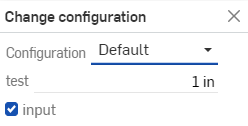
若要變更關聯實例的組態,請開啟環境選單,然後選擇 [變更組態] (下方中第一個圖片所示)。這樣會開啟「變更組態」對話方塊,您可於其中變更在組合件分頁內設定的關聯實例的組態 (下方中第二個圖片所示)。若要確認變更,按下 Enter 鍵。會出現一個藍色的訊息泡泡確認關聯組態的變更 (下方中第三個圖片所示):

-
若要隱藏或顯示關聯實例,請開啟環境選單,然後選擇 [隱藏/顯示關聯實例] (下方中第一個圖片所示)。這樣會開啟「隱藏/顯示關聯實例」對話方塊,您可於其中篩選組合件實例,並使用眼睛圖示來切換實例的顯示與否 (下方中第二個圖片所示):
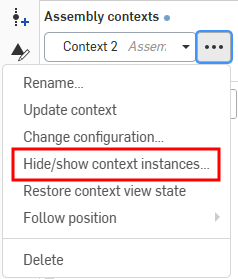
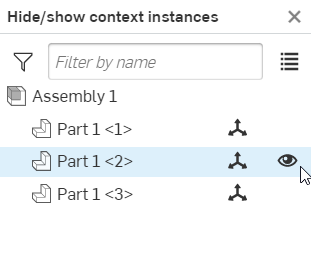
您也可以在關聯中隱藏/顯示和選擇結合連接器。
-
若要在 Part Studio 中隱藏一或的個關聯實例,請在圖形區域中選擇您要隱藏的實例,然後按右鍵並從從環境選單中選擇 [隱藏實例] (請見下方第一個圖片)。按一下環境選單中的 [還原關聯檢視狀態] 來將關聯的檢視恢復至其原始的顯示情形 (下方中第二個圖片所示):
![[隱藏關聯實例] 環境選單選項](Resources/Images/assembly/incontext-hide-instances-01.png)
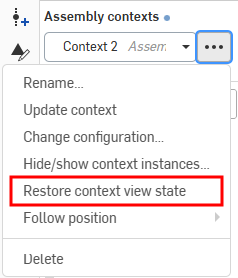
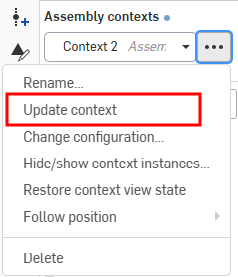
一旦建立關聯之後,您可以在 Part Studio 或組合件中變更關聯,並選擇是否要在 Part Studio 中更新該關聯。這樣可讓您在 Part Studio 內於關聯中作業但不影響組合件 (除非您要使用變更來更新組合件)。同理適用於在組合件內變更關聯。如果需要,您可以在組合件中做出變更,然後回到 Part Studio 中更新關聯來檢視變更。不會自動套用關聯的更新。
在組合件中更新關聯:選擇在關聯中編輯的零件,按右鍵並選擇 [更新關聯],然後選擇您要更新的關聯:

在 Part Studio 中更新關聯:在組合件關聯清單中選擇關聯,按一下 ![]() ,然後選擇 [更新關聯]:
,然後選擇 [更新關聯]:
Part Studio 關聯要求至少要將關聯所參考的一個 Part Studio 的零件插入到組合件中,且必須將這個零件設定為關聯的主要實例。
更新通知
當在關聯中時,如果對關聯所根據的特徵做出變更,會在左上方「組合件關聯」標籤旁出現實心藍色的圓圖示,並會出現在下拉功能表中的任何關聯上 (下方中第一個圖片所示)。例如,如果先前已將擠出套用至關聯所依賴的零件上,則您會看到這個圖示。在組合件中這個圖示會出現在關聯中的零件旁與以及其所屬的任何子資料夾中,並會有工具提示表示有可用的更新與適用的關聯 (下方中第二個圖片所示)。如果有多於三個關聯,前兩個關聯的工具提示會有 "與其他更多" 的後置。
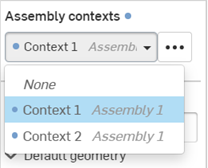
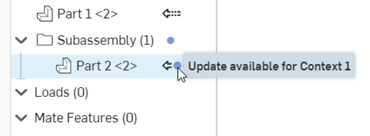
範例
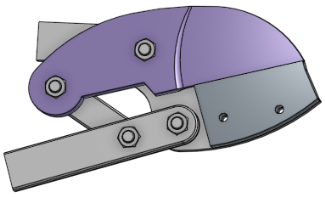
下方所建立的原始關聯中紫色刀片是直的:
然後將刀片編輯為有彎曲的邊緣:
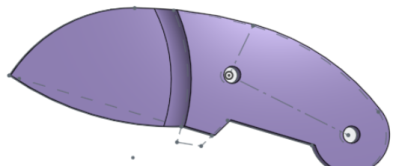
在組合件中,選擇 [更新關聯] (限制板的關聯) 來用彎曲的刀片更新剪具。由於限制板是擠出至刀片的面,因此更新時會將限制板重新計算至新的彎曲刀片面:
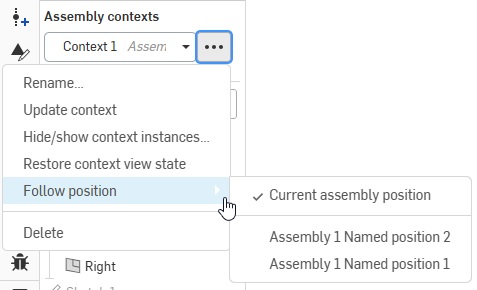
You can tie an assembly context to a named position. This enables you to sequentially update multiple contexts from the Part Studio without having to make changes to the assembly. No context goes out of date unless the named position view or the geometry changes.
In the Assembly contexts area above the Feature List, click the three-dot button (![]() ). Select Follow position and choose the current position or named position to associate with the context.
). Select Follow position and choose the current position or named position to associate with the context.
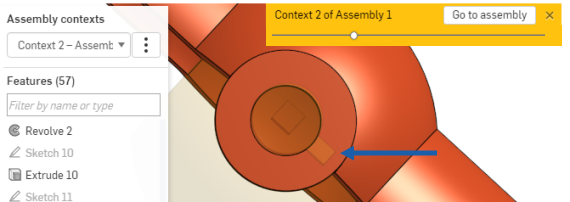
此處的範例展示有了兩個關聯的 Part Studio:一個關聯在關閉位置參考球閥,另一個關聯則在開啟的位置參考球閥。在各關聯中分別建構了一個止動器,所以在最後的設計中於開啟與關閉位置各有一個止動器。
在 Part Studio 中球閥於關閉位置的關聯:
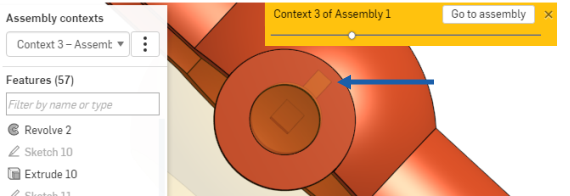
在 Part Studio 中球閥於開啟位置的關聯:
在 Part Studio 中止動器機制的最終設計:
設定主要實例
當您編輯在關聯中的零件時,會建立主要實例。主要實例會在 Part Studio 的特徵清單中的特徵與組合件實例清單的零件旁以實線箭頭所標明。主要實例會定義放置 Part Studio 中虛影組合件位置的定錨零件 (為在關聯中編輯指令選取的零件);以及所有出現在 Part Studio 中組合件零組件與該主要實例的相對關係。
您可以隨時變更關聯的主要實例,特別是在有斷開或遺失主要實例的情況下:
- 在組合件中選擇一個零件。
- 按右鍵來存取功能表,然後選擇 [<關聯名稱> > 設定為主要實例]。
會在零件清單中以實線箭頭 ![]() 標示新的主要實例,之前的主要實例 (如果有的話) 則會以虛線箭頭
標示新的主要實例,之前的主要實例 (如果有的話) 則會以虛線箭頭 ![]() 來標示。
來標示。
請注意,關聯中的主實例不會顯示為關聯中的 虛影零件。
重新命名關聯
會在建立關聯物件時給定一個預設名稱。要避免混淆,請於建立關聯時用有意義的名稱重新命名每個關聯。
在包含關聯物件的 Part Studio 中:
- 在組合件關聯清單中 (位於「特徵」清單上方),從下拉清單中選擇 [關聯]。
- 按一下選取「關聯名稱」時變為啟用的
 。
。 - 選擇 [重新命名]。
- 輸入新的名稱然後按下 Enter 或按一下
 。
。
選擇要編輯的工作區
當在一個工作區中操作並插入來自一個版本的零件時,假如選取了在關聯中編輯,則選擇要編輯的工作區對話方塊會開啟 (因為您不能在不可變的版本中編輯零件)。這樣可讓您選擇特定的工作區以於其中編輯零件:
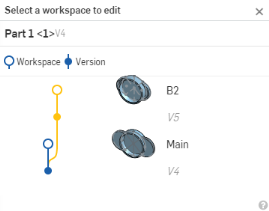
在對話方塊中,選擇特定的工作區 (在此案例中的 Main 或 B2) 以在其關聯中編輯。
結束在關聯中的編輯
使用此指令可讓您結束在關聯中編輯的工作階段,並在沒有關聯的情況下回到 Part Studio 中且不建立關聯物件。
當在 Part Studio 中編輯關聯時:
在白色的圖形區域或要編輯的零件上按右鍵,然後選擇 [結束關聯],或是按一下圖形區域最上方金色橫幅中的 X:

關聯物件就列在 Part Studio 中「特徵」清單的上方,請參考下方的 Part Studio 圖例:
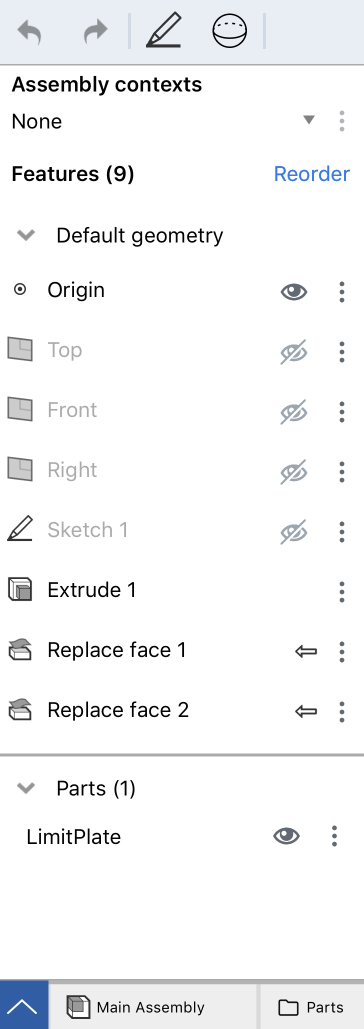
- 在這個 Part Studio 中關聯物件的清單
- 回到組合件中的圖示
當在關聯中編輯時,您可以對組合件中的零件做出任意數量的參考 - 您可以放心,這些參考並不會遺失或斷開,因此您的零件絕不會失敗。
您也可以在多個明確的位置建立同一組合件的多個關聯,以及在需要的情況下於 Part Studio 或組合件中手動更新關聯。更新關聯不是自動的;您可以使用 [更新關聯] 指令來控制是否要更新、何時要更新與更新的項目。這樣可避免在組合件中移動或重新定義其他零件時,意外地變更關聯中的零件。
在組合件中,從要編輯的零件的環境選單中選擇 [在關聯中編輯]。包含該零件的 Part Studio 開啟。組裝的零件會在 Part Studio 中出現 (虛影),以在組合件中相同的特殊條件關係環繞在主實例旁。此外,在 Part Studio 中的所有原始零件都會以不透明顯示,然後放置在建立處。
例如,出現在下方的剪具與把手是在個別的 Part Studios 中定義的。注意到刀片與限制板並未相觸:

若要確定限制板會與刀片相觸,請選擇限制板 (要編輯的零件),開啟環境選單並選擇 [在關聯中編輯] 來開啟限制板建立處的 Part Studio,並有組合件一起出現:

使用刀片來做為「擠出」特徵的參考點以擠出至該面。回到組合件中 (輕觸 [前進至組合件]) 並查看編輯後的結果。

如果一開始的設計意圖就十分明確,是可以在單一 Part Studio 中設計所有的零件。此處的範例假定已建立了組合件,但零件是來自不同的 Part Studios 之中,因此「在關聯中編輯」是最佳的選項。
在組合件的關聯中編輯 Part Studio:
- 在組合件中,插入零件並根據需要加入結合與條件關係來定位零件,或是使用三向操控器。
- 在用做為參考點 (主要實例) 的零件上輕觸兩下,然後從環境選單中選擇 [在關聯中編輯]。
包含所選零件的 Part Studio 開啟,整個組合件會以虛影的狀態出現。
- 做出想要的編輯,根據需要參考面、邊線、或組合件的零件 (請注意,不會自動更新任何項目。如果需要,您可以手動更新 Part Studio 或組合件,請參考下方的更新關聯)。
在組合件中的另一個零件上選擇一個參考點 (在主要實例之外) 來於特徵清單上方建立一個關聯物件。您可以根據需要使用任意數量的參考點 (會以紫色強調顯示所選的參考點)。
請注意,您可以重複這些步驟並在同一 Part Studio 中建立組合件的多個關聯,而且可以在其間轉換,所以請用有意義的名稱來重新命名關聯。
- 當完成編輯時,請使用下列方法之一回到組合件中:
- 輕觸圖形區域上方的 [前進至組合件]。
- 選擇視窗底部的組合件分頁
請注意到所做編輯會出現在組合件中。
一旦建立關聯之後,您可以在 Part Studio 或組合件中變更關聯,並選擇是否要在 Part Studio 中更新該關聯。這樣可讓您在 Part Studio 內於關聯中作業但不影響組合件 (除非您要使用變更來更新組合件)。同理適用於在組合件內變更關聯。如果需要,您可以在組合件中做出變更,然後回到 Part Studio 中更新關聯來檢視變更。並不會自動套用關聯的更新。
在組合件中更新關聯:選擇在關聯中編輯的零件,存取適境功能表並選擇 [更新關聯]。
若要在 Part Studio 中更新關聯:在「組合件關聯」清單中選擇關聯,輕觸水平點圖示,然後選擇 [更新關聯]。
設定主要實例
當您編輯在關聯中的零件時,會建立主要實例。主要實例會在 Part Studio 的特徵清單中的特徵與組合件實例清單的零件旁以實線箭頭所標明。主要實例會定義放置 Part Studio 中虛影組合件位置的定錨零件 (為在關聯中編輯指令選取的零件);以及所有出現在 Part Studio 中組合件零組件與該主要實例的相對關係。
您可以隨時變更關聯的主要實例,特別是在有斷開或遺失主要實例的情況下:
- 在組合件中選擇一個零件。
- 開啟環境選單,選擇關聯然後 [設定為主要實例]。
會在「零件」清單中以實線箭頭標示新的主要實例,之前的主要實例 (如果有的話) 則會以虛線箭頭來標示。
重新命名關聯
會在建立關聯物件時給定一個預設名稱。要避免混淆,請於建立關聯時用有意義的名稱重新命名每個關聯。
在包含關聯物件的 Part Studio 中:
- 在組合件關聯清單中 (位於「特徵」清單上方),從下拉清單中選擇 [關聯]。
- 當選取關聯名稱時,垂直點功能表會變為啟用的,輕觸功能表。
- 選擇 [重新命名]。
- 輸入新名稱並輕觸核取記號。
結束在關聯中的編輯
使用此指令可讓您結束在關聯中編輯的工作階段,並在沒有關聯的情況下回到 Part Studio 中且不建立關聯物件。
當在 Part Studio 的關聯中編輯時:
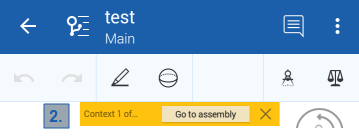
輕觸圖形區域最上方金色橫幅中的 x。

選擇要編輯的工作區
當在一個工作區中操作並插入來自一個版本的零件時,假如選取了 [在關聯中編輯],則「選擇要編輯的工作區」對話方塊會開啟 (因為您不能在不可變的版本中編輯零件)。這樣可讓您選擇特定的工作區以於其中編輯零件。
關聯物件就列在 Part Studio 中「特徵」清單的上方,請參考下方的 Part Studio 圖例:
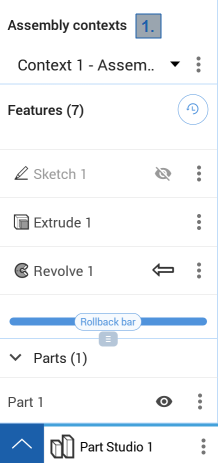
- 在這個 Part Studio 中關聯物件的清單
- 回到組合件中的圖示
當在關聯中編輯時,您可以對組合件中的零件做出任意數量的參考 - 您可以放心,這些參考並不會遺失或斷開,因此您的零件絕不會失敗。
您也可以在多個明確的位置建立同一組合件的多個關聯,以及在需要的情況下於 Part Studio 或組合件中手動更新關聯。更新關聯不是自動的;您可以使用 [更新關聯] 指令來控制是否要更新、何時要更新與更新的項目。這樣可避免在組合件中移動或重新定義其他零件時,意外地變更關聯中的零件。
在組合件中,從要編輯的零件的環境選單中選擇 [在關聯中編輯]。包含該零件的 Part Studio 開啟。組裝的零件會在 Part Studio 中出現 (虛影),以在組合件中相同的特殊條件關係環繞在主實例旁。此外,在 Part Studio 中的所有原始零件都會以不透明顯示,然後放置在建立處。
例如,出現在下方的剪具與把手是在個別的 Part Studios 中定義的。注意到刀片與限制板並未相觸:

若要確定限制板會與刀片相觸,請選擇限制板 (要編輯的零件),開啟環境選單並選擇 [在關聯中編輯] 來開啟限制板建立處的 Part Studio,並有組合件一起出現:

使用刀片來做為「擠出」特徵的參考點以擠出至該面。回到組合件中 (輕觸 [前進至組合件]) 並查看編輯後的結果。

如果一開始的設計意圖就十分明確,是可以在單一 Part Studio 中設計所有的零件。此處的範例假定已建立了組合件,但零件是來自不同的 Part Studios 之中,因此「在關聯中編輯」是最佳的選項。
在組合件的關聯中編輯 Part Studio:
- 在組合件中,插入零件並根據需要加入結合與條件關係來定位零件,或是使用三向操控器。
- 在用做為參考點 (主要實例) 的零件上輕觸兩下,然後從環境選單中選擇 [在關聯中編輯]。
包含所選零件的 Part Studio 開啟,整個組合件會以虛影的狀態出現。
- 做出想要的編輯,根據需要參考面、邊線、或組合件的零件 (請注意,不會自動更新任何項目。如果需要,您可以手動更新 Part Studio 或組合件,請參考下方的更新關聯)。
在組合件中的另一個零件上選擇一個參考點 (在主要實例之外) 來於特徵清單上方建立一個關聯物件。您可以根據需要使用任意數量的參考點 (會以紫色強調顯示所選的參考點)。
請注意,您可以重複這些步驟並在同一 Part Studio 中建立組合件的多個關聯,而且可以在其間轉換,所以請用有意義的名稱來重新命名關聯。
- 當完成編輯時,請使用下列方法之一回到組合件中:
- 輕觸圖形區域上方的 [前進至組合件]。
- 選擇視窗底部的組合件分頁
請注意到所做編輯會出現在組合件中。
一旦建立關聯之後,您可以在 Part Studio 或組合件中變更關聯,並選擇是否要在 Part Studio 中更新該關聯。這樣可讓您在 Part Studio 內於關聯中作業但不影響組合件 (除非您要使用變更來更新組合件)。同理適用於在組合件內變更關聯。如果需要,您可以在組合件中做出變更,然後回到 Part Studio 中更新關聯來檢視變更。並不會自動套用關聯的更新。
在組合件中更新關聯:選擇在關聯中編輯的零件,存取適境功能表並選擇 [更新關聯]。
若要在 Part Studio 中更新關聯:在「組合件關聯」清單中選擇關聯,輕觸水平點圖示,然後選擇 [更新關聯]。
Android 設定主要實例
當您編輯在關聯中的零件時,會建立主要實例。主要實例會在 Part Studio 的特徵清單中的特徵與組合件實例清單的零件旁以實線箭頭所標明。主要實例會定義放置 Part Studio 中虛影組合件位置的定錨零件 (為在關聯中編輯指令選取的零件);以及所有出現在 Part Studio 中組合件零組件與該主要實例的相對關係。
您可以隨時變更關聯的主要實例,特別是在有斷開或遺失主要實例的情況下:
- 在組合件中選擇一個零件。
- 開啟環境選單,選擇關聯然後 [設定為主要實例]。
會在「零件」清單中以實線箭頭標示新的主要實例,之前的主要實例 (如果有的話) 則會以虛線箭頭來標示。
重新命名關聯
會在建立關聯物件時給定一個預設名稱。要避免混淆,請於建立關聯時用有意義的名稱重新命名每個關聯。
在包含關聯物件的 Part Studio 中:
- 在組合件關聯清單中 (位於「特徵」清單上方),從下拉清單中選擇 [關聯]。
- 當選取關聯名稱時,垂直點功能表會變為啟用的,輕觸功能表。
- 選擇 [重新命名]。
- 輸入新名稱並輕觸核取記號。
結束在關聯中的編輯
使用此指令可讓您結束在關聯中編輯的工作階段,並在沒有關聯的情況下回到 Part Studio 中且不建立關聯物件。
當在 Part Studio 的關聯中編輯時:
輕觸圖形區域最上方金色橫幅中的 x。

選擇要編輯的工作區
當在一個工作區中操作並插入來自一個版本的零件時,假如選取了 [在關聯中編輯],則「選擇要編輯的工作區」對話方塊會開啟 (因為您不能在不可變的版本中編輯零件)。這樣可讓您選擇特定的工作區以於其中編輯零件。