 插入零件與組合件
![]()
![]()
![]()
「插入零件或組合件」會將零件、組合件、草圖與曲面的實例插入至使用中組合件中。您可以建立在 Part Studio 中定義的特定零件 (已發行或未發行的)、草圖與曲面 (或整個 Part Studio) 的實例,或建立在不同的組合件分頁中定義的組合件實例,以及建立來自其他文件的實例 (連結文件)。當相對應的圖元存在於目前文件或其他文件中 (瀏覽過的文件) 時,會在對話方塊中提供各種物件類型的篩選器。
快速鍵:i
當組合件分頁啟用時,組合件工具列也是啟用的。
在插入的過程中,第一個副本的預設位置是 Part Studio 原點 (被插入的零件或次組合件) 與組合件原點 (插入至的組合件) 的對齊,之後的副本則在離第一個副本稍微偏移處被插入。
固定一個零件與套用結合有所不同。固定 (在零件實例零件的環境選單中) 是針對套用固定於其中的組合件的;並不會繼續存在於零件被插入至的另一個組合件中。
當從組合件中刪除一個實例或特徵時,也會刪除所有相關的特徵 (結合連接器、結合、限制關係)。唯一的例外是結合群組,這些不會被刪除。
Onshape 中的組合件定義了所插入零件與次組合件實例的結構。在這種情境中,使用者可定義與測試自由度以及實例間的關係。
當建立一個新文件時,會有空白的 Part Studio 與 Assembly 分頁存在其中。按一下 Assembly 分頁來檢視。
工具列中包含命令、結合、關係以及建立組合件所需的所有工具。若要將組合件加入至文件中,按一下 [插入新分頁],然後選擇「建立組合件」。
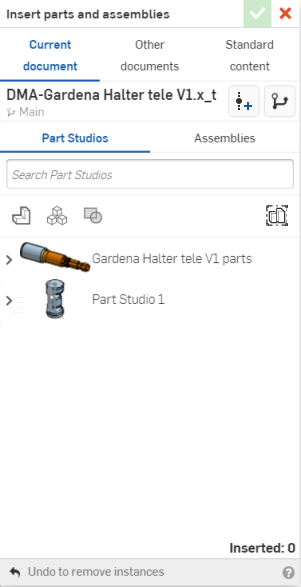
使用「插入」來將實例加入至組合件中。從「目前文件」、「其他文件」、或「標準內容」中選擇。使用 Part Studios 與組合件頁籤來篩選文件。在「搜尋」中輸入部分字詞或甚至非字母數字字元來優化搜尋結果。在 Part Studio 頁籤中,使用上方代表 Part Studio 元素的圖示來進一步篩選,像是「草圖」、「曲面」、「曲線」、與「零件」。
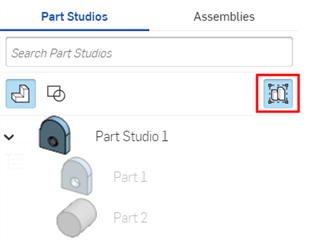
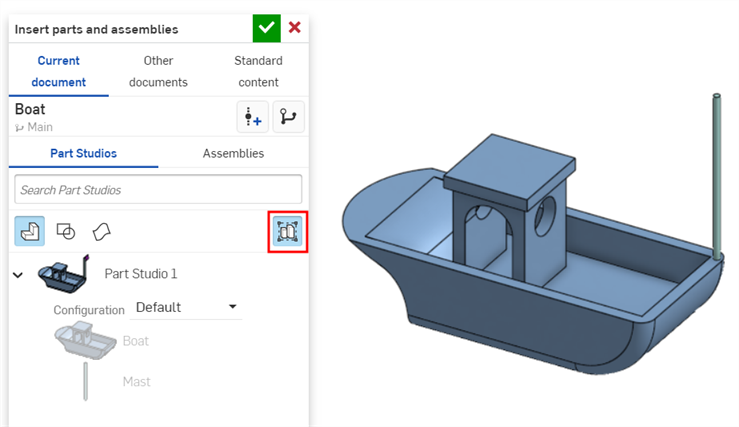
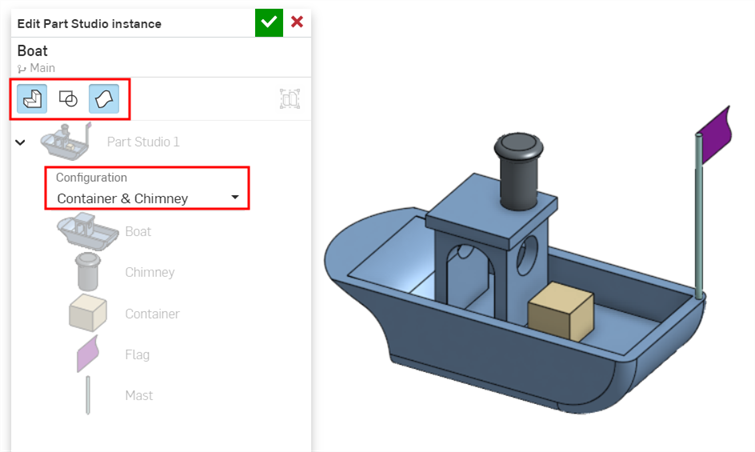
如果需要,按一下「將整個 Part Studio 以剛性插入」圖示以確保在未定義結合的情況下,零件彼此之間不會相對移動。在插入剛性的 Part Studio 之後,使用右鍵功能表來「編輯」以插入或移除所有零件、草圖、與曲面,或是修改 Part Studio 的組態。
當插入實例時,如果零件或是組合件有組態,請在選擇之前定義適當的選項。
在元素上按左鍵來將其插入。當游標在對話方塊中時,實例相對於原點的方位和位置與它們在 Part Studio 中的相同。如果將游標移出對話方塊,在圖形區域的任意處點按左鍵會將實例放置在點按的位置上。一旦放置之後,零件並不會鎖定在目前的位置。
您也可以在同一文件中將 Part Studio 內的零件、曲面與複合零件複製貼上到組合件中。在「零件」清單中的零件上按右鍵,然後選擇複製零件 (或使用 Ctrl/Cmd+c 鍵盤快速鍵),接著在組合件中按右鍵,然後選擇貼上零件 (或使用 Ctrl/Cmd+v 鍵盤快速鍵)。
- 按一下「插入零件與組合件」工具
 。
。
- 選擇一個文件:
- 選擇目前文件來從這個文件中插入
- 選擇其他文件來從另一個文件中插入
- 選擇標準內容來插入 Onshape 提供的標準零件。
Onshape 會記住這個選擇,在後續的操作中打開對話方塊時即會是之前所做的選擇。
在零件與曲面上的篩選同時顯示網格與混合模型。
- 選擇 Part Studios 或組合件。
- 在 Part Studio 中:
- 使用對話方塊中的圖示來篩選草圖
 、曲面
、曲面  、零件
、零件  、與複合零件
  。
。 - 使用搜尋欄位來找出特定的零件。
- 使用對話方塊中的圖示來篩選草圖
- 在組合件之中使用搜尋欄位來根據名稱找出組合件。
- 您可以根據零件/組合件名稱與其他屬性 (包括自訂屬性) 來搜尋。
- 「搜尋」可接受部份與多個字詞以及非字母數字的字元,像是標點符號。
- 搜尋列左側的篩選器
 會顯示可搜尋的一般屬性 (或所有屬性)。您一次可以使用多個篩選器。
 - 每個搜尋結果會以名稱之前的圖示指明符合搜尋準則的項目類型,接下來會有項目名稱。項目名稱下方是工作區或版本圖示,文件名稱與工作區名稱 (若搜尋準則指定的話,也會有版本名稱),零件編號與發行管理狀態 (請見下方)。

- 在 Part Studio 中:
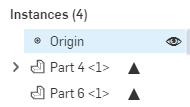
- 如果可用的話,您可以使用檢視已發行的項目篩選器來將物件的某一特定修訂版插入組合件中。在組合件的「實例」清單中會用填實三角形指明先前發行的零件。
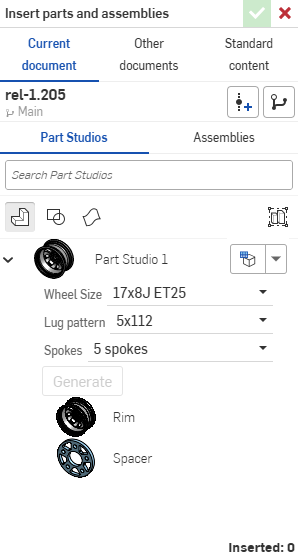
- 如果有的話,請選擇組態選項。選擇所需的輸入項,然後按一下產生:
您可以按一下設定為最後檢視的組態下拉清單 (
 ) 來選擇在 Part Studio 或組合件中最後的啟用組態,或選擇重設為預設來將所有輸入項重設回其預設值。
 - 選擇要插入的實例:
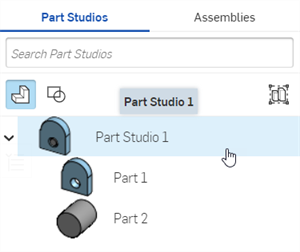
- 當在這個對話方塊中檢視零件時,您會看到預設的 Part Studio 詳細資料檢視。在這之下會看到該 Part Studio 中的個別零件。您可以從這裡:
- 按一下個別的次組合件來加入至目前的組合件中。
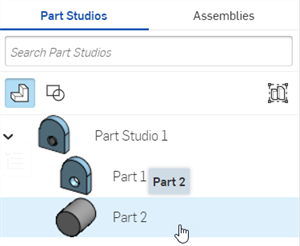
- 按一下「Part Studio」來將目前所有的零件加入到組合件中。
- 選擇將整個 Part Studio 以剛性插入按鈕,然後選擇 Part Studio。這個選項會以 Part Studio 中所有的變更自動更新組合件,包括加入的新零件。請參考編輯插入的剛性 Part Studio。
- 按一下個別的次組合件來加入至目前的組合件中。
- 當在這個對話方塊中檢視組合件時,您可以:
- 按一下個別的次組合件來加入至目前的組合件中。
- 按一下某一組合件來將其所有次組合件加入至目前的組合件中。
- 當在這個對話方塊中檢視零件時,您會看到預設的 Part Studio 詳細資料檢視。在這之下會看到該 Part Studio 中的個別零件。您可以從這裡:
- 按一下核取記號來插入實例。
- 會以與組合件和 Part Studio 原點對齊的方式來將零件插入到組合件中。
- 當插入零件的多個副本時,系統會將之後的副本在離第一個副本稍微偏移處插入。不過,如果您將游標移動至圖形區域中,您的選擇會出現在游標上。
- 拖曳來調整零件、組合件或草圖的位置。
當插入至組合件中時,草圖可以有結合連接器,且可與零件、其他草圖和組合件組裝結合。
在將已組態零件或組合件插入至組合件之後,您可以變更組態:
- 在「實例」清單中的零件或組合件上按右鍵,然後選擇變更組態。
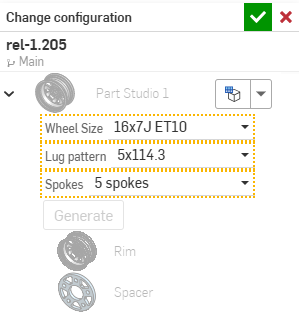
- 選擇一個新的組態選項。
- 當對所做選擇滿意時,按一下
 (使用
(使用  來取消操作)。
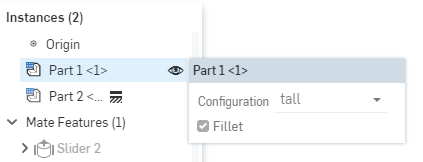
若要查看組合件中的啟用組態為何,將游標移動到「實例」清單中的零件上暫留,會出現帶有組態資訊的工具提示:
-
使用將整個 Part Studio 以剛性插入按鈕來將 Part Studio 插入至工程圖中:
-
從組合件實例清單中,在 Part Studio 上按右鍵,然後從環境選單中選擇編輯:
![在剛性 Part Studio 中從實例環境選單中選擇 [編輯]](Resources/Images/assembly/edit-ps-rigid-02.png)
-
「編輯 Part Studio 實例」對話方塊開啟。您可以在對話方塊中:
-
插入或移除所有零件 (
 )、草圖 (
 )、與曲面 (
 )。
)。 -
從「組態」下拉清單中切換至另一 Part Studio 組態。
-
-
按一下對話方塊中的核取記號 (
 ) 來接受您在組合件中的變更。
當您插入的零組件有已定義的結合連接器時 (來自 Part Studio 中),且您在組合件中已開啟「卡扣模式」![]() ,那麼:
,那麼:
- 當從「插入」對話方塊中拖曳零組件到組合件中時,您可以將在零組件上的來源結合連接器抓取組合件中的其他結合連接器上 (會在滑鼠移動暫留時出現)。
- 如果要插入的零組件有多個明確定義的結合連接器,您可以使用 Control 鍵來在結合連接器間循環,然後在適當的結合連接器上停止,將其做為新的卡扣模式來源結合連接器。
- 如果您抓住一個目標結合連接器並接受插入 (關閉對話方塊),會在來源與目標結合連接器之間套用一個「緊固結合」。
- 即使是在卡扣模式中,您仍可以在插入零件實例 (或次組合件) 時自由地移動與旋轉。
如果在要插入的零組件上沒有明確定義的結合連接器,則會提供一般非卡扣的自由拖曳 (即使開啟了卡扣模式)。
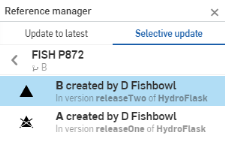
在插入至組合件後,可以更新已修訂的零件以反映更新的修訂版本。按一下實例清單中的圖式來開啟「參考管理員」。您可以在其中更新至最新的,或做出選擇性的更新。有較新版本可用的零件在實例清單中會有這個圖示:![]() 。
。
按一下圖示來向下找出您要選擇的修訂版:
![]() - 版本圖表來插入來自文件的某一特定版本
- 版本圖表來插入來自文件的某一特定版本
![]() - 建立版本來在操作進行中建立文件的新版本,以選擇已建立版本的圖元
- 建立版本來在操作進行中建立文件的新版本,以選擇已建立版本的圖元
在實例清單中連按兩下零件,以開啟該零件的建立關聯或編輯關聯的工作階段。
提示
- 當插入零件與組合件時,您可以在其他文件之中搜尋:
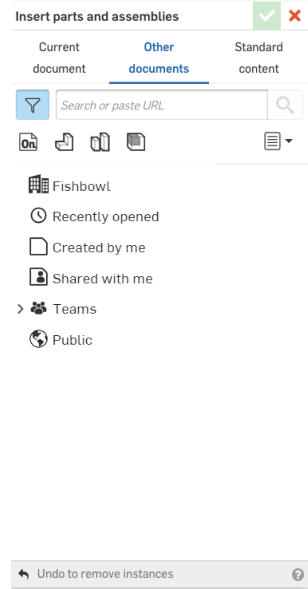
- 請注意到會於此處提供與文件頁面上相同的篩選器,包括團隊與標籤。
- 選擇一個篩選器來向下搜尋,然後找出文件。如果您知道所要找出項目的名稱,也可使用「搜尋」方塊。
- 一旦將零件、草圖或曲面插入至組合件之後,您可以變更某一特定圖元的版本:於實例清單中的圖元名稱上按右鍵,然後在環境選單中選擇「變更至版本...」。
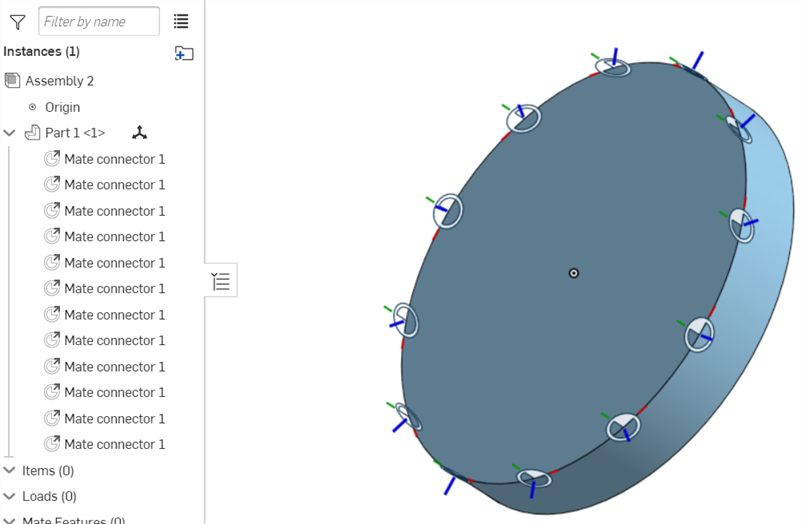
- 如果結合連接器是在 Part Studio 中複製排列的零件,在插入 Part Studio 時,會將結合連接器加入到組合件中。如果在將 Part Studio 插入到組合件中時沒有看到您的結合連接器,請確定零件是列為結合連接器的所屬圖元。
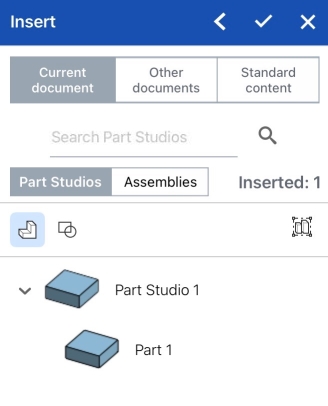
- 輕觸插入工具。

- Tap Current document to insert from this document or Other document to find another document from which to select. You can also select to insert Onshape-supplied standard parts from Standard content .
- If you select Browse documents, select a filter or search to find the document from which to insert, then tap to select the document.
僅在文件有一或多個版本的情況下,您才可以從該文件中選擇。如果沒有版本存在或有較新的版本存在,會顯示關於文件狀態的一個通知。如果沒有版本存在,您可以輕觸來在該文件中建立一個版本。
- 您可以選擇之前已發行的零件或組合件來插入。已發行的物件會在右邊有實心三角形標示。
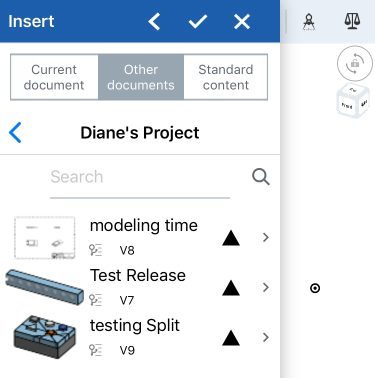
- 選擇 Part Studios 或組合件來檢視文件的 Part Studios 或組合件。
- 在 Part Studio 中輕觸來插入整個 Part Studio 或輕觸以選擇特定的零件。使用對話方塊中的圖示來篩選草圖
 、曲面
、曲面  、零件
、零件  、複合零件
、複合零件  、以及鈑金展開圖樣
  。使用搜尋欄位來找出特定的零件。
 - 在組合件中輕觸來插入一個組合件。使用搜尋欄位來找出特定的零件。
當檢視零件時,您會看到 Part Studio 預設的詳細資料。在這之下會出現該 Part Studio 中的個別零件。輕觸 Part Studio 的名稱來插入整個 Part Studio 的內容,或輕觸個別的零件。在組合件中也是如此。插入對話方塊會根據每個所插入的圖元更新「已插入」的數量。您也可以一次插入多個圖元到一個組合件中。
選擇將整個 Part Studio 以剛性插入圖示
 ,然後選擇 Part Studio。這個選項會以 Part Studio 中所有的變更自動更新組合件,包括加入的新零件。
 - 在 Part Studio 中輕觸來插入整個 Part Studio 或輕觸以選擇特定的零件。使用對話方塊中的圖示來篩選草圖
- 有組態的零件或組合件會顯示可選的選項,以讓您在插入至組合件中時選擇所需的組態。
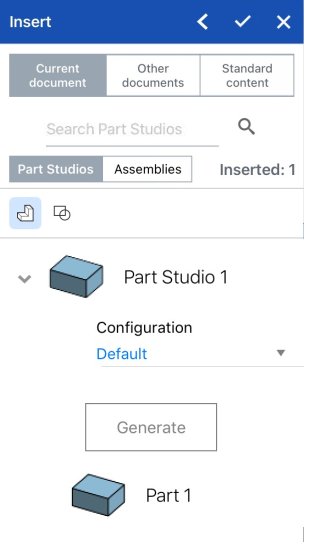
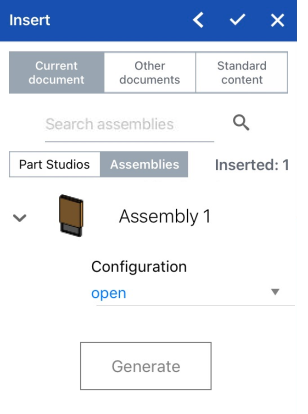
上方左邊的「插入」對話方塊顯示插入已組態零件;右邊顯示插入已組態組合件。
可在 iOS 裝置上查看與操作於瀏覽器 Onshape 中建立的組態。
- 選擇性使用,輕觸插入對話方塊右上角的>形箭頭 (箭號) 來摺疊對話方塊並檢視組合件。
- 輕觸核取記號來關閉插入對話方塊並儲存您的變更。
插入圖元的預設的位置是 Part Studio 原點 (被插入的零件或次組合件) 與組合件原點 (插入至的組合件) 的對齊。
如果您插入一個來自另一個文件的零件或組合件,一個連結的圖示會出現在特徵清單中的衍生特徵旁,表示特徵是與另一個文件連結的。![]()
當所插入 Part Studio 或組合件的來源文件有較新版本時,在實例清單中的連結圖示會以藍色強調顯示,同樣的圖示也會出現在組合件分頁中。![]()
關於連結文件與如何更新連結文件的詳細資訊,請參考連結文件。
- 插入圖元的預設的位置是 Part Studio 原點 (被插入的零件或次組合件) 與組合件原點 (插入至的組合件) 的對齊。
- 如果已在 Part Studio 中將結合連結點加在零件上,則將零件加入至組合件分頁中時也會有結合連接器。在 Part Studio 中定義有明確結合連接器的零件於組合件實例中會有下拉清單,其中包含屬於零件的結合連接器。
-
固定一個零件與套用結合有所不同。固定 (在零件的環境選單中) 是針對套用固定於其中的組合件的;並不會繼續存在於零件被插入至的另一個組合件中。
- 當從組合件中刪除一個實例或特徵時,也會刪除所有相關的特徵 (結合連接器、結合、限制關係)。唯一的例外是結合群組,這些不會被刪除。
- 輕觸插入工具。

- Select Current document to insert from this document workspace or Other documents to find another document from which to select. You can also select to insert Onshape-supplied standard parts from Standard content .
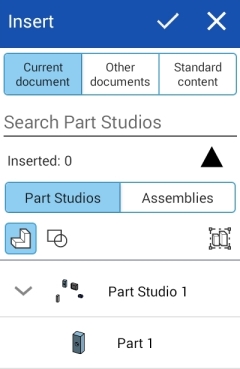
- If you select Browse documents, select a filter or search to find the document from which to insert, then tap to select the document.
僅在文件有一或多個版本的情況下,您才可以從該文件中選擇。如果沒有版本存在或有較新的版本存在,會顯示關於文件狀態的一個通知。如果沒有版本存在,您可以輕觸來在該文件中建立一個版本。
- 您可以選擇之前已發行的零件。使用填實三角形圖示來篩選有已發行零件或組合件的文件。
- 選擇 Part Studios 或組合件來檢視文件的 Part Studios 或組合件。
- 在 Part Studio 中輕觸來插入整個 Part Studio 或輕觸以選擇特定的零件。使用對話方塊中的圖示來篩選草圖
 、曲面
、曲面  、零件
、零件  、複合零件
、複合零件  、以及鈑金展開圖樣
  。使用搜尋欄位來找出特定的零件。
 - 在組合件中輕觸來插入一個組合件。使用搜尋欄位來找出特定的零件。
當檢視零件時,您會看到預設的 Part Studio 詳細資料檢視,其下會有個別的零件。輕觸 Part Studio 名稱來插入目前在 Part Studio 中的所有零件,或是輕觸個別的零件。
「插入」對話方塊會根據每個所插入的圖元更新「已插入」的數量。您也可以一次插入多個圖元到一個組合件中。選擇將整個 Part Studio 以剛性插入圖示
 ,然後選擇 Part Studio。這個選項會以 Part Studio 中所有的變更自動更新組合件,包括加入的新零件。
 - 在 Part Studio 中輕觸來插入整個 Part Studio 或輕觸以選擇特定的零件。使用對話方塊中的圖示來篩選草圖
- 有組態的零件會顯示可選的選項,以讓您在插入至組合件中時選擇所需的組態:
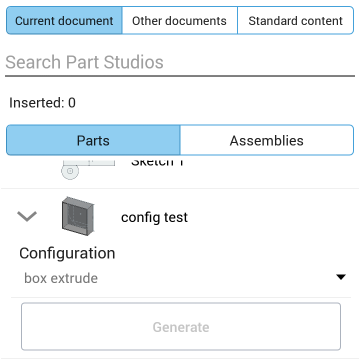
可在 Android 裝置上查看與操作於瀏覽器 Onshape 中建立的組態。
- 選擇性使用,輕觸插入對話方塊右上角的>形箭頭 (箭號) 來摺疊對話方塊並檢視組合件。
- 輕觸核取記號。
插入圖元的預設的位置是 Part Studio 原點 (被插入的零件或次組合件) 與組合件原點 (插入至的組合件) 的對齊。
如果您插入一個來自另一個文件的零件或組合件,一個連結的圖示會出現在特徵清單中的衍生特徵旁,表示特徵是與另一個文件連結的。![]()
當所插入 Part Studio 或組合件的來源文件有較新版本時,在實例清單中的連結圖示會以藍色強調顯示,同樣的圖示也會出現在組合件分頁中。![]()
關於連結文件與如何更新連結文件的詳細資訊,請參考連結文件。
- 插入圖元的預設的位置是 Part Studio 原點 (被插入的零件或次組合件) 與組合件原點 (插入至的組合件) 的對齊。
- 如果已在 Part Studio 中將結合連結點加在零件上,則將零件加入至組合件分頁中時也會有結合連接器。在 Part Studio 中定義有明確結合連接器的零件於組合件實例中會有下拉清單,其中包含屬於零件的結合連接器。
-
固定一個零件與套用結合有所不同。固定 (在零件的環境選單中) 是針對套用固定於其中的組合件的;並不會繼續存在於零件被插入至的另一個組合件中。
- 當從組合件中刪除一個實例或特徵時,也會刪除所有相關的特徵 (結合連接器、結合、限制關係)。唯一的例外是結合群組,這些不會被刪除。