設為透明
![]()
快速鍵:Shift+t
將所選的 Part Studio 或組合件圖元設為透明。其他的圖元會維持為不透明的。選項包括視覺呈現透明的內部幾何以便選取、測量、分析與編輯,並根據相連性或具體鄰近性來擴展透明度的選擇。
設為透明可用於:
-
改善在大型 Part Studios 與組合件中圖元的顯示。
-
在被其他幾何擋住的幾何 (例如,點、邊線、面、結合連結器) 上查看與執行操作。
-
在尋找和隱藏/顯示圖元以存取相關模型幾何確定是困難或繁瑣的情況下,「隔離顯示」會是隱藏/顯示指令的替代選項。
設為透明指令是隔離顯示的相反指令。
「隔離顯示」與「設為透明」指令是互為相反的。
「設為透明」會將所選的 Part Studio 或組合件元素變為透明但將所有的其他元素保持為不透明。然而,「隔離顯示」會將所選元素保持為不透明,並將所有其他元素變為透明。
這兩個指令強化在大型 Part Studio 與組合件中元素的顯示狀態,並可幫助查看被其他幾何擋住的元素。
若要將一或多個元素設為不透明或透明,請在 Part Studio 的「零件」清單、組合件的「實例」清單或圖形區域中做出選擇,然後按右鍵再從環境選單中選擇 [隔離顯示] 或 [設為透明]。或者是將游標移動暫留至一元素上,然後按下 Shift+i 來隔離顯示,或按下 Shift+t 來設為透明。移動游標至元素上暫留,然後使用相同的快速鍵來累進加入元素。
核取「選擇透明幾何」來選擇、測量、分析、與編輯在圖形區域中的透明幾何。
使用顯示或隱藏內部幾何滑桿來調整透明程度。
在「隔離顯示」與「設為透明」中,滑桿控制了透明外緣與透明內部幾何的顯示情形。當滑桿是在最左邊時,仍會顯示外緣但內部幾何會是完全透明的。在將滑桿移到右邊時,內部的幾何會變為可見。當將滑桿向右移動時,內部幾何與選擇的外緣會淡化,直到兩者都完全不可見為止。
使用「零組件控制」來根據距離或連接性以擴展。當根據距離擴展並將滑桿向右移動時,「隔離顯示」會將每個連續的零件變為不透明,而「設為透明」會根據與原始選取項目的鄰近性來調整透明度。當根據連接性來擴展時,將滑桿向右移動會根據與原始選取項目的結合連接的鄰近性來將每個連續的零件變為透明或不透明。僅在組合件中提供根據連接性來擴展。
關閉對話方塊或按下 Escape 鍵來退出。
在退出與重新進入對話方塊時,以及在文件工作階段之間,系統會維持「選擇透明幾何」與透明滑桿的設定。
可從「零件」清單 (在 Part Studio 中) 或「實例」清單 (在組合件中) 的環境選單中使用設為透明指令,,或在 Part Studio 或組合件圖形區域中於模型選取項目上按右鍵來存取此功能。
從 Part Studio 或組合件中:
-
從「零件」或「實例」清單,或是圖形區域中選擇您要設為透明的圖元。圖元可以是零件/實例、點、邊線、面、結合連接器、資料夾或群組。
-
在清單或模型選取項目上按右鍵,然後從環境選單中選擇設為透明。設為透明對話方塊隨即開啟:
-
設定透明度滑桿 (在透明度控制之下):
-
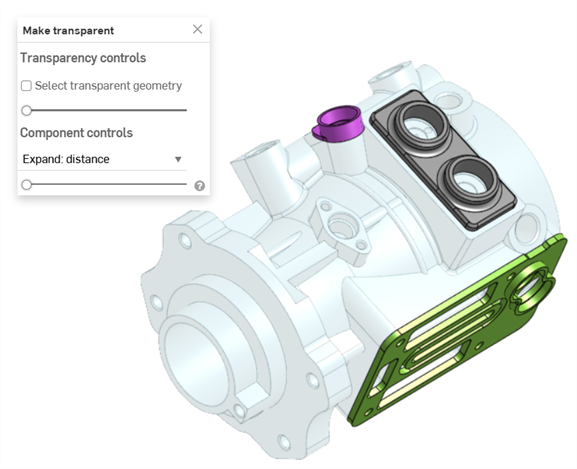
設定在最左邊時,僅會顯示透明幾何的外邊線。不會顯示所選項目的內部幾何 (如上所示)。
-
設定到最右邊時,透明的幾何會是完全透明的。
-
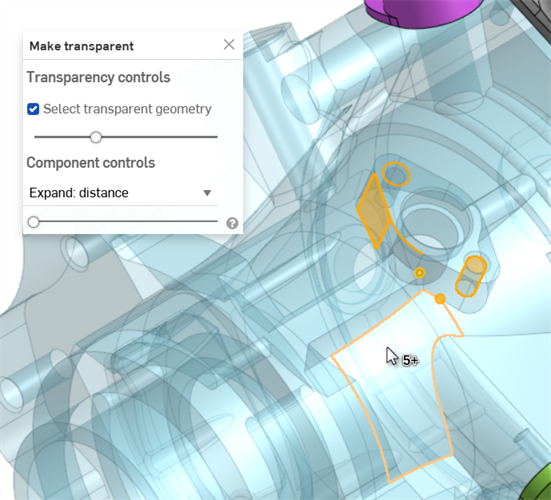
設定在兩邊的大約中間處時,會顯示透明幾何的內部幾何 (如下所示)。將滑桿移動到右邊會增加透明度,使得透明幾何會較為透明。將滑桿移動到左邊會降低透明度,使得透明幾何變為更不透明。

-
-
在核取了選擇透明幾何時,您可以在圖形區域中選擇、測量、分析、與編輯透明幾何,像是零件/實例、點、邊線、面、和結合連接器 (下圖所示)。在未核取時,僅能選取、測量、分析與編輯非透明的幾何。
在核取了「選擇透明幾何」時,也可以從「零件」或「實例」清單中選擇透明的零件/實例、資料夾、結合連接器、與群組。
-
使用零組件控制來選擇:
-
擴展:距離 - 根據與所選零件或實例的具體鄰近性使用滑桿來將每個連續的零件或實例變為透明。將滑桿向右移動會使得更多零件/實例變為透明。
-
擴展:連接性 (僅適用於組合件分頁中) - 根據結合的連接性使用滑桿來將每個連續的實例變為透明。將滑桿向右移動會使得更多的實例變為透明。
-
-
按一下對話方塊中的 x 圖示來移除所有零件或實例的透明顯示。在退出之後,系統會保留在設為透明對話方塊中做出的選擇。
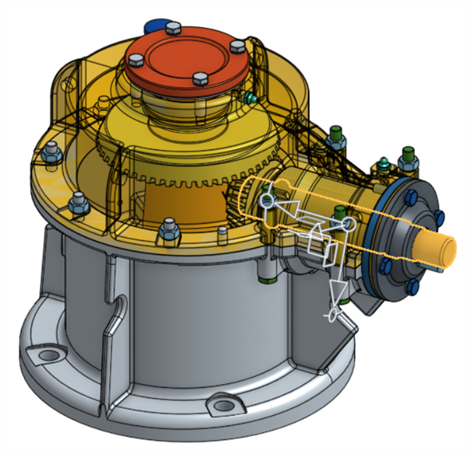
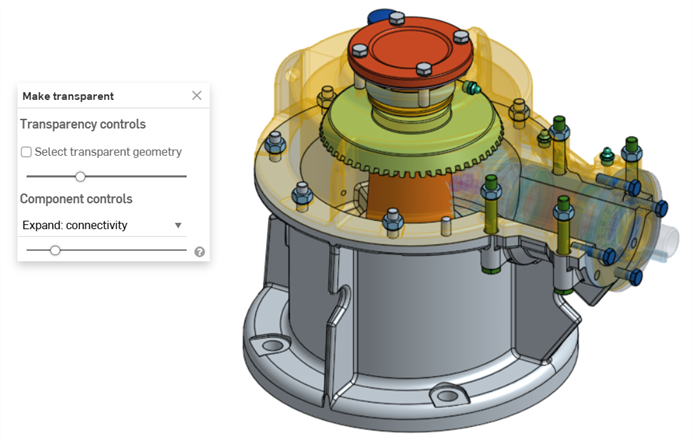
在下方的範例中,選取了齒輪和閥門組合件的圓軸實例,接著從環境選單中選擇設為透明:
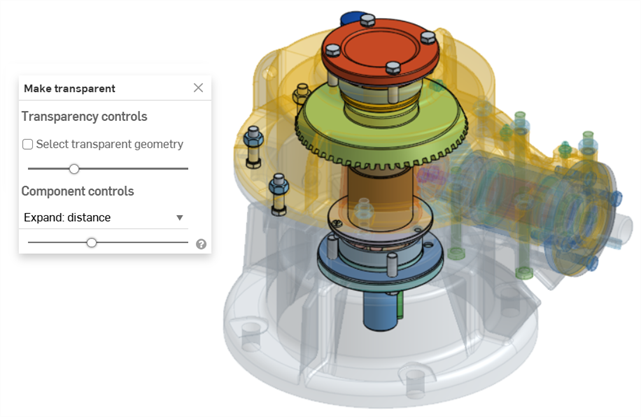
使用擴展:距離滑桿以根據實例與所選圓軸實例的鄰近性來將實例變為透明:
使用擴展:連接性滑桿以根據與圓軸實例的連續結合連接性來將實例變為透明:
-
使用快速鍵 Shift+t 來將游標之下的零件或實例設為透明。這個指令是累計的;您可以接連使用在零件或實例上來將其全部保留為透明,直到您退出設為透明對話方塊為止。您也可以多重選取零件或實例,然後選擇 Shift+t 指令。
-
也可以使用選擇其他 (`) 鍵 (重音鍵,在 “1” 鍵的左邊) 來累進選擇其他的圖元。
-
若要將零件或實例的整個資料夾變為透明,請在「零件」或「實例」清單中於資料夾上按右鍵,然後選擇設為透明。
- 當在關聯中建構模型與使用剖面視圖時也可以使用設為透明。
- 如果您退出對話方塊並再次進入,系統會記住選擇透明幾何與透明滑桿的設定。
-
如果核取了選擇透明幾何,將透明度滑桿完全移動到左邊或右邊會自動停用此選項 (取消核取)。隨後若移動滑桿則會自動再次啟用 (核取)。
-
除了使用設為透明對話方塊的 x 圖示來退出,也可以:
-
在圖形區域中的模型上按右鍵,或是在「零件」/「實例」清單中的模型上按右鍵,然後從環境選單中選擇退出設為透明
-
按一下 Esc (退出) 鍵
-