Getting Started as a Light User
![]()
![]()
![]()
Light user accounts are typically used by members of the internal supply chain, managers or executives, and can even be provided to external suppliers or clients. All Onshape users have access to the one single source of their enterprise data. There are times, however, when some users don't need all the CAD functionality but rather just need to access, view, and export data. To better serve the needs of different users, Onshape provides two types of user accounts:
- Full users - Full users have the ability to access all of Onshape’s functionality to create, edit, and share data. Typically, Full user accounts are used by engineers, designers, or CAD specialists.
- Light users - Light users can view, comment on, and export enterprise data that has been shared with them.
When you sign in to Onshape as a Light user, you experience a trimmed-down version of the Onshape user interface called the View only toolbar. Many features and toolbars are removed, leaving only the commands necessary for finding, opening, viewing, commenting on, and exporting data. These commands are conveniently accessed through the View only toolbar.
In addition to the toolbar, you can also right-click on a sketch or part to access a menu of available commands like Show Dimensions, and other commands as well. Double-click on a feature in the Features list to see the settings and options used to create it.
See Managing Your Onshape Plan > Signing in to an account.
An Onshape document is a version-controlled container for potentially many types of data. A single document may contain parts, assemblies, drawings, and even uploaded files like PDFs, images, or videos. Every organization uses documents differently, but understanding how documents are structured and how to find different types of information will help you work with them effectively.
Tabs
Each Onshape document may contain different types of information, broken down into different kinds of tabs which can be seen along the bottom of the window:

Examples of the different types of tab data
Hover over a tab for a thumbnail of its contents. Click on a tab to access its contents. You are also able to click the Tab manager button
![]() in the bottom left to see a vertical list of tabs, as well as search and filter for specific types or instances of data:
in the bottom left to see a vertical list of tabs, as well as search and filter for specific types or instances of data:
- Select a tab type filter to sort by tab type.
- Enter search criteria if you wish.
- View the results of your search.
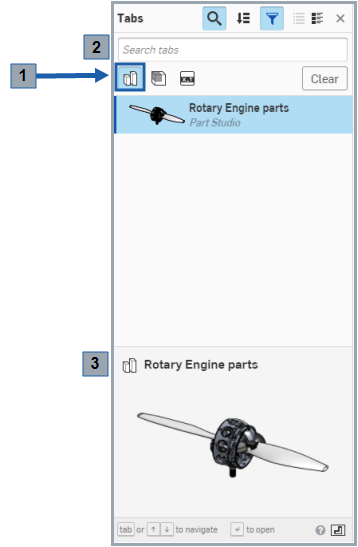
The Tab manager with the Part Studio filter selected
Tabs fall into 9 categories:
- Part Studio -

Parts in Onshape are created in Part Studio tabs. A Part Studio may contain one part or multiple parts, depending on how the designer constructed them.
- Drawing -

Drawing tabs will be familiar if you have used drawing files in another system. Onshape drawings can have multiple sheets and reference multiple parts or assemblies.
- Feature Studio -

A Feature Studio is a tab containing FeatureScript, a programming language used to define your own custom features in Onshape. (See Feature Studios for more information.)
- Application -

Third-party applications from the Onshape App store may also appear as tabs in an Onshape document. These may be less relevant to your use of Onshape, but are nonetheless important to recognize if you encounter them.
- Image -

Images uploaded into Onshape are stored in a tab and are displayed both in the tab and the thumbnail of the tab.
- Zip -

A zip file is an import of compressed (or zipped) files for the purpose of storing information in Onshape along with the project data. See Importing Files for more information.
- Material library -

Users are able to upload their own company material libraries for use in Onshape. See Customizing Materials for more information.
- PDFs
-

PDFs generate a preview and may be viewed directly in the Onshape document.
- Assemblies -
(including BOMs)

Assemblies are created in Assembly tabs, very similar to the assembly files you may be familiar with from other systems. One key difference is that in Onshape, the assembly simultaneously contains the Bill of Materials (BOM).
- X_T -

X-T is translated or un-translated CAD data from another system. See Importing files for more information.
For more information on using the tab manager, see Document Tabs.
The Onshape Light user interface includes the following features (note that the numbers coincide with the numbers in the image above):
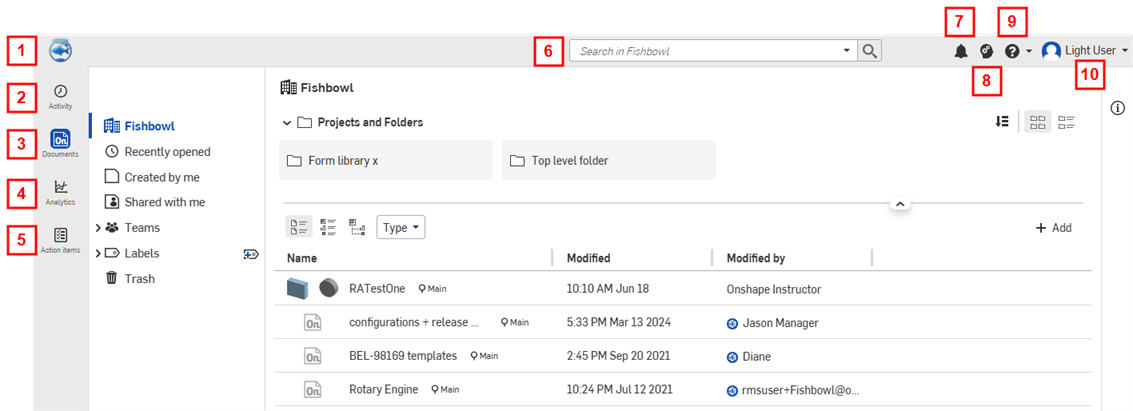
- Refresh Documents icon - Your company icon is located in the top far left corner of the Onshape homepage and displays the Documents page. Click this icon from anywhere in Onshape.
- Activity tab - This tab is located in the left sidebar of the Light user homepage and allows you to navigate to your Activity stream (a listing of the actions you and your colleagues have taken within Onshape).
- Documents tab - The Documents tab is located in left sidebar of the Light user homepage and allows you to navigate to your Documents page (identical to clicking your company logo).
- Analytics tab - The Analytics tab allows you to navigate to your Analytics page to view reports about documents, user, and usage. For more information on Analytics, see Analytics.
- Action items tab - The Action items tab is located in the left sidebar of the Light user homepage and allows you to navigate directly to your Action items (tasks and release management assignments) page.
- Search bar - The Search bar on the Documents page allows you to search through all documents. When a filter is selected (on the far left: Recently opened, Created by me, Shared with me), the Search is conducted on documents within that filter.
- Notifications button - The Notifications button, located at the top of your Light user homepage to the right of the Search bar, allows you to view notifications related to document comments, file import and export status, workplace status, etc.
- Learning Center button - Onshape's Learning Center button is located at the top of the Light user homepage to the right of the App Store button, and allows you to navigate to Onshape's Learning Center, which includes self-paced courses and recorded webinars about how to use Onshape.
 Help icon -
Onshape's Help menu icon is located at the top right of the page, to the right of the Learning Center button. Click on the icon to open the Help menu drop down. Select the Help option to access Onshape's Help center.
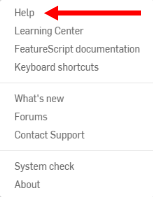
This menu also contains a way to contact support: Contact Support opens a dialog in which you can enter a question, optionally add a screenshot of your problem, and select whether or not to share your document directly with an Onshape Support representative (this permission can be revoked at any time).
 Account user icon -
The right-most icon at the top of your Onshape Light user page is the Account icon, usually followed by the name of the user. Click on this icon, or your name, to open a drop down menu with options to navigate to your account, your enterprise settings, and an option to sign out.
For more information on getting started with some common setup preferences and accessing commands, see Setting Your Preferences.

Click Activity in the left sidebar..
The Activity page is your Onshape home page and is your default starting point in Onshape. On this page you see document-related activity in a stream. Use the 'ellipsis' menu to access commands related to the activity entry.
For more information, see Monitoring User Activity.

An activity stream with the ellipsis highlighted in red

Click Documentsin the side bar to open a list of all the documents you have permission to access.
The Documents page is where you'll likely start most of your work in Onshape. Click your company logo in the top left corner of the window to return to the Documents page from anywhere in Onshape.
The Documents page lists all of the documents you have access to, sometimes listed singly, sometimes organized into projects and folders (shown below, outlined in red). This page also contains filters for narrowing the list of documents (outlined in orange), and a search box (outlined in yellow). Click on a project, folder, or document name to open it.

In the above example, the icons outlined in blue represent Labels, Document details, and List and Grid view options.
For more information about using the Documents page, see Documents Page.

You are able to access Onshape’s advanced search bar in your Light user Documents page, shown above outlined in red. To navigate there, click
 , or the Go to documents icon (your company logo), both located in the top left corner of the page. Onshape's advanced search tools may be used to find specific parts, assemblies and drawings by part number, release status, version and revision.
Click the down arrow in the search bar to open the advanced search dialog . From this dialog you can specify the different parameters for your search:
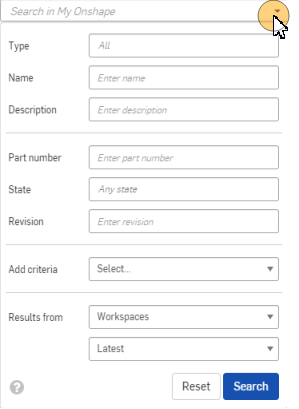
As an example, say you receive a work order specifying part number 00203 rev B and you need both the drawing and the 3D model of the part to complete the order. To find both, open the advanced search dialog and fill it out as shown:
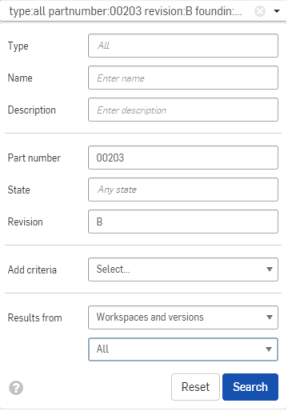
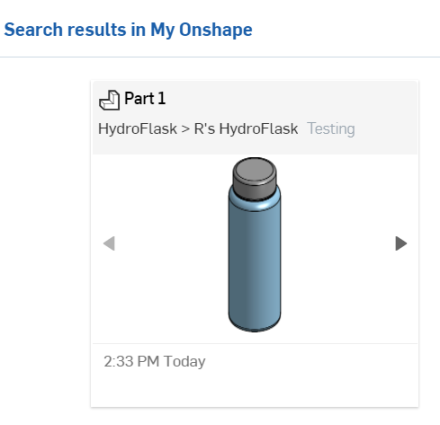
Click Search to display the results (shown in the second example above), and click on a result to bring you directly to the drawing and the 3D model. From there you are able to perform any of the actions described previously to comment on, measure, or export objects as needed.
For more information using the Onshape search functionality, see Advanced Search.
The View only toolbar is the default presentation for all users who do not have edit permissions on a document.
Upon entering a document, a Light user or a user with View only permissions will see this layout (note the View only toolbar outlined in red):
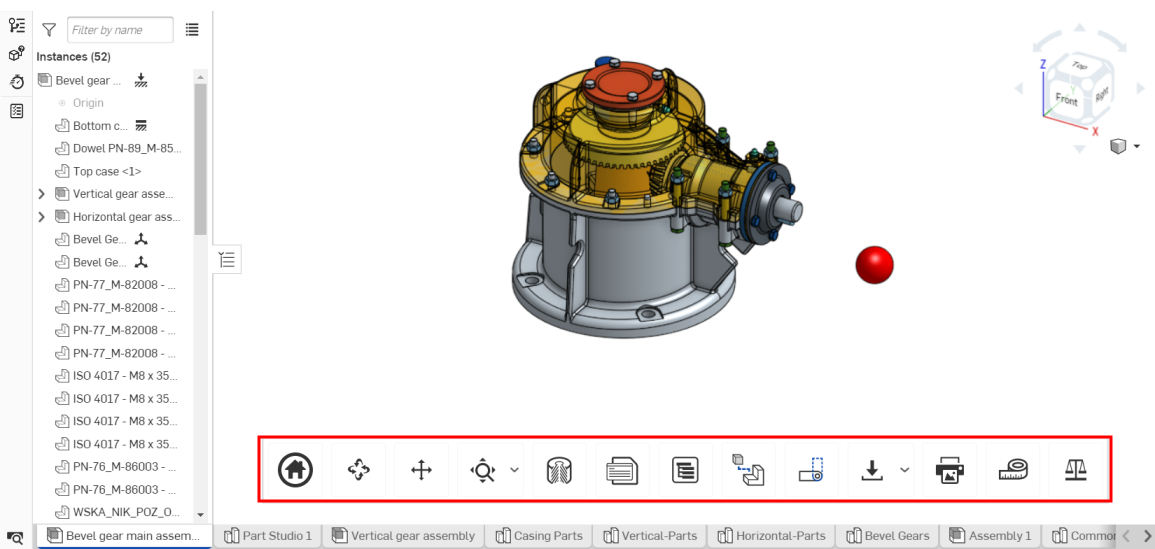
A user in Enterprise and any other account will have this toolbar as well, when shared with the View only permissions. Only a company owner has the ability to change their company's settings to hide the View only toolbar in all documents. Users with editing permissions on a document will not see the View only toolbar.
For more information on how to operate the View only toolbar, see Using the View Only Toolbar.
The View only toolbar is located at the bottom of your Onshape Part Studio or Assembly (shown above outlined in red) and can have up to 18 tools or features, some of which depend on the tab type or the user's permissions:

Toolbar as typically seen in a Part Studio, above

Toolbar as typically seen on an iOS device, above

Toolbar as typically seen on an Android device, above

Toolbar as typically seen in an Assembly, above
- Home -
 Click the Home icon to automatically restore the initial view of your document.
 - Rotate -
 Click the Rotate icon, then click and drag your cursor in the direction you want your document to rotate.
 - Pan -
 Click the Pan icon, then click and drag your cursor in the direction you want to pan your document.
 - Zoom to fit -
 Click the Zoom to fit icon to automatically zoom your image to fit the middle of the screen. Click the dropdown menu arrow to the right of the icon to see the following features:
- Zoom to window -
 Click Zoom to window, then drag your cursor to create your zoom bounding box around the part of the entity you wish to zoom in on; your image zooms accordingly
 - Zoom -
 Click Zoom, then click and drag your cursor up and down or left and right to zoom in and out.
While using the Onshape application on a desktop, you can scroll up or down with your mouse at any time to zoom in or out.
On Windows machines with a standard 3-button mouse, Onshape provides the following scheme for manipulating the 3D model in Part Studios and Assemblies:
3D Rotate: Right-mouse-button-click+drag
Zoom in and out: Scroll up and scroll down, respectively
2D pan: Ctrl+right-mouse-button+drag (middle button click+drag)
For more information on customizing your view manipulation in Onshape, see View Navigation and Viewing Parts.
- Zoom to window -
-
Section view -
 Click the Section view icon to open the Section view manipulator:
Select the plane, planar face, or mate connector that you want to view, then click the checkmark
 in the top right corner of the Section view manipulator to finalize your decision.
 - Properties -
 When you are in a Part Studio, click the Properties icon to open a Properties dialog where you will have the ability to edit your Part Studio's name, description, part number, state, and more:
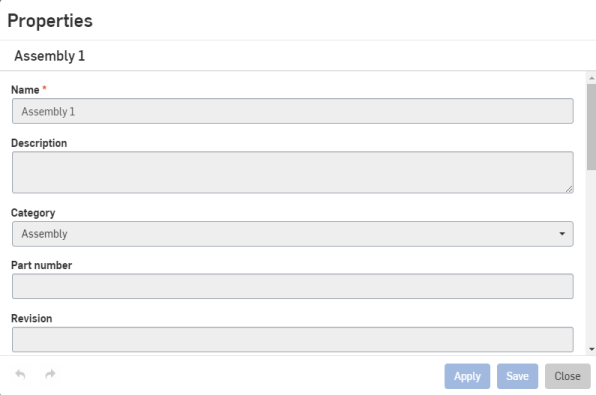
To see the properties of a specific part on an entity, click the specific part and then click the Properties icon.
In an Assembly, click the Properties icon to open a Properties dialog.
Light users and full users who lack write permissions do not have the ability to edit properties.
-
Appearance panel -
 This tool appears only when a Part Studio tab is selected. Click to open the Appearance panel from the right side of the UI.
You can see the color associated with a particular part or face. For more information about assigning colors, see Customizing Parts and Faces: Appearance.
-
Display states -
 This tool appears only when an Assembly is selected. Click to open the Display states dialog. See Display States for more information.
 -
Cut list -
 This tool appears only when a Part Studio tab is selected and Frames are used. Click to open the Cut list panel from the right side of the UI. See Cut List for more information.
 -
Custom tables -
 This tool appears only when a Part Studio tab is selected. Click to open the Custom tables panel from the right side of the UI. If a custom table has been added to the document, it opens:
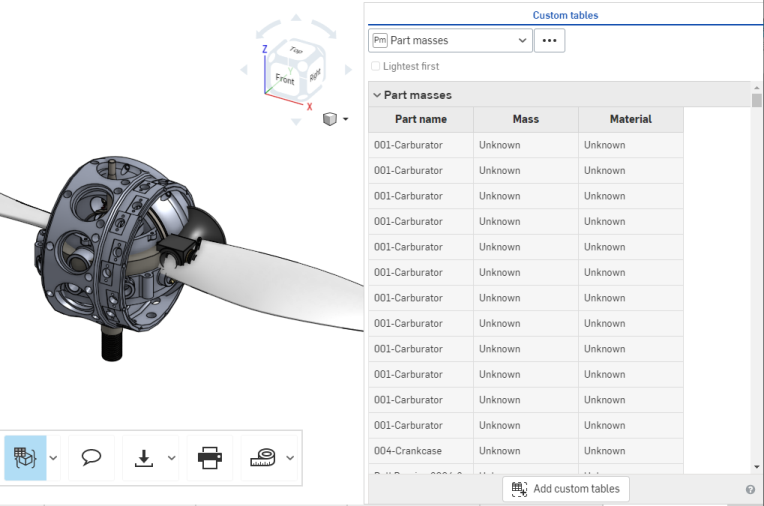
- Configuration panel -
 Click the Configuration table icon to open the Configured part properties panel (note that this icon appears only when your assembly or Part Studio contains configured properties):
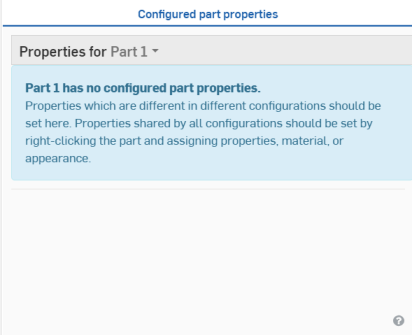
To learn more about the Configuration panel, see Configurations.
- Bill of Materials -
 Click the BOM icon to open the BOM panel, or close the BOM panel.
 - Exploded views -
 Click the Exploded views icon to open the panel in order to select an Exploded view to display.
This tool only appears when an Assembly is selected.
-
Follow a user... -
 Click the Follow a user icon to open a menu with a list of users that are currently in the document (note that this icon only appears if there are multiple users in a document):
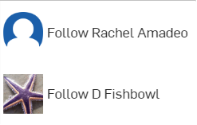
Click a user you wish to follow, and your Onshape window will adjust to show you their document view in real time, as shown below:
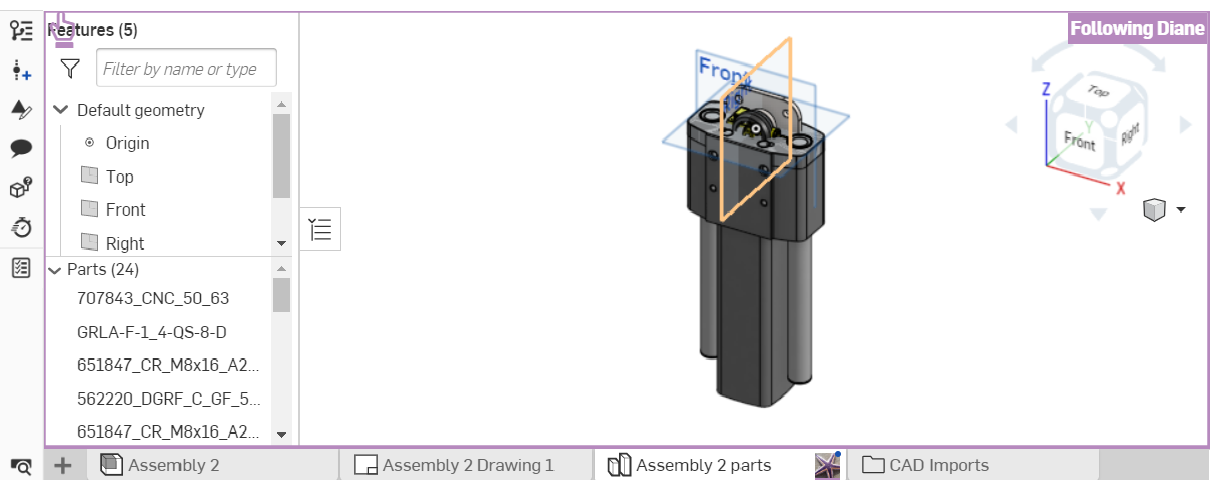
To stop following a user, re-click the Follow a user icon in the toolbar. To learn more about following a user, see Follow Mode.
- Export tab -
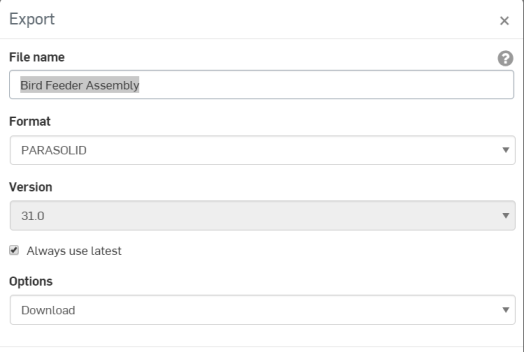
 Click the Export icon to open the Export dialog. Here, you can edit your document's name and export options.
- Export selected -
 Click the Export selected icon to export all selected geometry (note that this icon appears only when exportable geometry is already selected). An Export dialog like the one above appears; edit your file name, format, version, and export options, and click the Export button to finalize your decisions.
 - Select and export... -
 To export a specific assembly or part, click the dropdown menu arrow to the right of the Export icon and click Select and export...(note that this icon only appears if there no exportable geometry is selected). This opens an Export manipulator; click the part or assembly you want to export, then click the checkmark
  in the top right corner. This opens the same Export dialog as shown above. Choose your export settings and click the Export button to finalize your decisions.
- Export selected -
-
Print -
 Click the Print icon to open the Print setup dialog:
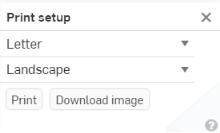
Here, you have the ability to edit your print settings. When you are ready to print, click the checkmark
 in the top right corner. This opens a print-preview of your document, with options to choose more printer-specific settings.
 -
Measure -
 Hold your cursor over the Measure icon to read how the Measure tool functions:
The above message explains how the Measure tool is automatically shown in the lower right corner of the Onshape window whenever an entity or part is selected. Click on the Measure icon to see an animated example of the tool's functionality.
-
Mass Properties -
 Click the Mass properties icon to open the Mass properties panel:
In a Part Studio, if there are no parts selected, the Mass properties panel displays the Part Studio properties. If there are parts selected, it displays only the properties for those selected parts.
Everything in Onshape has a unique URL. Many organizations post links to specific versions of Onshape objects (Part Studios, Assemblies, Drawings, etc) in work orders or ERP software, allowing you to get to the exact version you need. These links can be easily copied from and to the address bar of your browser.
Using the Share button is not available to Light users at this time as Light users are not permitted to share documents.
Selection in an Onshape document is additive. When you left click to select a piece of geometry and then click again on another piece of geometry, Onshape adds the second selection (and subsequent selections) rather than switching to it. You can clear your selection by tapping the spacebar on your keyboard (or clicking in empty space). The first example below is of the view of your document in a Part Studio with just one part selected. The second example shows how your document would look with three parts selected simultaneously, the parts all highlight in yellow when selected.
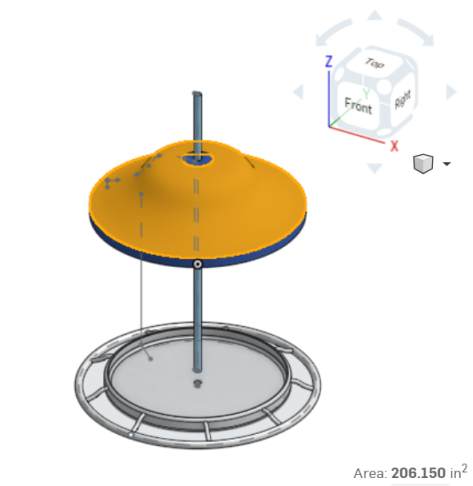
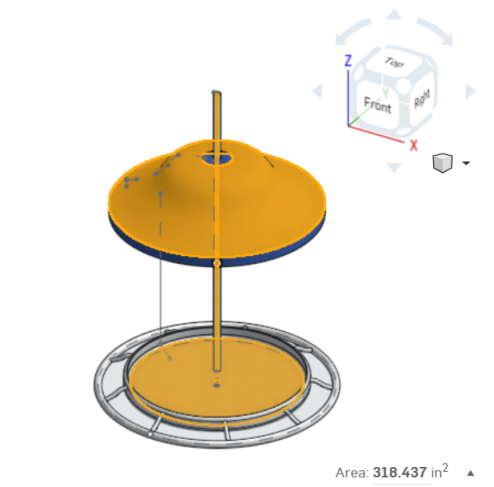
You can use the Measurement and Mass properties tools in the View only toolbar, but also, the Onshape measure tool is automatic in Part Studios and Assemblies when any entity is selected. Measurement information appears automatically in the bottom right corner of the interface when you make a selection or selections. For more information on measuring, see Measure Tool.
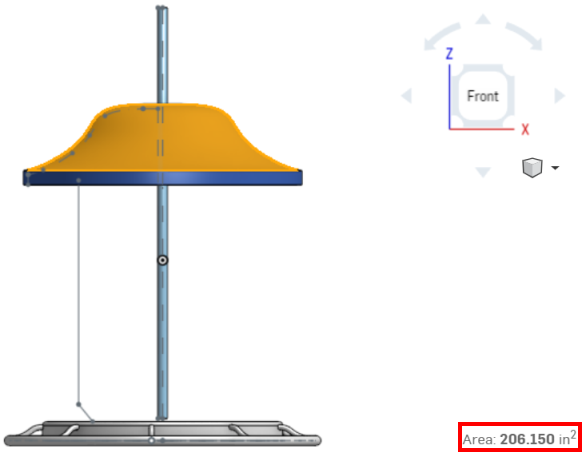
The measurement tool in a Part Studio displayed the area of the selected part.
The same is true for mass properties. Select a part or assembly and the mass properties icon appears in the bottom right corner of the interface:
![]()
Click the icon to display the properties for the selection.
For more information on mass properties, see Mass Properties Tool.
-
While inside a document, right-click on a tab to access the context menu:
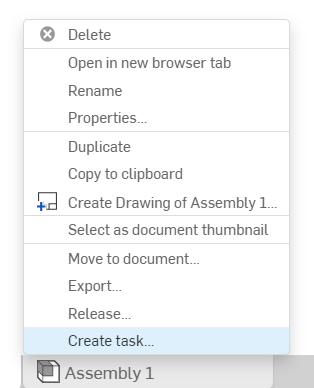
-
Click the Create task option from the menu to open the Create task dialog box:
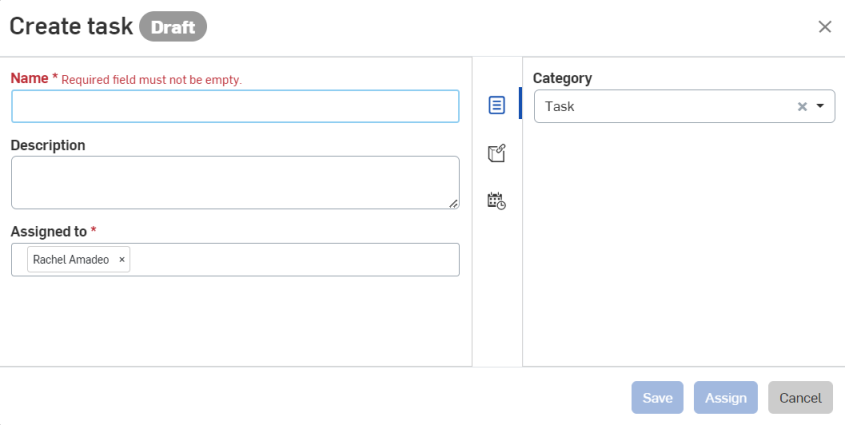
-
Specify a task name.
-
Optionally, specify a task description.
-
On the right side of the dialog, next to the Properties icon (
 ) a default category of Task is assigned. You can keep or delete this category and/or enter another.
-
Click the References icon (
 ) to associate this task with a part, Assembly, Drawing, file, Feature Studio, or application in a particular document or version of a document. When the Reference dialog opens, click the Add reference icon (
 ), search for a reference or paste a URL to a specific reference, or select from the list to find a reference in a particular document of a part, Assembly, Drawing, file, Feature Studio, or application. You can also create a version or view the version graph.
-
Click the Priority & Dates icon (
 ) and enter a due date.
-
Click Save to save the task and assign it later; click Assign to assign it to a particular user now, or click Cancel to abort the creation of the task.

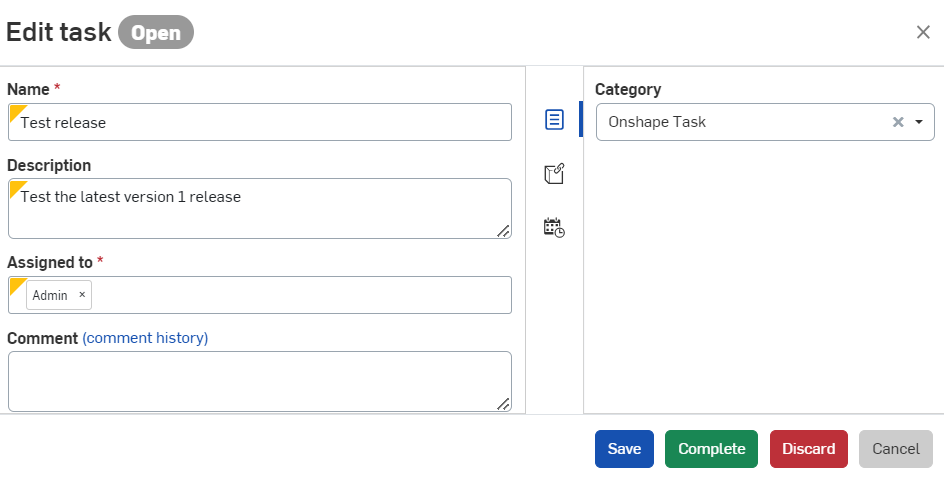
An example task in the Action items list after it is created.
To re-assign a task to a different user after creating the task, select View task to edit. Remove the user in the Assigned to field and select a different user. Click Save to re-assign the task.
You may be given permission to Comment on documents, which allows you to converse with other members of your organization directly in Onshape. To add a comment, open a document and click the Comment button
![]() in the View only toolbar to open the Comments panel, shown below:
in the View only toolbar to open the Comments panel, shown below:
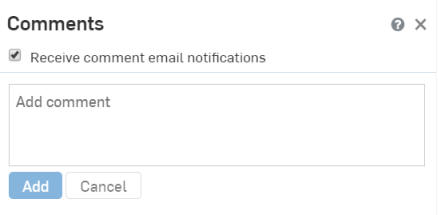
The Comment button will not appear if you do not have permission to comment.
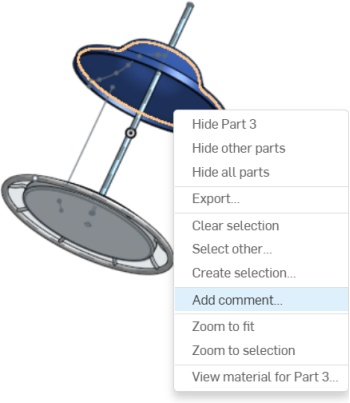
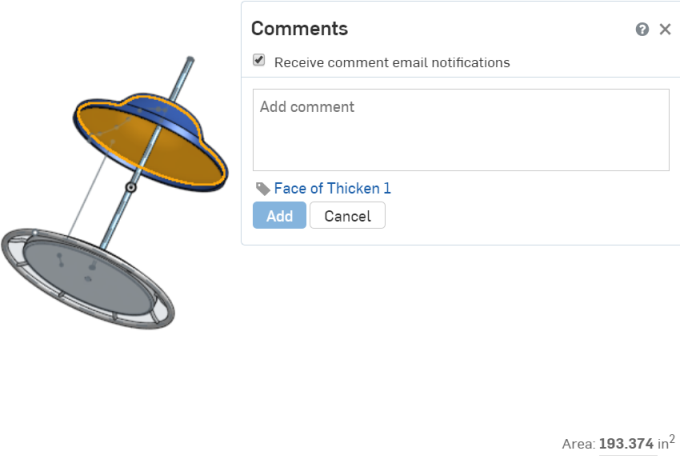
If you have permission to comment on the document, you can add comments to model geometry and features by right-clicking on it and selecting Add comment from the context menu, shown in the first example below. Selecting Add comment opens a Comments dialog with the part selected tagged to the comment, shown in the second example below. You can also mention other users in a comment simply by typing @ before their username.
For more information on commenting, see Commenting in Workspaces and Versions.
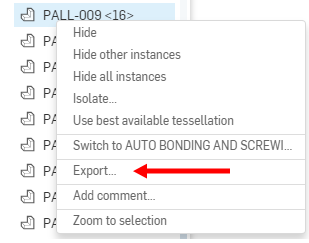
You can export parts, Assemblies and Drawings to a number of different file formats, which allows you to, for example, easily create the STEP files that your supplier needs to make your parts. If you have permission to export data, right-click on a part in the Parts list or graphics area of a Part Studio, an Assembly tab or a Drawing tab and select Export from the context menu (shown in first example below). An Export dialog will appear (second image below):
For more information on exporting data and supported file formats, see Exporting Files.
Right-click, or context, menus appear everywhere in Onshape and contain many of the commands needed to complete your tasks. Right-click to activate context menus for entities in the graphics area (such as parts, surfaces, and sketches), entities in Feature lists (such as Extrude and Revolve features), Parts lists in both Part Studios and Assemblies (individual parts, surfaces, curves, and assemblies), and entities in Drawings. Key command like Export are found in context menus, so be sure to right-click throughout the interface to access the commands needed to accomplish your goals.
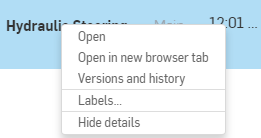
Example of a context menu generated by right-clicking on a document on the Documents page
When a user has release management responsibilities (Enterprise or Professional users only), they cannot initiate a release, but they can and may have the responsibility to observe, comment, and approve a release candidate. There is no Light user tool on the toolbar for this purpose, however, the user must access the release candidate through the notification they received, which may be:
- Email notification with a link
- Internal notification in the document
- Mobile notification with a link
These notifications will contain a View release link that when clicked takes the user directly to the release candidate dialog.
For an explanation of which global permissions can be granted to a Light user, see Global permissions for Light users.
To learn more about organizing documents using folders, you can follow the self-paced course here: Onshape Enterprise for Light Users (Onshape account required). You can also follow the technical briefing article here: Navigating Onshape for New Users (Onshape account required).