Importing Files
![]()
![]()
![]()
You can import (upload) any type of file into Onshape, either into an existing and open document, or as its own document (from the Documents page). For a list of supported files, see Supported File Formats. You can import files from your desktop and also from integrated Dropbox, Google Drive, or Microsoft OneDrive accounts. See Integrations for more information on integrating cloud apps with your Onshape account.
Once your file is imported, see Working with imported CAD for further information.
The Onshape limit for uploads is 4GB per file.
CAD files imported into Onshape from another system do not have a feature tree in Onshape; Onshape provides tools for performing parametric features on simple solids instead. For more information, see Working with Imported CAD and the blog post Making Supplier Models Work for You.
When importing data into Onshape, there are two things to think about:
- The origin of the data
- Where in Onshape you want the data to reside
Where Onshape imports your data depends upon where you initiate the import:
- To import data into a new document, import from the Documents page - Create one or many new Onshape documents with appropriate tabs from the imported file. The file name becomes the new document name. The document is listed on the Documents page, and a version is automatically created. See Importing from the Documents page.
- To import data into an existing document, import from within an open document -Create new Onshape tabs in the active document. The file name becomes the new tab name, and the file type is shown in the new tab icon. See Importing from within a document.
The origin and format of the data comes into play with how Onshape translates it:
- Data from most systems imports via a universal format like ACIS, JT, STEP, IGES, Parasolid, OBJ, or STL.
- For AutoCAD solids, the best import format is ACIS, and all 2D data is imported to DWG or DXF.
When Onshape recognizes an imported file as a CAD file (based on its file extension), Onshape automatically presents processing options. Onshape checks the zip file for supported assembly files with the same name as the zip file. When zipping assembly files for import into Onshape, you have the option to zip the files individually, or zip an entire directory.
The following CAD files can be imported as zip files:
-
SOLIDWORKS
-
Inventor
-
Pro/Engineer
-
Creo/PVZ
-
NX
-
Catia
-
Parasolid
Preparing a SOLIDWORKS Assembly file (Pack and Go)
In SOLIDWORKS:
-
Select Flatten to single folder. Zip the file and give it the exact same name as the top level assembly. The file name and top level assembly should contain no special characters.
-
If your assembly uses configurations or lightweight components, use this procedure before importing:
- Click the Assembly tab.
- Right-click the root file in the Assembly tree and select Set Lightweight to Resolved.
- Right-click the root file in the Assembly tree and select Rebuild on Save Mark > Add Mark for All Configurations.
- Save the root file.
Preparing any other supported Assembly file
- Create a .zip file of your top-level assembly.
- Make sure that the file name contains no special characters.
- The zip file must have the same name as the top-level assembly (minus the extension) and you must not rename the zip file. Ensure that the file extension is only .zip and does not include the old extension (such as .sldasm.zip or .asm.zip).
- Include all parts and subassemblies.
- Flatten the file structure so there are no folders in the .zip file.
- Ensure the top-level assembly and the .zip file have the same name.
- Import the entire .zip file into Onshape.
Onshape and SOLIDWORKS both run on the Parasolid modeling kernel. Saving a SOLIDWORKS assembly as a Parasolid (.x_t) file is another way to import into Onshape.
Preparing a Part file
No special preparation is required. Select the part file when prompted by the Onshape import dialog.
When importing a CAD file into Onshape, you have the following processing options:
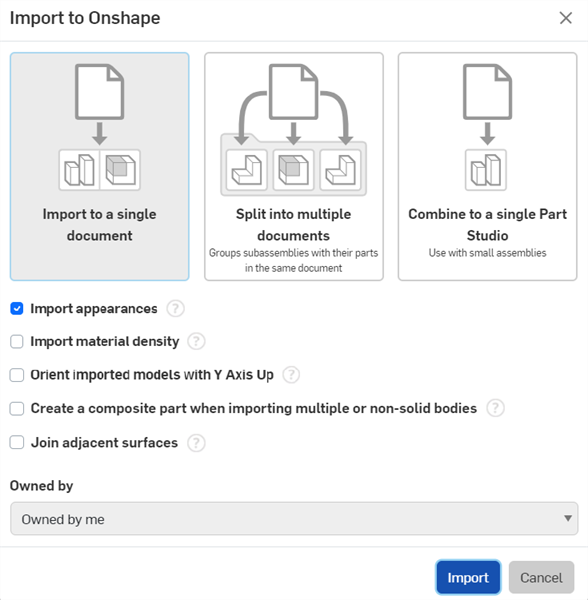
- Import to a single document - Part Studio and Assemblies are created as needed, depending on the contents of the imported file and named according to the names in the imported file.
- Split into multiple documents
- This option creates a document and subdocuments that contain related parts, assemblies, and subassemblies. If an Assembly contains more than 100 unique parts (at its level), additional documents are created with the Part Studios for those parts.
There is a checkbox option to import the file into one document per part or Assembly. Those separate documents are placed in a folder with the name of the export file. The data structure and its links are preserved. This option is not recommended when working with large assemblies since the import can create a large number of documents that can be difficult to manage.
In all cases below, the top level Assembly has the Download option only. The other linked part documents have both Update and Download options.
If the file only contains multiple parts (and no assembly), each part is put into its own document, and a top level Assembly is created that links to those parts.
If the Assembly does not have subassemblies, the Assembly is imported into a single document.
If the Assembly has subassemblies, the top level Assembly and each subassembly have their own separate documents.
- Combine to a single Part Studio - If the file is an assembly, or contains an assembly, you have the option to import it as only a Part Studio. In this case, the assembly is stored as a set of parts in a single Part Studio. There will be duplicate parts created whenever a part is instanced more than once. Be aware that this choice should only be made if the assembly is small, otherwise, performance will be affected.
Regardless of which option you choose, above, Onshape allows import of parts with faults. If a part doesn’t pass Onshape validation, it is still imported with faults. Faults are indicated in the Feature list and the Parts list by a red name, and also in the Notifications messages. Note that if some geometry in the imported part is bad, some downstream operations may fail.
If Onshape detects that a part may be fractured upon import, then all surfaces and curves that belong to the same (shattered) body are automatically turned into a single closed composite part during the import process.
Additional options:
-
Import appearances - By default, face appearances defined on models are imported. Uncheck to remove face appearances when importing.
Whether or not the Import appearances option is enabled or disabled when imported, you have the option to enabled or disable face appearances post-import. Open the Import feature from the document's Part Studio tab, and check or uncheck Import appearances:
- Import material density - Check this option to import any defined material density from some CAD systems into Onshape. In the document, the material density appears as a custom material, enabling certain properties (e.g., Mass) to be computed from imported parts. Material densities can be imported from the following file types:
SolidWorks
Solid Edge
CatiaV5
Pro/Engineer
Creo
NX
- Orient imported models with Y Axis Up
- Onshape's up axis
is the Z axis. When unchecked, the models are imported with the Z axis up. For CAD files from systems where the up axis is the Y axis, check this box to import the models with the Y axis up.
Onshape supports the Y Axis Up option for all systems/files except Autodesk (.ipt) and CATIA (.catpart).
The up axis can also be changed post import. Open the Import feature from the document's Part Studio and check Source is 'Y Axis Up'.
- Create a composite part when importing multiple or non-solid bodies -
If checked, a composite part is manually created when importing neutral CAD file (.step or .x_t, for example) consisting of multiple non-solid bodies. All parts in the imported Part Studio become a single closed composite part, regardless of whether or not the parts belong to the same body. Not available when Combine to a single Part Studio is selected.
The composite part can also be created post-import. Open the Import feature from the Part Studio and check Create composite.
- Join adjacent surfaces - When this option is selected, Onshape will attempt to join adjacent surfaces into Part(s).
- IGES postprocessing - (IGES imports only) When checked, this option repairs issues with linear edge translation. Note that checking this option can increase processing time by 50%.
The automatic processing happens only for files that Onshape can translate. All other files are simply imported into a tab.
- To upload a file:
- Click the Create button.
To import from your hard drive, click Import files (
 ). To import from an integrated application, click Import from (
 ) .
) .
If you have already integrated your applications, click on your cloud-source. If you have not yet integrated a cloud-source, click Connect service...; a wizard will lead you through the integration process. See Integrations for more information.
- Select a file (or files) to import.
If you belong to a company plan, Onshape prompts for the desired owner of the document: select yourself or the company.
- To drag and drop a file, drag it to the Documents list, and drop it when the blue import outline appears.
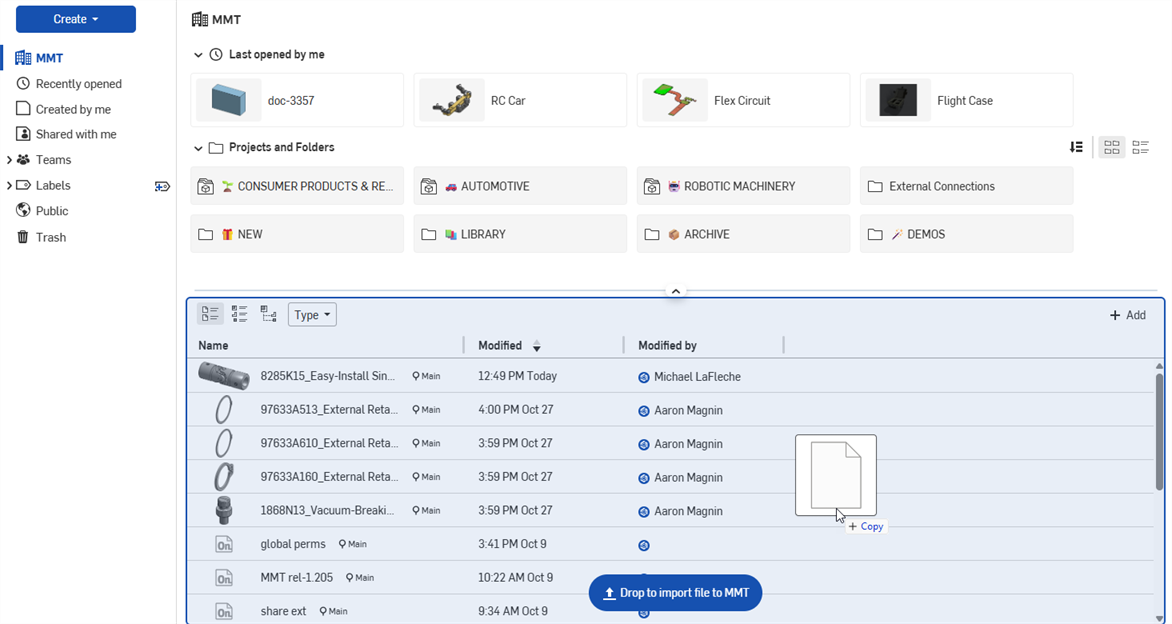
- Select your desired processing options. For information on each option, see the Processing CAD files section.

- Click the Import button to initiate the import.
The automatic processing happens only for files that Onshape has the ability to translate. All other files are simply imported into a tab.
- Now you have the ability to:
- Click on the file name in the import list to immediately view the file in Onshape, through the document that was automatically created for it.
- Upon hovering, click the X on the right side of the Import list to close it and return to the Documents page. The document just created is listed on the Documents page.
-
In an open document, at the bottom of the page, click the Insert new tab icon
(
 ) and select Import
  .
. - The file explorer opens on your local machine; select a file to import.
-
In the Import dialog make your import type selection. For information on each option, see the Processing CAD files section.
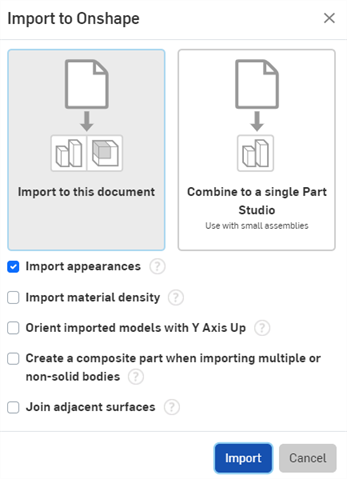
- Click the Import button to initiate the import.
The automatic processing happens only for files that Onshape has the ability to translate. All other files are simply imported into a tab.
The imported file is now in the open Onshape document, as its own tab (listed across the bottom of the document page).
In addition to being able to write directly to and from the Onshape format, you also have the ability to write to and from any of the Onshape supported formats. For supported formats, see Supported File Formats.
Files that do not contain any CAD data can also be imported into Onshape: PDFs, image files, literally any kind of file. Onshape handles them the same way as CAD files: when you import from the Documents page, the imported file is placed in a new document; when you import from within a document, the imported file is placed in a tab within the document. When there is no data to display, Onshape displayed information about the file, such as:
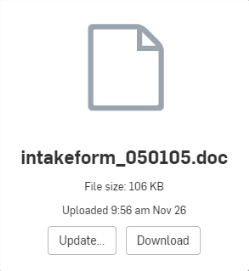
If the file changes after you import into Onshape, use the Update button to update the file. If you wish to download the file, use the Download button.
Use the Notifications button ![]() to view the import queue and see the import progress, including any errors or warnings. Click the retry link to restart a failed import.
to view the import queue and see the import progress, including any errors or warnings. Click the retry link to restart a failed import.
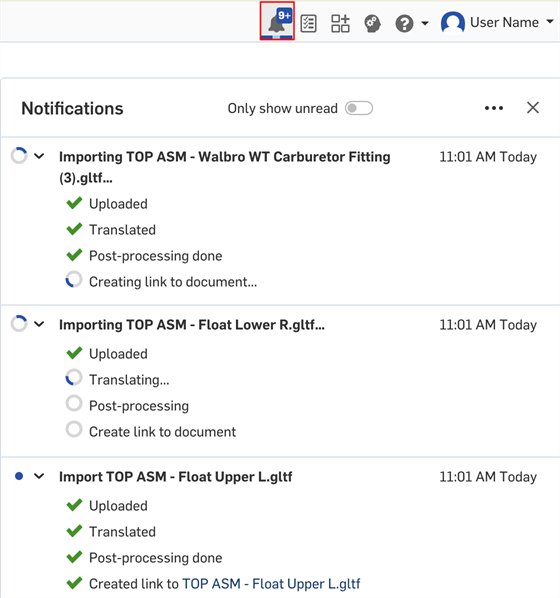
Notifications import queue
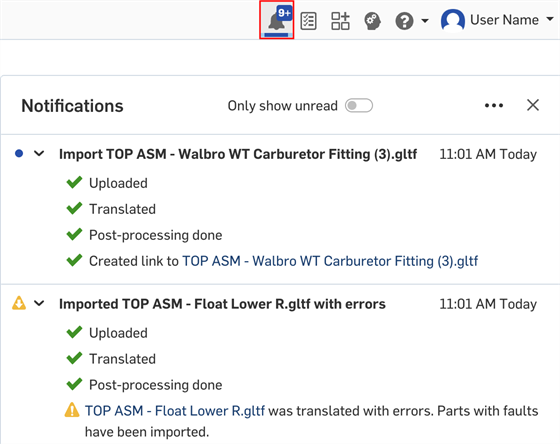
Successful import with warnings
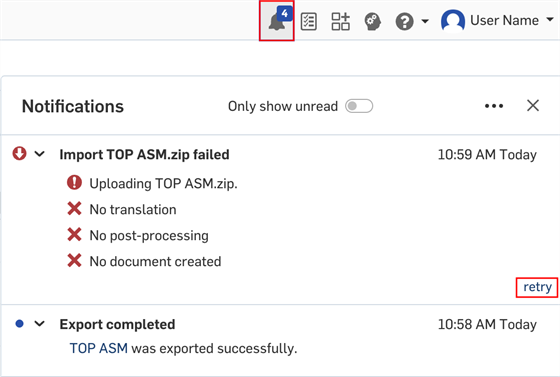
Import with errors
You have the ability to import (upload) any type of file into Onshape, either into an existing and open document, or as its own document (from the Documents page). For a list of supported files, see Supported File Formats.
Onshape mobile currently supports importing files from cloud-based sources only. The cloud-based storage app that you want to use must be installed on your mobile device and you must be signed into it, in order for it to incorporate with Onshape.
How Onshape handles your import depends upon where you initiate the import: from the Documents page or within a document.
Creates a new Onshape document and appropriate tabs; the document is given the same name as the file you are importing, as are the tabs.
Steps:
- Tap the import button in the lower right corner of the Documents Page.

- Select where you want to import the file from.
Onshape supports importing files from cloud-based sources such as iCloud and Dropbox, as well as your device camera and photo library.
- The imported file will appear as a document in the Documents page. Specify the privacy of the document and, if you are importing a CAD file, specify import settings. For more info see Import settings below.
- The imported file appears as a new document in your Documents list. The name of the new document matches that of the file you imported.
If you do not see your preferred cloud-based source, tap More and check the settings that follow.
Depending from where you would like to import a file, you may have to manually enable the ability to import from your device storage in your device settings.
The Import dialog does not refresh files. You must go to the cloud storage provider app to see an updated list of files to import.
Creates new Onshape tabs in the active document; the tab names reflect the naming of the file.
Steps:
- In a document, open the Create Tab menu and select "Import...".
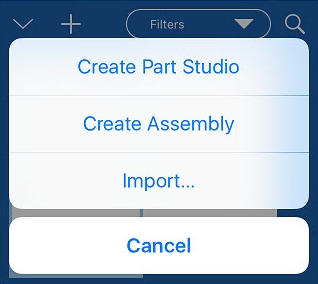
- Select where you want to import the file from: Import Files, Import from Camera, Import from Photo Library.
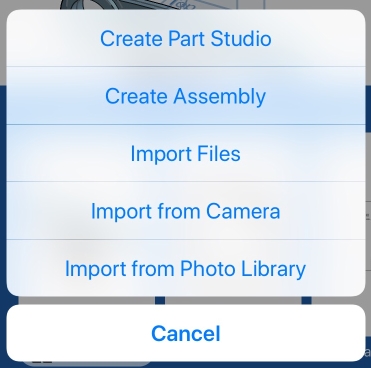
Import Files allows you to import from your device and cloud-based sources like iCloud and Dropbox.
If you do not see your preferred cloud-based source, tap More and check the settings that follow.
- The imported file will appear as a tab within your document. Specify the privacy of the document and, if you are importing a CAD file, specify import settings. For more info see Import settings below.
- The imported file appears as the appropriate tab(s) in your document. The name of the new tab (or tabs) matches that of the file you imported.
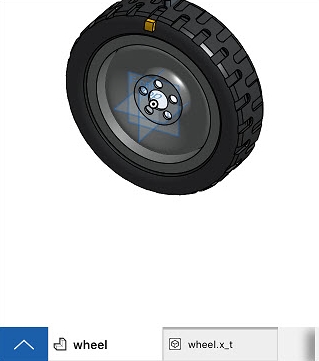
If you import a CAD file and it is successfully translated into Onshape format, a second tab is created for it.
Every file imported into Onshape becomes its own tab, named with the original file name. If the file is a CAD file, the appropriate Part Studio and Assembly tabs are also created.
Tips when importing a SOLIDWORKS Pack and Go file
In SOLIDWORKS:
-
Select Flatten to single folder. Zip the file and give it the exact same name as the top level assembly. The file name and top level assembly should contain no special characters.
- If your assembly uses configurations or lightweight components, use this procedure before importing:
- Click the Assembly tab.
- Right-click the root file in the Assembly tree and select Set Lightweight to Resolved.
- Right-click the root file in the Assembly tree and select Rebuild on Save Mark > Add Mark for All Configurations.
- Save the root file.
Importing a CAD file
When importing a CAD file, you have the following processing options:
- Imported models are in 'Y Axis Up' coordinates - If the file was created in a system that orients with Y Axis Up, the models would by default be brought into Onshape (a Z Axis Up system) with a flipped coordinate system. Toggle this switch to reorient the axis system to match Onshape and display the model with the coordinates you expect.
- Import file to Part Studios only (flatten) - If the file is an assembly, or contains an assembly, you have the option to import it as only a Part Studio, by toggling on the flatten option. In this case, the assembly is flattened to a set of parts in a Part Studio. There will be duplicate parts created whenever a part is instanced more than once.
- Allow import of parts with faults - If a part doesn't pass Onshape validation, it can still be imported with faults. The fault is indicated in the Feature list and the Parts list by a red name, and also in the Notifications messages. The presence of this option does not indicate that a fault has been detected.
- Create a composite part when importing multiple or non-solid bodies -
When this option is checked, all parts in the imported Part Studio become a single closed composite part, regardless of whether or not the parts belong to the same body. The bodies are combined to form the composite (one single part).
If you miss this option during the import process, after import you can double-click the Import feature in the Part Studio and select Create composite to create the composite part at that time.
-
Units - When importing .stl and .obj files, you can select the units you wish use upon import: centimeter, foot, inch, meter, millimeter, or yard.
By toggling on 'Allow import of parts with faults', the Import feature will show an error in the Features list, but you will be allowed to import and reference the bad geometry. Because the geometry is bad, some downstream operations may fail.
The automatic processing happens only for files that Onshape can translate. All other files are simply imported into a tab.
When Onshape recognizes an imported file as a CAD file (based on its file extension), Onshape automatically presents processing options. You are also able to choose to export to another format from a context menu for an entire Part Studio (including hidden parts), or for a particular part selected from the parts list. Onshape checks a zip file for supported assembly files with the same name as the zip file. When zipping assembly files for import into Onshape, you have the option to zip the files individually, or zip an entire directory. Keep in mind that when zipping an entire directory, the zip file must have the same name as the assembly (minus the extension) and you must not rename the zip file.
For more information, see Exporting Files.
You have the ability to import (upload) any type of file into Onshape, either into an existing and open document, or as its own document (from the Documents page). For a list of supported files, see Supported File Formats.
Onshape mobile currently supports importing files from cloud-based sources only. The cloud-based storage app that you want to use must be installed on your mobile device and you must be signed into it, in order for it to incorporate with Onshape.
How Onshape handles your import depends upon where you initiate the import: from the Documents page or within a document.
Creates a new Onshape document and appropriate tabs; the document is given the same name as the file you are importing, as are the tabs.
Steps:
- Tap the Plus sign button in the lower right corner of the Documents Page, and then the Import button:


- Select where you want to import the file from.
Onshape supports importing files form cloud-based sources such as DropBox, Google Drive, and One Note (any provider that implements Storage Access Framework is available).
- Select how you wish to import the file, tap the down arrow below the image, to the right of
Import to a single document:
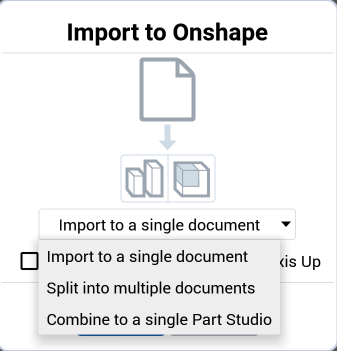
Import to a single document - Part Studio and Assemblies are created as needed, depending on the contents of the imported file and named according to the names in the imported file.
Split into multiple documents -If the file is an assembly, this option creates a folder with the file name that contains a set of documents. Each document contains a subassembly as well as the top-level parts belonging to that subassembly. Each part in the document is given its own Part Studio, which allows you to easily edit the parts in the assembly. If an assembly contains more than 100 unique parts (at its level), additional documents will be created with the Part Studios for those parts. Each subassembly is linked to the document containing the top-level assembly. This import method is recommended in order to achieve the best performance when working with large assemblies.
If the file only contains parts (and no assembly), each part will be put in its own Part Studio in the same document, and a top level assembly will be created containing those parts.
Optionally, there is a checkbox for if you would rather have the import create one document for each part and assembly. This option is not recommended when working with large assemblies since the import can create a large number of documents that can be difficult to manage.
Combine to a single Part Studio - If the file is an assembly, or contains an assembly, you have the option to import it as only a Part Studio. In this case, the assembly is stored as a set of parts in a single Part Studio. There will be duplicate parts created whenever a part is instanced more than once. Be aware that this choice should be made only if the assembly is small, otherwise, performance will be affected.
- Select whether to Orient imported models with Y Axis Up - If the file was created in a system that orients with Y Axis Up, the models would by default be brought into Onshape (a Z Axis Up system) with a flipped coordinate system. Toggle this switch to reorient the axis system to match Onshape and display the model with the coordinates you expect.
- The imported file appears as a new document in your Documents list. The name of the new document matches that of the file you imported.
Depending from where you would like to import a file, you may have to manually enable the ability to import from your device storage in your device settings.
The Import dialog does not refresh files. You must go to the cloud storage provider app to see an updated list of files to import.
Creates new Onshape tabs in the active document; the tab names reflect the naming of the file.
Steps:
- In a document, tap the icon at the bottom of the screen.

- Tap the plus sign icon to open the Create Tab menu and select Import.
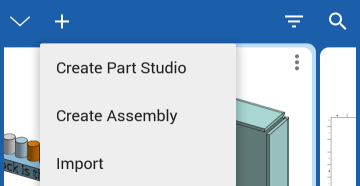
-
Select where you want to import the file from. Onshape supports importing files from cloud-based sources such as Google Drive as well as files downloaded to your device.
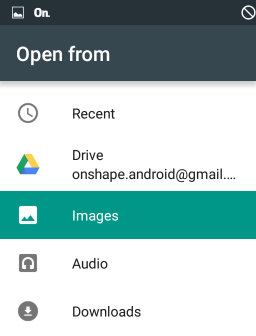
- Select the file to import.
- A folder is created inside the document, CAD Imports. The imported file has a tab in the folder. The imported data appears as the appropriate tab(s) in your document. The name of the new tab (or tabs) matches that of the file you imported.

If you import a CAD file and it is successfully translated into Onshape format, a second tab is created for it.
If you import a non-CAD file like a PDF, JPEG, or another type of binary content, if the source file changes, use the Update command on the tab context menu to update the file in the document.
Every file imported into Onshape becomes its own tab, named with the original file name. If the file is a CAD file, the appropriate Part Studio and Assembly tabs are also created.
Tips when importing a SOLIDWORKS Pack and Go file
In SOLIDWORKS:
-
Select Flatten to single folder. Zip the file and give it the exact same name as the top level assembly. The file name and top level assembly should contain no special characters.
- If your assembly uses configurations or lightweight components, use this procedure before importing:
- Click the Assembly tab.
- Right-click the root file in the Assembly tree and select Set Lightweight to Resolved.
- Right-click the root file in the Assembly tree and select Rebuild on Save Mark > Add Mark for All Configurations.
- Save the root file.
Importing a CAD file
When importing a CAD file, you have the following processing options:
- Imported models are in 'Y Axis Up' coordinates - If the file was created in a system that orients with Y Axis Up, the models would by default be brought into Onshape (a Z Axis Up system) with a flipped coordinate system. Toggle this switch to reorient the axis system to match Onshape and display the model with the coordinates you expect.
- Import file to Part Studios only (flatten) - If the file is an assembly, or contains an assembly, you have the option to import it as only a Part Studio, by toggling on the flatten option. In this case, the assembly is flattened to a set of parts in a Part Studio. There will be duplicate parts created whenever a part is instanced more than once.
- Allow import of parts with faults - If a part doesn't pass Onshape validation, it can still be imported with faults. The fault is indicated in the Feature list and the Parts list by a red name, and also in the Notifications messages. The presence of this option does not indicate that a fault has been detected.
- Create a composite part when importing multiple or non-solid bodies -
When this option is checked, all parts in the imported Part Studio become a single closed composite part, regardless of whether or not the parts belong to the same body. The bodies are combined to form the composite (one single part).
If you miss this option during the import process, after import you can double-click the Import feature in the Part Studio and select Create composite to create the composite part at that time.
By toggling on 'Allow import of parts with faults', the Import feature will show an error in the Features list, but you will be allowed to import and reference the bad geometry. Because the geometry is bad, some downstream operations may fail.
The automatic processing happens only for files that Onshape can translate. All other files are simply imported into a tab.
When Onshape recognizes an imported file as a CAD file (based on its file extension), Onshape automatically presents processing options. You are also able to choose to export to another format from a context menu for an entire Part Studio (including hidden parts), or for a particular part selected from the parts list. Onshape checks a zip file for supported assembly files with the same name as the zip file. When zipping assembly files for import into Onshape, you have the option to zip the files individually, or zip an entire directory. Keep in mind that when zipping an entire directory, the zip file must have the same name as the assembly (minus the extension) and you must not rename the zip file.
For more information, see Exporting Files.
For additional Learning center resources, follow the technical briefing articles here: Importing Data (Onshape account required) and Bulk Import Process (Onshape account required).