Document Tabs
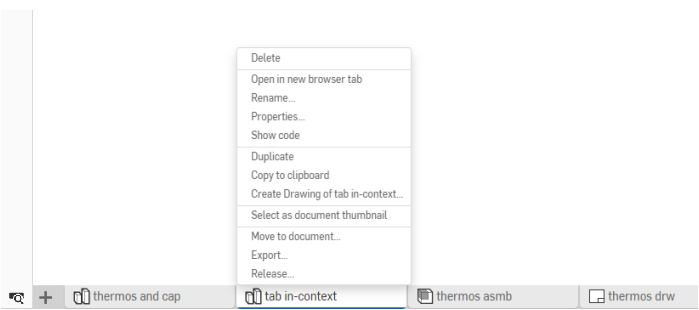
As explained in Documents, Part Studios, Assemblies, and non-native files imported into Onshape documents are represented in tabs in the user interface. Click a tab to select it and make it active. Only one tab is active in one browser tab at a time, but you can open any tab in a new browser tab to have multiple active tabs open. In addition to working in a tab, you can perform actions on tabs. Right-click on a tab to access the context menu for that tab.
Creating more tabs in a document
Click the Insert new tab icon
![]() in the bottom left of the interface to create a new Onshape tab:
in the bottom left of the interface to create a new Onshape tab:
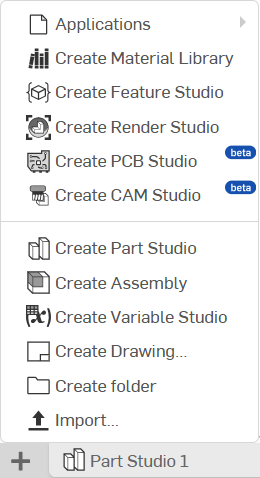
- Add application lets you select an application for use in the document; one that you have already added through the App Store
- Create Material library creates a new Material library for use in Onshape
- Create Feature Studio creates a new empty Feature Studio
- Create Render Studio creates a new empty Render Studio tab
- Create PCB Studio creates a new empty PCB Studio tab
- Create CAM Studio creates a new empty CAM Studio tab
- Create Part Studio creates a new empty Part Studio tab
- Create Assembly creates a new empty Assembly tab
- Create Variable Studio creates a new empty Variable Studio tab
- Create Drawing creates a new empty Drawing tab
- Create folder creates a folder into which you can move tabs in order to organize them, see Organizing tabs
- Import automatically creates a new tab for that file, see Importing Files
Working with tabs and the Tab manager
When working with a lot of data, the number of tabs you start amassing may get a bit unwieldy. Onshape provides a Tab manager to help you organize and find tabs more easily.
To the left of the Insert new icon
![]() on the
Document panel
is the Toggle tab manager icon
on the
Document panel
is the Toggle tab manager icon
![]() . The Tab manager opens a panel on the left side of the Onshape window (moving to the right any Assembly list or Feature list, depending on the type of tab you have open at the time):
. The Tab manager opens a panel on the left side of the Onshape window (moving to the right any Assembly list or Feature list, depending on the type of tab you have open at the time):
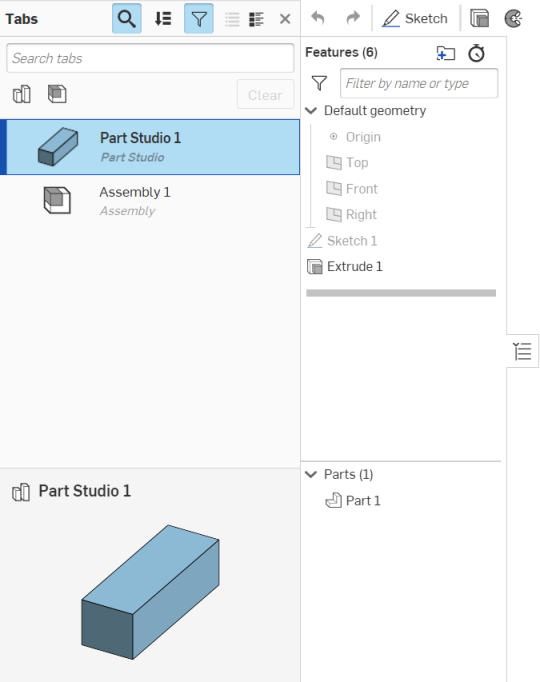
The tab manager lists all of the tabs you have in the document.
Anatomy of the tab manager
The tab manager has icons at the top to filter the tabs by. The resulting list of tabs can then be ordered according to Tab order in the document, alphabetical by name, or by type. There is a search box at the top to enter the name of the tab you are looking for:
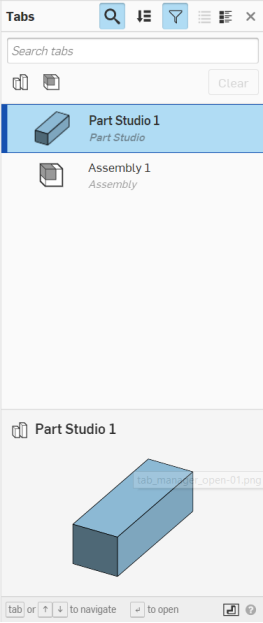
Use the icons at the top of the tab manager to control the search to whatever is selected (remember that selection is additive):
-
Search tabs field
 - Toggle the Search field open and closed.
-
Tab order selection
 - Select the order in which to list the tab names: A-Z or Z-A, or by type of tab.
-
Display filter icons
 - Toggle the tab type icons visible or not visible: Part Studio, Assembly, Drawing, File (only icons for the tab types found in the document are displayed).
-
List view
 - Display tab names only.
-
Detail view
 - Display tab names and details.
At the bottom of the tab manager is a thumbnail view of the currently selected tab.
There are many ways to use the tab manager:
- Use Ctrl+spacebar to view previously opened tabs' thumbnails. Keep Ctrl depressed and repeatedly press spacebar to proceed through the previously opened tabs. Release both keys to open the tab whose thumbnail is currently active.
- Click and drag tabs in the tab manager list to reorder them in the document.
Keep in mind that tab order is shared among all users in a workspace, and is persistent. For example, if User-1 changes the order of the tabs, User-2 will also see the changes when the workspace is open.
-
Click on the name of a tab to navigate to that tab and make it active.
-
Active tabs are indicated by a blue border and blue highlight.
- The active tab and scroll state is not shared, nor persistent. Each user collaborating on a document has their own active tab and their own tab scroll state.
- When a workspace is opened, the active tab is the previously active tab. (When a workspace is opened for the first time, the active tab is the first tab in the series.)
- A newly created tab is placed directly to the right of the currently active tab and is made active immediately.
- When scrolling through tabs, the active tab is always kept in view.
- You can use Ctrl+click to select more than one tab in the tab manager.
Hover over a tab in the tab bar to see a thumbnail of the contents.
Organizing tabs
You can move tabs from one document to another (new or existing) through the Move to document command on the context menu. This will help optimize the performance of large documents. If moving to a new document, the document is created during this operation.
Whatever is moved creates a link between the moved entity and the original document. Keep in mind that the moved entity is removed from the original document entirely.
When moving an Assembly tab, the Assembly tab and the Part Studios from which the part instances are referenced will all move to the new document, unless you select to not move the Part Studios through this dialog:
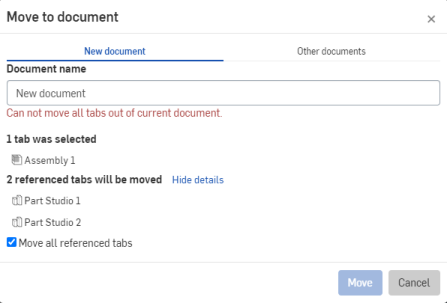
The Move action is prevented if it would result in a document with no tabs. In this case, the message in red (above) is displayed. You can still move the Assembly tab to another document, and leave the Part Studios in this document by unchecking the Move all referenced tabs checkbox.
Moving a tab to a shared document requires Edit and Link permissions, and moving a tab from a shared folder requires Edit and Copy permissions. (Shared folders are those owned by a company that you are not part of, but are shared into.)
If you have a document with a Part Studio and a drawing, and you want to share just the drawing with a vendor or other third-party, you can move the model out of the document, leaving just the drawing:
- Create a drawing of your model.
- Create a version of the model.
- Right-click on the drawing tab and select 'Change to version' so the drawing now references a particular version (instead of the workspace).
Now that the drawing is linked to a version of the model, you can move the model (Part Studio or Assembly) to another document without moving the drawing (if you wish) or move the drawing to another document and it will not include referenced tabs. This leaves you with a document with just the drawing, which you can safely share with a third-party or other user. Keep in mind that the drawing is now versioned and will not indicate if changes are made to the model. You can, of course, right-click on the drawing (in the new document) and select Update linked document and select a newer version of the document to which the drawing is linked.
To derive a drawing into another document on it's own, while keeping a linked copy in the master file (so the drawing is in two places):
- Right-click the Drawing tab and select Duplicate. Now you have two drawings.
- Move one drawing out of the document to the document you want to share with someone. Both drawings are linked to the original document. However, the duplicate drawing will not be updated if changes are made to the original drawing - you can update the duplicate (and moved) drawing to a newer version of the linked document, if desired (as described above).
Organize tabs with folders on the Tab bar. Use the
![]() menu to Create a folder:
menu to Create a folder:
- Select Create folder from the menu.
- A new folder tab appears on the Tab manager, with the name field active.
- Supply a name for the folder.
- Drag and drop tabs onto the folder to place them in that folder.
When a folder is active, the Tab bar displays only the tabs in that folder, all other tabs are represented by the All tabs icon
![]() :
:

Select the All tabs icon
![]() to display all tabs again.
to display all tabs again.
You can nest folders: drag and drop a folder onto another folder.
Use the context menu on any folder to act on that folder, including:
- Rename - Edit the folder name
- Move to parent folder - Move the folder and its contents to the parent folder, if present (tabs and folders within the folder remain within)
- Unpack folder - Move any tabs or folders within the folder to the parent folder and delete the folder
- Move to document - Move the folder and its contents to another existing or newly created document; tabs and folders within the folder remain within it
These actions are also available through the Tab manager. For more information on folders, see Documents Page.
Depending on whether you are in a version or in a workspace, the actions available to you for any particular tab are different.
Versions: Using the context menu of a tab, you have the ability to:
- Open the tab in a new browser tab
- Access the Properties for the tab, including Description
- Display the FeatureScript code for Part Studios only (view only)
- Export the tab
- Create a task for the tab, assigning it to another user (or yourself), referencing the tab, and specifying a due date. All users assigned to a task are notified.
Workspaces: Using the context menu of a tab, you have the ability to:
- Open the tab in a new browser tab
- Rename the tab
- Access the Properties for the tab, including Description
- Display the FeatureScript code for that tab (for Part Studios only, in view mode)
- Create a duplicate (copy) of the tab, these tabs are not associative in any way
-
Copy the tab to the clipboard, and then paste it into another document using the
 menu
menu
On an iOS mobile device, tap the tab you want to copy and then tap Copy to clipboard from the context menu.
- Select (this tab) as the document thumbnail
- Move the tab to another document (see above)
- Export the tab
- Delete the tab, even if it is the currently active tab
- Create a task for the tab, assigning it to another user (or yourself), referencing the tab, and specifying a due date. All users assigned to a task are notified.
Right-click on a tab to access a context menu:
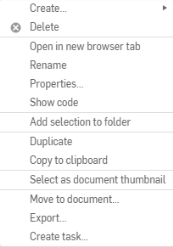
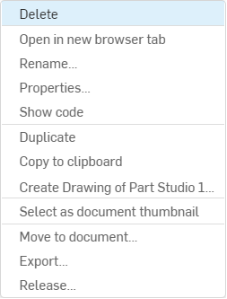
To delete a tab, simply right-click on the tab you wish to delete, and click Delete:
If deleting the tab might cause conflicts, you will see this warning:
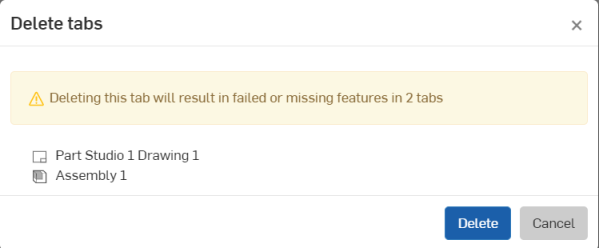
Click Delete to finalize the deletion, or click Cancel to close the dialog without deleting any tabs.
If the tab is able to be deleted without causing any conflicts it will simply be deleted, with no warning, upon clicking Delete.
Click
![]() to open the Tab manager. The toolbar and Feature list (or Parts list in an Assembly) move to the right and the
Tab manager
opens.
to open the Tab manager. The toolbar and Feature list (or Parts list in an Assembly) move to the right and the
Tab manager
opens.
When you are in a version with released objects, the Tab manager has a Released filter
![]() as well:
as well:
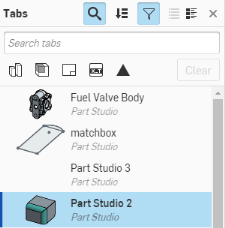
You can:
- Enter a partial or complete tab name to find an existing tab. (Onshape employs a type-ahead feature for your convenience.)
-
Use
 to view the tabs as a list, as shown above, with the tab icon indicating the type of tab and a thumbnail preview.
-
Use
 to view the tabs in detail view, shown below, with each line item including a thumbnail preview.
- Use the tab type icons to filter by that tab type. Use the Clear button to turn filters off. (Filters appear when their specific entity is present in the document workspace or version (Part Studio, Assemblies, Drawings, and Releases, for example.)
With the tab filters off, folders become visible and actionable through a context menu, specifically, you can:
- On a folder:
- Rename - Edit the folder name
- Add selected to a folder - Create a new folder immediately and add the selection to it
- New folder - Create a new folder inside the selected folder
- Unpack folder - Move the contents of the selected folder to the parent and delete the folder
- On any item in the list:
- Add selection to folder - Create a new folder immediately and add the selection to it
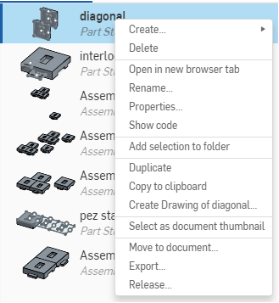
- On a folder:
- Use the tab type icons to filter by that tab type. Use the Clear button to turn filters off. (Filters appear when their specific entity is present in the document workspace or version (Part Studio, Assemblies, Drawings, and Releases, for example.)
- Click on a tab in the list to open it.
- Use Ctrl+click to select multiple tabs in the list, then use the context menu to:
- Move those tabs to another document
- Add selected tabs to a folder (creating a folder if no folder exists)
- Use Ctrl+click to select multiple items in the list, then use the context menu to act on those items, including delete multiple tabs.