以輕度使用者的身份開始使用
![]()
![]()
![]()
輕度使用者的帳戶通常是給內部供應鏈的成員、主管或執行長,或甚至是外部供應商或客戶來使用。所有的 Onshape 使用者都可存取單一來源的 enterprise 資料。但是在某些情況下,使用者並不需要使用所有的 CAD 功能,而僅需存取、檢視與匯出資料。為了滿足不同使用者的需要,Onshape 提供兩種類型的使用者帳戶:
- 完全使用者 - 完全使用者可存取 Onshape 的所有功能來建立、編輯與共享資料。完全使用者的帳戶通常是給工程師、設計人員或 CAD 專業人員使用。
- 輕度使用者 - 輕度使用者可對已與其共享的 enterprise 資料檢視、評論與匯出。
當您以輕度使用者的身分登入至 Onshape 時,會看到稱為「唯檢視工具列」的 Onshape 使用者介面精簡版。許多功能與工具列已遭移除,僅留下尋找、開啟、檢視、評論與匯出資料所需的指令。您可以從唯檢視工具列中輕鬆地存取這些指令。
除了工具列之外,您也可以在草圖或零件上按右鍵來存取可用的指令功能表,像是 [顯示尺寸] 與其他的指令。在特徵清單中的特徵上連按兩下來查看用來建立特徵的設定與選項。
Onshape 文件是受版本控管的容器,可包含許多類型的資料。一個單一文件可以包含零件、組合件、工程圖,甚至是上傳的檔案 (像是 PDF、圖片或影片)。每個組織可用不同的方式來使用文件,但了解文件的架構方式與如何找出不同類型的資訊有助您更有效率地操作。
分頁
每個 Onshape 文件可能會包含不同類型的資訊,會分別出現在視窗底部的各種分頁中:

不同分頁資料類型的範例
移動滑鼠在分頁上暫留以查看內容的縮圖。在分頁上按一下來存取分頁內容。您也可以按一下底部左側的「分頁管理員」按鈕 ![]() 來查看分頁的直式清單,以及搜尋並篩選找出特定類型的資料或實例:
來查看分頁的直式清單,以及搜尋並篩選找出特定類型的資料或實例:
- 選擇分頁類型篩選器來根據分頁類型進行篩選。
- 輸入您想用的搜尋準則。
- 檢視搜尋的結果。
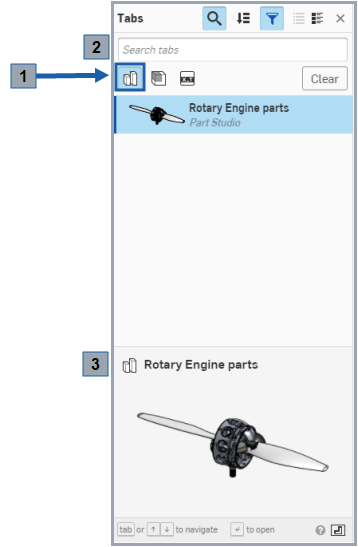
在「分頁管理員」中選取了 Part Studio 篩選器
分頁可歸至 9 個類別:
- Part Studio -

Onshape 中的零件是在 Part Studio 分頁內建立的。取決於設計人員建構零件的方式,一個 Part Studio 可以包含一或多個零件。
- 工程圖 -

如果您在其他系統中使用工程圖檔案,則不會對工程圖分頁感到陌生。Onshape 工程圖可以有多張圖頁,並可參考多個零件或組合件。
- Feature Studio -

Feature Studio 是一個包含程式設計語言 FeatureScript 的分頁,可用來在 Onshape 中定義自己的自訂特徵 (詳細資訊請參考 Feature Studios)。
- 應用程式 -

來自 Onshape 應用程式商店的協力廠商應用程式同時會在 Onshape 文件中以分頁出現。這可能與 Onshape 的使用較不相關,但當您看到時可以理解仍是相當重要的。
- 圖片 -

上傳至 Onshape 的圖片會儲存在分頁中,且會同時顯示在分頁與分頁縮圖上。
- Zip -

Zip 檔案是經壓縮檔案的匯入,以供在 Onshape 中與其他專案資料一起存放資訊。詳細資訊請參考匯入檔案。
- 材料資源庫 -

使用者可以上傳自己公司的材料資源庫來在 Onshape 中使用,詳細資訊請參考自訂材料。
- PDFs -

PDFs 會產生預覽,且可以直接在 Onshape 文件中檢視。
- 組合件 - (包括 BOM)

組合件是在組合件分頁中所建立,與您在其他系統中慣用的組合件檔案類似。一個主要的不同是,Onshape 的組合件同時會包含材料表 (BOM)。
- X_T -

X-T 是來自其他系統的轉譯或非轉譯 CAD 資料。詳細資訊請參考匯入檔案。
關於使用分頁管理員的詳細資訊,請參考文件分頁。
Onshape 輕度使用者介面中包括下列的功能 (注意到項目數量與上方圖片中的數量一致):
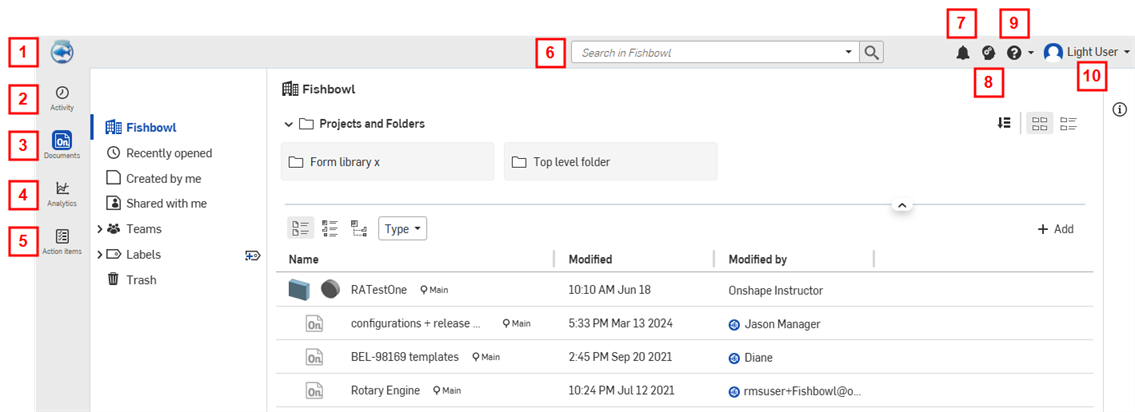
- 重新整理文件圖示 - 您公司的圖示是位在 Onshape 首頁上方的最左角落處,並會顯示文件頁面。您可以在 Onshape 中的各處點按這個圖示。
- 活動分頁 - 這個分頁是位在輕度使用者首頁的左側邊欄中,可讓您巡覽「活動」資料流 (您與同事在 Onshape 中所執行動作的清單)。
- 文件分頁 - 文件分頁是位在輕度使用者首頁的左側邊欄中,可讓您巡覽文件的頁面 (與點按您公司標誌的作用相同)。
- 分析分頁 - 分析分頁可讓您瀏覽「分析」頁面以查看關於文件、使用者與使用量的報告。 關於「分析」的詳細資訊,請參考分析。
- 行動項目分頁 -「行動項目」分頁位在輕度使用者首頁的左側邊欄中,可讓您直接巡覽您「行動項目」(工作與發行管理的指派) 的頁面。
- 搜尋列 - 文件頁面中的搜尋列可讓您在所有的文件中搜尋。當選取了篩選器時, (在最左側:「最近開啟的」、「本人所建立」以及「與本人共享」),搜尋會僅在該篩選條件內執行。
- 通知按鈕 -「通知」按鈕位在輕度使用者首頁上方的搜尋列右側,可讓您檢視與文件評論、檔案匯入與匯出狀態、工作區狀態等相關的通知。
- Learning Center 按鈕 - Onshape 的學習中心按鈕是在輕度使用者首頁上方「應用程式商店」按鈕的右邊,可讓您巡覽 Onshape 的學習中心,其中包括如何使用 Onshape 的自學課程與先前錄製的網路研討會。
 說明圖示 - Onshape 的說明功能表圖示位在頁面右上方「學習中心」按鈕的右邊。在圖示上按一下來開啟「說明」功能表下拉清單以存取 Onshape 的說明中心。
![透過 [說明] 功能表存取說明檔案](Resources/Images/Light_user/Help_menu_drop_down.png)
這個功能表同時包含聯絡支援人員的方法:聯絡支援人員會開啟一個對話方塊,您可於其中輸入問題,選擇是否要附上問題的螢幕擷取畫面,並決定是否要直接與 Onshape 支援代表共享文件 (可隨時撤銷這個許可權限)。
 帳戶使用者圖示 - 您 Onshape 輕度使用者頁面上方最右側的圖示是帳戶圖示,通常伴隨有使用者名稱。在這個圖示或您的名稱上按一下來開啟下拉式功能表,其中的選項可讓您巡覽帳戶、Enterprise 設定,以及登出。
關於如何開始設定常用的喜好設定與存取指令的詳細資訊,請參考「我的帳戶」設定。

按一下左側邊欄中的活動。
「活動」頁面是您 Onshape 的首頁,且是您在 Onshape 中作業的預設起點。您將在這個頁面中看到以資料流出現的文件相關活動。使用「省略符號」功能表來存取與活動項目相關的指令。
詳細資訊請參考監測使用者活動。

以紅色強調顯示省略符號的活動資料流

按一下側邊欄中的文件來開啟您有存取權限所有文件的清單。
文件頁面是您最可能開始 Onshape 作業的地方。按一下視窗左上角您公司的標誌來從 Onshape 中的各處回到文件頁面上。
文件頁面會列出所有您可存取的文件,有時會將文件單獨列出,有時則會將文件放在專案與資料夾中 (如下以紅色輪廓線框出)。這個頁面同時包含可縮減文件清單的篩選器 (以橘色輪廓線框出),以及搜尋方塊 (用黃色輪廓線框出)。按一下專案、資料夾或文件名稱來開啟。

在上方的範例中,以藍色輪廓線框出的圖示代表「標籤」、「文件詳細資料」以及「清單」和「方格」檢視選項。
關於使用「文件」頁面的詳細資訊,請參考文件頁面。

您可以從輕度使用者的文件頁面中存取 Onshape 的進階搜尋列 (如上方紅色輪廓線所框出)。若要巡覽至該處,按一下  ,或按一下 [前往文件中] 圖示 (您的公司標誌),兩個圖示都位在頁面的左上角。使用 Onshape 的進階搜尋工具可根據零件編號、發行狀態、版本與修訂版來找出特定的零件、組合件與工程圖。
按一下搜尋列中的下拉箭頭來開啟「進階搜尋」對話方塊。在這個對話方塊中您可以指定搜尋的不同參數:
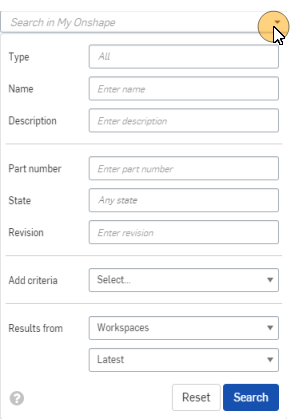
舉例來說,假設您收到的工單指定的零件編號是 00203 rev B,您同時需要零件的工程圖與 3D 模型來完成工單的要求。若要同時找出這兩個項目,請開啟「進階搜尋」對話方塊然後如下所示填寫:
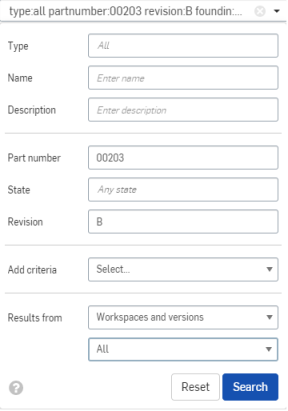
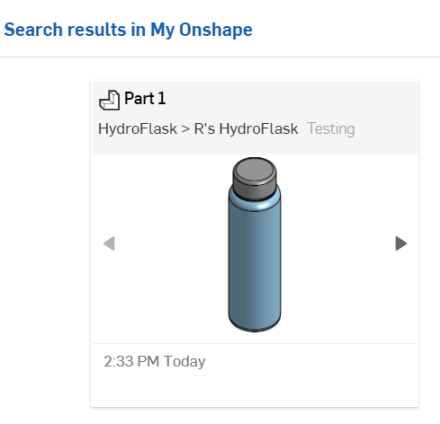
按一下搜尋來顯示結果 (如上方第二個範例所示),點按結果會直接將您帶至工程圖與 3D 模型中。在其中您可以執行上方所述的各種動作,以根據需要評論、測量或匯出物件。
關於使用 Onshape 搜尋功能的詳細資訊,請參考進階搜尋。
對文件沒有編輯權限的所有使用者,會看到的預設畫面是唯檢視工具列。
在開啟文件時,輕度使用者或僅有「唯檢視」權限的使用者會看到這樣的畫面配置 (注意到以紅色輪廓線框出的唯檢視工具列):
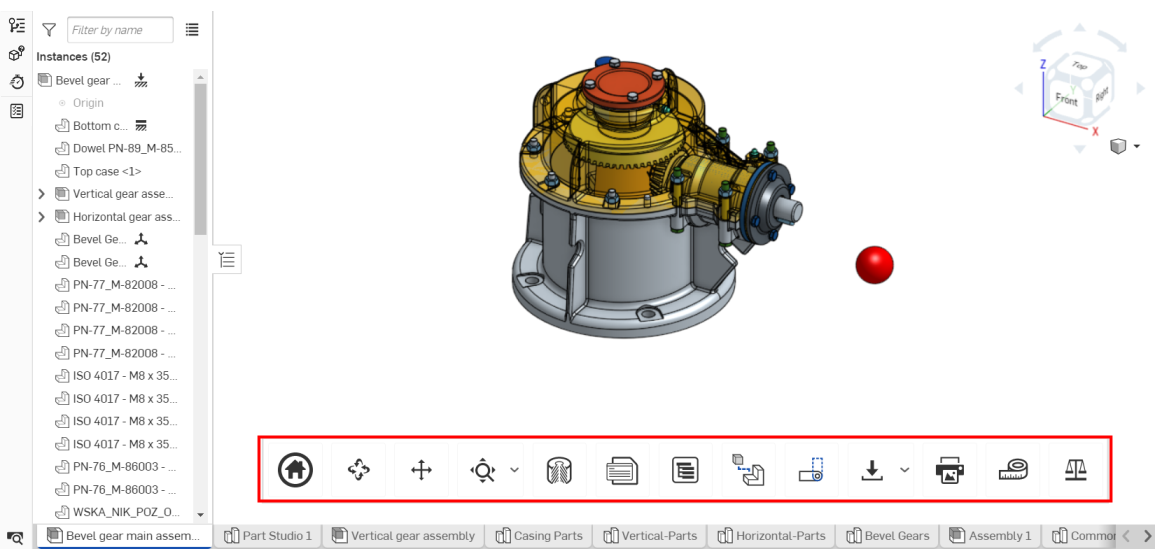
Enterprise 與其他帳戶的使用者在僅有「唯檢視」權限的情況下也會有這個工具列。只有公司擁有者可以變更公司設定以隱藏所有文件中的唯檢視工具列。對文件有編輯權限的使用者並不會看到唯檢視工具列。
關於如何操作唯檢視工具列的詳細資訊,請參考使用唯檢視工具列。
唯檢視工具列位在您 Onshape Part Studio 或組合件的底部 (在上圖中以紅色輪廓線框出),提供多至 18 個工具或功能,可用的項目取決於分頁類型或使用者的權限:

上圖是在 Part Studio 中常見的工具列

上圖是在 iOS 裝置上常見的工具列

上圖是在 Android 裝置中常見的工具列

上圖是在組合件中常見的工具列
- 首頁 -
 按一下「首頁」圖示來自動還原至您文件最初的檢視畫面。
 - 旋轉 -
 按一下「旋轉」圖示,然後點按並拖曳游標到要文件旋轉的方向。
 - 移動 -
 按一下「移動」圖示,然後點按並拖曳游標到要文件移動的方向。
 - 縮放至適當比例 -
 按一下「縮放至適當比例」圖示來自動將影像縮放至螢幕中央的適當大小。按一下圖示右邊的下拉式功能表箭頭來查看下列的功能:
- 縮放成視窗大小 -
 按一下「縮放成視窗大小」,然後在您要放大的圖元部分拖曳游標形成一個縮放邊界方塊;您的圖片即會適當地縮放。
 - 縮放 -
 按一下「縮放」,然後上下或左右拖曳游標來放大或縮小。
當在桌面電腦上使用 Onshape 應用程式時,您可以隨時使用滑鼠上下捲動來放大或縮小。
在使用標準 3 鍵滑鼠的 Windows 機器上,Onshape 提供下列的方案讓您在 Part Studios 與組合件中操控 3D 模型:
3D 旋轉: 點按滑鼠右鍵+拖曳
放大與縮小: 分別向上與向下捲動
2D 移動: Ctrl+滑鼠右鍵+拖曳 (點按中間鍵+拖曳)
關於在 Onshape 中自訂視角操控的詳細資訊,請參考視角操控與檢視零件。
- 縮放成視窗大小 -
-
剖面視圖 -
 按一下「剖面視圖」圖示來開啟「剖面視圖」操控器:
選擇您要檢視的平面、平坦面或結合連接器,然後按一下剖面視圖操控器右上角的核取記號
 來完成操作。
 - 屬性 -
 當您在 Part Studio 中時,按一下「屬性」圖示來開啟「屬性」對話方塊,您可於其中編輯 Part Studio 的名稱、說明、零件編號、狀態等等:
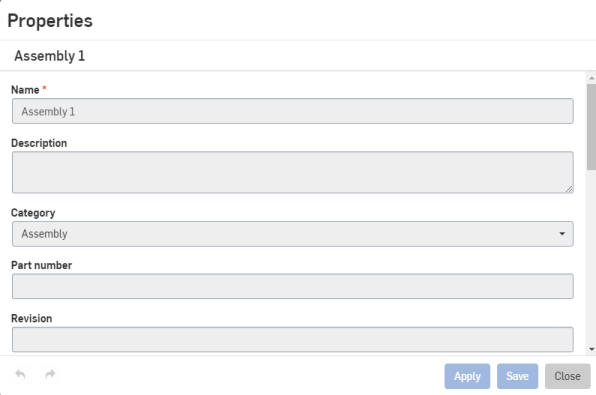
若要查看圖元上特定零件的屬性,按一下指定的零件然後點按「屬性」圖示。
在組合件中按一下「屬性」圖示來開啟「屬性」對話方塊。
輕度使用者與沒有寫入權限的完全使用者無法編輯屬性。
-
「外觀」面板 -
 這個工具只會在選取一個 Part Studio 分頁時出現。按一下來從介面的右側開啟「外觀」面板。
您可以查看與特定零件或面相關的色彩。關於指定色彩的詳細資訊,請參考自訂零件與面:外觀。
-
顯示狀態 -
 僅在已選取組合件時,這個工具才會出現。按一下來開啟「顯示狀態」對話方塊。詳細資訊請參考顯示狀態。
 -
切割清單 -
 僅當已選取 Part Studio 分頁且使用「框架」時,這個工具才會出現。按一下來開啟使用者介面右側的「切割清單」面板。詳細資訊請參考切割清單。
 -
自訂表格面板 -
 這個工具只會在選取一個 Part Studio 分頁時出現。按一下來從介面的右側開啟「自訂表格」面板。如果已在文件中加入自訂表格,系統會開啟表格:
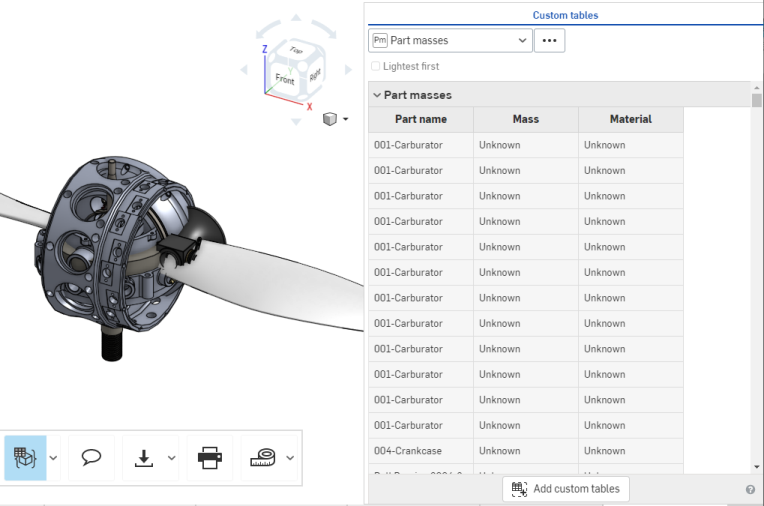
- 組態面板 -
 按一下「組態表格圖示」來開啟「已組態的零件屬性」面板 (請注意到僅在您的組合件或 Part Studio 中包含有已組態屬性時這個圖示才會出現):
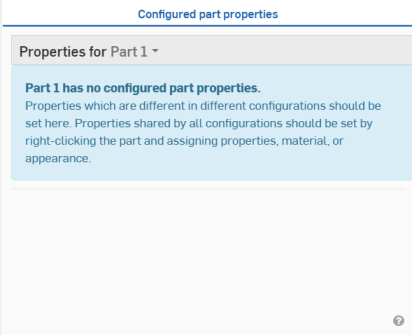
要進一步了解「組態」面板,請參考組態。
- 材料表 -
 按一下「BOM」圖示來開啟 BOM 面板,或關閉 BOM 面板。
 - Exploded views -
 Click the Exploded views icon to open the panel in order to select an Exploded view to display.
 僅當選取了組合件時,這個工具才會出現。
-
跟隨使用者... -
 按一下「跟隨使用者」圖示來開啟目前在文件中的使用者清單 (注意到僅在文件中有多個使用者時這個圖示才會出現):
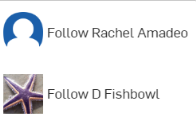
按一下您要跟隨的使用者,您的 Onshape 視窗會調整以顯示該使用者即時的文件畫面,如下圖所示:
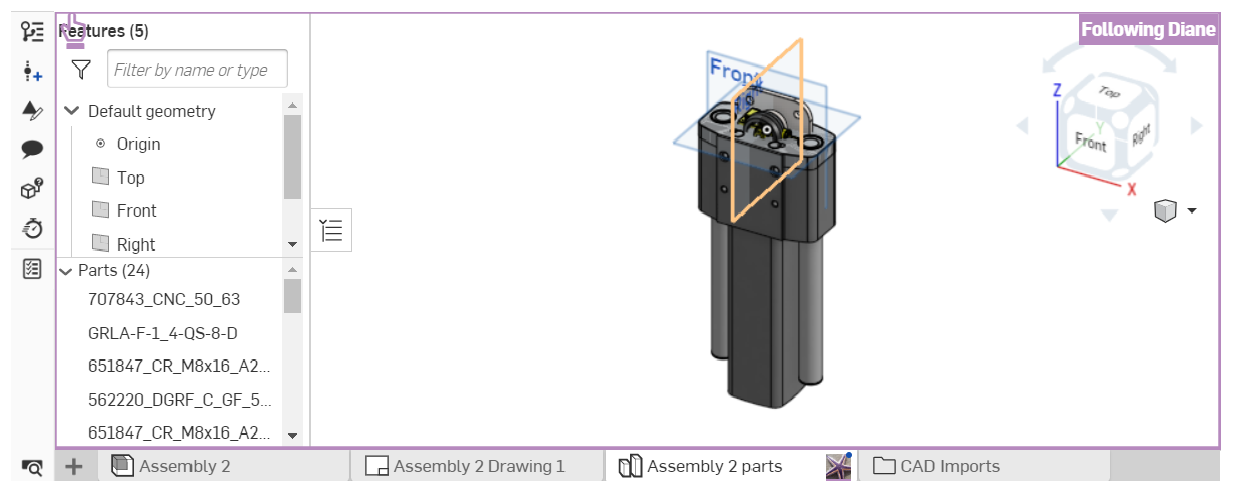
若要停止跟隨一個使用者,請再次點按工具列中的「跟隨使用者」圖示。若要進一步了解跟隨使用者的詳細資訊,請參考跟隨模式。
- Export tab -
 Click the Export icon to open the Export dialog. Here, you can edit your document's name and export options.
 - Export selected -
 Click the Export selected icon to export all selected geometry (note that this icon appears only when exportable geometry is already selected). An Export dialog like the one above appears; edit your file name, format, version, and export options, and click the Export button to finalize your decisions.
 - Select and export... -
 To export a specific assembly or part, click the dropdown menu arrow to the right of the Export icon and click Select and export...(note that this icon only appears if there no exportable geometry is selected). This opens an Export manipulator; click the part or assembly you want to export, then click the checkmark
  in the top right corner. This opens the same Export dialog as shown above. Choose your export settings and click the Export button to finalize your decisions.
- Export selected -
-
列印 -
 按一下「列印」圖示來開啟「列印設定」對話方塊:
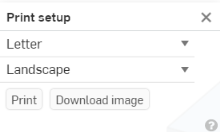
您可以於此處編輯您的列印設定。當您準備好列印時,按一下右上角的核取記號
 。這樣會開啟文件的預覽列印,並有選項可讓您選擇特定於印表機的設定。
 -
測量 -
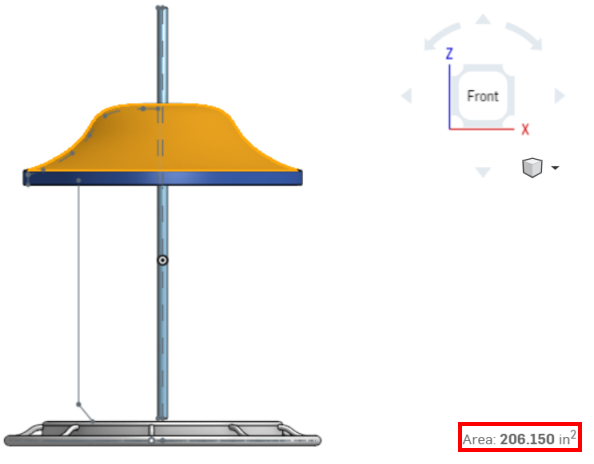
 將您的游標於「測量」圖示上暫留來讀取操作「測量」工具的方式:
上方的訊息說明在選取了圖元或零件時,「測量」工具如何自動出現在 Onshape 視窗的右下角。按一下「測量」圖示來查看工具功能的動畫範例。
-
質量屬性 -
 按一下「質量屬性」圖示來開啟「質量屬性」面板:
如果在 Part Studio 中沒有選取任何零件,則「質量屬性」面板會顯示 Part Studio 的屬性。如果已選取了零件,則僅會顯示所選取零件的屬性。
在 Onshape 中的各種項目都有獨特的 URL。許多組織會在工單或 ERP 軟體中貼上對 Onshape 物件 (Part Studios、組合件、工程圖等) 特定版本的連結,以讓您可以取得所需的確切版本。可以從您瀏覽器的位址列輕鬆地複製貼上這些連結。
不會向輕度使用者提供 [共享] 的按鈕,因為不允許輕度使用者分享文件。
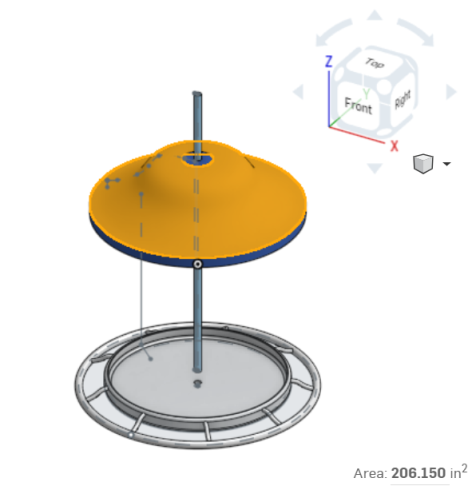
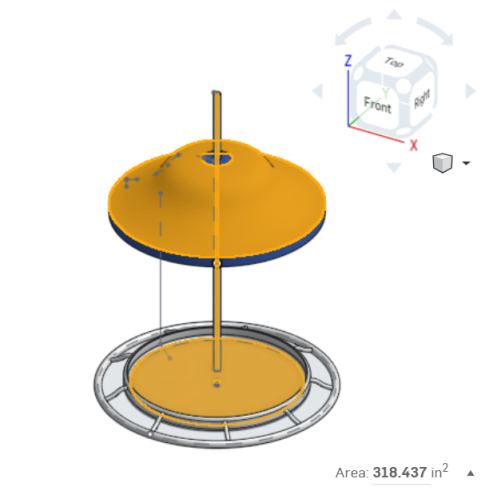
在 Onshape 文件中的選取項目是累加的。當您按左鍵選取幾何的一部分,然後再於幾何的另一部分點按時,Onshape 會加上第二個選取項目 (以及之後的選取項目) 而不是改選取它。您可以輕觸鍵盤上的空格鍵 (或點按空白區域) 來清除選取的項目。下方的第一個範例顯示在您文件的 Part Studio 中只選取了一個零件。第二個範例顯示同時選取三個零件時文件看起來的樣子,當選取時,系統會以黃色強調顯示零件。
-
當在文件中時,於分頁上按右鍵來存取環境選單:
![在環境選單中強調顯示 [建立工作] 選項的螢幕擷取畫面](Resources/Images/concepts/createtask-inmenu.png)
-
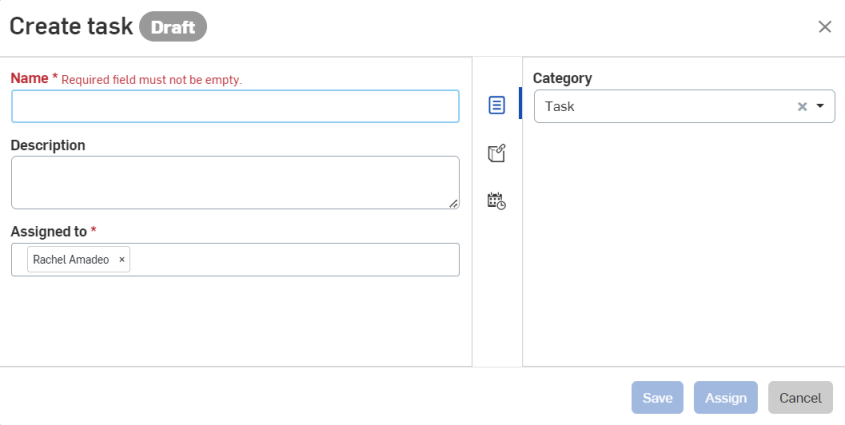
按一下功能表中的建立工作選項來開啟「建立工作」對話方塊:
-
指定工作名稱。
-
選擇性地指定工作的說明。
-
在對話方塊右側的「屬性」圖示 (
 ) 旁已指派有預設的工作類別。您可以保留或刪除這個類別,和/或輸入另一個類別。
 -
按一下「參考」圖示 (
 ) 來將這個工作與某一特定文件或文件版本中的零件、組合件、工程圖、檔案、Feature Studio 或應用程式相關聯。當「參考」對話方塊開啟時,按一下「加入參考」圖示 (
 ),搜尋參考或貼上至特定參考的 URL,或從清單中選擇以找出在某一特定零件、組合件、工程圖、檔案、Feature Studio 或應用程式中的參考。您也可以建立一個版本或是檢視版本圖表。
 -
按一下「優先順序與日期」圖示 (
 ),然後輸入一個到期日。
 -
按一下 儲存 來儲存工作並於稍後指派;按一下 指派 來立即指派給某一個使用者,或按一下 取消 來中止建立工作。

建立工作之後,出現在行動項目清單中的工作範例。
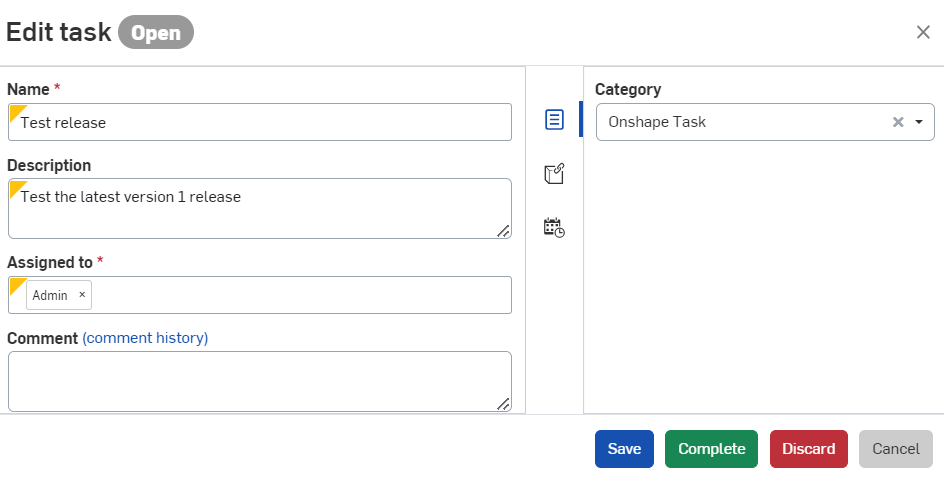
若要在建立工作之後將工作重新指派給不同的使用者,請選擇 檢視工作 來編輯。在 指派給 欄位中移除使用者,然後選擇一個不同的使用者。按一下 儲存 即可重新分配工作。
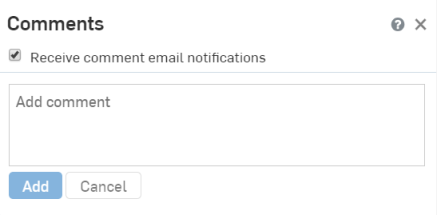
若您被給予了可對文件做出評論的權限,即表示您可以在 Onshape 中直接與組織的其他成員對話。若要新增評論,請開啟文件,然後按一下唯檢視工具列中的「評論」按鈕 ![]() 來開啟「評論」飛出視窗,如下所示:
來開啟「評論」飛出視窗,如下所示:
如果您沒有評論的許可權限,則「評論」按鈕不會出現。
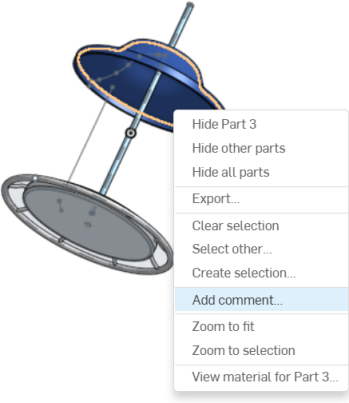
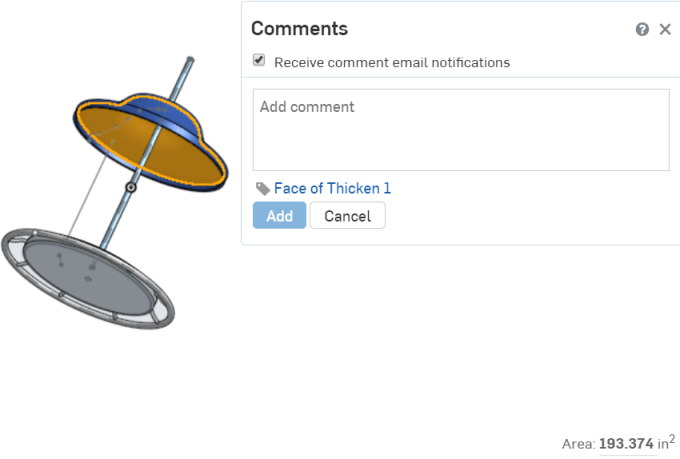
如果您有可在文件上做出評論的權限,您可以在模型幾何與特徵上加入評論,方法是在模型幾何與特徵上按右鍵,然後從環境選單中選擇 [新增評論] (如下方第一個範例所示)。選擇新增評論會開啟「評論」對話方塊,其中已選取評論要標記的零件 (如下方第二個範例所示)。您僅需在使用者名稱前輸入 @ 即可在評論中提及該使用者。
關於評論的詳細資訊,請參考在工作區及版本上做出評論。
您可以將零件、組合件與工程圖匯出為數種不同的檔案格式。像是可讓您輕鬆地建立 STEP 檔案以供製造零件的供應商使用。如果您有匯出資料的權限,可在零件清單或 Part Studio 圖形區域的零件上按右鍵,或是在組合件分頁或工程圖分頁上按右鍵,然後從環境選單中選擇 [匯出] (如下方第一個範例所示)。會出現一個「匯出」對話方塊 (下方第二個圖片):
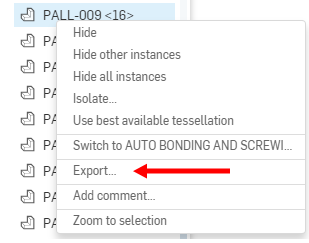
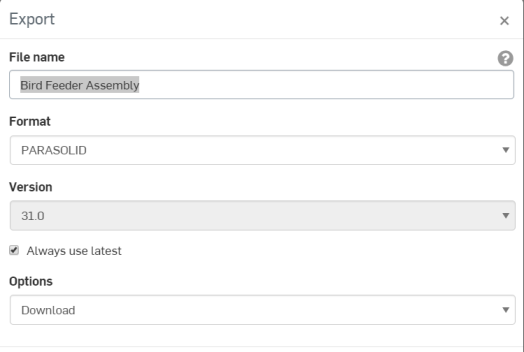
關於匯出資料與所支援檔案格式的詳細資訊,請參考匯出檔案。
按滑鼠右鍵,環境選單即會出現在 Onshape 中的各處,其中包含許多可完成您操作的指令。按右鍵來啟動圖形區域中圖元 (像是零件、曲面與草圖) 的環境選單,啟動特徵清單中的項目 (像是擠出與旋轉等特徵),啟動 Part Studios 與組合件中零件清單中的項目 (個別的零件、曲面、曲線與組合件),以及啟動工程圖中的圖元。像是「匯出」等的關鍵重要指令也會在適境內文功能中出現,因此務必在介面各處使用滑鼠右鍵來存取可完成您操作目標的指令。
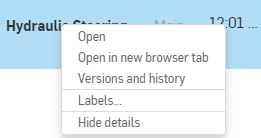
在文件頁面中的文件上按右鍵所出現環境選單的範例
當使用者有發行管理的責任時 (僅限 Enterprise 或 Professional 使用者),並無法開始一個發行,但可以和可能會有觀察、評論與核准發行候選的責任。工具列中並沒有基於此目的的輕度使用者工具;不過,使用者必須經由其所接收到的通知來存取發行候選,這些通知包括:
- 帶有連結的電子郵件通知
- 文件中的內部通知
- 帶有連結的行動裝置通知
這些通知會包含「檢視發行」的連結,點按連結會直接將使用者帶至發行候選對話方塊。
關於可授予那些全域權限給輕度使用者的說明資訊,請參考輕度使用者的全域權限。
若要進一步了解使用資料夾來管理文件的詳細資訊,您可用自己的步調跟著 Onshape Enterprise for Light Users (需要有 Onshape 帳戶) 的課程操作。您也可以參照此處的技術簡報文章:Navigating Onshape for New Users (需要有 Onshape 帳戶)。
