Sketch Tools
![]()
![]()
![]()
Tools in the Sketch toolbar such as Line, Corner rectangle, Center point rectangle, Center point circle, 3 point circle, Tangent arc, 3 point arc, Spline, Point, and Construction are used to create a sketch in a Part Studio.

The Sketch toolbar appears when you:
- Create a new sketch by clicking the Create new Sketch tool in the Feature toolbar
- Open an existing sketch for editing
It contains all the tools necessary to create a 2D sketch from which you create a 3D feature or part.
A small arrow beside a tool icon indicates a drop-down menu:
![]()
The icon beside the arrow representing the group is the last tool of that group previously chosen.
When you access Extrude or Revolve from the Sketch toolbar, your open sketch is accepted and the dialog is closed. At that point, the feature dialog (Extrude or Revolve) is opened with all regions automatically selected.
Access the Sketch shortcut toolbar with the S key while in an active sketch (with a Sketch dialog open):

Customize the Sketch shortcut toolbar through your Onshape account Preferences page.
See Sketch tools, Feature tools, and Assemblies for more information on customizing those toolbars.
Note that the rest of the Feature tools are available on the Feature toolbar.
Shortcut: alt/opt+c
![]()
In Onshape, you have the ability to search for tools in the Sketch toolbar as well as the Assembly toolbar and Feature toolbar: see Sketch tools, Feature tools, and Assemblies for more information on those specific topics.
- The Escape key exits a tool selection.
- When selecting, non-fully constrained sketch points (displayed in blue or red) are prioritized over any overlapping, fully constrained sketch points (displayed in black).
- You are able to apply constraints (including dimensions) between sketch curves and planes.
-
You are able to use expressions and trigonometric functions in numeric fields in Part Studios.
- The sketch context menu is a quick way to access many commands available for sketches.
For more information, see Context Menus.
In addition to the surfacing tools, curves are used to create the basic building blocks of surfaces.
This lists the collection of curve feature tools. This is not an exhaustive list. Additional Feature tools may be used when manipulating curves.
- Sketch tools - Tools in the Sketch toolbar such as Line, Corner rectangle, Center point rectangle, Center point circle, 3 point circle, Tangent arc, 3 point arc, Spline, Point, and Construction used to create a sketch in a Part Studio.
-
 Helix - Create a helix using a conical or cylindrical face, single axis or z-axis of a mate connector, or circular edge.
 -
 3D fit spline - Create a 3D fit spline through a series of vertices. Creates a curve which is listed in the Parts list under Curves.
 -
 Projected curve - Create a curve from the projection of two sketches (Two sketches option) or from the projection of a curve on a face (Curve to face option).
 -
 Bridging curve - Create a Curve connecting any two points, vertices, or Mate connectors. The resulting Curve is listed in the Feature list and the Parts list.
 -
 Composite curve - Represent multiple edges as one Curve. Select multiple adjacent edges, sketch entities, and other curves. Selecting non-contiguous edges may result in multiple Curves created. Selections for each Curve must meet at their vertices. (Curves are listed in the Parts > Curves list.)
 -
 Intersection curve - Create a curve at the intersection of two or more surfaces or faces. The selections must intersect.
 -
 Trim curve - Trim or extend a curve by a distance or to a bounding entity.
 -
 Isocline - Create an isocline on a sloped face. An isocline runs on a face at positions where the face has a certain slope compared to its reference definition. The resulting isocline is listed in the Feature list and Parts list.
 -
 Offset curve - Create and extend and/or split a new curve by offsetting edges on surrounding faces.
 -
 Isoparametric curve - Create smooth curves that run along a face or surface in the U or V direction.
 -
 Edit curve - Edit an existing curve by selecting sketch entities or curves to apply a simplified approximation, elevate the degree, reposition control curve vertices and/or planarize into any 2D plane.
 -
 Routing curve - Create a multi-point curve across one or more planes in 3D space (routed path). This is useful for creating pipe routing, wiring, and NURBS curves for advanced surfacing.
Sketch tools are used to create the 2D sketches that are required to make 3D features and parts.
Creating a sketch
-
At the top of your opened document is the main toolbar. Tap the New Sketch tool (
 ) to begin a sketch:
-
A sketch dialog opens:
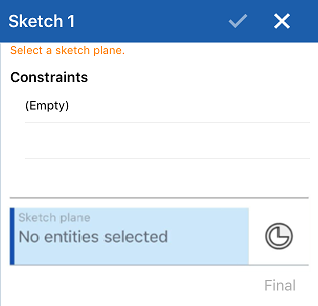
-
The main toolbar switches to show sketch options:

-
Tap each icon on the toolbar to access the following options:
-
Undo/Redo (
 /
/ )
) -
Extrude/Revolve feature category (
 ). Tap the dropdown icon to access the Revolve feature.
 -
Sketch tools and categories (
 /
/ /
/ /
/ /
/ /
/ /
/ ). If an icon has an accompanying dropdown arrow, tap it to access additional sketch tools under each category. Then tap to select a sketch tool.
 -
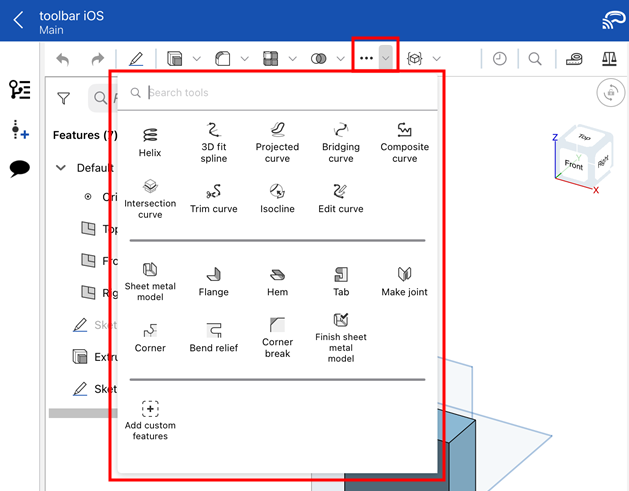
Additional sketch tools, accessed from the overflow menu (
 ):
):
-
Recently used tools (
 ):
):
- Measure tool (
 )
)
-
- Select a plane or planar face of a part, or tap the Mate connector icon and select a Mate connector.
- Select a sketch tool and start sketching.
Copy & Paste
You have the ability to copy and paste a sketch within, or across, Part Studios.
To copy a sketch:
- Select the sketch in the Feature list, open the Context Menu, and select "Copy sketch"
- Select the overflow menu of the sketch in the Feature list and select "Copy sketch"
- While editing or creating a sketch, open the Context Menu and select "Copy sketch"
Once you have copied a sketch, you can move into a different Part Studio, and paste the sketch in a sketch or Feature in the other Part Studio.
To paste a sketch:
- Select a sketch in the Feature list, open the Context Menu, and select "Paste into sketch"
- Select the overflow menu of a sketch in the Feature list and select "Paste into sketch"
- While editing or creating a sketch, open the Context Menu and select "Paste into sketch"
- While editing a feature, select a plane or planar face, open the Context Menu, and select "Paste into sketch"
Once you have pasted a sketch, touch and drag, or tap, to position the pasted sketch.
Tips
- With no tools active, touch and drag points or sketch entities to adjust them.
- You are able to apply constraints (including dimensions) between sketch curves and planes.
Sketch tools are used to create the 2D sketches that are required to make 3D features and parts.
At the top of your opened document is the main toolbar:
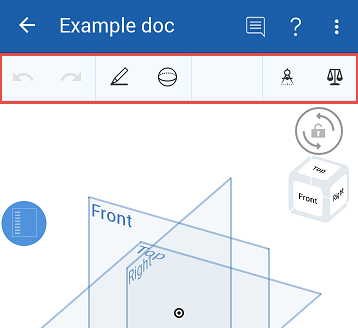
The main toolbar has Undo/Redo buttons to the left, Sketch and Feature tool icons to the right of the Undo/Redo buttons, and the Measure tool and Mass Properties tool to the right.
See Measure tool or Mass Properties for more info.
Tap the New sketch tool to begin a sketch:
![]()
A sketch dialog opens:
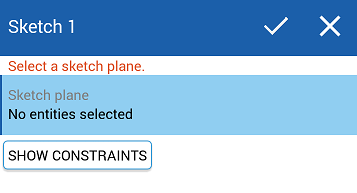
When you begin a new sketch, the New sketch tool now houses all of the sketch tools. Tap to see the list of sketch tools:
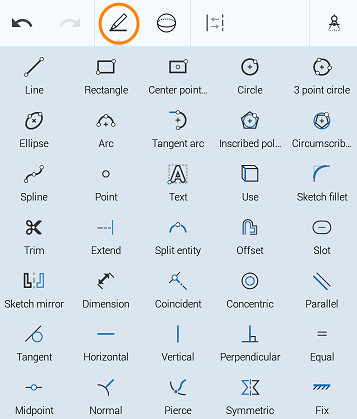
Scroll vertically to see the entire list of Sketch tools.
When a sketch is open, the Construction tool moves to the main toolbar for your convenience. See Construction for more information on the Construction tool.
Get started
- Select the New sketch tool.
A sketch dialog opens.
- Select a plane or planar face of a part, or tap the Mate connector icon and select a Mate connector.
- Select a sketch tool and start sketching.
Copy & Paste
You are able to copy and paste a sketch within, or across, Part Studios.
To copy a sketch:
- Select the sketch in the Feature list, open the Context Menu, and select "Copy sketch"
- Select the overflow menu of the sketch in the Feature list and select "Copy sketch"
- While editing or creating a sketch, open the Context Menu and select "Copy sketch"
Once you have copied a sketch, you can move into a different Part Studio, and paste the sketch in a sketch or Feature in the other Part Studio.
To paste a sketch:
- Select a sketch in the Feature list, open the Context Menu, and select "Paste into sketch"
- Select the overflow menu of a sketch in the Feature list and select "Paste into sketch"
- While editing or creating a sketch, open the Context Menu and select "Paste into sketch"
- While editing a feature, select a plane or planar face, open the Context Menu, and select "Paste into sketch"
Once you have pasted a sketch, you can touch and drag, or tap, to position the pasted sketch.
Tips
- With no tools active, touch and drag points or sketch entities to adjust them.
- You have the ability to apply constraints (including dimensions) between sketch curves and planes.
For an additional Learning center resource, follow the self-paced course here: Introduction to Sketching (Onshape account required).