Working with Constraints
![]()
![]()
![]()
Available in: Sketch
Constraints are available and viewable when a sketch is being created or otherwise open for editing.
Constraints applied between entities in two sketches (for instance, when you Use an entity from one sketch in another sketch) are differentiated by a blue background. Constraints may be applied manually and some are created when geometry is created as you sketch. Upon hover, the referenced constraint’s background is a darker blue:
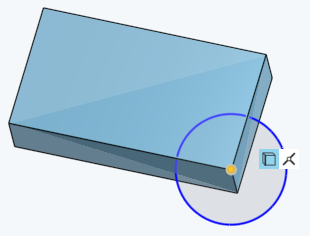
The Use constraint shown above (with the blue background) constrains a vertex in the rectangle’s sketch with the center point of the circle in the circle’s sketch.
The Constraint Manager lists all sketch constraints and dimensions, allowing for quick analysis.
Click Show sketch diagnostic tools, then select Constraint manager.
Filter the list by Type, Mode, and Status to focus on specific issues.
Hover over a constraint or entity in the list to highlight its associated sketch geometry in the graphics area. Constraints with errors are red for quick identification.
Delete individual constraints directly from the list with the trash icon, or select Delete all to remove all listed.
Toggle off Automatically select constraints to isolate constraints in a specific region. Only the constraints of selected entities appear in the Constraint manager.
To apply a constraint, either:
-
Select the constraint from the menu (or use its corresponding shortcut key) and select the entities to which the constraint is applied in the sketch.
-
Select the sketch entities and click the constraint on the toolbar's constraint menu.
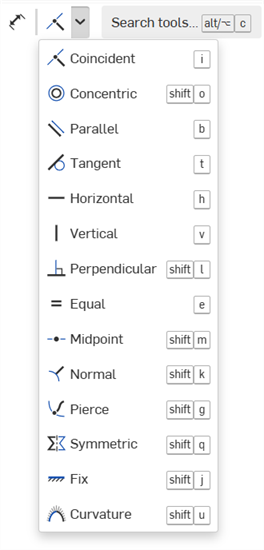
The following constraints are available from the toolbar constraints menu:
-
Coincident - Make 2 or more sketch entities share the same location in a sketch.
-
Concentric - Make any point coincident with the center of an arc or circle. Make selected arcs and circles share a center point.
-
Parallel - Make 2 or more lines parallel.
-
Tangent - Make a tangent relation between 2 sketch entities, or between a sketch entity and a plane.
-
Horizontal - Constrain 1 or more lines, or a set of points, to be horizontal.
-
Vertical - Constrain 1 or more lines, or a set of points, to be vertical.
-
Perpendicular - Make 2 lines perpendicular.
-
Equal - Make multiple lines equal in length, or multiple arcs equal in radii.
-
Midpoint - Constrain a sketch point to the midpoint of a line or arc.
-
Normal - Make a curve and line, or a curve and plane, perpendicular.
-
Pierce - Make a sketch entity coincident with another entity outside the active sketch plane.
-
Symmetric - Make 2 entities of the same type symmetric, relative to a line, plane, or linear edge.
-
Fix - Lock a sketch entity onto the sketch plane so it does not move.
-
Curvature - Create curvature continuous transitions between sketch splines or conics and surrounding geometry.
With a sketch open, hover over a sketch entity, like a line or arc, to see the constraints for that entity. As you move the mouse to hover over entities, constraints will appear only for the highlighted entity. To keep all constraints visible, use the Shift key as you move the mouse.
Entities are highlighted in orange upon hover, with the exception of referenced constraints which have a blue background and a darker blue background upon hover. Related entities are highlighted with yellow, as when you select a constraint and the coordinating entities is also highlighted.
These constraints are not available in the Constraint section of the toolbar, but are created automatically during specific actions as described below:
-
 Quadrant - Constrains a point to be coincident to an ellipse and either the major or minor axis of that ellipse. Can be made by inference, dragging something to, or placing something on one of the points on an ellipse.
-
 Use - Constrains a sketch entity in one sketch to an entity in another sketch; made by selecting the Use tool and then an entity (sketch entity, face, or edge) in a different sketch or feature.
-
 Intersection - Constrains the end points of an open curve (resulting from using the Intersection tool) with Pierce constraints
 so that they lie on the edges of the intersected face; for a closed curve, constrains the sketch entities with Intersection constraints.
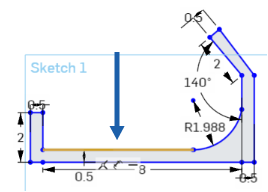
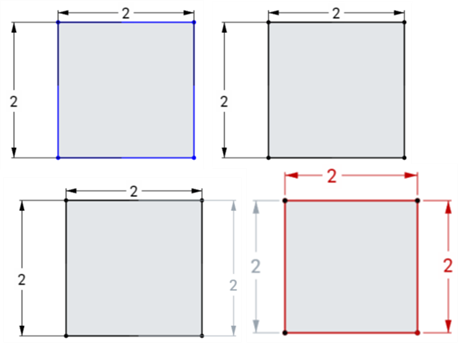
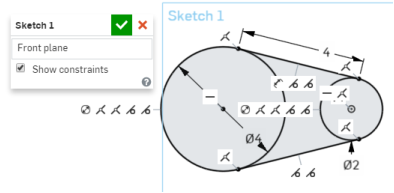
The color of sketch entities indicate its constrained status:
- Blue means underconstrained.
- Black means fully constrained.
- Red means a constraint problem (overconstrained).
The color of a constraint icon indicates its constrained status:
- Black on gray means well-defined.
- White on red indicates a problem.
- When selecting, non-fully constrained sketch points (blue and red) are prioritized over any overlapping, fully constrained sketch points (black).
Adding more dimensions or constraints will further constrain the sketch. Dragging entities may help you understand what constraints or dimensions you may want to add.
View and filter the sketch constraints and dimensions in order to analyze them and correct any sketch constraint errors.
Accessing the Constraint manager
From the Sketch dialog:
-
Click the Show sketch diagnostic tools icon (
 ).
). -
Click Constraint manager.
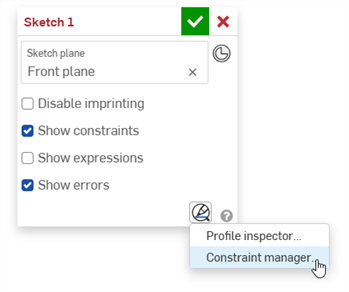
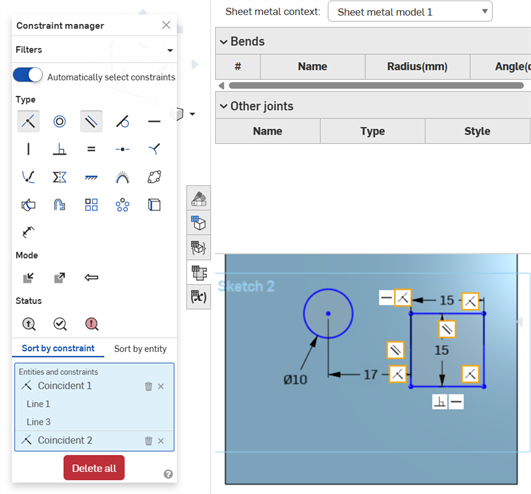
The Constraint manager dialog opens:
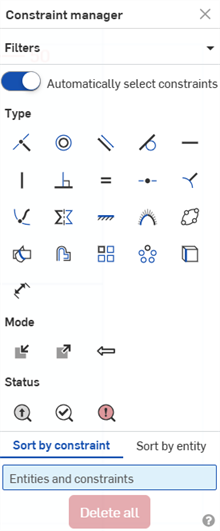
Using the Constraint manager
From the Constraint manager dialog, you can do the following:
-
Filters - Collapse/Expand all dialog sections at once (Type, Mode, Status).
-
Automatically select constraints - When toggled on (default), any constraint selected in the Constraint manager dialog places a yellow bounding box around corresponding constraints in the sketch. When off, constraints will not have a bounding box placed around them (they are not selected).
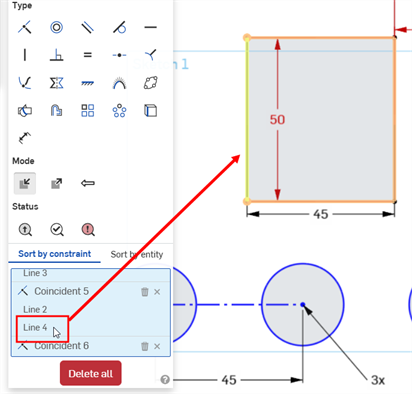
This option is useful if you want to select only those constraints from a specific part of the sketch. For example, toggle this option off. Select the constraints Type you want to locate in the portion of your sketch (for example, coincident constraints in the example below). Then create a selection box around a portion of your sketch (a rectangle in the example below). Only constraints for that section display bounding boxes around them and are available from the Entities and constraints list (see below).
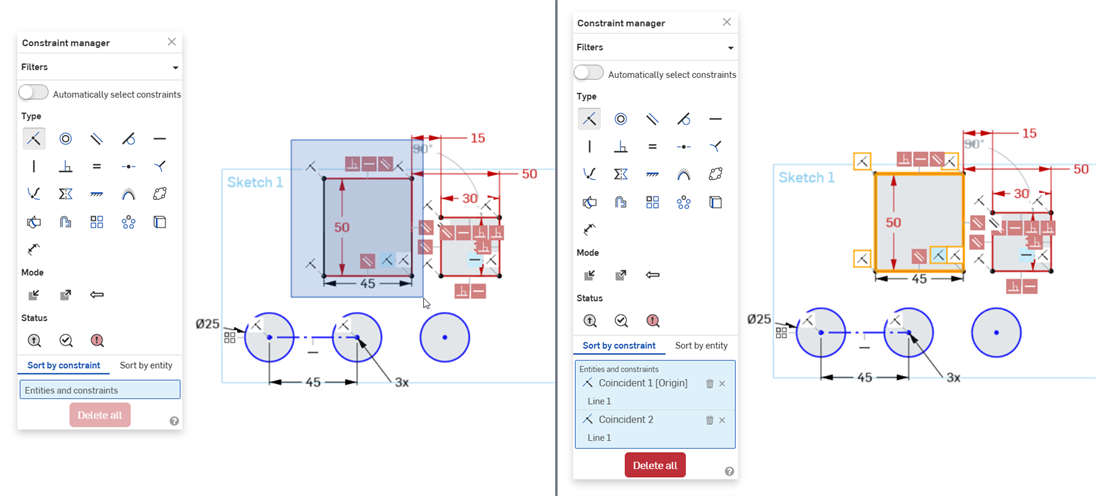
Disabling "Automatically select constraints" and then box-selecting the rectangle in the sketch (left). Once selected, the filters only apply to the selected sketch entity. In the example here, coincident constraints are only shown for the previously-selected rectangle (right).
-
Type - Select from a list of available constraints. For example, selecting Coincident places a yellow bounding box around all coincident constraints in the sketch (provided Automatically select constraints is enabled).
-
Mode - Select from the following 3 modes:
-
Internal - Selects constraints from the current sketch.
-
External - Selects constraints from external sources.
-
In context - Selects constraints referenced in context
-
-
Status - Select from the following 3 statuses:
-
Driven - Driven constraints. When selected, driven constraints are highlighted yellow. If they are underconstrained, they are highlighted a darker blue.
-
Solved - Solved constraints. When selected, solved constraints are highlighted yellow. If they are underconstrained, they are highlighted a darker blue.
-
Errors - Constraints in error. When selected, constraints in error are highlighted a darker red,
-
-
Sort by constraint - Sorts the Entities and constraints list below by constraint first, then entity second.
-
Sort by entity - Sorts the Entities and constraints list below by entity first, then constraint second.
-
Entities and constraints list - Displays all selected constraints, depending on the filter selections in the dialog. Hovering over a constraint or entity in the list highlights it in the sketch. From this list, you can:
-
Delete constraint (
 ) - Deletes the constraint from the sketch.
 -
Remove selection (
 ) - Removes the constraint from the Entities and constraints list.
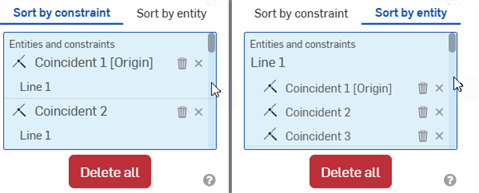
Sort by constraint (left); Sort by entity (right)
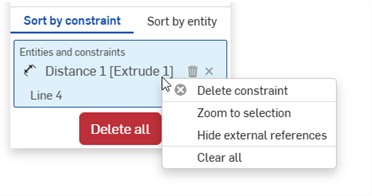
Right-click on a constraint or entity in the Entities and constraints list to access the following commands:
-
Delete constraint/entity - Deletes the selection (constraint or entity)
-
Zoom to selection - Zooms in to the selection (constraint or entity)
-
Hide external references - Hides all externally referenced constraints
-
Clear all - Clears all constraints from the Entities and constraints list
-
-
-
Delete all - Deletes all selected constraints from the sketch.
Turning Constraint manager off
To turn off the Constraint manager, either:
-
Click X at the top right corner of the Constraint manager dialog.
-
Click the Show sketch diagnostic tools icon (
) and select Turn constraint manager off: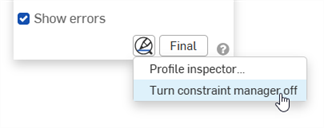
Notes
-
Select as many types, modes and statuses from the dialog to filter the constraints to what is selected. These filters can be used in any combination.
-
If Show constraints and Show errors are disabled in the Sketch dialog, hovering over the constraint in the Entities and constraints list displays only that constraint (and related entities) in the sketch:

-
Selecting an entity in the Entities and constraints list highlights the entity in light yellow:
-
Constraint manager also works with sketches in the Sheet metal flat pattern view:
You have the ability to interact with constraint icons:
- Click and drag the icon or group of icons to a different location.
- Hover over a single constraint icon to see which entities are highlighted, indicating the constraint applies to them.
- Delete a constraint: click a single constraint icon and press Delete or select Delete from the context menu.
- In the Sketch dialog, check Show constraints to display all constraints defined for the sketch.
- Conflicting constraints are shown as white symbols on a red background.
When sketching, constraint indicators appear next to the mouse cursor as the curves snap to inferences.