Feature Basics
![]()
![]()
![]()
Available in: Part Studio
Onshape has somewhat unique feature tools you use to create parts. Many of our tools are 'combination' tools and serve many purposes like creating new material, adding additional material, removing material, and also creating intersecting material. For example, the Extrude tool is used for all of the above.
This topic walks you through the basics of feature tool dialogs: how to use them, what the color paradigm means, and the other unique characteristics that make Onshape features easy to use.
When creating Features in Onshape, you use this Feature tools toolbar:
![]()
In Onshape, features are applied to 2-D sketches in a Part Studio to create 3-D parts. All Feature tools are in the Feature tools toolbar as icons or within drop down menus. Two Feature tools, Extrude and Revolve, are available on the Sketch tools toolbar for efficiency and may be used when a sketch is open. Each Feature created is stored parametrically, that is, visible in the Feature list as its own entity.
Access the Feature shortcut toolbar with the S key while in the graphics area (with no open dialog):

Customize this shortcut toolbar through your Onshape account Preferences page.
The Feature tools toolbar is always accessible at the top of the workspace in a Part Studio. If you are editing a sketch, you will see the Sketch toolbar, close the sketch to see the Feature toolbar. You can also customize the main Feature toolbar at the top of the page, for more information see Part Studios.
You can create as many features (and therefore parts) as you want, in a Part Studio.
- In a Part Studio, with an existing sketch or part, click to select the Feature tool you want. That tool's dialog opens, for example:
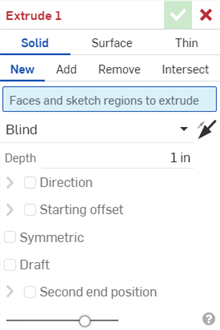
When a Feature dialog opens, two fields are active: the first (blue) field requiring selection in the graphics area with a mouse click, and the first (white) text field requiring keyboard input. Use the Tab key to move focus from one field to the next, sequentially, starting with the first active text field. You can also use the arrow keys to expand a dropdown menu, and the Enter key to accept a selection in the menu. Use the Enter key again to accept the input and close the dialog.
- Using the dialog, and by selecting entities in the workspace (sketches, part faces, or surfaces) fill out the required parameters.
- When you are done filling out the parameters, visualize changes using the Preview slider.
-
Accept the feature by clicking
 .
.
You can cancel a feature at any time by clicking
![]() or by pressing the Escape key.
or by pressing the Escape key.
Each Feature tool requires different information to complete the feature. For more specific information on what is required for each tool, see Feature tools.

In addition to using a mouse to navigate through the dialog, you can:
- Use the mouse to resize or move the dialog.
- Use the Tab key to move from one field to another.
- Use arrow keys to navigate a dropdown menu (Blind, above) and the Enter key to select from the menu.
- Use the spacebar to check/uncheck options (Draft and Second end position, above).
-
Click the
 to commit the feature (or press Enter).
-
Click
 to cancel the feature and close the dialog.
- Title
- The title is red if you have not completely filled out the dialog, or if the information entered has resulted in an error. This prevents you from committing a broken feature.

If you have specified all of the information, correctly, needed to complete the feature, then the title is black. This indicates that you may commit the feature successfully.

- Blue text and underline
- Blue text with a blue underline indicates a selected item. Click to select an item from a horizontal list.

- Blue highlight
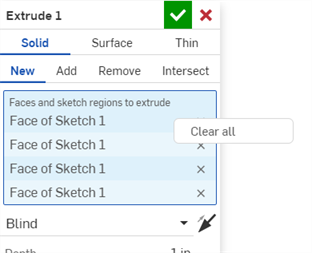
- A highlighted field indicates that a selection from the graphics area is required. Click in the field, then click in the graphics area to make one or more selections. Click on the x in the right of the field to remove a selection.

To clear multiple field selections at once, right-click on the field and select Clear all from the context menu.
- Drop down menus
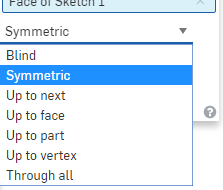
- Click to open a drop down menu, then click to select an option.
- Opposite direction
-When applicable, click the icon to toggle the direction of the feature.

- Input field
- Click to input a value. You have the ability to specify a unit of measurement by adding it to the value, or you are able to
set default units
for all of your documents.

- Check boxes
- Check boxes indicate an optional specification that can be applied to the feature. Click to check or uncheck a box to use optional specifications.

In the image above, a Draft is being applied to the extrude feature but a second end position is not.
- Preview slider bar
- The Preview slider is an opacity control that lets you adjust the display opacity of the feature along a scale of 0% (before the feature is applied) to 100% (after the feature is applied).
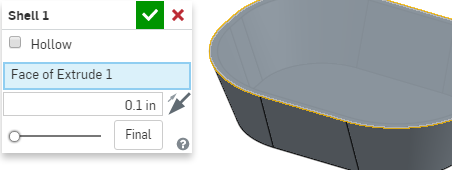
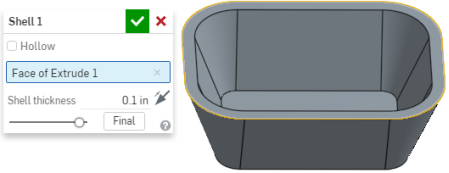
When you edit a feature, by default Onshape displays the model rolled back to its state when that feature was created, hiding all later features. The Final button displays the final result while you are still editing the feature. If you are editing the last feature, there is no Final button in the dialog, since you are already seeing the final result.
If you have permission to copy a document, but not edit the document, you are still able to open the document, view it, and also open Feature dialogs within the document. Without Edit permission, however, you will not be able to make any changes to the document, unless you first make a copy, and all dialog fields are grayed out and inactive:
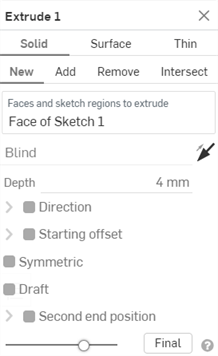
- Contextual Help
- Click on the
 in the lower right of any dialog to open the Help documentation to the related topic.
Some feature dialogs accept the selection of multiple entities (called array parameters) whose selection order is critical in order to create certain geometry. For example, when selecting profiles to use in a Loft feature, the order in which you select the sketches defines the direction of the loft. Onshape allows the reordering of these entities directly in the dialog.
For example, if you have selected three profiles for a loft and then want to add a fourth, but the fourth profile invalidates the geometry. The first time you create the loft, the dialog has three profiles and the model is valid:
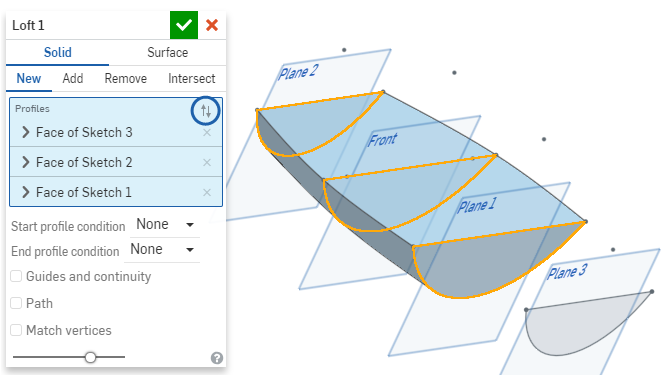
When you want to add the fourth profile, and you just select it, it is added to the bottom of the list of profiles. If it doesn't occur in an order that makes sense, an error occurs. However, you can click the opposing arrows (circled in blue above) at the top of the Profiles field to activate the reorder mechanism (circled in blue below):
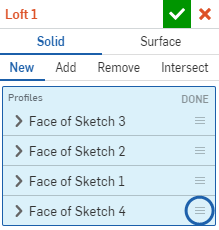
Click and drag the reorder icon to reorder the selected profile to the correct position in the dialog:
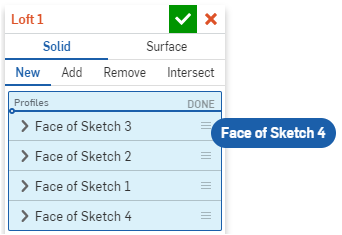
Drop to place the profile in the desired position:
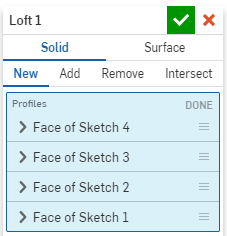
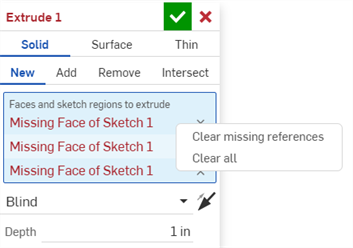
If an entity that a feature refers to is deleted, Onshape displays the missing references in red in the feature dialog. In the example below, the sketches for the extrude were deleted.
Click the X next to a missing reference to remove it, or right-click the field and select Clear missing references from the context menu to removing all missing references.
Place comments on a particular feature for later reference or for other collaborators. You are also able to indicate that you want to receive email notifications of other users' comments on the feature.
- Right-click on the feature in the Feature list and select Add comment.
- Type a comment, optionally indicate that you wish to receive email notifications of others' comments.
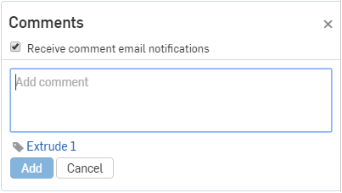
- Click Add to add the comment or Cancel to close the Comments panel without adding a comment.
If another user has share permissions on the document and has selected Receive comment email notifications, an email is sent to that email address with the text of your comment in it.
Click on the comments icon at the top to open the comments panel:
![]()
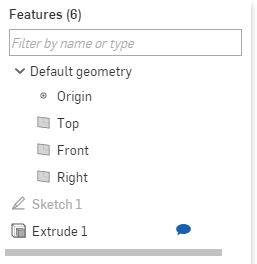
When the comments panel is open, any Features that have been commented on, will have an icon next to them in the Features list.
A variable can be used in place of Boolean parameters by converting the Boolean parameter into an expression:
-
Create the variable prior to the feature in which the variable is to be used. You can use the Variable feature or Variable table. See Variable and Variable table for more information.
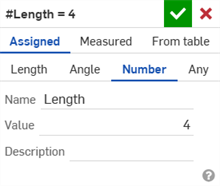
In the example below, an arbitrary value of 4 is used to create the #Length variable:
-
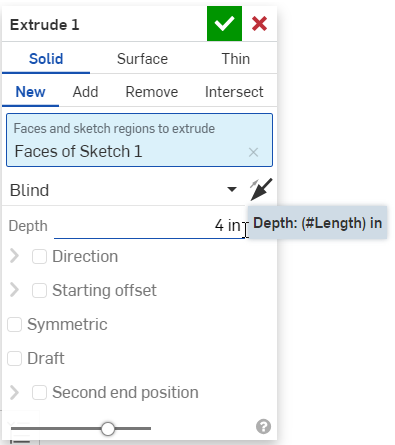
Open a feature dialog (for example, the Extrude dialog below), and enter the #Length variable in the Depth field. The length is converted to a measurement (inches here):
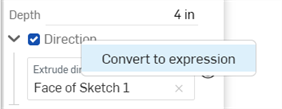
- Right-click on the Direction field and select Convert to expression:
-
Entering #Length>3 results in a true Direction value:
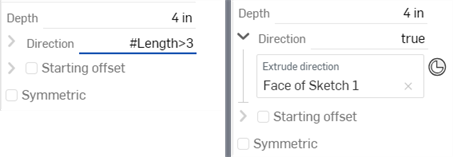
Entering #Length<3 results in a false Direction value:

-
If you wish to convert the expression back to a boolean, right-click on the Text field and select Convert to checkbox (shown below left). The Direction expression is converted back to a checkbox (shown below right).

When creating Features in Onshape, you use the Feature tools in the Feature toolbar.

Tap the Feature tool categories (![]() /
/![]() /
/![]() /
/![]() /
/![]() /
/![]() ) to access the Feature tools under each category. Then tap to select a Feature.
) to access the Feature tools under each category. Then tap to select a Feature.
Additional feature tools are accessed from the overflow menu (![]() ):
):
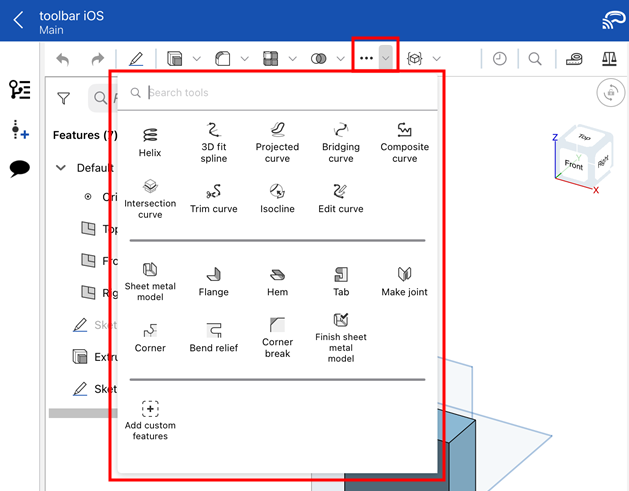
Feature tools create, modify, or manipulate 2D and 3D geometry to create new parts, modify existing ones, or generate construction tools for later use. Features are stored parametrically, visible in the Feature list as its own entity.
The Feature toolbar is always accessible at the top of the graphics area in a Part Studio. If you are editing a sketch, there are two Feature tools available in the Feature toolbar, for efficiency; Extrude and Revolve. Close the sketch to see and use the other Feature tools.
Basic workflow
You have the ability to create as many features (and therefore parts) as you want, in a Part Studio.
- In a Part Studio, with an existing sketch or part, tap to select the Feature tool you want. That tool's dialog opens:
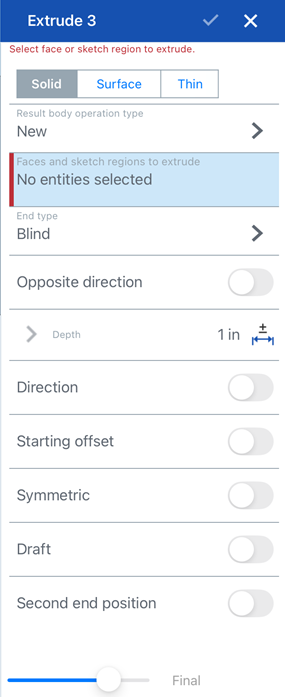
- Using the dialog, and by selecting entities in the workspace (sketches, part faces, or surfaces) fill out the required parameters.
- When you are done filling out the parameters, visualize changes using the Preview slider.
- Accept the feature by tapping the checkmark.
You have the ability to cancel a feature at any time by tapping the x.
Each Feature tool requires different information to complete the feature. For more specific information on what is required for each tool, see Feature tools.
For more information on how to fill out the required parameters in a dialog, see Dialogs.
When creating Features in Onshape, you use the Feature tools in the Feature toolbar.
![]()
Feature tools create, modify, or manipulate 2D and 3D geometry to create new parts, modify existing ones, or generate construction tools for later use. Features are stored parametrically, visible in the Feature list as its own entity.
The Feature toolbar is always accessible at the top of the graphics area in a Part Studio. If you are editing a sketch, there are two Feature tools available in the Feature toolbar, for efficiency; Extrude and Revolve. Close the sketch to see and use the other Feature tools.
You have the ability to create as many features (and therefore parts) as you want, in a Part Studio.
- In a Part Studio, with an existing sketch or part, tap to select the Feature tool you want. That tool's dialog opens:

- Using the dialog, and by selecting entities in the workspace (sketches, part faces, or surfaces) fill out the required parameters.
- When you are done filling out the parameters, visualize changes using the Preview slider.
- Accept the feature by tapping the checkmark.
You have the ability to cancel a feature at any time by tapping the x.
Each Feature tool requires different information to complete the feature. For more specific information on what is required for each tool, see Feature tools.
For more information on how to fill out the required parameters in a dialog, see Dialogs.