Sketch Basics
![]()
![]()
![]()
Available in: Sketch
Use the Sketch toolbar to create a set of curves drawn on a plane, with a system of dimensions and constraints.
In Onshape, sketches are created in Part Studios and consist of sketch curves (line segments, polygons, rectangles, splines, etc). Sketches are the basis for models and are stored parametrically, visible in the Features list as its own entity.
You can rigidly transform geometry in an active sketch simultaneously through the context menu once sketch entities are selected.
You can copy sketches within a Part Studio, copy a sketch to another Part Studio, and derive a sketch for use in another Part Studio.
To access the Sketch toolbar and begin sketching, clickSketch
(![]() ) in the Feature toolbar:
) in the Feature toolbar:

This opens the Sketch dialog:
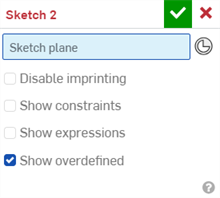
Onshape remembers your selected options in the Sketch dialog and preserves them the next time you open it.
When the Sketch dialog is active, use this Sketch tools toolbar:
![]()
Access the Sketch shortcut toolbar with the S key while in an active sketch (with a Sketch dialog open):

Customize the shortcut toolbar through your Onshape account Preferences page. See Sketch tools, Feature tools, and Assemblies for more information on customizing those toolbars.
To learn more about creating sketches in Onshape, you can follow the self-paced course here: Sketching (Onshape account required).
To learn about creating solid bodies and parts from sketches, using Feature tools, you can follow the self-paced course here: Part Design Using Part Studios (Onshape account required).
You can create as many sketches as necessary in a Part Studio and Extrude into as many parts as you want.
- In a Part Studio, click
Sketch
to open the Sketch dialog:

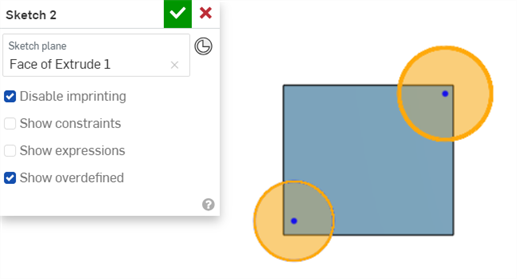
When sketching on the face of a pre-existing part (shown below left), you can select the Disable imprinting checkbox to prevent the face of existing part being broken into distinct regions based upon the new sketch (shown below right):

The sketch above is created using the face of the rectangle. When the Disable imprinting box is left unchecked, the rectangle sketch lines become part of the new sketch (of the circles). (Notice the shaded regions that are sections of the extruded rectangle, above.)
When the Disable imprinting box is checked, the rectangle does not become part of the new sketch, as shown by the entire circles being selected (and not broken into two regions) below:
- Select the plane to sketch on (you can sketch on one plane at a time).
You can also select a part face or a Mate connector (implicit or explicit) as the sketch plane if you have an existing sketch or part.
Click the
 icon in the sketch dialog to see implicit Mate connectors when you mouse over the sketch or part. The sketch will respect the coordinate system defined by the Mate connector.
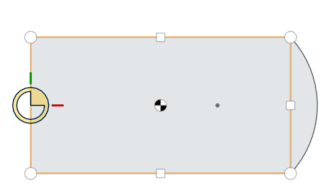
Above, the circles and squares and the centroid are implicit Mate connectors visible upon mouse-over
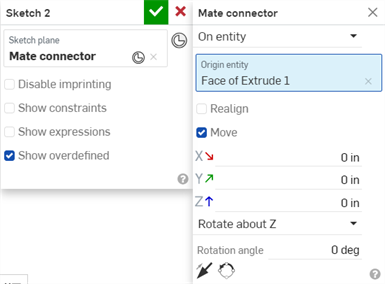
Once a Mate connector is selected, click the Mate connector icon in the dialog field (outlined in blue below) to open a dialog with which to edit the Mate connector:
- Select a Sketch tool from the Sketch toolbar.
- Click in the graphics area to create the sketch geometry. Different tools require different numbers of clicks (as specified in those topics).
Some tools allow you to specify dimensions while you sketch, for example:
Sketch dimension appears as the sketch is drawn. 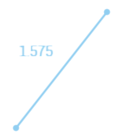
When the sketch is drawn the suggested dimension value appears in a box. Type a value (or expression) to dimension the sketch geometry.
Or, continue sketching and the geometry remains un-dimensioned.
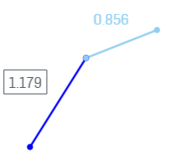
Dimensions specified for two of the three line segments. 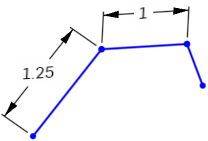
- Toggle between multiple dimension boxes using the Alt+arrow key (for example, in rectangles).
- You can also use a variable for a dimension:
- To enter a variable into a dimension field while sketching the geometry (shown above), enter "=#" and the variable name, as in: =#d. Entering "#" without the equal sign (=) first changes the 3D view to a left view.
- To enter a variable into a dimension field after it has been sketched, the equal sign (=) is not required. Enter "#" and the variable name, as in: #d.
- Dimension a sketch at a later time using the Dimension tool.
- Use
automatic inferencing
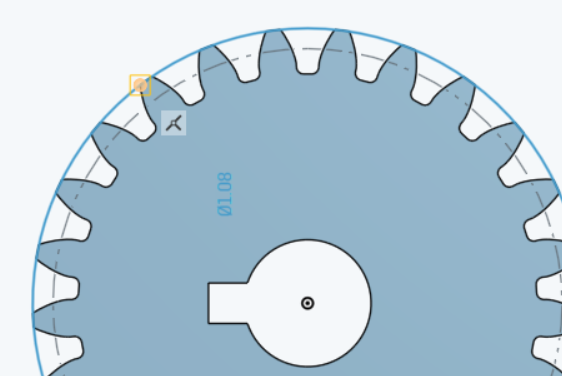
to apply constraints while sketching including coplanar vertices and edges of an existing (but separate) sketch or feature. As you move the cursor over existing sketches or features, coplanar vertices and edges will 'wake up' (be highlighted) indicating you can select them to create an inferred constraint.
For example, in the image below the gear was created with a sketch on the Top plane. In a later sketch, to create a circle on the Top plane, hover over a vertex on the gear to constrain the circle to the edge of the gear:
- Add manual constraints as appropriate.
-
Accept the sketch and close the dialog with
 .
.
Canceling the sketch with
![]() closes the dialog and does not record the sketch actions taken when the dialog was open. To reverse the action of clicking the
closes the dialog and does not record the sketch actions taken when the dialog was open. To reverse the action of clicking the
![]() , click the Restore link in the message bubble that appears:
, click the Restore link in the message bubble that appears:

See also: Troubleshooting Sketch Geometry.
As you sketch and pass over points or lines, you may awaken inferences.
To see all constraints, check the Show constraints checkbox in the Sketch dialog.
When selecting, non-fully constrained sketch points (displayed in blue or red) are prioritized over any overlapping, fully constrained sketch points (displayed in black).
Line styles
As you sketch and then create models, notice the line styles of your sketches and edges of your models change or differ from each other. Read on to understand line styles in Onshape.
Sketch lines
| Active sketch | Selected line, active sketch | Inactive sketch | Selected line, inactive sketch |
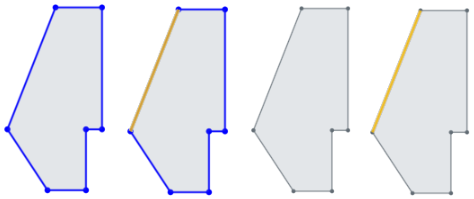
|
|||
Construction lines
| Active | Active, selected | Inactive | Inactive, selected |
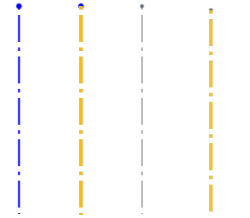
|
|||
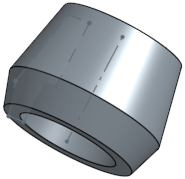
Sketch lines obstructed by model geometry
The single line in the middle of the part, below, is a construction line.
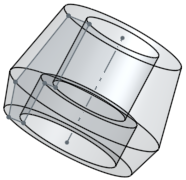
Hidden lines
The part edges are dark and solid, the sketch lines are lighter and solid, and the construction line is light and dashed (going through the middle of the part).
Used edges (projected edges)
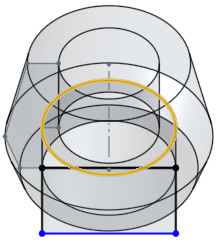
Use (project) an edge of a part into another sketch. Below, the circular edge (highlighted) is used and results in a straight line in the new sketch:
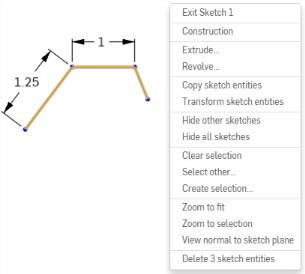
Use the context menu > Transform sketch entities command (available when at least one sketch entity is selected) to move sketch entities simultaneously.
The manipulation triad appears, drag to manipulate selected sketch entities:
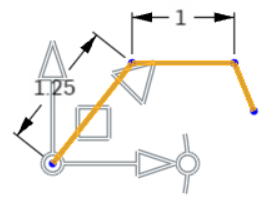
The center of the triad is used for free drag, allowing for repositioning of the triad without changing the transform operation. Free drag snaps to sketch inferences, and normal drag does not.
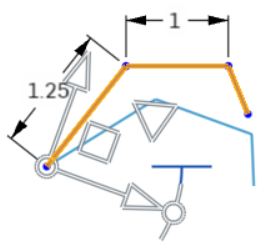
Drag the highlighted (above) angle indicator to rotate the sketch.
Result, below:

Pre- and post-selection is supported; entities can be added and removed during the operation.
Click off the sketch or press Enter to commit the transform and exit the operation. Press Esc to cancel the operation.
In the case of no rotation or 180 degree rotation, internal constraints are unchanged.
In the case of 90 degree or 270 degree rotation, horizontal and vertical constraints swap.
In some cases, construction geometry may be added to maintain degrees of freedom.
Directed dimensions are deleted, and may be replaced with construction geometry and minimum dimensions.
Transform is supported for images, text, DWG, and DXF:
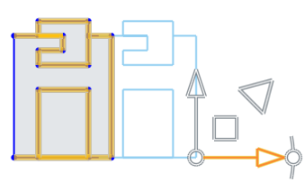
For more information, see Transform Sketch.
Sketches must be selected in the Feature list in order to be copied and then pasted into either an open sketch, or via the Paste into sketch command from the context menu:
- Select the sketch in the Feature list, right-click to access the context menu, and select Copy sketch.
- Either open a sketch, right-click and select Paste into sketch on the context menu.
- Or right-click the sketch to paste into, in the Feature list and select Paste into sketch.
- Select a sketch in Part Studio A Feature list, right-click and select Copy sketch.
- Make Part Studio B active.
- Either select an existing sketch, right-click and select Paste sketch entities.
- Or create a new sketch, select a sketch plane, right-click and select Paste sketch entities.
You must have a sketch in a Part Studio in order to derive it in another Part Studio. You need not have an existing sketch nor create a new sketch before inserting a derived sketch.
-
In the second Part Studio, click Derived
 .
.
- In the dialog, select the sketches to derive; you can select more than one.
-
Close the dialog with
 .
.
Sketches are placed on the plane upon which they were created. When the original sketch is edited, the changes are reflected in the derived sketch.
If an expression without a variable is used for a sketch dimension, it is indicated with the Expression without a variable icon (![]() ) to the left of the dimension value. If an expression with a variable is used for a sketch dimension, it is indicated with the Expression with variable icon (
) to the left of the dimension value. If an expression with a variable is used for a sketch dimension, it is indicated with the Expression with variable icon (![]() ) to the left of the dimension value.
) to the left of the dimension value.
To show expressions in the sketch:
-
Check the Show expressions checkbox on the Sketch dialog.
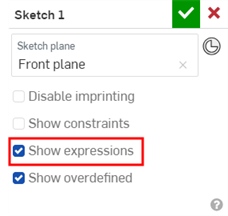
-
The expressions are displayed above the dimension (shown in the image below right).

Expressions when Show expressions is unchecked (left) and checked (right).
Tips
-
Expression text display length is limited to 70 characters.
-
If Show expressions is checked on the Sketch dialog, it will be unchecked when the Sketch dialog is closed and reopened.
-
See Variable for more information about creating variables for use in expressions in a Part Studio.
Place comments on a particular sketch for later reference or for other collaborators. You can also indicate that you want to receive email notifications of other users' comments on the sketch.
- Right-click on the sketch in the Feature list and select Add comment.
- Type a comment, optionally indicate that you wish to receive email notifications of others' comments.
- Close Comments panel.
If another user has been shared on the document and has selected Receive comment email notifications, an email is sent to that email address with the text of your comment in it.
Use the Shift+h key command as a toggle to hide/show all sketches in a Part Studio.
When creating sketches in Onshape, you use the New Sketch tool and the Sketch tools.

In Onshape, sketches are created in Part Studios and consist of sketch curves (line segments, polygons, rectangles, splines, etc). Sketches are the basis for models and are stored parametrically, visible in the Feature list as its own entity.
You can rigidly transform geometry in an active sketch simultaneously through the context menu once sketch entities are selected.
You can copy sketches within a Part Studio, copy a sketch to another Part Studio, and derive a sketch for use in another Part Studio.
To access the Sketch tools and begin sketching:
-
Tap the New Sketch tool (
 ) in the toolbar.
 -
Tap the Sketch tools or categories (
 /
/ /
/ /
/ /
/ /
/ /
/ ). If an icon has an accompanying dropdown arrow, tap it to access additional sketch tools under each category. Then tap to select a sketch tool.
You can create as many sketches as necessary in a Part Studio and Extrude into as many parts as you want.
- In a Part Studio, tap the New Sketch tool (
 ) in the toolbar. The Sketch dialog opens.
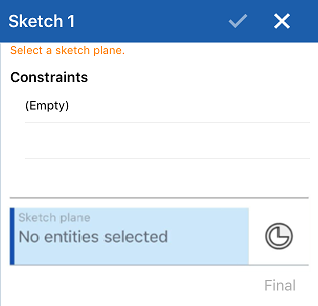
- Tap to select the plane to sketch on (you are only able to select one plane at a time).
You can select a Mate connector (implicit or explicit) as the sketch plane. The sketch will respect the coordinate system defined by the Mate connector.
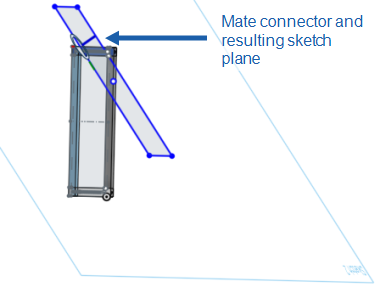
- Select a Sketch tool from the Sketch toolbar.
- Tap in the graphics area to create the sketch curve. Different tools require different numbers of taps (as specified in those topics).
- Dimension a sketch using the Dimension tool.
- Use automatic inferencing to apply constraints while sketching.
- Add manual constraints as appropriate.
- Tap the checkmark to accept the sketch and close the dialog.
Canceling the sketch by tapping the x closes the dialog and does not record the sketch actions taken when the dialog was open.
As you sketch and pass over points or lines, you may awaken inferences. You can also manually add constraints using the constraint tools.
See Automatic Inferencing and Constraints for more info.
Line styles
As you sketch and then create models, notice the line styles of your sketches and edges of your models change or differ from each other. Read on to understand line styles in Onshape.
Sketch lines
Active:
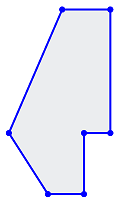
Active, selected:
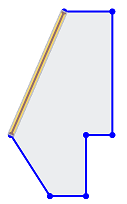
Inactive:
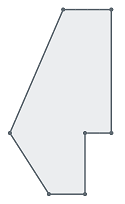
Inactive, selected:
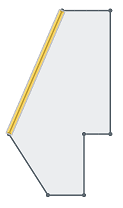
Construction lines
Active:

Active, selected:

Inactive:

Inactive, selected:

Sketch lines obstructed by model geometry
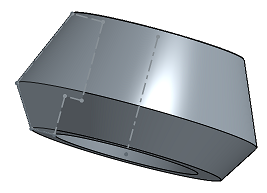
The single line in the middle of the part below is a construction line.
Hidden lines
The part edges are dark and solid, the sketch lines are lighter and solid, and the construction line is light and dashed (going through the middle of the part).
Used edges (projected edges)
Use (project) an edge of a part into another sketch. Below, the circular edge (highlighted) is used and results in a straight line in the new sketch.
You can copy and paste a sketch within, or across, Part Studios.
To copy a sketch
- Select the sketch in the Feature list, open the Context Menu, and select "Copy sketch"
- Select the overflow menu of the sketch in the Feature list and select "Copy sketch"
- While editing or creating a sketch, open the Context Menu and select "Copy sketch"
Once you have copied a sketch, you can move into a different Part Studio, and paste the sketch in a sketch or Feature in the other Part Studio.
To paste a sketch
- Select a sketch in the Feature list, open the Context Menu, and select "Paste into sketch"
- Select the overflow menu of a sketch in the Feature list and select "Paste into sketch"
- While editing or creating a sketch, open the Context Menu and select "Paste into sketch"
- While editing a feature, select a plane or planar face, open the Context Menu, and select "Paste into sketch"
Once you have pasted a sketch, touch and drag, or tap, to position the pasted sketch.
You must have a sketch in a Part Studio in order to derive it in another Part Studio. You do not need to have an existing sketch, nor do you need to create a new sketch, before inserting a derived sketch.
- While in a Part Studio, select the Derived tool.

A list of Part Studios and their features appears. If the list is lengthy, use the search box to search for a Part Studio or feature by name.
- Tap to select a Part Studio.
- Tap to select a sketch to derive into the current Part Studio.
See Derived for more info.
When creating sketches in Onshape, use the New Sketch tool and the Sketch tools.
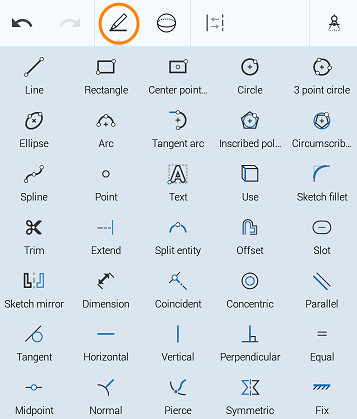
In Onshape, sketches are created in Part Studios and consist of sketch curves (line segments, polygons, rectangles, splines, etc). Sketches are the basis for models and are stored parametrically, visible in the Feature list as its own entity.
You can rigidly transform geometry in an active sketch simultaneously through the context menu once sketch entities are selected.
You can copy sketches within a Part Studio, copy a sketch to another Part Studio, and derive a sketch for use in another Part Studio.
To access the Sketch tools and begin sketching, tap the New Sketch tool in the toolbar.
![]()
You can create as many sketches as necessary in a Part Studio and Extrude into as many parts as you want.
- In a Part Studio, tap the New Sketch tool. The Sketch dialog opens.
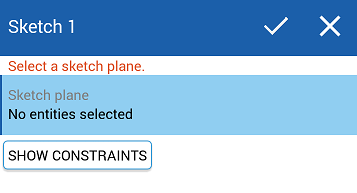
- Tap to select the plane to sketch on (you are only able to select one plane at a time).
You can also select a Mate connector (implicit or explicit) as the sketch plane. The sketch will respect the coordinate system defined by the Mate connector.

- Select a Sketch tool from the Sketch toolbar.
- Tap in the graphics area to create the sketch curve. Different tools require different numbers of taps (as specified in those topics).
- Dimension a sketch using the Dimension tool.
- Use automatic inferencing to apply constraints while sketching.
- Add manual constraints as appropriate.
- Tap the checkmark to accept the sketch and close the dialog.
Canceling the sketch by tapping the x closes the dialog and does not record the sketch actions taken when the dialog was open.
As you sketch and pass over points or lines, you may awaken inferences. You can also manually add constraints using the constraint tools. To see all constraints, tap the Show constraints button in the Sketch dialog.
See Automatic Inferencing and Constraints for more info.
Line styles
As you sketch and then create models, notice the line styles of your sketches and edges of your models change or differ from each other. Read on to understand line styles in Onshape.
Sketch lines
Active:

Active, selected:

Inactive:

Inactive, selected:

Construction lines
Active:

Active, selected:

Inactive:

Inactive, selected:

Sketch lines obstructed by model geometry
The single line in the middle of the part below is a construction line.

Hidden lines
The part edges are dark and solid, the sketch lines are lighter and solid, and the construction line is light and dashed (going through the middle of the part).
Used edges (projected edges)
Use (project) an edge of a part into another sketch. Below, the circular edge (highlighted) is used and results in a straight line in the new sketch:
You can copy and paste a sketch within, or across, Part Studios.
To copy a sketch
- Select the sketch in the Feature list, open the Context Menu, and select "Copy sketch"
- Select the overflow menu of the sketch in the Feature list and select "Copy sketch"
- While editing or creating a sketch, open the Context Menu and select "Copy sketch"
Once you have copied a sketch, you can move into a different Part Studio, and paste the sketch in a sketch or Feature in the other Part Studio.
To paste a sketch
- Select a sketch in the Feature list, open the Context Menu, and select "Paste into sketch"
- Select the overflow menu of a sketch in the Feature list and select "Paste into sketch"
- While editing or creating a sketch, open the Context Menu and select "Paste into sketch"
- While editing a feature, select a plane or planar face, open the Context Menu, and select "Paste into sketch"
Once you have pasted a sketch, you have the option to touch and drag, or tap, to position the pasted sketch.
You must have a sketch in a Part Studio in order to derive it in another Part Studio. You do not need to have an existing sketch, nor do you need to create a new sketch, before inserting a derived sketch.
- While in a Part Studio, select the Derived tool.

A list of Part Studios and their features appears. If the list is lengthy, use the search box to search for a Part Studio or feature by name.
- Tap to select a Part Studio.
- Tap to select a sketch to derive into the current Part Studio.
See Derived for more info.