パフォーマンスに関する考慮事項
あらゆるツールにおけるモデリングプロセスの一部は、製造、ワークフロー、そしてもちろん、モデリング自体のための効率的かつ適切なモデリングです。CAD ツールを使用してモデルを効果的に作成すると、モデル全体の再生時間が短縮されます。Onshape では、モデリングの効率化と再生時間の短縮を実現するために、特定の手順を実行できます。
下図の推奨事項に加えて、これらの他の学習リソースの詳細は、Onshape ドキュメントでデータを管理するためのベストプラクティス (Onshape アカウントが必要です)、品構造組織のヒント (Onshape アカウントが必要です)、およびハードウェアの推奨事項 (Onshape アカウントが必要です)を参照してください。次のコース「ドキュメントのパフォーマンスの最大化 (Onshape アカウントが必要です)」に登録することもできます。
Part Studio で再生時間をチェックする
パーツによっては、Part Studio での再生に時間がかかる場合があります。これにより、ロード時間が必要以上に遅くなる可能性があります。モデリング戦略によっては、再生時間が長くなるだけでなく、フィーチャーリストに複雑なフィーチャーが配置される場合もあります。
再生時間を短縮するためにできること
まず、長い時間がかかっているフィーチャを確認します。 [フィーチャーリスト] の [再生] パネルを使用して、フィーチャーごとの時間を確認します。フィーチャーリストの時計アイコンをクリックして、[再生時間] パネルを開きます。
![[再生時間] アイコンをクリックして、[再生時間] リストを開きます。](Resources/Images/concepts/regeneration-times.png)
再生に長い時間がかかっているフィーチャーを確認したら、アクションを実行できます。
次に、再生時間にどのように影響するかを理解してください。
- 生成に時間がかかるコンフィギュレーションテーブルや Part Studio で作業する場合は、再生を一時停止します。
- パターンまたはミラーを作成するときは、[フィーチャーパターン] オプションを使用し (下に青枠で囲まれています)、必要に応じて [フィーチャーを再適用する] をオンにするだけです。これにより、パターンのインスタンスごとにフィーチャーを再生する必要がありません。
![[フィーチャーを再適用する] を選択解除したパターン](Resources/Images/performance-02.png)
-
テクスチャ、ボルトのスレッド、内部ジオメトリ、その他の審美的な詳細など、再生に時間がかかるフィーチャーを抑制する コンフィギュレーション を作成します。この方法により、設計やモデル化を行う間にこの軽量な抑制されたコンフィギュレーションを使用し、設計プロセスの最後に、よりパフォーマンスを重視した抑制されていないコンフィギュレーションに切り替えることができます。
-
長い再生フィーチャーを フィーチャーリストの末尾に移動します。
フィーチャーパターンおよびミラーツールの使用方法の詳細は、円形パターン、曲線パターン、直線パターン、およびミラーを参照してください。
再生時間の短縮の詳細は、フィーチャーリストの操作を参照してください。
バージョンからパーツを派生する
パーツの派生は、時間の節約と設計の一貫性の両方において、設計の合理化に役立ちます。設計を反復処理したり、そこから密接に関連するパーツをモデル化するために、設計を再作成する必要はありません。
ただし、パーツを派生させる際には、考慮すべき事項がいくつかあります。何よりもまず、派生はドキュメントのバージョンから行うのが最善です。バージョンは不変で静的であるため、バージョン内のエンティティから派生するときに再生時間や更新は必要ありません。[派生] ダイアログでバージョンを直接選択できます。例は次の通りです。
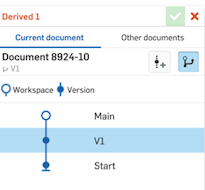
バージョンの詳細は、バージョンマネージャーを参照してください。パーツの派生の詳細は、派生ツールを参照してください。
多くの Part Studio でパーツを派生させないでください
再作成するのではなく派生させる方が、経済的で設計に精通しているのですが、デイジーチェーン方式で多くの Part Studio 間で派生させると、パフォーマンスへの影響があります。代わりに、バージョンを作成し、そのバージョンから直接派生させます。設計を変更する必要がある場合は、バージョンからブランチを作成し、変更を行い、派生元となる別のバージョンを作成します。
3 つの Part Studio で派生している場合は、Part Studio が「多すぎる」とみなされるので、バージョンから直接派生することをお勧めします。
パーツの派生の詳細は、派生ツールを参照してください。
アセンブリで作業するためのヒント
-
バージョン参照を使用します。バージョンは不変で静的なので、再生時間が短く、自動更新もありません。パーツ、複数のコンフィギュレーションがある Part Studio、サブアセンブリにバージョン参照を使用すると、アセンブリの読み込み時間が短縮されます。
-
サブアセンブリを完全に拘束して固定サブアセンブリを使用します。固定サブアセンブリ合致は、上位アセンブリでは解決する必要がありません。固定サブアセンブリがあると、合致計算時間が短縮されます。
-
拡大やパンを行うと、多数の Part Studio から派生した多数のインスタンスが存在する複雑なアセンブリでは、インスタンスを選択すると、そのテッセレーションが他のどのインスタンスよりも先に調整されます。
-
最上位のアセンブリに挿入されたサブアセンブリには、[位置のロック/フォロー] オプションを使用してください。
アセンブリ内の小さなコンポーネントは、フレームレートを維持するため表示が切り捨てられます。ボディの数が 5,000 未満のアセンブリの場合、画面サイズのしきい値は 2 ピクセルです。大規模なアセンブリの場合、しきい値は 10 ピクセルです。これによる視覚的な影響はごくわずかで、大規模なアセンブリ (標準コンテンツのパーツが多数あるアセンブリなど) のフレームレートが向上します。切り捨ては表示のみで、BOM は変更されません。
ドキュメントごとにタブを妥当な数に保つ
Onshape は、並列のドキュメント内にあるすべての要素タブを計算します。Onshape ドキュメントは、さまざまな種類のデータと一見無限の数のタブを保持できるコンテナの一種ですが、ベストプラクティスは次のとおりです。
- ドキュメント内のタブの数は 100 未満のように小さくしてください。
- 特定のタブを別のドキュメントに移動するには、[ドキュメントに移動] を使用します。これにより、1 つのドキュメント内のパフォーマンスが向上するだけでなく、パーツを別のドキュメントに移動して、設計の特定のパーツをレビューの目的で特定のサードパーティと共有できます。詳細は [タブの整理] を参照してください。
合致を扱うためのヒント
-
できる限り自由度の少ない合致を使用し、接線合致、平面合致、および平行合致の数を削減します。Onshape 独自の合致システムにより、2 つのパーツ間でよりシンプルな合致を使用することができます。自由度の多い少数の合致を使用することで、合致の解決時間を大幅に短縮することができます。
-
合致制限の使用を減らします。合致制限は、アセンブリの解決時間を長くする原因となります。制限数を減らすか、必要になるまで合致を抑制することで、合致の解決時間を改善します。
遅延、ネットワーク、地域の問題
遅延は長い待ち時間の結果です。待機時間はミリ秒単位で測定され、データがデバイス (クライアント) から Onshape (サーバー) に移動し、再びデバイスに戻るまでにかかる時間です。ラウンドトリップタイム (RTT) とも呼ばれます。Onshape での作業では、遅延によって遅延が発生する可能性があります。
遅延はいつでも改善できるとは限りません。
接続不良インジケータ
Onshape では、ラグが発生すると警告する接続不良インジケーター ![]() が、グラフィック領域の左下に表示されます。
が、グラフィック領域の左下に表示されます。
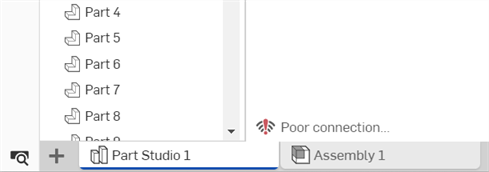
Onshape はウェブソケット経由で Onshape サービスに ping を常に送信します。クライアントは、結果の応答を使用して、クライアントからサーバーまでの往復時間を決定します。一連の ping 値が収集されると、中央値が計算され、遅延が大きいかどうかが判断されます。その場合は、「接続不良」インジケータが表示され、遅延時間が長い限り表示されたままになります。
警告がたまにしか発生しないか、ごくまれにしか発生しない場合、通常は何もする必要がありません。ただし、この警告が続く場合や、特定の時間帯や特定のネットワークで頻繁に表示される場合は、解決策を見つけることをお勧めします。
ドキュメントを回復
ドキュメントの読み込み中にタイムアウトした場合は、[ドキュメントを回復] または [Part Studio を回復] ダイアログを使用して処理方法を決定してください。
![[ドキュメントを回復] ダイアログ](Resources/Images/history/recover-document-dialog-01.png)
![[Part Studio を回復] ダイアログ](Resources/Images/history/recover-part-studio-dialog-01.png)
- フィーチャーリストの頂点にロールバック - (Part Studio の回復時のみ使用可能) フィーチャーリストの上部にあるロールバックバーを使用して Part Studio を再度読み込みます。
- 履歴から以前の変更内容に復元 - [バージョンと履歴] リスト内のオプションにカーソルを合わせ、3 点メニューをクリックして、メニューからオプションを選択します。
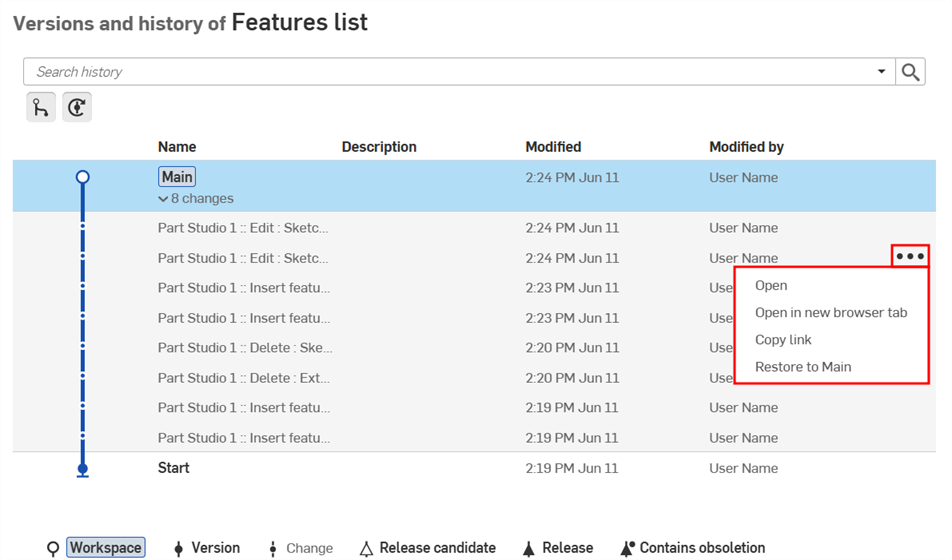
- 引き続き待機 - ドキュメントの読み込みを引き続き待機します。
遅延の一般的な原因と解決策
これらのソリューションには、IT 管理者の関与が必要な場合があります。
-
接続先の地域が間違っています。DNS (ドメインネームシステム) リゾルバが地理的に近くにないこと、または VPN (仮想プライベートネットワーク) を使用していることが原因である可能性があります。Onshape は VPN サーバーの現在地をユーザーの位置として検出します。
-
DNS リゾルバーの問題の場合は、ISP が提供している DNS リゾルバーを使用していることを確認してください。それが利用できない場合は、お住まいの国または地域の DNS リゾルバーを使用してください。
DNS リゾルバーのコンフィギュレーションは、オペレーティングシステムまたはルーターで実行されます。http://www.whatsmydnsserver.com などのサイトは、どの DNS リゾルバーを使用しているかを見つけるのに役立ちます。
一部の DNS リゾルバーは、「EDNS クライアントサブネット」と呼ばれる技術で問題を修正します。Google はこれを使用していますが、Microsoft (OpenDNS) とCloudflare (1.1.1.1) は使用していません。
-
可能であれば VPN の使用を避けるか、VPN 内の位置情報に近い地域を選択して、より近い Onshape の地域を使用してください。
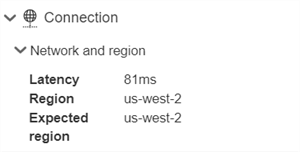
リアルタイムの待機時間、接続先のサーバーの地域、現在地に最も近いサーバーの地域 (想定地域) を表示するには、パフォーマンスパネルの [接続] > [ネットワークと領域] ドロップダウンを使用してください。
-
Onshape:
-
米国、オレゴン (us-west-2)
-
アイルランド、ダブリン (EU-west-1)
-
日本、東京 (ap-northeast-1)
-
シンガポール (ap-southeast-1)
-
オーストラリア、シドニー (ap-southeast-2)
-
-
Onshape Government:
-
米国、オレゴン州 (us-gov-west-1)
-
米国、バージニア州 (us-gov-east-1)
-
-
-
ISP (インターネットサービスプロバイダー) 経由のネットワーク接続が不十分です。
-
ISP はインターネット速度の制限を設定します。許容される最大速度を確認するには、ISP に問い合わせてください。インターネット速度を測定するには、Fast.com を使用してください。
-
別のネットワーク接続に切り替えてみてください。たとえば、ホットスポットを使用している場合は、Wi-Fi に切り替えるか、イーサネットケーブルを接続してみてください。
-
Wi-Fi 接続を使用している場合は、ルーターの近くにおり、コンピュータとルーター間の信号を遮るものがないことを確認してください。新しいネットワークに切り替えるか、信号強度が高いルーターを使用してください。
-
-
別の地域のユーザーと同時に Onshape ドキュメントで共同作業しています。
-
ドキュメントは、それを開く人に最も近い領域で開きます。1 人のユーザーがドキュメントを編集するデザイナーで、もう 1 人のユーザーが変更を確認する閲覧者である場合は、必ずデザイナーがドキュメントを開いてください。閲覧者が誤ってドキュメントを開いた場合は、両方のユーザーがドキュメントを約 10 分間閉じてから、デザイナーがドキュメントを開くことで、デザイナーの領域に切り替えることができます。
-
-
https://dnsleaktest.com/ でデータリークテストを実施してください。これにより、潜在的な問題が見つかることがよくあります。
-
使用しているブラウザには、IndexedDB 経由で利用できるローカルストレージがありません。データをローカルにキャッシュできないため、読み込みパフォーマンスに影響します。これは通常、ハードドライブに十分な空き容量がないことを示しています。
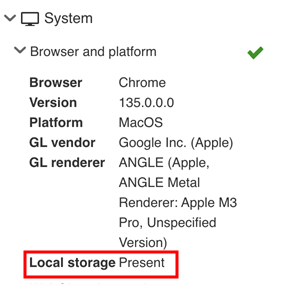
ローカルストレージがある場合は、データをローカルにキャッシュできるため、パフォーマンスが向上します。
その他のリソース
-
Cloudping は、ブラウザから複数の AWS 領域までの遅延を測定する独立したツールです。これを使用して、接続先の地域と遅延がほぼ一致しているかどうかを確認できます。
-
AWS ネットワークの待機時間では、待機時間に関する情報とその改善方法に関する提案を提供します。
-
Wireshark はラグの分析に使用できるネットワークプロトコルアナライザーです。
それでも遅延の問題を解決できない場合は、サポートチケットを Onshape に提出してください。