 曲線パターン
![]()
![]()
![]()
選択したパーツ、面、フィーチャーは、スケッチ線 (または一連の隣接する曲線、ソリッドパーツ上のエッジ、ワイヤパーツ上のエッジ) に沿って、選択した順序で複製します。マテリアルの追加や削除、パスに交差するパーツの新規作成、既存のパーツの修正が行えます。曲線パターンは、アクティブなシートメタルの操作中も使用できます。
Onshape には複数のパターンフィーチャーがあり、Part Studio 内でパーツ、フィーチャー、または面の追加インスタンス作成できます。使用可能なパターンタイプは、直線パターン、円形パターン、ミラーパターン、曲線パターンです。
直線パターンは、単一方向に沿ってインスタンスを生成するか、2 方向に配列を作成します。
円形パターンは、軸の周りにインスタンスを生成します。
ミラーパターンは、ミラー平面の周囲のインスタンスを反射します。
曲線パターンは、曲線またはパスに沿ってインスタンスを生成します。
パターンタイプを選択します。
パーツパターンは、選択したパーツの追加インスタンス作成します。パーツパターンを選択すると、ブール演算オプションを使用して新規作成、追加、削除、交差を行うことができます。
新規作成タブでは、パターンのインスタンスごとに新しいパーツが作成されます。この操作は慎重に行ってください。Part Studio に同一のパーツが重複すると、アセンブリや部品表では個別の一意のパーツとして表示されるため、重複しないようにしてください。
追加タブでは、既存のパーツにマテリアルを追加します。重複するパーツの場合、追加操作で複数のパーツを 1 つに結合できます。
削除タブでは、パターンインスタンスがパーツと交差するマテリアルを削除します。
交差タブでは、パターンインスタンスがパーツと交差する場所のマテリアルを残します。
ブール演算オプションを使用すると、パーツをツールボディとして使用してマテリアルを追加または削除したり、パターンインスタンスと既存のジオメトリとの交点を維持したりできます。
フィーチャーパターンは、フィーチャーリストで選択した 1 つまたは複数のフィーチャーを複製します。
既定では、フィーチャーパターンはシードフィーチャーの末端の種類を考慮しません。末端の種類が異なる場合は、[フィーチャーを再適用] を選択して、フィーチャーの依存関係や端点の条件を含め、選択したフィーチャーからパーツを再生成します。このオプションは、パフォーマンスや再生時間に影響する可能性があるため、必要な場合にのみ使用してください。
面パターンは選択した面を複製します。計算負荷は、パラメトリックに結合されたフィーチャーやパーツよりも面の方がはるかに低いため、最高のパフォーマンスが得られます。このため、結果のジオメトリが同一の場合は、フィーチャーパターンやパーツパターンよりも優先されます。
面が接線方向につながっている場合や、ポケットや突起などの認識可能な幾何学的フィーチャーを形成している場合は、[選択範囲を作成] を使用してパターン化する面のサブセットをより簡単に選択できます。
面の選択のタイプを設定し、1 つまたは複数の面を選択して [選択を追加] をクリックします。
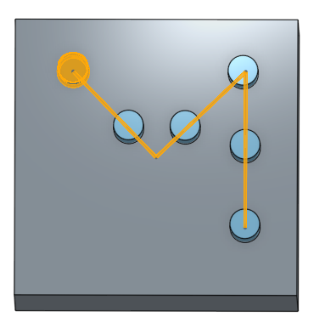
ミラーを除くすべてのパターンには、インスタンスをスキップするオプションが含まれています。インスタンスをスキップすると、ジオメトリの競合が発生したり、特定のインスタンスを除外したい場合に役立ちます。選択点はインスタンスごとにグレーで囲まれて表示されます。インスタンスをスキップするには、それぞれの選択点を選択するか、ボックス選択を使用して複数のインスタンスを同時に選択します。Onshape は、スキップしれたインスタンスの選択ポイントを水色で強調表示します。
マージ範囲は、どのパーツがパターンフィーチャーの影響を受けるかを決定します。たとえば、マージ範囲に含めることで、どのパーツをパターン化されたポケットでカットするかを指定できます。マージ範囲に含まれていないパーツは、パターンフィーチャーの影響を受けません。
マージ範囲にすべてのパーツを含めるには、[すべてとマージ] を選択します。
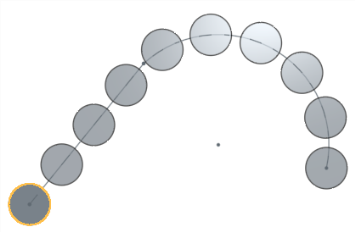
曲線パターンフィーチャーは、曲線に沿って等間隔に配置されたパーツ、フィーチャー、面をパターン化します。
曲線パターンフィーチャーを開始する前に、そのフィーチャーがたどるパスを作成してください。スプライン、円弧、円などの 2D スケッチエンティティ、または 3D 曲線やパーツエッジなどの 3D 空間のエンティティを使用してパス定義します。最良の結果を得るには、シードインスタンスから始まるパス作成してください。パスには、始点から終点までがつながっている限り、複数のエンティティを含めることができます。
フィーチャーツールバーから新しい曲線パターンを作成します。
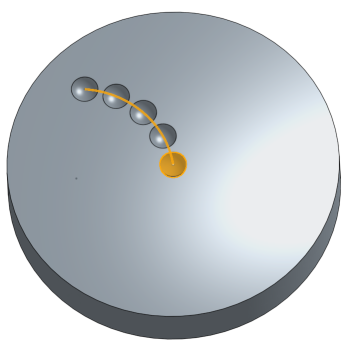
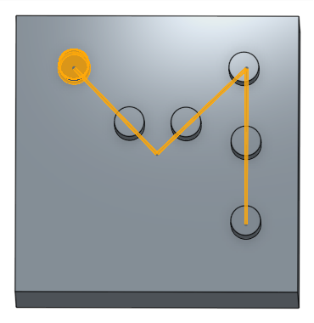
パターンタイプとシードインスタンスに適切なオプションを選択します。この例では、パーツのエッジに沿って 2 つのフィーチャーをパターン化しています。フィールドに沿ってパターン化するパスにフォーカスし、パターン化するパスに結合するエンティティを選択します。次に、インスタンス数を入力します。この値には元のシードインスタンスが含まれます。等間隔に設定すると、選択したパスの全長に沿ってインスタンスが均等に配置され、距離を指定するとインスタンス間の間隔が定義されます。
[方向] を [曲線に正接] に設定して、インスタンスがシードの方向と一致するようにします。
-
 をクリックします。
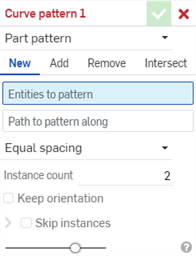
- パターンタイプを選択します。
- パーツ - 個々のパーツをパターン化します。
- フィーチャー - フィーチャーリストにリストされている特定のフィーチャ (またはフィーチャ) (押し出し、フィレット、スイープ、スケッチなど) をパターン化します。フィーチャはシートメタルでは機能しません。シートメタルの修正については、面パターンタイプを参照してください。
- 面 - 特定のパーツ上の特定の面をパターン化します。
- [結果操作タイプ] を選択します。
- 新規 - 新しいパーツに使用する新しいマテリアルを作成します。
- 追加 - 新しいマテリアルを作成して既存のマテリアルに追加します。
- 削除 - 既存のマテリアルからマテリアルを削除します。
- 交差 - ジオメトリがオーバーラップしている場所だけマテリアルを残します。
- [パターン化するエンティティ] フィールドにフォーカスして、パターンに複製するエンティティを選択します。
パターン化する面を選択する場合、[選択範囲の作成]
 は関連する面を選択するのに便利です。
 - [パターン化に沿ったパス] フィールドにフォーカスを設定し、複製されたパターンエンティティを配置するスケッチ線 (または一連の隣接する曲線、ソリッドボディ上のエッジ、ワイヤボディ上のエッジ) を選択します。
- 間隔オプションを選択します。
- 等間隔 - 要求された数のインスタンスを曲線に沿って均等に分散します。
- 距離 - 各インスタンスからオフセットするスペースを設定します
- (距離間隔のみ) 各インスタンスをオフセットするスペースを [距離] フィールドに入力します。
- パターンに含めたいインスタンスの数を入力します。
- 使用できるインスタンスの最小数は 1 です。
- 曲線の長さが、指定した [距離] のインスタンス数をサポートするのに十分でない場合は、エラーが表示されます。この場合は、インスタンス間のオフセットを減らす、インスタンス数を減らす、[等間隔] オプションに切り替える、またはより長い曲線を選択することができます。
- 方向タイプを選択します。
- 曲線に正接 - インスタンスは選択した曲線に正接します。
- 面に垂直 - インスタンスは選択した面に平行に配置されます。
- ロック - 選択したインスタンスは所定の位置にロックされます。
- ([面をロックする] を選択した場合) ロックする面を選択します。
- スキップするパターンのインスタンスを指定するには、[インスタンスをスキップする] オプションをチェックしてください。
- Click the instance's selection handle to add it to the list of instances to skip.
- インスタンスを Part Studio に追加し直すには、リスト内のインスタンスの横にある X をクリックします。
- [クリア] をクリックすると、スキップするインスタンスのリストからすべてのインスタンスが削除されます。
- (フィーチャーパターンタイプのみ) [フィーチャーを再適用する] を選択し、単に初期パターンインスタンスを再作成する代わりに、インスタンスごとにフィーチャーを再生成します ([インスタンス数] で指定)。
-
 をクリックします。
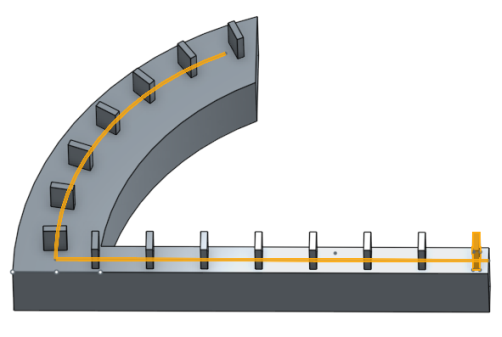
個々のパーツをパターン化します。
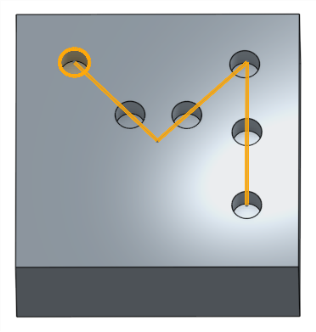
パーツは、2 つの隣接するスケッチ線に沿って 10 回パターン化され、新しいマテリアルが作成されました。
[フィーチャーを再適用する] を選択せずに、フィーチャーリスト (押し出し、フィレット、スイープ、スケッチなど) にリストされている特定のフィーチャ (1 つまたは複数) をパターン化します (より高速で軽量なフィーチャパターン)。これはシートメタルでは使用できません。
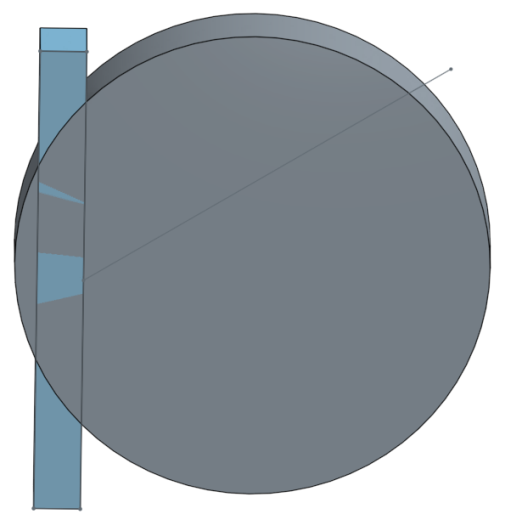
次の例では、最初の押し出しは [次まで] です (押し出しはサーフェスの面まで上がります)。[フィーチャーを再適用する] を選択しないと、パターン化されたフィーチャー (押し出しとフィレット) は初期フィーチャからパターン化され、再生成されません (したがって、[次まで] によりパターンのそれぞれのインスタンスは更新されません)。
![[フィーチャーを再適用する] を選択せずに次まで押し出した例](Resources/Images/feature-tools/curvepattern-reapply-off-01.png)
フィーチャーリストにリストされた特定の (1 つまたは複数の) フィーチャー (押し出し、フィレット、スイープ、スケッチなど) を、[フィーチャーを再適用する] を選択してパターン化します。これはシートメタルで使用できます。
次の例では、最初の押し出しは [次へ] です (押し出しはサーフェスの面まで上がります)。[フィーチャーを再適用する] を選択すると、パターン化されたフィーチャー (押し出しとフィレット) がパターンのインスタンスごとに再生成され、[次まで] がパターンの各インスタンスに適用されます。
![[フィーチャーを再適用する] を選択して次まで押し出した例](Resources/Images/feature-tools/curvepattern-reapply-on-01.png)
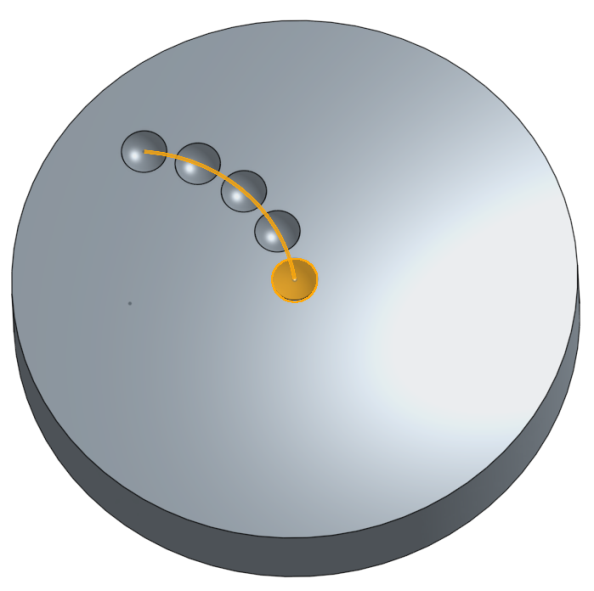
特定のパーツ上の特定の面をパターン化します。
既存のマテリアルからマテリアルを除去するために、1 つのスケッチ線に沿って面を 5 回パターン化しました。
新規 - 新しいパーツになる新しいマテリアルを作成します。

追加 - マテリアルを作成して既存のマテリアルに追加します (この例では、[すべてとマージする] を選択)。

マテリアルを除去し、パターン化するパーツを選択して削除します。
ジオメトリが重なっている部分だけマテリアルを残します。
変更前:

変更後:

- フィーチャーをパターン化する場合、フィーチャーリストで任意の内容を任意の順序で選択できます。選択した順序に関係なく、フィーチャーはフィーチャーリストに表示されている順序で適用されます。
- フィーチャーリストでパターンを選択すると、そのパターンはパターン化されますが、シードはパターン化されません。シードを含めるには、それも選択します。
- ブーリアン演算フィーチャー (ブーリアン演算、分割など) をパターン化する場合は、ブーリアン演算が適用されたフィーチャーも選択する必要があります。
- フィーチャーパターンを作成する場合、[押し出し] フィーチャーの端点の条件など、フィーチャーのすべての側面が適用されます。(対照的に、面パターンはこれらのタイプの修飾子を認識しません)。
- パターンが完成したら、どのエンティティも個別に削除できます。
- 複数のスケッチ線 (またはソリッドパーツ上のエッジ、またはワイヤパーツ上のエッジ) を使用してパターンを導き、予測通りの結果とならない場合は、スケッチ線を異なる順序で選択することを試してください。
-
[フィーチャーを再適用] オプションを有効にしてフィーチャーパターンを使用すると、シードフィーチャーの外部参照がインスタンスごとに自動的に再生されます。
スケッチを選択すると、シードスケッチの寸法と原点または既定の平面 (上、正面、右) への拘束は再適用されません。この動作を利用して、パターン内でどの寸法や拘束を再適用するかを調べることができます。
- スケッチでは、寸法を記入してエンティティを原点または既定の平面に拘束することで、これらの寸法と拘束が各パターンインスタンスに再適用されないようにすることができます。
- 寸法と拘束を原点または既定平面に再適用する必要がある場合は、まず原点または既定の平面に拘束された線と点を使用して補助スケッチを作成します。次に、シードスケッチで、これらのスケッチエンティティを原点または既定の平面の寸法と拘束のプロキシとして使用します。
- 合致コネクタが Part Studio でパターン化されたパーツである場合、Part Studio を挿入するとすべてアセンブリに追加されます。Part Studio をアセンブリに挿入しても合致コネクタが表示されない場合は、そのパーツが合致コネクタ所有者エンティティとしてリストされていることを確認してください。
- 曲線パターンツールアイコン (
 ) をタップします。
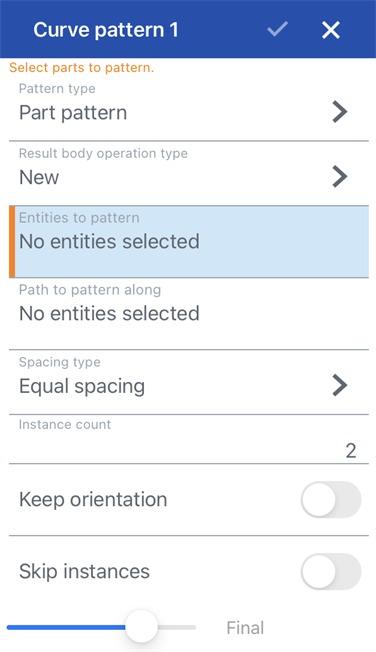
- パターンタイプを選択します。
- パーツ - 個々のパーツをパターン化します。
- フィーチャー - フィーチャーリスト (押し出し、フィレット、スイープ、スケッチなど) にリストされた特定のフィーチャーをパターン化する
- 面 - 特定のパーツ上の特定の面をパターン化します。
- 次のように結果ボディ操作タイプを選択します。
- 新規 - 新しいパーツに使用する新しいマテリアルを作成します。
- 追加 - 新しいマテリアルを作成して既存のマテリアルに追加します。
- 削除 - 既存のマテリアルからマテリアルを削除します。
- 交差 - ジオメトリがオーバーラップしている場所だけマテリアルを残します。
- パターン化するエンティティ フィールドにフォーカスして、パターンに複製するエンティティを選択します。
- パターン化するパスフィールドにフォーカスを設定し、複製されたパターンエンティティを配置するスケッチ線 (または一連の隣接する曲線、ソリッドボディ上のエッジ、ワイヤボディ上のエッジ) を選択します。
- 間隔タイプを選択してください:
- 等間隔 - 要求された数のインスタンスを曲線に沿って均等に分散します。
- 距離 - 各インスタンスからオフセットするスペースを設定します
- (距離間隔のみ) 各インスタンスをオフセットするスペースを [距離] フィールドに入力します。
- パターンに含めたいインスタンスの数を入力します。
- 使用できるインスタンスの最小数は 1 です。
- 曲線の長さが、指定した [距離] のインスタンス数をサポートするのに十分でない場合は、エラーが表示されます。この場合は、インスタンス間のオフセットを減らす、インスタンス数を減らす、[等間隔] オプションに切り替える、またはより長い曲線を選択することができます。
- 方向タイプを選択します。
- 曲線に正接 - インスタンスは選択した曲線に正接します。
- 面に垂直 - インスタンスは選択した面に平行に配置されます。
- ロック - 選択したインスタンスは所定の位置にロックされます。
- オプションで、[インスタンスをスキップ] を切り替えて、スキップするインスタンスを選択します。インスタンスをダブルタップすると、そのインスタンスが Part Studio に再び追加されます。
- チェックマークをタップします。
個々のパーツをパターン化します。
パーツは、2 つの隣接するスケッチ線に沿って 10 回パターン化され、新しいマテリアルが作成されました。

フィーチャーリストに一覧表示されている 1 つまたは複数の特定のフィーチャー (押し出し、フィレット、スイープ、スケッチなど) をパターン化します。
[押し出し] フィーチャーは、2 つの隣接するスケッチ線に沿って 15 回パターン化され、既存のマテリアルに追加されます。
特定のパーツ上の特定の面をパターン化します。
既存のマテリアルからマテリアルを削除するために、1 つのスケッチ線に沿って面を 5 回パターン化しました。
新規 - 新しいパーツになる新しいマテリアルを作成します。
追加 - マテリアルを作成して既存のマテリアルに追加します (この例では、[すべてとマージする] を選択)。
マテリアルを除去し、パターン化するパーツを選択し、[削除] を選択します。

ジオメトリが重なっている部分だけマテリアルを残します。
変更前:
変更後:

- フィーチャーをパターン化すると、フィーチャーリストから任意の順序でフィーチャーを選択できます。選択順序に関係なく、フィーチャーは フィーチャーリストに表示される順序で適用されます。
- フィーチャーリストでパターンを選択すると、そのパターンはパターン化されますが、シードはパターン化されません。シードを含めるには、それも選択します。
- ブール演算フィーチャー (ブール演算、分割など) をパターン化する場合は、ブール演算が適用されたフィーチャーも選択する必要があります。
- フィーチャーパターンを作成する場合、[押し出し] フィーチャーの端点の条件など、フィーチャーのすべての側面が適用されます。(対照的に、面パターンはこれらのタイプの修飾子を認識しません)。
- パターンが完成したら、どのエンティティも個別に削除できます。
- パターンを方向づけるために複数のスケッチ線 (またはソリッドボディ上のエッジ、またはワイヤボディ上のエッジ) を使用してもパターンが意図したとおりに作成されない場合は、スケッチ線を別の順序で選択してみてください。
- フィーチャーパターンで [フィーチャーを再適用する] が有効になっている場合、外部参照はインスタンスごとに自動的に再生されます。スケッチでは、シードスケッチから原点または既定平面までの寸法と拘束は再適用されません。
- 曲線パターンツールをタップします。


- パターンタイプを選択します。
- パーツ - 個々のパーツをパターン化します。
- フィーチャー - フィーチャーリスト (押し出し、フィレット、スイープ、スケッチなど) にリストされた特定のフィーチャーをパターン化する
- 面 - 特定のパーツ上の特定の面をパターン化します。
- 次のように結果ボディ操作タイプを選択します。
- 新規 - 新しいパーツに使用する新しいマテリアルを作成します。
- 追加 - 新しいマテリアルを作成して既存のマテリアルに追加します。
- 削除 - 既存のマテリアルからマテリアルを削除します。
- 交差 - ジオメトリがオーバーラップしている場所だけマテリアルを残します。
- パターン化するエンティティ フィールドにフォーカスして、パターンに複製するエンティティを選択します。
- パターン化するパスフィールドにフォーカスを設定し、複製されたパターンエンティティを配置するスケッチ線 (または一連の隣接する曲線、ソリッドボディ上のエッジ、ワイヤボディ上のエッジ) を選択します。
- 間隔オプションを選択します。
- 等間隔 - 要求された数のインスタンスを曲線に沿って均等に分散します。
- 距離 - 各インスタンスからオフセットするスペースを設定します
- (距離間隔のみ) 各インスタンスをオフセットするスペースを [距離] フィールドに入力します。
- パターンに含めたいインスタンスの数を入力します。
- 使用できるインスタンスの最小数は 1 です。
- 曲線の長さが、指定した [距離] のインスタンス数をサポートするのに十分でない場合は、エラーが表示されます。この場合は、インスタンス間のオフセットを減らす、インスタンス数を減らす、[等間隔] オプションに切り替える、またはより長い曲線を選択することができます。
- 方向タイプを選択します。
- 曲線に正接 - インスタンスは選択した曲線に正接します。
- 面に垂直 - インスタンスは選択した面に平行に配置されます。
- ロック - 選択したインスタンスは所定の位置にロックされます。
- オプションで、[インスタンスをスキップ] を切り替えて、スキップするインスタンスを選択します。インスタンスをダブルタップすると、そのインスタンスが Part Studio に再び追加されます。
- チェックマークをタップします。
個々のパーツをパターン化します。
パーツは、2 つの隣接するスケッチ線に沿って 10 回パターン化され、新しいマテリアルが作成されました。
フィーチャーリストに一覧表示されている 1 つまたは複数の特定のフィーチャー (押し出し、フィレット、スイープ、スケッチなど) をパターン化します。
[押し出し] フィーチャーは、2 つの隣接するスケッチ線に沿って 15 回パターン化され、既存のマテリアルに追加されます。
特定のパーツ上の特定の面をパターン化します。
既存のマテリアルからマテリアルを削除するために、1 つのスケッチ線に沿って面を 5 回パターン化しました。
新規 - 新しいパーツになる新しいマテリアルを作成します。
追加 - マテリアルを作成して既存のマテリアルに追加します (この例では、[すべてとマージする] を選択)。
マテリアルを除去し、パターン化するパーツを選択し、[削除] を選択します。
ジオメトリが重なっている部分だけマテリアルを残します。
変更前:
変更後:
- フィーチャーをパターン化すると、フィーチャーリストから任意の順序でフィーチャーを選択できます。選択順序に関係なく、フィーチャーは フィーチャーリストに表示される順序で適用されます。
- フィーチャーリストでパターンを選択すると、そのパターンはパターン化されますが、シードはパターン化されません。シードを含めるには、それも選択します。
- ブール演算フィーチャー (ブール演算、分割など) をパターン化する場合は、ブール演算が適用されたフィーチャーも選択する必要があります。
- フィーチャーパターンを作成する場合、[押し出し] フィーチャーの端点の条件など、フィーチャーのすべての側面が適用されます。(対照的に、面パターンはこれらのタイプの修飾子を認識しません)。
- パターンが完成したら、どのエンティティも個別に削除できます。
- パターンを方向づけるために複数のスケッチ線 (またはソリッドボディ上のエッジ、またはワイヤボディ上のエッジ) を使用してもパターンが意図したとおりに作成されない場合は、スケッチ線を別の順序で選択してみてください。
- フィーチャーパターンで [フィーチャーを再適用する] が有効になっている場合、外部参照はインスタンスごとに自動的に再生されます。スケッチでは、シードスケッチから原点または既定平面までの寸法と拘束は再適用されません。