![]()
![]()
![]()
Part Studio 全体または特定のパーツのバリエーションを作成して、パーツファミリを作成します。任意のフィーチャーまたは入力値、およびパーツプロパティ、カスタムパーツプロパティ、面およびパーツの外観、そしてスケッチテキストも構成できます。たとえば、[押し出し] フィーチャーの深度、フィレットフィーチャーの適用、フィレット用に選択した面、カスタムフィーチャーの FeatureScript、パーツ番号、色、マテリアルを構成できます。
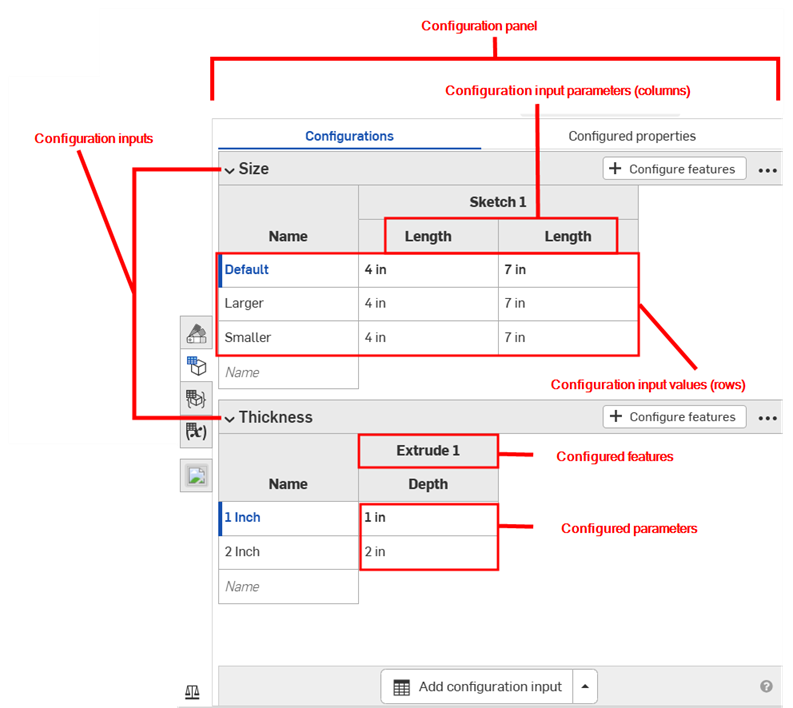
1 つの Part Studio で構成するフィーチャーと入力はすべて、コンフィギュレーションと呼ばれます。各 Part Studio は、1 つのコンフィギュレーションを持つことができます。ただし、1 つのコンフィギュレーション内に複数のコンフィギュレーション入力を作成できます。これは、構成するフィーチャーまたは入力値が必ずしも相互に関連していない場合に特に役立ちます。たとえば、パーツの長さと直径がフィレットが適用されているかどうかに関係しない場合は、2 つのコンフィギュレーション入力を使用できます。これにより、柔軟性が向上し、各コンフィギュレーション入力が不必要に複雑にならないようにすることができます。
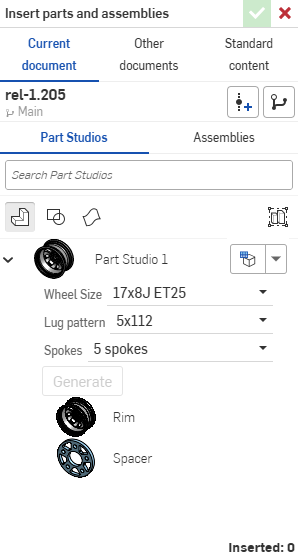
Part Studio で定義したコンフィギュレーション入力は、パーツをアセンブリや図面に挿入する場合の [挿入] ダイアログのオプションになります。たとえば、さまざまなホイールオプションを作成するためのコンフィギュレーション入力を作成できます。Part Studio をアセンブリに挿入する場合は、コンフィギュレーション入力ごとにオプションを選択して、挿入する Part Studio のコンフィギュレーション全体を指定します。
コンフィギュレーションは 1 つのブラウザのみで作成されますが、iOS と Android で表示できます。構成済みのパーツおよび Part Studio の操作の詳細については、コンフィグレーションを使用するを参照してください。また、アセンブリコンフィギュレーション、変数スタジオコンフィギュレーション、リリースコンフィギュレーションも参照してください。
同じドキュメントで 1 人または複数のユーザーが作業している場合、フォローモードで作業している場合を除き、各ユーザーが選択したコンフィギュレーションが表示されます。この時点で、フォロワーは引出線で選択されたコンフィギュレーションを確認します。
コンフィギュレーションはブラウザ (Part Studio またはアセンブリ) でのみ作成されます。Part Studio 全体または特定のパーツのバリエーションを作成して、パーツファミリを作成します。任意のフィーチャーまたはパラメータ値、およびパーツプロパティ、カスタムパーツプロパティ、面およびパーツの外観、そしてスケッチテキストも設定できます。たとえば、[押し出し] フィーチャーの深度、フィレットフィーチャーの適用、フィレット用に選択した面、カスタムフィーチャーの FeatureScript、パーツ番号、色、マテリアルを設定できます。
1 つの Part Studio で設定するすべてのフィーチャーとパラメータがコンフィギュレーションになります。各 Part Studio には 1 つのコンフィギュレーションを設定できますが、1 つのコンフィギュレーション内に複数のコンフィギュレーション入力を作成できます。
Part Studio で定義したコンフィギュレーション入力は、アセンブリまたは図面にパーツを挿入するときに、挿入ダイアログのオプションになります。
この例では、新しいシートの厚さのコンフィギュレーションと代替フランジのコンフィギュレーションの 2 つのコンフィギュレーションが作成されます。ワークスペースにモデルがある状態で、コンフィギュレーションアイコンをクリックして [コンフィギュレーション] パネルを開きます。[Part Studio を設定] ボタンをクリックします。コンフィギュレーション名としてシートの厚さを入力します。タブをクリックして新しい行を作成し、2 番目のコンフィギュレーション名として Alternate flange と入力します。各行は異なるコンフィギュレーションになります。
[シートの厚さ] 行を選択した状態で、[フィーチャーを設定] ボタンをクリックし、フィーチャーリスト内のパラメータを含むフィーチャーをダブルクリックします。パラメータを選択すると、黄色の破線で囲まれます。この場合は [シートの厚さ] パラメータを選択します。パラメータの新しい列がテーブルに作成されます。表のセルをダブルクリックし、新しい値を指定します。次に、[代替フランジ構成] 行を選択し、同じ操作を行います。その際、[フランジ] フィーチャーを使用して、表の [距離] と [曲げ角度] に代替値を指定します。
モデルで入力をテストするには、フィーチャーリストのコンフィギュレーション領域にあるドロップダウン矢印をクリックし、新しいコンフィギュレーションを選択して結果を確認します。新しい入力パラメータを使用してモデルが更新されます。
ワークスペースにモデルまたはスケッチがある状態で、[コンフィギュレーション] パネルを開きます。
- ビューキューブの下にあるコンフィギュレーションパネルアイコン (
 ) をクリックします。
 -
コンフィギュレーションパネルが開きます。[Part Studio を構成] をクリックして入力を追加します。
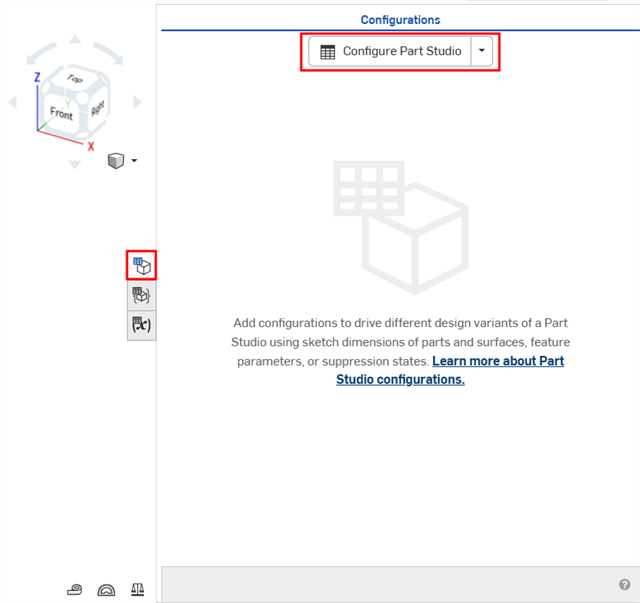
既定では、[コンフィギュレーション] の左にあるキャレットが展開されます。パネルのセクションを終了したら、キャレットをクリックしてそのセクションを折りたたみます。
- 最初の行をクリックしてアクティブ化し、最初の列に入力値の名前を入力します。タブを押します 次の行に移動します。行の左側にある青いバーは、Part Studio で現在選択されているコンフィギュレーションを示します。
This example has 3 possible configurations: Short, Medium, and Tall.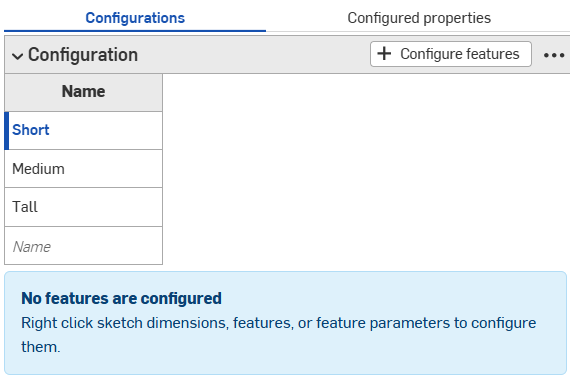
- 選択した入力値に対してフィーチャーを構成するには、[フィーチャーを構成] をクリックします。
- In the Features list, click the feature to configure and select the parameter. The parameter is outlined with a broken yellow line and a new column is created for that parameter.
For example, click the Extrude feature in the Features list, and select the Depth parameter in the Extrude dialog. The parameter is highlighted in yellow in the dialog, and a new column appears in the table.
![[押し出し] ダイアログの [奥行き] パラメータをコンフィギュレーションパラメータとして選択](Resources/Images/feature-tools/config-extrude-depth-02.png)
列名は、既定でフィーチャー名 (最上位の見出し) とフィールド名 (下位レベルの見出し) になります。この場合、Extrude 1 はパラメータ名で、深度がフィールド名になります。
フィーチャーダイアログでフィールドにカーソルを合わせて、コンフィギュレーションが可能なパラメータを表示します。コンフィギュレーションに使用できるパラメータは、その上にカーソルを合わせると、黄色で強調表示されます。
- 構成済みパラメータを編集するには、次の手順を実行します。
- 値を編集するには、その値をダブルクリックして新しい値を入力します。
For this example, set the depths for the 3 input values:![[押し出し] ダイアログの [奥行き] パラメータをコンフィギュレーションパラメータとして選択](Resources/Images/feature-tools/config-set-value-02.png)
- To edit a selection in a dialog, double-click the configured parameter in the table to open the feature dialog.
The parameter in the feature dialog is highlighted in blue. Remove any unwanted selections, and make the new selections on the model or sketch. Click the green checkmark in the feature dialog to close it.
![[フランジ] ダイアログでフランジにするエッジをコンフィギュレーションパラメータとして選択](Resources/Images/feature-tools/config-set-selection-01.png)
- 値を編集するには、その値をダブルクリックして新しい値を入力します。
- コンフィギュレーションの定義が完了したら、黄色いバナーの [完了] ボタンをクリックします。
- 入力に別のパラメータ (列) を追加するには、手順 4 ~ 7 を繰り返します。
- モデルを使用して入力をテストするには、左パネルの [コンフィギュレーション] の下矢印を使用してメニューから選択します。
![[コンフィギュレーション] のフィーチャーリストで、下矢印を使用してメニューから選択します。](Resources/Images/feature-tools/config-select-configs-01.png)
The model should update accordingly. If it does not, check the model for design intent and the configurations definition for accurate selection.
構成済みフィーチャーのクロスリファレンス
構成済みのテーブル内のフィーチャーにカーソルを合わせると、モデル空間でフィーチャーが表示されます (下図を参照)。
Part Studio コンフィギュレーションには、1 つまたは複数のコンフィギュレーション入力を含めることができます。上記の手順では、アセンブリまたは図面にパーツを挿入するときに、リストタイプのコンフィギュレーション入力を作成する方法を説明しています。これらのコンフィギュレーション入力を複数作成して (1 つの入力が複雑になりすぎたり、入力が複製されたりするのを防ぐため)、異なるタイプの入力を作成することもできます。構成できる入力の他のタイプは、コンフィギュレーション変数とチェックボックスです。また、現在のドキュメントまたは外部のドキュメントにある、別の Part Studio またはアセンブリから入力を貼り付けることもできます。
(上記の手順を使用して) コンフィギュレーション入力を定義したら、[コンフィギュレーション] パネルの下部にあるボタン ![]() を使用して追加のコンフィギュレーション入力を作成できます。
を使用して追加のコンフィギュレーション入力を作成できます。
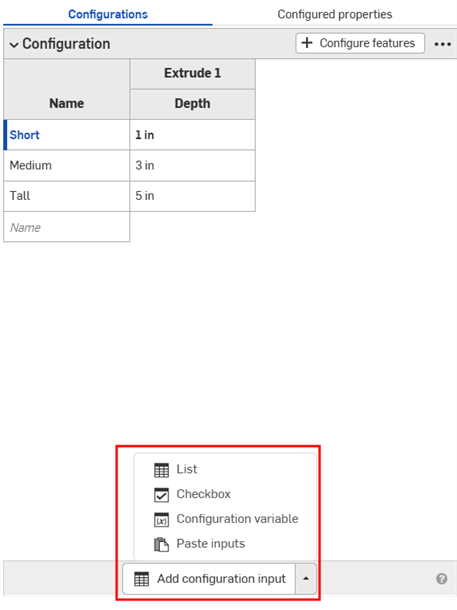
コンフィギュレーション入力を作成するときに、追加する入力タイプを指定できます。
- リスト - Part Studio でフィーチャー入力リストを作成し、1 つまたは複数のパーツをアセンブリまたは図面に挿入するときに選択のリストとして表示されます (このタイプは上記で説明されています)。
- チェックボックス - フィレットや面取りなどのフィーチャーのオン/オフを切り替え、フィーチャーの抑制または抑制解除するためのチェックボックスを作成します。このタイプでは、挿入時にオン/オフを切り替えるためのチェックボックスが表示されます。作成したら、[+ フィーチャーを構成] ボタンを使用して、関連するフィーチャーを選択します。
- コンフィギュレーション変数 - 任意のフィーチャーおよび FeatureScript で使用できる変数を作成します。変数の種類には、長さ、角度、整数、実数、テキストなどがあります。挿入時の変数の値を入力します。
- 入力を貼り付け - 別の Part Studio またはアセンブリからの入力をこのドキュメントまたは別のドキュメントに貼り付けます。入力のコピーと貼り付けを参照してください。
この方法で作成した場合、リスト入力ダイアログが表示されます。コンフィギュレーション入力に付けた名前は、システム内の変数になります。これは、上記の基本的な手順で作成した場合の名前とは異なり、この名前はシステム内の変数ではありません。
-
 矢印をクリックして [リスト] を選択します。新しい入力が [コンフィギュレーション] パネルに追加されます。
![[エッジまたはフランジへの側面] セクションを含むフィールドが選択されたフランジフィーチャー。](Resources/Images/feature-tools/config-add-list-input-01.png)
- 上記の基本手順のセクションに記載されている手順に従ってパラメータを構成します。
-
 矢印をクリックして [チェックボックス] を選択します。チェックボックス入力ダイアログが開きます。
- 入力の名前を入力します。
コンフィギュレーション入力には、空のチェックボックス行とチェック済みのチェックボックス行を持つ 1 つの列があります。
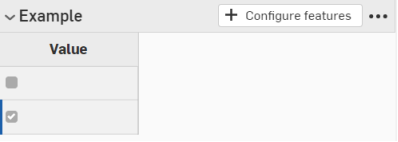
- パラメータを構成するには、
 をクリックします。
 - フィーチャーリストで、パラメータを含むフィーチャーをクリックし、パラメータを選択します。そのパラメータの輪郭は黄色の破線で囲まれ、テーブル内のそのパラメータに対して新しい列が作成されます (別の入力で構成されたパラメータは、黄色の破線で囲まれ、構成できません)。
この例では、コンフィギュレーション入力パラメータとして [抑制解除] が選択されています。
-
 をクリックして、フィーチャーダイアログを閉じます。
 - [コンフィギュレーション入力] の [パラメータ] 列には 2 つの行があり、両方ともチェックボックスがオンになっています。最初の列でオフになっているボックスの横にあるチェックボックスをオフにして、テーブルが次のように表示されます。
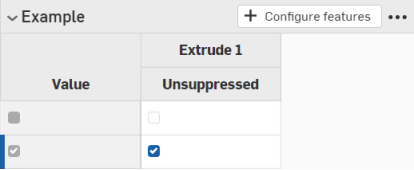
コンフィギュレーションリストのフィーチャーリストの上にあるこのコンフィギュレーション入力には、押し出しをオン (抑制解除) またはオフ (抑制) にするためのチェックボックスが表示されます。
- ボタン
 の右側にある矢印をクリックします。
  を選択します。
- 変数入力ダイアログに変数入力の名前を入力します。これはシステム内で実際の変数となり、#variableName として参照されます。
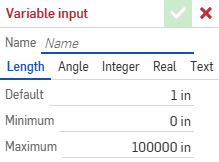
- 変数のタイプ (長さ、角度、整数、実数、テキスト) を選択します。テキストは、カスタムの FeatureScript で使用できる任意のタイプのテキストにすることができます。
- 選択した変数のタイプに値を入力します。
- Click the checkmark to save your definition.
- 変数をフィーチャーに適用します:
- フィーチャーリスト内のフィーチャーをダブルクリックして開きます。
- 入力を右クリックして、[#variableName に設定] をクリックします。変数名 (先頭に # 付き) を任意の式に直接入力することもできます。
![寸法を右クリックし、[寸法の構成] を選択する例](Resources/Images/feature-tools/config-set-variable-01.png)
- フィーチャーダイアログを閉じます。変数入力の使用法は、コンフィギュレーションパネルに一覧表示されます。
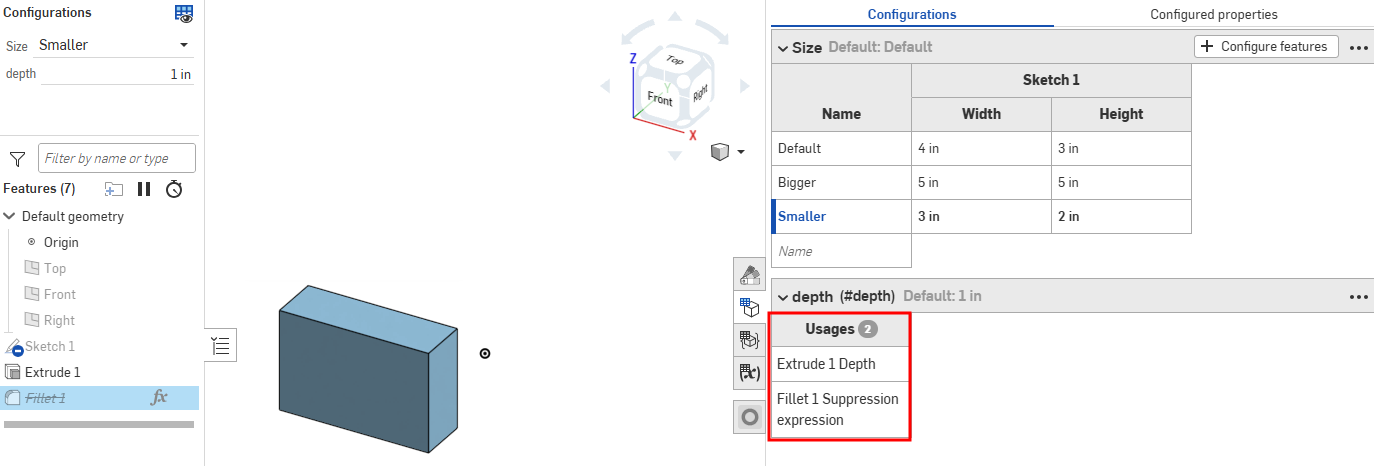
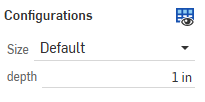
- ページの左側にあるフィーチャーリストの上にあるコンフィギュレーションリストで値を選択して、値をテストします。
アセンブリミラーから派生した Part Studio のコンフィギュレーションテーブルおよびコンフィギュレーション入力は閲覧限定で、ソースの Part Studio から参照されます。これらのコンフィギュレーションテーブルおよびコンフィギュレーション入力は、ソースの Part Studio タブから編集する必要があります。
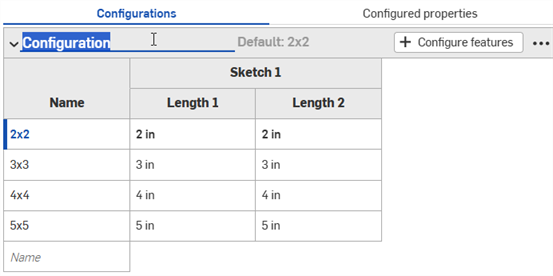
コンフィギュレーション入力または入力パラメータ (列) の名前を変更するには、現在の名前の上にカーソルを置いて I カーソルを表示します。現在のテキストをクリックして選択し、新しいテキストを入力し、Enter キーを押します。
コンフィギュレーションの名前の変更
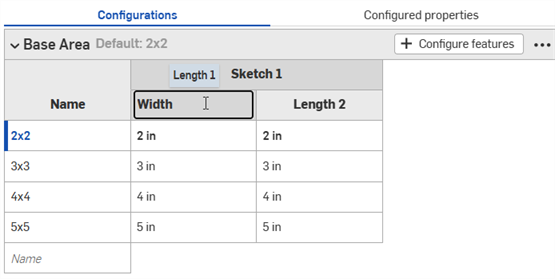
コンフィギュレーション入力パラメータ (列) の名前は、スケッチフィーチャーのみで変更できます。
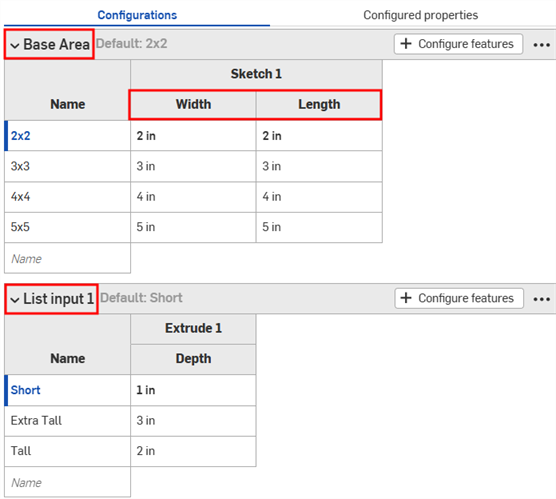
コンフィギュレーション入力の名前は、コンテキストメニューでも変更できます。下記のコンテキストメニューセクションを参照してください。
Configuration context menus
To make adjustments to a configuration input, click three-dot button ![]() . The options on the context menu will vary depending on if you're configuring a Part Studio, Assembly, or Variable Studio:
. The options on the context menu will vary depending on if you're configuring a Part Studio, Assembly, or Variable Studio:
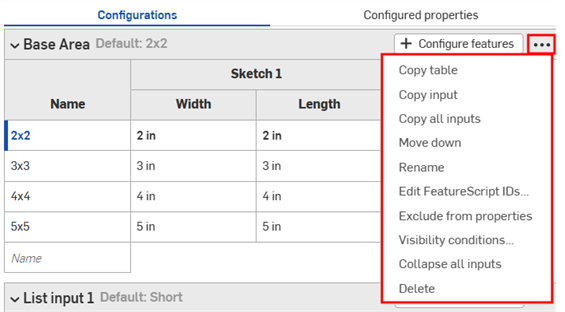
- テーブルをコピー - コンフィギュレーション入力全体をコピーし、それをスプレッドシートに貼り付けてレコードを保持または編集できます。同様に、スプレッドシートからコンフィギュレーション入力に貼り付け直すことができます。このページの入力値とパラメータのコピーと貼り付けのセクションを参照してください。
- 入力をコピー - 入力と値 (行) をコピーします。その後、それを別の Part Studio またはアセンブリの [コンフィギュレーション] パネルに貼り付け、[テーブルをコピー] コマンドを使用してパラメータを追加できます。このページの入力のコピーと貼り付けのセクションを参照してください。
- すべての入力をコピー - [コンフィギュレーション] パネルのすべての入力と値 (行) をコピーします。その後、それを別の Part Studio またはアセンブリの [コンフィギュレーション] パネルに貼り付け、[テーブルをコピー] コマンドを使用してパラメータを追加できます。このページの入力のコピーと貼り付けのセクションを参照してください。
- 上/下に移動 - コンフィギュレーションパネルの入力を並べ替えます。入力をクリックしてドラッグし、順序を変更することもできます。
- 名前を変更 - コンフィギュレーション入力の名前を変更します。上記のコンフィギュレーション名の変更のセクションで説明しているように、入力の名前を変更することもできます。
- Edit FeatureScript IDs - (Parts and Part Studios only) This dialog will change the internal FeatureScript identifiers of the configuration input. Click inside the dialog boxes to change IDs. When finished, select Break reference and change IDs in the lower right corner.
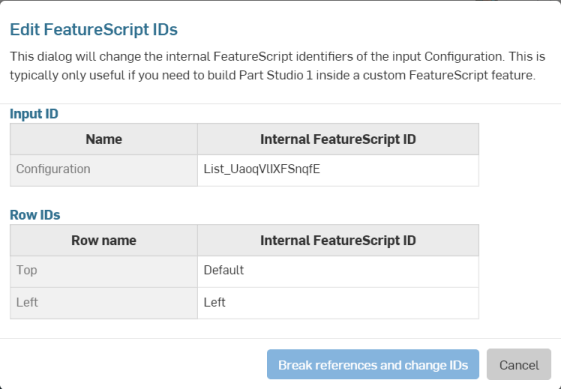
このダイアログは通常、カスタムの FeatureScript フィーチャー内に Part Studio を構築する必要がある場合にのみ役立ちます。
- Exclude from properties - (Parts and Part Studios only). See Configurations: Excluding configurations from affecting properties.
- すべての入力を折りたたむ/展開する - コンフィギュレーションパネルのすべてのコンフィギュレーション入力を折りたたんだり展開したりします。
- 可視性条件 - このページの可視性条件の設定セクションを参照してください。
- 削除 - コンフィギュレーション入力をすぐに削除するには、このアクションを選択します。警告は表示されません。
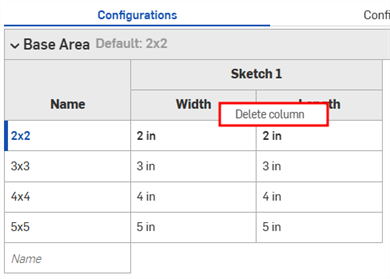
すべてのテーブルについて、コンテキストメニューを使用して、行または列を操作します。
列のコンテキストメニュー
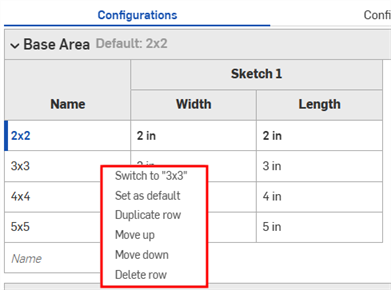
行のコンテキストメニュー
- 切り替え - 現在選択された入力ではない行を右クリックすると、メニューアイテムの先頭に [別の入力に切り替え] が表示されます。
- 既定として設定 - 行が現在、既定の入力値でない場合は、その行を新しい既定として設定します。現在の既定は、入力名の横に表示されます。
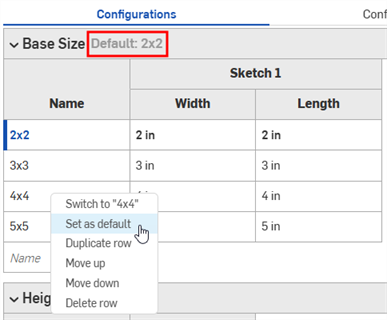
- 行を重複 - 行を複製します。これは、このテーブルに新しい入力を貼り付ける準備を行うときに特に便利です。詳細は、このページのコンフィギュレーション入力内外へのテーブルのコピーと貼り付けのセクションを参照してください。
- 上/下に移動 - 選択した行を上または下に 1 行ずつ移動します。クリックしてドラッグして行を並べ替えることもできます。
- 名前を変更 - 入力の名前を変更します。
- 列/行を削除 - 選択した列または行を削除します。
テーブルで個々の列のエッジをドラッグすると、サイズを変更できます。積み上げ縦棒ラベルの場合は、上の図の青い矢印で示されている下部のラベルをドラッグします。
[コンフィギュレーションの可視性条件] ダイアログでは、コンフィギュレーションにロジックを追加できるため、特定の入力やオプションをいつ利用可能にするかを制御できます。
![入力の 3 つのオプションルールを表示する [コンフィギュレーション可視条件] ダイアログ](Resources/Images/feature-tools/config-visibility-option-range-02.png)
[高さ] と [幅] の 2 つの入力があるパーツを考えてみましょう。
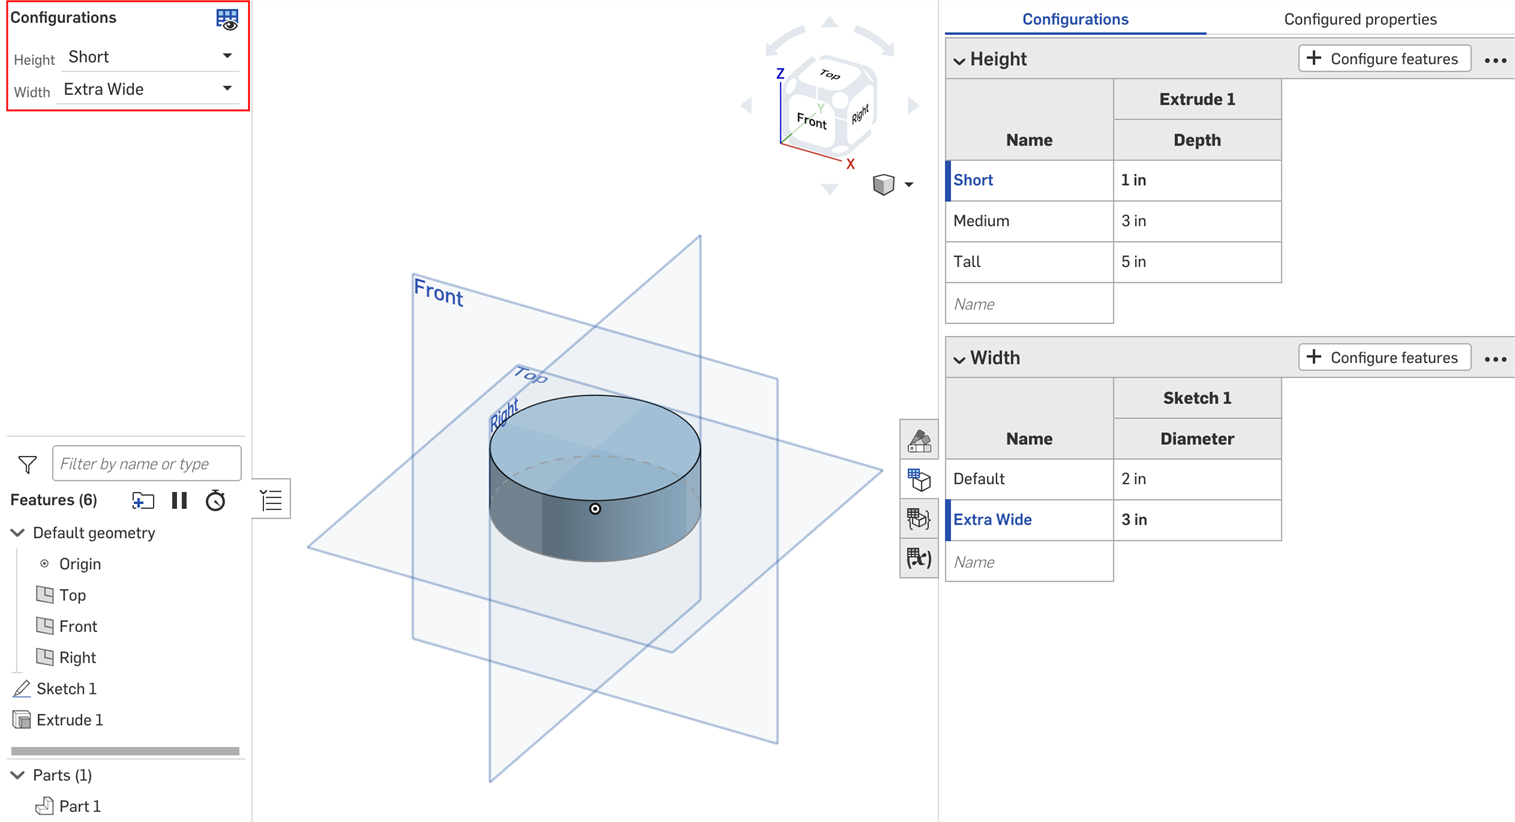
既定では、どの高さのパーツにも任意の幅を設定できます。ただしここでは、高さを [高い] に設定した場合にのみ、幅を [エキストラワイド] に設定できるよう限定するには、[幅] の入力を表示する条件を設定できます。
- [コンフィギュレーション] パネルで、入力の 3 点ボタンをクリックし、メニューから [可視性条件] を選択します。
[コンフィギュレーションの可視性条件] ダイアログが開きます。右側のパネルには、現在選択しているコンフィギュレーションのプレビューが表示されます。このパネルで選択したオプションを直接変更して、設定をプレビューできます。![可視性条件が強調表示された [コンフィギュレーション] パネルのその他のオプションメニュー](Resources/Images/feature-tools/config-visibility-dropdown-05.png)
![既定の [コンフィギュレーションの可視性条件] ダイアログ](Resources/Images/feature-tools/config-visibility-dialog-03.png)
- [条件を追加] をクリックします。
- 最初のドロップダウンをクリックし、この入力の可視性を制御する入力を選択します。この例では、高さの入力を選択します。
- 2 番目のドロップダウンで、特定のオプションを選択する場合は [が次の場合]、オプションの範囲を選択する場合は [が次の間の場合] します。
- が次の場合: 表示される 3 番目のドロップダウンをクリックし、入力に許可するオプションを選択します。
- が次の間の場合: 3 番目のドロップダウンをクリックし、範囲内で最初に使用可能なオプションを選択します。4 番目のドロップダウンをクリックし、範囲内で最後に使用可能なオプションを選択します。
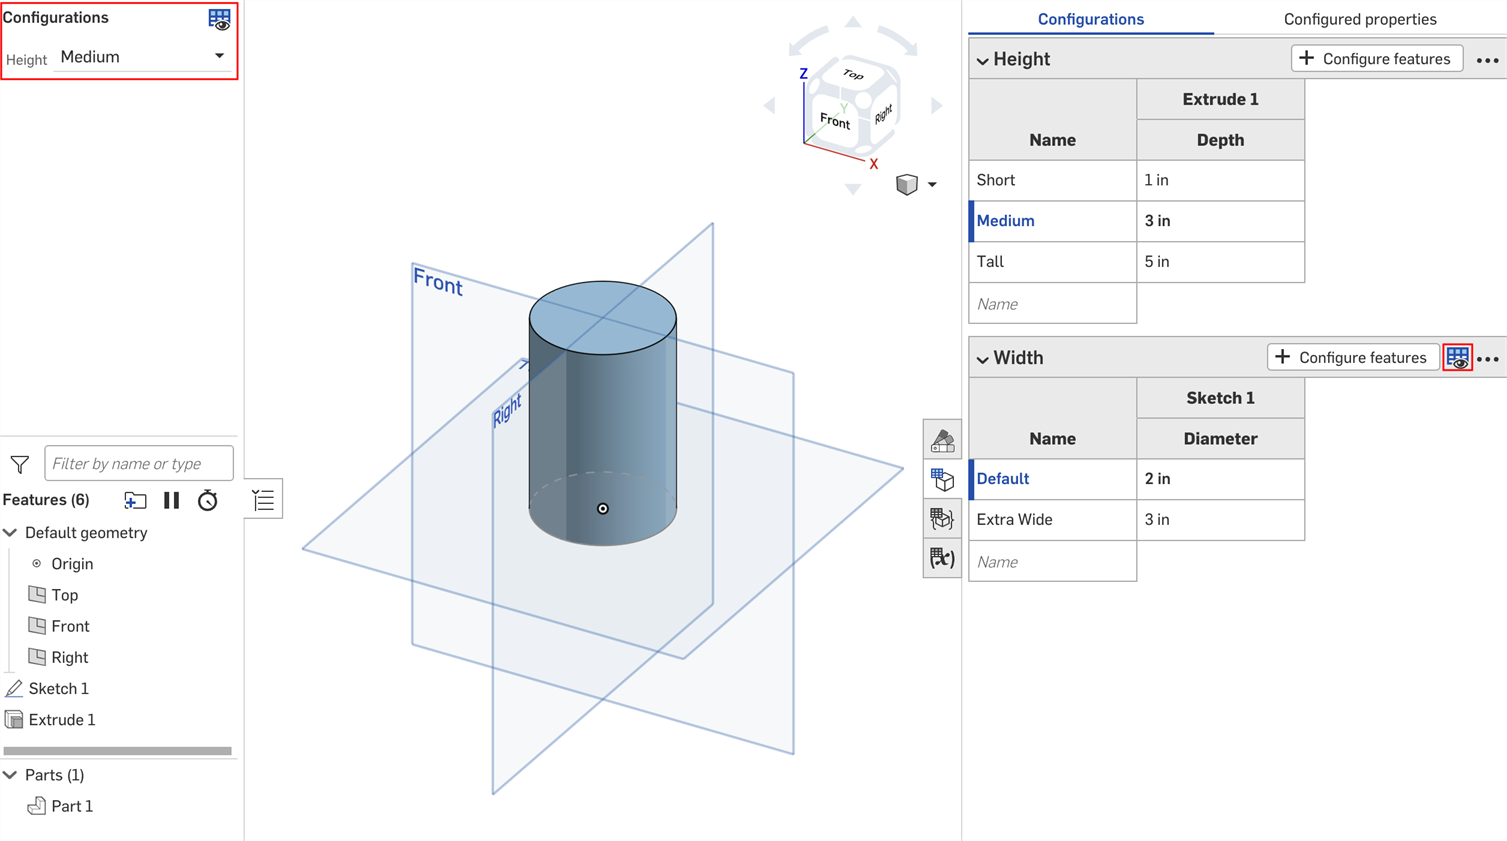
この例では、幅の入力は高さを [高い] にした場合のみ使用できます。右側のプレビューが更新され、選択内容が反映されます。下の画像では、高さを既定値に設定すると幅の入力が使用できないことがわかります。![1 つの条件が追加された [コンフィギュレーションの可視性条件] ダイアログ](Resources/Images/feature-tools/config-visibility-dialog-withCondition-03.png)
- [保存] をクリックします。これで、幅の入力は高さを [高い] にした場合にのみ表示され、幅の入力テーブルには可視性条件アイコン
 が表示されます。
![可視性条件が強調表示された [コンフィギュレーション] パネルのその他のオプションメニュー](Resources/Images/feature-tools/config-visibility-ex-short-01.png)
![両方の幅が表示されており高さが [高い] に設定された可視性条件の例](Resources/Images/feature-tools/config-visibility-ex-tallDefault-01.png)
![幅が [エキストラワイド] で高さが [高い] に設定された可視性条件の例](Resources/Images/feature-tools/config-visibility-ex-tallWide-01.png)
[コンフィギュレーション可視条件] ダイアログのオプションルールの設定を使用して、特定のオプションを表示する条件を指定できます。
オプションルールのロジックはリスト入力にのみ設定できます。
- [コンフィギュレーションの可視性条件] ダイアログで、入力内容を展開して [オプションルールを追加] をクリックします。ダイアログに新しいセクションが表示されます。
![[オプションルールを追加] ボタンが強調表示された既定の [コンフィギュレーションの可視性条件] ダイアログ](Resources/Images/feature-tools/config-visibility-default-options-01.png)
- [表示] 行に、制御するオプションを選択します。
- オプション: 表示されるドロップダウンをクリックし、条件を設定するオプションを選択します。
- 範囲: 最初のドロップダウンをクリックし、範囲の最初のオプションを選択します。2 番目のドロップダウンをクリックして、範囲内の最後のオプションを選択します。範囲は特定のオプションが含まれます。範囲は重複していてもかまいません。
- [条件] 行で、次を選択します。
- 最初のドロップダウンから入力を選択します。
- 特定のオプションを選択する場合は [が次の場合]、オプションの範囲を選択する場合は [が次の間の場合] を選択します。
- が次の場合: 表示されるドロップダウンをクリックし、オプションに指定可能な値を選択します。
- が次の間の場合: 最初のドロップダウンをクリックし、範囲内で最初に許可するオプションを選択します。2 番目のドロップダウンをクリックして、範囲内で最後に許可するオプションを選択します。
-
[条件を追加] をクリックし、この一連の手順を繰り返して、コンフィギュレーション内にロジックを追加していきます。
オプションルールの各条件は AND ステートメントで組み合わされます。すべての条件が満たされなければ、制御されたオプションは表示されません。
- もう一度 [オプションルールを追加] をクリックして、他のオプションの条件を追加します。
- [保存] をクリックします。
以下の例では、[深い] オプションは面積が [既定] 以上の場合のみ使用できます。[標準] オプションは面積が [大]、[既定]、または [小] の場合のみ使用できます。[浅い] オプションは面積が [小] か [より小さい] の場合のみ使用できます。
![入力の 3 つのオプションルールを表示する [コンフィギュレーションの可視性条件] ダイアログ](Resources/Images/feature-tools/config-visibility-options-01.png)
次の例では、重複する範囲を使用して可視性条件を指定しています。
![入力の 3 つのオプションルールを表示する [コンフィギュレーション可視条件] ダイアログ](Resources/Images/feature-tools/config-visibility-option-range-02.png)
以下の例では、オプション制御と範囲制御を組み合わせて必要なロジックを設定しています。
![追加のオプションルールを表示する [コンフィギュレーション可視条件] ダイアログ](Resources/Images/feature-tools/config-visibility-option-and-02.png)
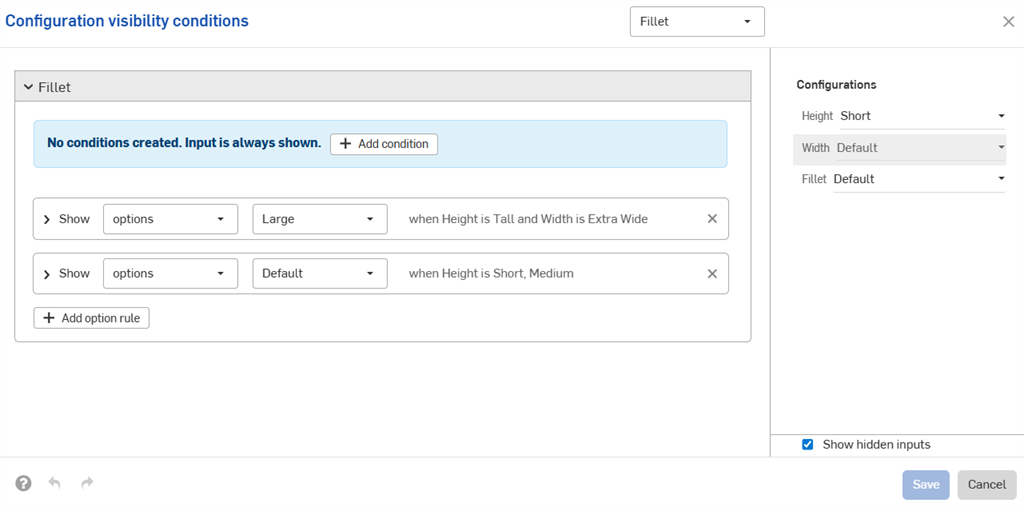
入力条件は付加的です。上の例に 3 つ目のコンフィギュレーションを追加し、下図のように条件を設定した場合、[大きなフィレット] オプションは高さを [高い] に、幅を [エキストラワイド] に設定したパーツに限定して使用できます。
![複数の条件を含む [コンフィギュレーションの可視性条件] ダイアログ](Resources/Images/feature-tools/config-visibility-dialog-additive1-03.png)
[高い] に対して既定の幅を設定すると、フィレットのコンフィギュレーションは非表示になります。
![複数の条件を含む [コンフィギュレーションの可視性条件] ダイアログ](Resources/Images/feature-tools/config-visibility-dialog-additive2-03.png)
コンフィギュレーション入力は、コンフィギュレーションパネルでその下に表示される入力の可視性のみ制御できます。この例では、[幅] の入力は [高さ] の入力で制御できますが、[フィレット] の入力では制御できません。![パラメータはその上位パラメータのみで制御できることを示す [コンフィギュレーションの可視性条件] ダイアログ](Resources/Images/feature-tools/config-visibility-dialog-control-03.png)
必要な入力またはオプションが見つからない場合、可視性条件は自動的に修復 (削除) されます。
たとえば、[幅] の入力の可視性が [高さ] の入力に依存しており、[高さ] の入力が削除された場合、[幅] の可視性条件は自動的に削除されます。同じことが、削除または移動された個々のオプションにも当てはまります。この例では、[高さ] の入力も [フィレット] オプションから削除されます。
ワークスペースに警告が表示され、ダイアログから条件が削除されます。

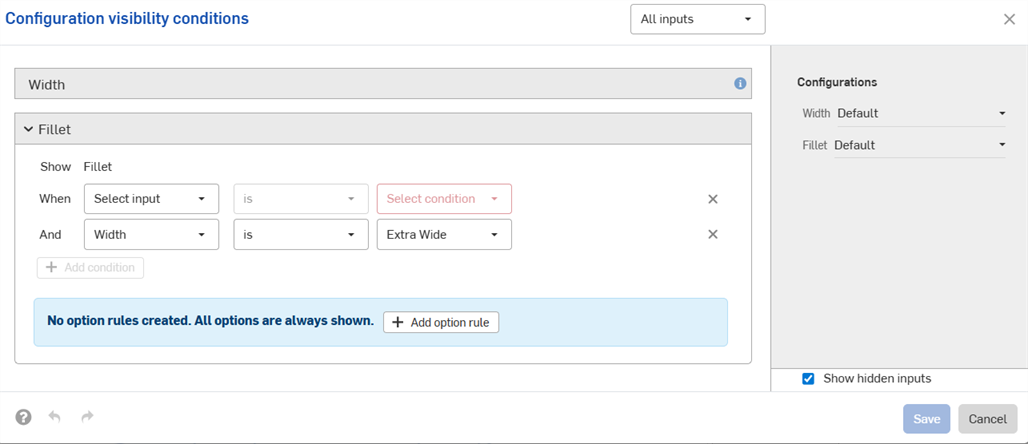
-
設定した可視性条件とオプションルールは、すべての [挿入] ダイアログ (つまり、構成したパーツをアセンブリに挿入する際) で使用できます。可視性条件の変更は、構成された要素を参照する既存のすべてのドキュメントに自動的に反映されます。
-
非表示の入力には常に既定値があります。このページの最初の例では、[幅] オプションを設定しなくても、[高さ] が低いパーツと中程度のパーツは [幅] は [既定] になります。
-
コンフィギュレーション入力に可視オプションがない場合、その入力は非表示となり、既定値になります。
-
-
入力またはオプションを折りたたむと、可視性条件の概要がダイアログに表示されます。
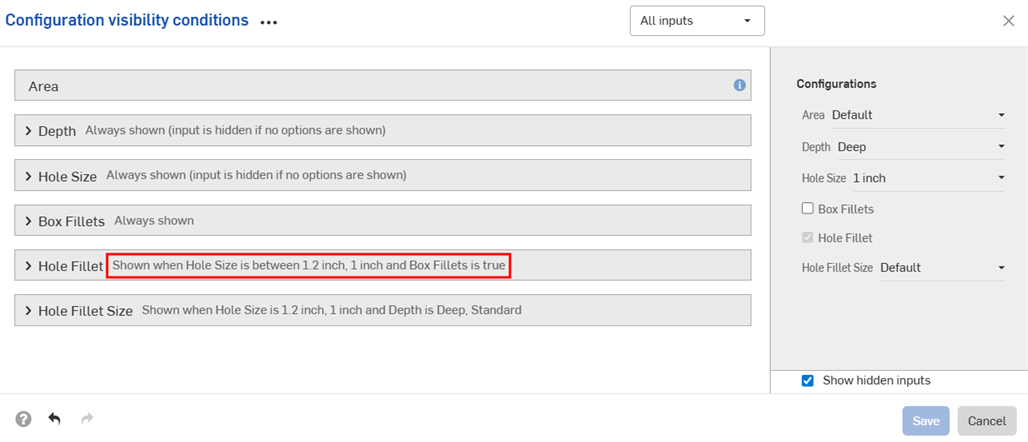
-
(パーツと Part Studio のみ): プロパティから除外されたコンフィギュレーション入力は、その下にある他の入力のうち、同じくプロパティから除外された可視性のみ制御できます。以下の例では、プロパティから幅が除外されている場合 (
 アイコンで表示)、フィレットもプロパティから除外されている場合にのみ、フィレットの可視性を制御できます。
![可視性条件が強調表示された [コンフィギュレーション] パネルのその他のオプションメニュー](Resources/Images/feature-tools/config-visibility-dialog-excluded1-03.png)
![可視性条件が強調表示された [コンフィギュレーション] パネルのその他のオプションメニュー](Resources/Images/feature-tools/config-visibility-dialog-excluded2-03.png)
-
(パーツと Part Studio のみ): プロパティから除外されたコンフィギュレーション入力は、リリースパッケージおよびリビジョン参照値では既定値として扱われます。可視性条件により既定値を使用できない場合は、最初に表示された値が使用されます。
- 他の入力を表示するには、[コンフィギュレーションの可視性条件] ダイアログで [入力] ドロップダウンを使用します。[すべての入力] を選択すると、使用可能なすべての入力が表示されます。
![[入力] ドロップダウンをクリックした [コンフィギュレーションの可視性条件] ダイアログ](Resources/Images/feature-tools/config-visibility-input-dropdown-02.png)
- ダイアログに複数の入力が表示されている場合は、3 点ボタンをクリックしてすべての入力を展開または折りたたみます。
![3 点ボタンをクリックして、[コンフィギュレーションの可視性条件] ダイアログのすべての入力を展開または折りたたみます。](Resources/Images/feature-tools/config-visibility-expand-collapse-02.png)
- [コンフィギュレーションの可視性条件] ダイアログのプレビューセクションは、コンフィギュレーションをテストするためのプレイグラウンドとして使用できます。
- グレーで表示されている入力をダイアログから削除するには、[非表示の入力を表示] チェックボックスをオフにします。
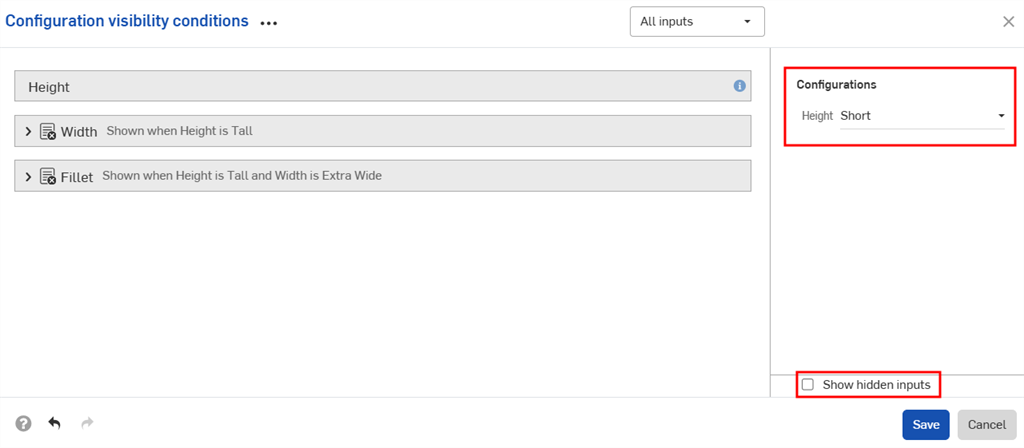
- グレーで表示されている入力をダイアログから削除するには、[非表示の入力を表示] チェックボックスをオフにします。
-
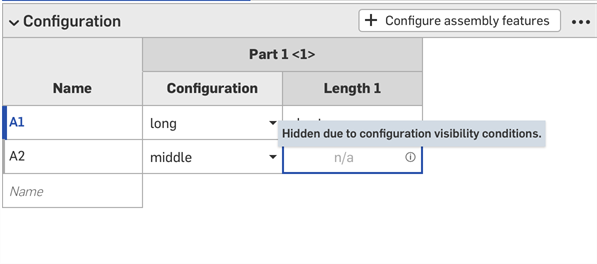
構成済みパーツをアセンブリに追加すると、非表示の入力は [コンフィギュレーション] パネルにグレーで表示されます。
-
コンフィギュレーションセレクタで
 をクリックして、すべての入力の [コンフィギュレーションの可視性条件] ダイアログを開きます。設定パネルで
  をクリックして、その入力のダイアログを開きます。
Part Studio、アセンブリ、変数スタジオとの間でコンフィギュレーション入力をコピーして貼り付けることができます。これにより、設計間でコンフィギュレーションをすばやく簡単に共有できます。
-
コピーする入力を含む Part Studio、アセンブリ、または変数スタジオでコンフィギュレーションパネルを開きます。
-
入力の 3 点メニューをクリックして、[入力をコピー] または [すべての入力をコピー] を選択します。
![[入力をコピー] と [すべての入力をコピー] が強調表示されたコンフィギュレーション入力の 3 点メニュー](Resources/Images/feature-tools/config-copy-inputs-02.png)
-
入力の貼り付け先のタブでコンフィギュレーションパネルを開きます。
-
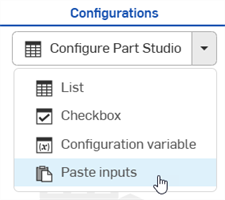
[Part Studio を構成]/[アセンブリを構成]/[変数スタジオを構成] の横の矢印をクリックして、[入力を貼り付け] を選択します。
入力は [コンフィギュレーション] パネルに挿入されます。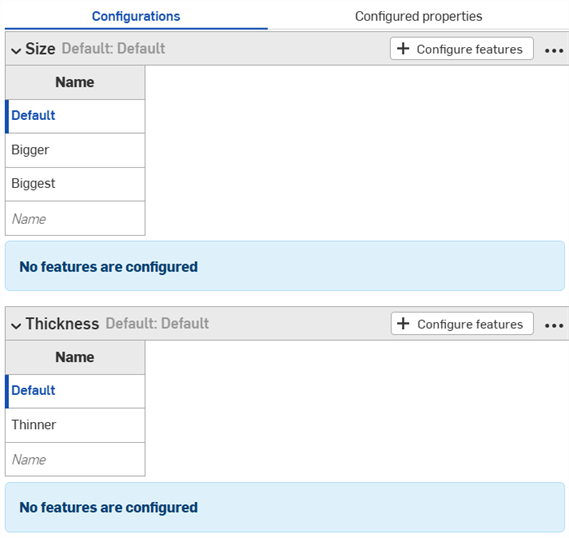
-
新しいタブで、構成するパラメータを選択します。入力値とパラメータを入力テーブルにコピーする方法については、この後説明します。
注記:
- Part Studio 間、アセンブリ間、および変数スタジオ間、同じドキュメント内、および異なるドキュメント間で、コンフィギュレーション入力をコピーして貼り付けることができます。
- すべての名前、表示条件、FeatureScript ID、および変数定義が入力とともにコピーされます。
- コピーした入力は、ユーザーがログアウトするまで使用できます。
- コピーした入力と貼り付けた入力の間の参照は保持されません。貼り付け後、元のコンフィギュレーション入力への変更は貼り付け先の入力に反映されません。
- 貼り付けた可視条件は、ターゲットコンフィギュレーションに可視性の計算に必要なすべての入力がない場合、自動的に修復 (削除) されます。
- 同じ内部 FeatureScript ID を持つコンフィギュレーション入力は貼り付けられません。これを修正するには、同じ内部 FeatureScript ID を持つコンフィギュレーション入力を削除して、再度貼り付けます。
コンフィギュレーションのコピーや貼り付けを行うことで、値の入力や編集の手間を省けます。
値とパラメータをコピーするには、次の手順を実行します。
- コンフィギュレーションパネルの右上隅にある
 メニューを開きます。
 - [テーブルをコピー] を選択します。
![コンフィギュレーション入力テーブルの横にある [詳細] ボタンをクリックします](Resources/Images/feature-tools/config-copy-table-02.png)
- テーブルをコピーしたら、スプレッドシートに貼り付けることができます。
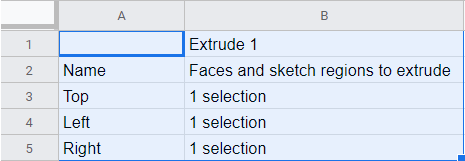
上記のように、列名もテーブルに付属していることに注意してください。これで、テーブルを編集してからコピーして貼り付けることで Onshape に戻すことができます。
- 下の青で示すように、データのある行と列 (列名や見出しではなく) のみを選択します:
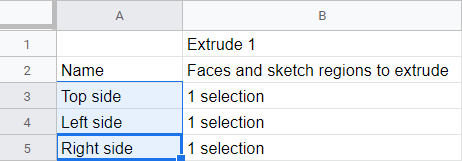
必要に応じて、テーブルに追加の空の行を追加することもできます。コピーコマンドを選択するときに、スプレッドシートの追加の行をコピーするだけで済みます。
- [コピー] コマンドを発行します。
- Onshape コンフィギュレーションテーブルで、テーブルの左上のセルをクリックします。
- キーボードの [貼り付け] コマンドを発行します。
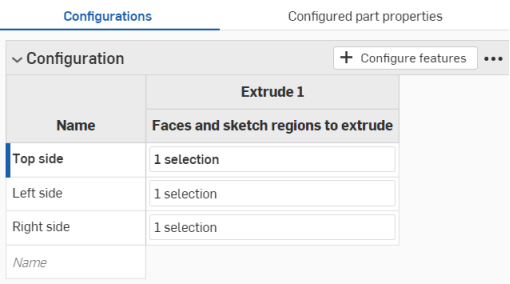
Onshape では、データがコンフィギュレーション入力テーブルの行および列にある場合には、コピーされたデータに自動的に置き換えます。Onshape には、各入力の既定の単位も自動的に含まれます。
スプレッドシートからコピーした行が Onshape コンフィギュレーション入力テーブルからの行より多い場合、それらの行は貼り付けには含まれることに注意してください。Onshape はその場で行を作成します。
ただし、スプレッドシートからコピーした列が Onshape コンフィギュレーション入力テーブルの列より多い場合、それらの列は貼り付けに含まれません。Onshape はその場で列を作成しませんが、貼り付ける前に、コンフィギュレーションテーブルに追加の列 (パラメータ) を作成できます。
Onshape には、以前に定義した各コンフィギュレーション入力とオプションのプロパティをコンフィギュレーションパネルから直接構成するメカニズムもあります。パーツのプロパティまたは外観のプロパティを構成できます。Professional アカウントまたは Enterprise アカウントをお持ちの場合は、カスタムプロパティを構成することもできます。
- コンフィギュレーションパネルに既存の設定を入力した状態で、パネル上部の [構成済みのプロパティ] をクリックします。
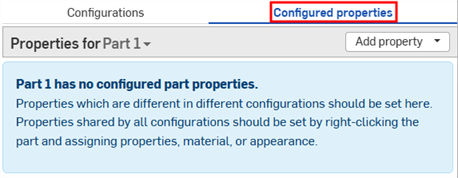
- [プロパティ] ドロップダウンをクリックして、構成するパーツまたは外観を選択します。
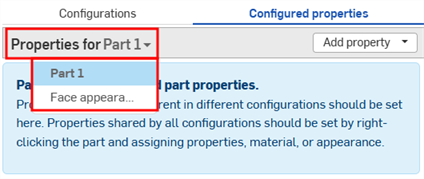
Parts and appearances that include configured properties are displayed with a checkmark in the list: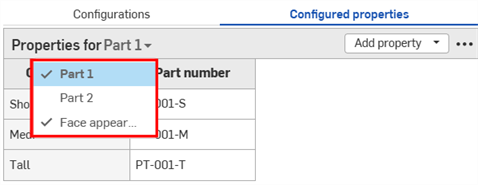
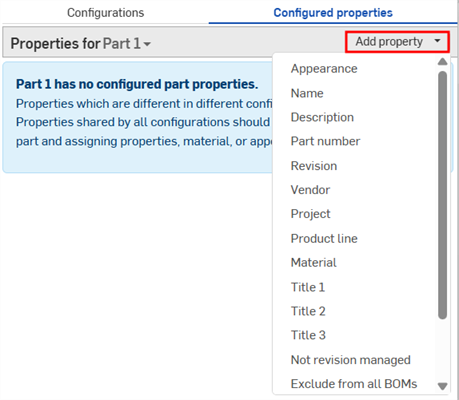
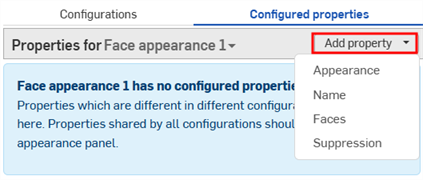
- [プロパティを追加] をクリックします。
-
構成するプロパティを選択します。プロパティは、パーツ、外観、およびカスタムプロパティで使用できます。すべてのコンフィギュレーション入力がテーブルに追加されます。
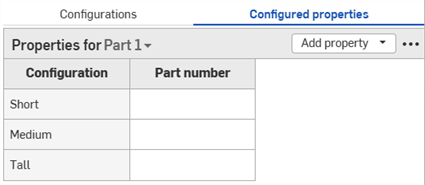
- プロパティ列のセルをダブルクリックして編集します。Tab を押して次の行に移動します。
- 値を編集するには、新しい値を入力し、Enter キーを押して確定します。
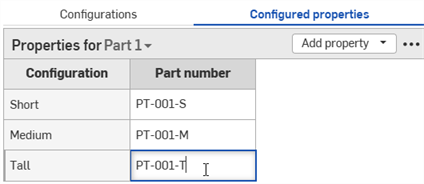
- ダイアログの選択を編集するには、ダイアログで新しい選択を行い、
 をクリックしてダイアログを閉じます。
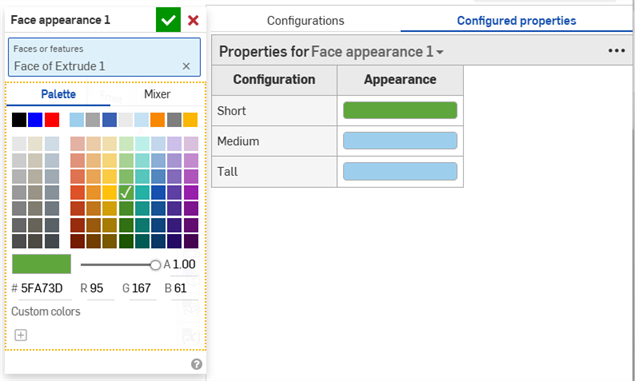
- 値を編集するには、新しい値を入力し、Enter キーを押して確定します。
-
必要に応じて繰り返して追加のプロパティを構成します。以下の例では、パーツ番号と面の外観プロパティの両方が構成されています。
![[パーツ番号] 列で右クリックしてパーツ番号を生成する例](Resources/Images/feature-tools/config-props-final-01.png)
If you have automatic part number generation turned on (through your Professional company numbering schemes or Enterprise numbering schemes), you can right-click in the Part number property column and select Generate next part number:
![[パーツ番号] 列で右クリックしてパーツ番号を生成する例](Resources/Images/feature-tools/configuration-generatepartnumber.png)
テーブル内のプロパティが読み取り専用になっている場合は、テーブルの削除、テーブルへのプロパティの追加、読み取り専用のプロパティ列の削除はできません。編集可能なプロパティのセル値は引き続き変更できます。読み取り専用のプロパティを再び編集可能にして、テーブルを変更します。
一部のコンフィギュレーションテーブルはプロパティから除外できます。これは、構成済みのプロパティテーブルでコンフィギュレーション入力を繰り返したくない場合に便利です。除外されたコンフィギュレーションは、常に既定値を持つものとして扱われます。
たとえば、ばねを考えてみましょう。ばねの直径と高さの両方のコンフィギュレーションが可能です。
![[コンフィギュレーション] パネルの [オーバーフロー] メニューをクリックし、[プロパティから除外] を選択します](Resources/Images/feature-tools/configurations-exclude-spring-01.png)
ばねが圧縮されているかどうかはジオメトリに影響しますが、パーツ番号には影響しません。圧縮されていてもいなくてもパーツは同じです。ばねの高さに関係なくすべてのパーツ番号の割り当てを必須にするには、各入力を構成済みのプロパティテーブルに個々に追加し、それぞれのパーツ番号を指定する必要があります。
![[コンフィギュレーション] パネルの [オーバーフロー] メニューをクリックし、[プロパティから除外] を選択します](Resources/Images/feature-tools/configurations-exclude-before-01.png)
コンフィギュレーションオプションごとにパーツ番号が設定されています。
代わりに圧縮のコンフィギュレーションをプロパティから除外する場合は、直径のみに基づいてパーツ番号を指定できます。
![[コンフィギュレーション] パネルの [オーバーフロー] メニューをクリックし、[プロパティから除外] を選択します](Resources/Images/feature-tools/configurations-exclude-after-01.png)
構成済みプロパティテーブルから除外された圧縮コンフィギュレーションテーブル。パーツ番号は、ばねの高さに関係なく設定されます。
手順: プロパティからコンフィギュレーション入力を除外する
-
[コンフィギュレーション] パネルで、コンフィギュレーションの横にある 3 点ボタンをクリックし、メニューから [プロパティから除外] を選択します。コンフィギュレーション名の横に [プロパティから除外済み] アイコン
 が表示されます。
![[コンフィギュレーション] パネルの [オーバーフロー] メニューをクリックし、[プロパティから除外] を選択します](Resources/Images/feature-tools/configurations-exclude-menu-04.png)
手順: 除外したコンフィギュレーションをプロパティに戻す
-
[コンフィギュレーション] パネルで、コンフィギュレーションの横にある 3 点ボタンをクリックし、メニューから [プロパティに含める] を選択します。
![[コンフィギュレーション] パネルの [オーバーフロー] メニューをクリックし、[プロパティに含める] を選択します。](Resources/Images/feature-tools/configurations-include-menu-02.png)
除外されたコンフィギュレーションの注記
-
除外されたコンフィギュレーションは、独自の既定値を持つものとして扱われます。リリースパッケージとリリビジョンのリファレンスはこれらの既定を使用します。可視性の条件により既定値を使用できない場合は、最初に表示された値が使用されます。
- 除外されたコンフィギュレーションのみが異なるパーツは、部品表 (BOM) とリリース管理で同じパーツとして扱われます。
- コンフィギュレーションが除外されたものがリリースされると、そのコンフィギュレーションのすべての値についてリリースされたと見なされます。
- 除外されたコンフィギュレーションは引き続き以下に含まれます。
- ジオメトリ計算
- 計算済みプロパティ
- 質量特性ツール
- BOM で指定されている質量と、質量特性ツールで指定されている質量との間に相違がある場合は、BOM で一部のコンフィギュレーションが無視されていることが原因と考えられます。
-
コンフィギュレーションが除外されているパーツを使用する場合、影響する構成済みプロパティから除外済みアイコンが表示されます。
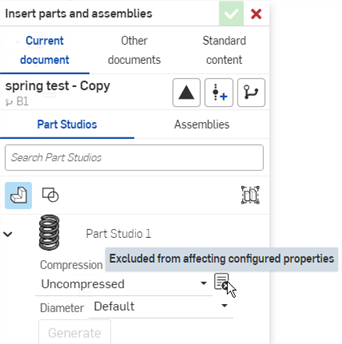
![[コンフィギュレーション] パネルの [オーバーフロー] メニューをクリックし、[プロパティから除外] を選択します](Resources/Images/assembly/configuration-exlude-rm-indicator-01.png)
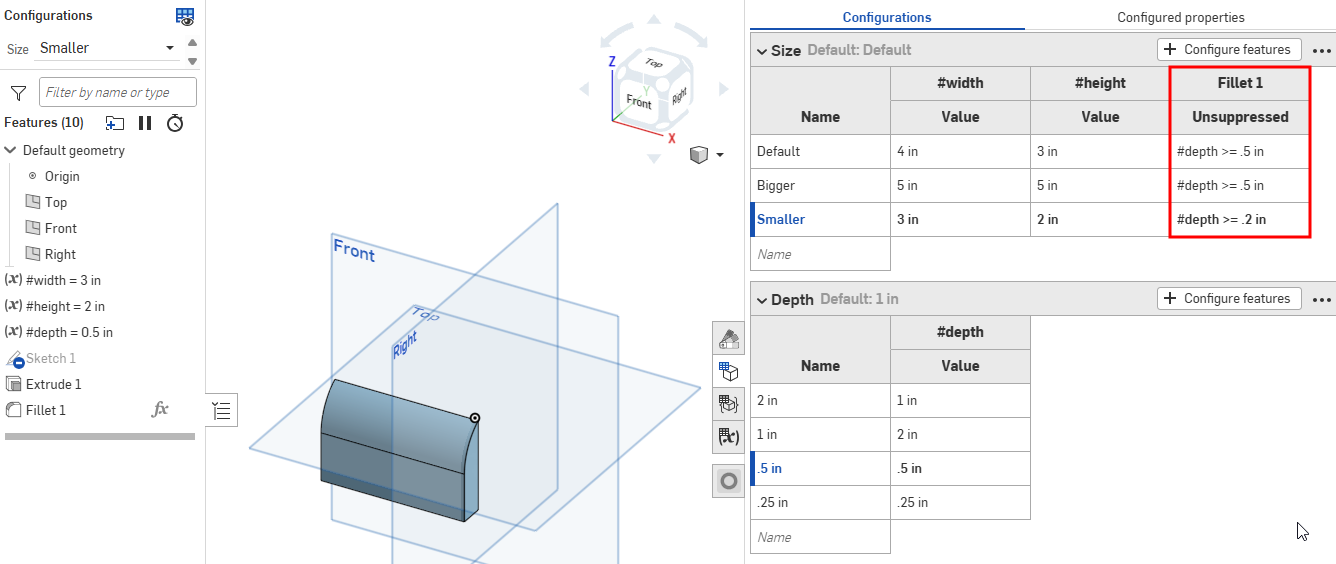
動的抑制数式を構成するには、目的の入力で [フィーチャーを構成] をクリックし、フィーチャーリストで対応するフィーチャーを右クリックし、コンテキストメニューから [抑制を構成] (または [抑制構成]) を選択して、コンフィギュレーションパネルにフィーチャーを追加します。その後、コンフィギュレーションパネルで式を直接編集できます。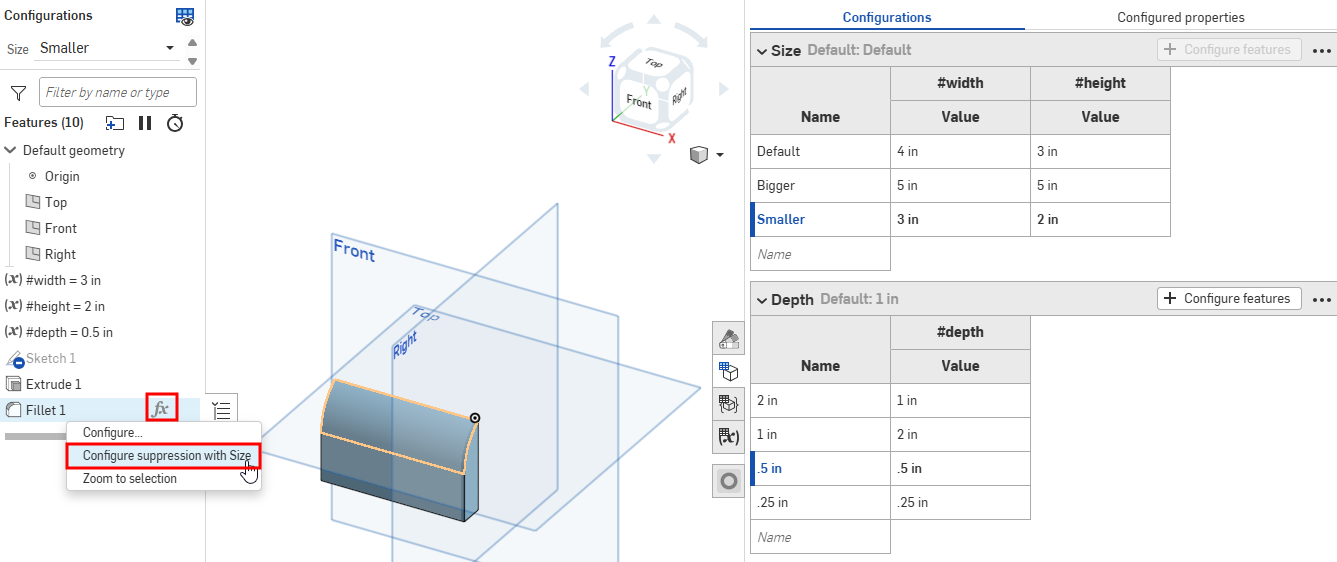
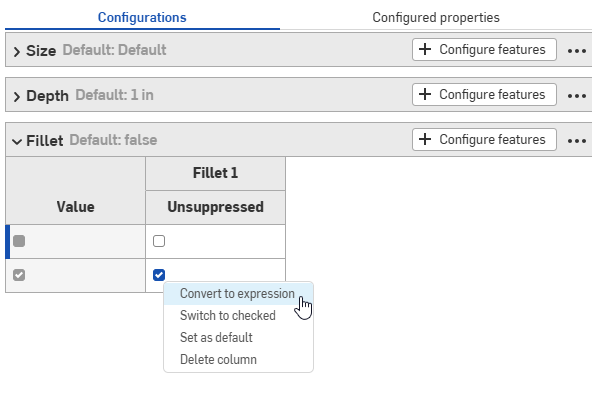
チェックボックスを数式に変換するには、コンフィギュレーションパネルのチェックボックスを右クリックし、[数式に変換] をクリックします。その後、コンフィギュレーションパネルで式を直接編集できます。チェックボックスに戻すには、式を右クリックして [チェックボックスに変換] をクリックします。
構成済みの動的抑制をフィーチャーから削除すると、その式は自動的にコンフィギュレーションパネルでチェックボックスに変換されます。
Part Studio またはアセンブリで直接作成したコンフィギュレーション入力を使用して、設計をプレビューできます。ただし、コンフィギュレーション入力作成の主な用途は、特定のコンフィギュレーションを選択して他のアセンブリ、図面、リリースなどに挿入することです。
コンフィギュレーションをプレビューしています
画面の左上にある [コンフィギュレーション] 領域を使用してコンフィギュレーション入力を選択し、それらが設計全体にどのように影響するかを確認します。選択した入力に合わせて設計が更新され、最終的な設計をプレビューできます。可能なコンフィギュレーション入力のすべての順列は、1 つのコンフィギュレーションです。
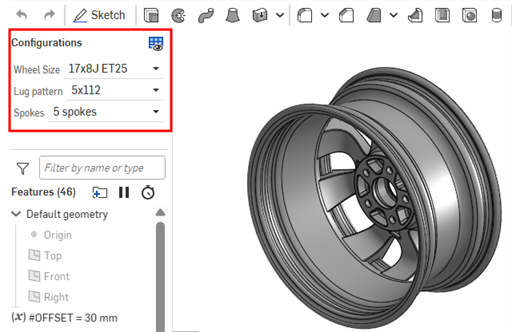
コンフィギュレーションを挿入しています
[Part Studio とアセンブリを挿入] ダイアログ経由で、構成済みパーツ、Part Studio、またはアセンブリを、アセンブリ、リリース、および図面に挿入できます
-
[挿入] ダイアログで目的の入力を直接選択します。
![入力ドロップダウンをクリックして、[挿入] ダイアログでコンフィギュレーションオプションを選択します](Resources/Images/feature-tools/configurations-insertdialog-inputs-02.png)
-
[前回表示したコンフィギュレーションに設定] アイコン (
 ) をクリックして、Part Studio または [アセンブリ] タブでプレビューされた最後のアクティブなコンフィギュレーションを選択するか、矢印をクリックして [既定にリセット] を選択し、すべての入力を既定値に設定します。
![[Part Studio とアセンブリを挿入] ダイアログの [前回表示したコンフィギュレーションに設定] ドロップダウン](Resources/Images/feature-tools/configurations-insertdialog-reset-01.png)
-
コンフィギュレーションに問題がない場合は、[生成] をクリックします。
-
挿入するコンフィギュレーションをクリックします。
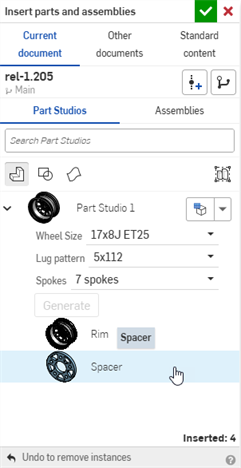
アセンブリでは、構成済みのパーツとアセンブリは、[インスタンス] リストに ![]() アイコンで示されます。
アイコンで示されます。
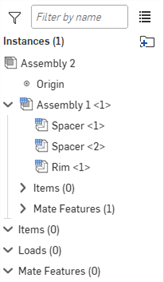
コンフィギュレーションを変更する
構成済みパーツまたはアセンブリをアセンブリに挿入したら、コンフィギュレーションを変更できます。
- [インスタンス] リストでパーツまたはアセンブリを右クリックし、[コンフィギュレーションを変更] を選択します。
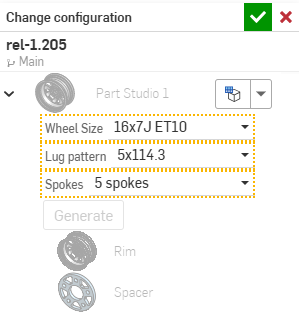
- 新しいコンフィギュレーション値を選択します。
- 選択内容に問題がなければ、
 をクリックします (操作をキャンセルするには
  を使用します)。
[アセンブリ] でどの設定が現在アクティブかを確認するには、インスタンスリストで部品にカーソルを合わせると、ツールチップが設定情報と合わせて表示されます。
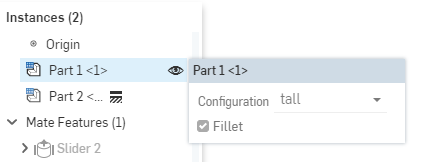
iOS および Android でのコンフィギュレーションのサポートは、次に制限されます。
-
右側のコンフィギュレーションパネル (
 ) を表示する
 -
左側のパネル (フィーチャーリストの上) でのコンフィギュレーションの選択を切り替える:
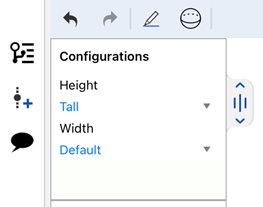
iOS でコンフィギュレーションを選択する
-
(iOS のみ) コンフィギュレーションに可視性条件が存在する場合は、その条件が適用されます。
iOS または Android プラットフォームからコンフィギュレーションや可視性条件を作成または編集することはできません。これはデスクトップ (ブラウザ) プラットフォームからのみ実行できます。
ラーニングセンターのその他のリソースについては、自習コース: コンフィギュレーションをご覧ください。また、学習経路コース: パーツコンフィギュレーションの入門 (Onshape アカウントが必要です) や、技術説明の記事: パラメトリック変数とコンフィギュレーション変数 (Onshape アカウントが必要です) も参照できます。
