 円形パターン
![]()
![]()
![]()
直線パターン直線パターン直線パターン選択したパーツ、面、またはフィーチャーを軸または合致コネクタ (暗黙的または明示的) を中心に複製します。新しいパーツの作成、または既存のパーツを修正 (マテリアルの追加や削除、またはパスへのパーツの交差) します。直線パターンの作成についての詳細は、直線パターンを参照してください。円形パターンは、アクティブなシートメタルの操作中にも使用できます。
Onshape には複数のパターンフィーチャーがあり、Part Studio 内でパーツ、フィーチャー、または面の追加インスタンス作成できます。使用可能なパターンタイプは、直線パターン、円形パターン、ミラーパターン、曲線パターンです。
直線パターンは、単一方向に沿ってインスタンスを生成するか、2 方向に配列を作成します。
円形パターンは、軸の周りにインスタンスを生成します。
ミラーパターンは、ミラー平面の周囲のインスタンスを反射します。
曲線パターンは、曲線またはパスに沿ってインスタンスを生成します。
パターンタイプを選択します。
パーツパターンは、選択したパーツの追加インスタンス作成します。パーツパターンを選択すると、ブール演算オプションを使用して新規作成、追加、削除、交差を行うことができます。
新規作成タブでは、パターンのインスタンスごとに新しいパーツが作成されます。この操作は慎重に行ってください。Part Studio に同一のパーツが重複すると、アセンブリや部品表では個別の一意のパーツとして表示されるため、重複しないようにしてください。
追加タブでは、既存のパーツにマテリアルを追加します。重複するパーツの場合、追加操作で複数のパーツを 1 つに結合できます。
削除タブでは、パターンインスタンスがパーツと交差するマテリアルを削除します。
交差タブでは、パターンインスタンスがパーツと交差する場所のマテリアルを残します。
ブール演算オプションを使用すると、パーツをツールボディとして使用してマテリアルを追加または削除したり、パターンインスタンスと既存のジオメトリとの交点を維持したりできます。
フィーチャーパターンは、フィーチャーリストで選択した 1 つまたは複数のフィーチャーを複製します。
既定では、フィーチャーパターンはシードフィーチャーの末端の種類を考慮しません。末端の種類が異なる場合は、[フィーチャーを再適用] を選択して、フィーチャーの依存関係や端点の条件を含め、選択したフィーチャーからパーツを再生成します。このオプションは、パフォーマンスや再生時間に影響する可能性があるため、必要な場合にのみ使用してください。
面パターンは選択した面を複製します。計算負荷は、パラメトリックに結合されたフィーチャーやパーツよりも面の方がはるかに低いため、最高のパフォーマンスが得られます。このため、結果のジオメトリが同一の場合は、フィーチャーパターンやパーツパターンよりも優先されます。
面が接線方向につながっている場合や、ポケットや突起などの認識可能な幾何学的フィーチャーを形成している場合は、[選択範囲を作成] を使用してパターン化する面のサブセットをより簡単に選択できます。
面の選択のタイプを設定し、1 つまたは複数の面を選択して [選択を追加] をクリックします。
ミラーを除くすべてのパターンには、インスタンスをスキップするオプションが含まれています。インスタンスをスキップすると、ジオメトリの競合が発生したり、特定のインスタンスを除外したい場合に役立ちます。選択点はインスタンスごとにグレーで囲まれて表示されます。インスタンスをスキップするには、それぞれの選択点を選択するか、ボックス選択を使用して複数のインスタンスを同時に選択します。Onshape は、スキップしれたインスタンスの選択ポイントを水色で強調表示します。
マージ範囲は、どのパーツがパターンフィーチャーの影響を受けるかを決定します。たとえば、マージ範囲に含めることで、どのパーツをパターン化されたポケットでカットするかを指定できます。マージ範囲に含まれていないパーツは、パターンフィーチャーの影響を受けません。
マージ範囲にすべてのパーツを含めるには、[すべてとマージ] を選択します。
円形パターンフィーチャーは、選択したパーツ、フィーチャー、または中心軸の面を複製します。
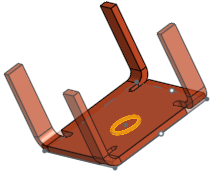
フィーチャーツールバーから新しい円形パターンフィーチャーを起動します。パターンタイプとシードインスタンスに適切なオプションを選択します。この例では、3 つのツーリングボディをパターン化して、上部鋳物と下部鋳物から形状を削除します。パターン軸にフォーカスを当てて、円形エッジ、円筒面、合致コネクタ、またはスケッチ円を選択します。合致コネクタの主軸はパターン軸の役割を果たします。または、[合致コネクタを選択] ボタンをクリックして、パターン軸として暗黙的合致コネクタを定義します。パターン軸フィールドの合致コネクタアイコンをクリックして、合致コネクタの位置合わせ、位置、または角度を変更します。
角度とインスタンス数を入力します。インスタンス数にはシードインスタンスが含まれます。
[等間隔] をオンにすると、Onshape はパターンの角度全体でインスタンスを均等に配置します。この例では、3 つのインスタンスすべてが 60 度の角度で等間隔に配置されています。[等間隔] をオフにすると、インスタンス間の角度が適用されます。これで、インスタンス間の角度は 60 度になり、1 つ目のインスタンスと最後のインスタンス間の角度が 120 度に増えました。反対方向の矢印を切り替えて、方向を元のインスタンスの左右に切り替えます。シードインスタンスがパターンの中心にある場合は、[中心] をオンにすると、シードインスタンスから軸を中心に対称的にインスタンスがパターン化されます。
-
 をクリックします:
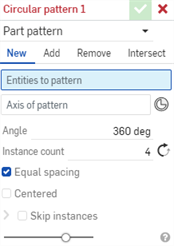
- [結果操作タイプ] を選択します。
- 新規 - 新しいパーツになる新しいマテリアルを作成します。
- 追加 - 新しいマテリアルを作成し、既存のマテリアルに追加します。
- 削除 - 既存のマテリアルからマテリアルを削除ます。
- 交差 - ジオメトリが重なる部分だけマテリアルを残します。
- パターンタイプを [パーツ]、[フィーチャー]、または [面] から選択します。
- パーツ - 個々のパーツをパターン化します。
- [フィーチャー] - フィーチャーリストにリストされている特定の (1 つまたは複数) のフィーチャーをパターン化します。
- 面 - 特定のパーツ上の特定の面をパターン化します。
- [パターン化するエンティティ] フィールドにフォーカスして、パターンに複製するエンティティを選択します。
パターン化する面を選択する場合、[選択範囲の作成]
 は、関連する面を選択する場合に便利です。
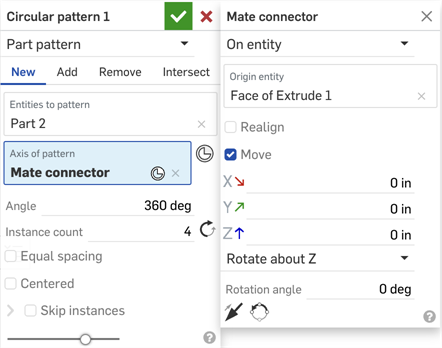
 - [パターンの軸] フィールドでフォーカスを設定し、パーツのエッジ、面、円錐または円筒面、直線スケッチエンティティ、または合致コネクタ (暗黙的または明示的) を選択します (
 をクリックして、推定合致コネクタを選択します)。
合致コネクタを選択したら、ダイアログフィールドの合致コネクタアイコン (下の青の外枠) をクリックして、合致コネクタを編集するためのダイアログを開きます。
- 各パターンエンティティ間の距離を入力してから、反復回数、またはインスタンス数を入力します (使用できるインスタンスの最小数は 1 です)。
- [等間隔] ボックスでは、指定した角度内でパターンパーツを等間隔に配置できます。
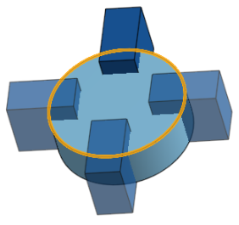
![円形パターンの例。[等間隔] をオフにすると、パーツが 90 度間隔で配置されます。](Resources/Images/feature-tools/circularpattern-equal-off-01.png)
上記の [等間隔] をオフにすると、パーツが 90 度間隔で配置されます。
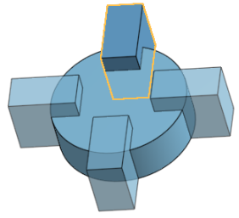
![円形パターンの例。[等間隔] をオンにすると、パーツが 90 度以内で等間隔に配置されます。](Resources/Images/feature-tools/circularpattern-equal-on-01.png)
上記の [等間隔] をオンにすると、パーツは 90 度以内で等間隔に配置されます。
- [中心揃え] を使用して、シードインスタンス/面/フィーチャーをパターンの中心にします。
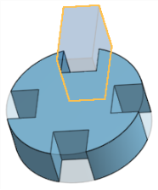
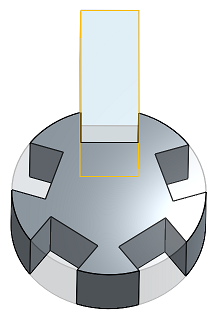
![円形パターンの例。[等間隔] をオンにすると、パーツが 90 度以内で等間隔に配置されます。](Resources/Images/feature-tools/circularpattern-centered-off-01.png)
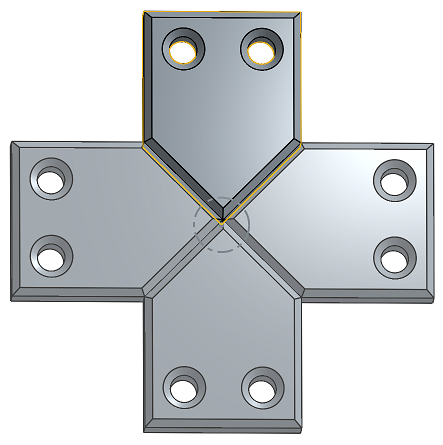
シードインスタンスはパターンの上部 (赤い輪郭) 、パターンは左上、[中心] チェックボックスがオフになっています。
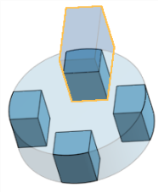
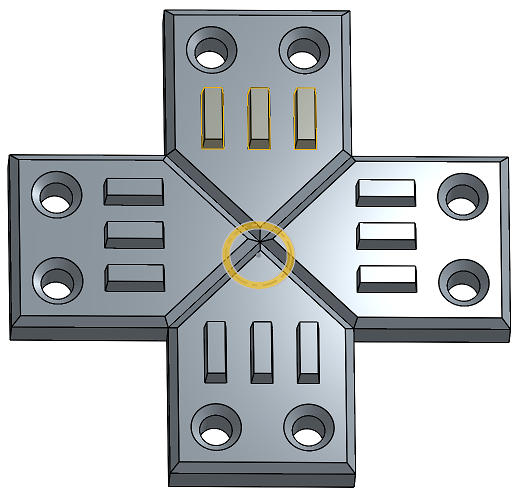
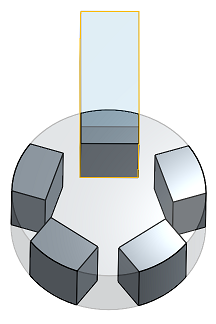
![[中心揃え] チェックボックスをオンにすると、シードインスタンスは上部に残り、上のように輪郭が赤で描かれます。](Resources/Images/feature-tools/circularpattern-centered-on-01.png)
シードインスタンスは上部に残り、上のように輪郭が赤で描かれます。[中心揃え] チェックボックスをオンにすると、パターンはシードインスタンスの両側から広がります。
- スキップするパターンのインスタンスを指定するには、[インスタンスをスキップする] オプションをチェックしてください。
- インスタンスの選択ハンドルをクリックして、スキップするインスタンスのリストに追加します。
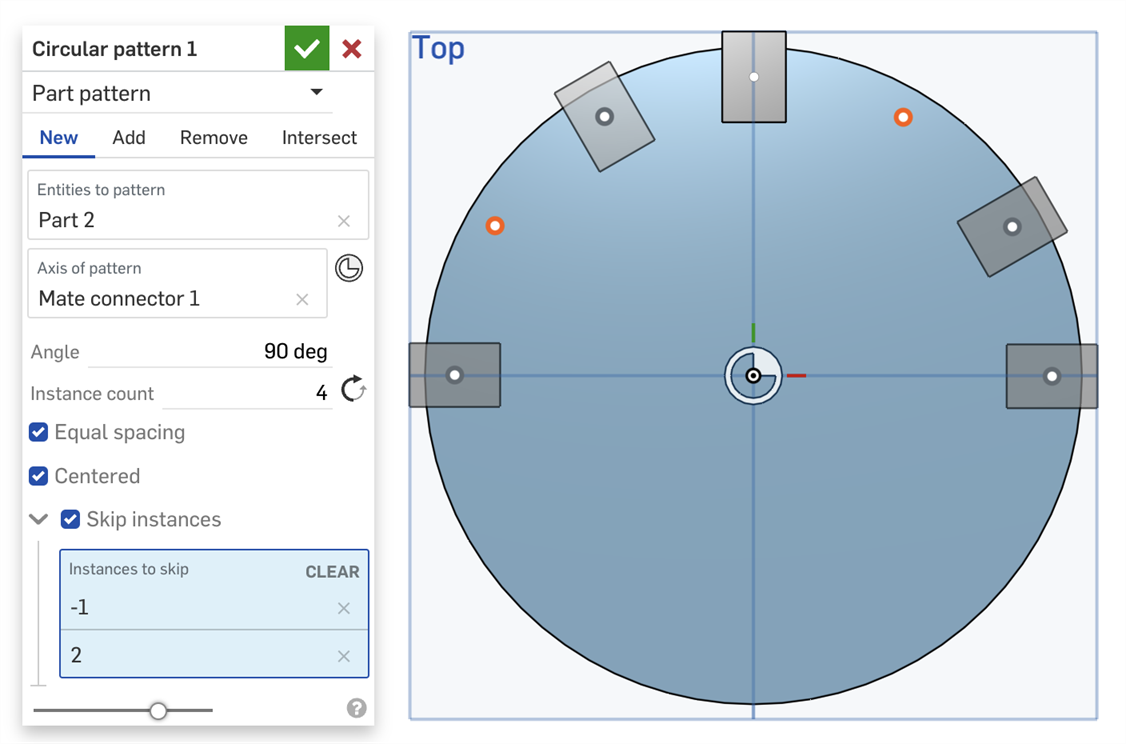
- インスタンスを Part Studio に追加し直すには、リスト内のインスタンスの横にある X をクリックします。
- [クリア] をクリックすると、スキップするインスタンスのリストからすべてのインスタンスが削除されます。
- インスタンスの選択ハンドルをクリックして、スキップするインスタンスのリストに追加します。
- (フィーチャーパターンタイプのみ) [フィーチャーを再適用する] を選択し、単に初期パターンインスタンスを再作成する代わりに、インスタンスごとにフィーチャーを再生成します ([インスタンス数] で指定)。
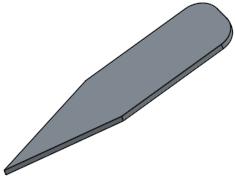
個々のパーツをパターン化する
断面が 1 つ作成され、[追加] としてパターン化され、このパーツが作成されます。
シートメタルの場合、このブレードがパーツとして選択され、エッジがパターン軸として選択されています。
[フィーチャーを再適用する] を選択せずに、フィーチャーリストにある特定のフィーチャ (1 つまたは複数) をパターン化します (より高速で軽量なフィーチャパターン)。これはシートメタルでは使用できません。
次の例では、最初の押し出しは [次まで] です (押し出しはサーフェスの面まで上がります)。[フィーチャーを再適用する] を選択しないと、パターン化されたフィーチャー (押し出し) は初期フィーチャからパターン化され、再生成されません (したがって、[次まで] によりパターンのそれぞれのインスタンスは更新されません)。
![[フィーチャーを再適用する] を選択せずに次まで押し出した例](Resources/Images/feature-tools/circularpattern-not-perinstance.png)
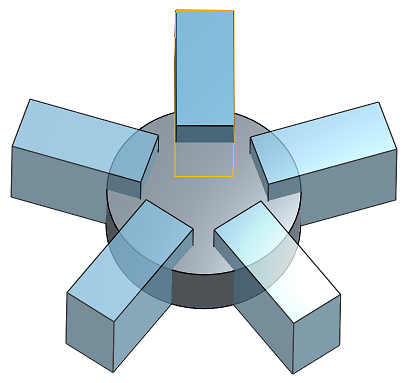
フィーチャーリストにリストされた特定の (1 つまたは複数の) フィーチャーを、[フィーチャーを再適用する] を選択してパターン化します。これはシートメタルで使用できます。
次の例では、最初の押し出しは [次へ] です (押し出しはサーフェスの面まで上がります)。[フィーチャーを再適用する] を選択すると、パターン化されたフィーチャー (押し出し) がパターンのインスタンスごとに再生成され、[次まで] がパターンの各インスタンスに適用されます
![[フィーチャーを再適用する] を選択して次まで押し出した例](Resources/Images/feature-tools/circularpattern-perinstance.png)
特定のパーツ上の特定の面をパターン化する
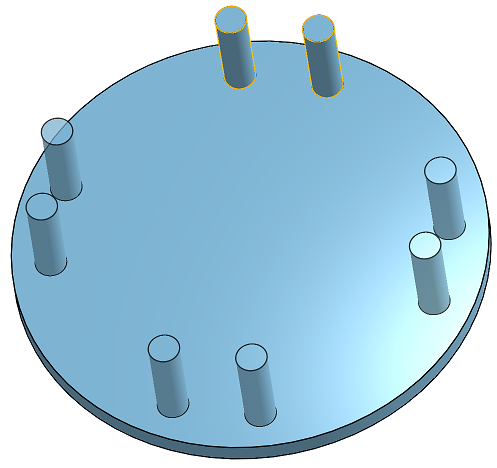
選択した面は、円筒状の面とそのトップ面 (2 つの円柱の場合) で、90 度の角度、4 つのインスタンスでパターン化されます。
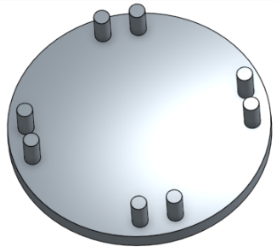
このシートメタルの一部で選択した面がフランジになります。軸または合致コネクタ (暗黙的または明示的) が強調表示された円です。
新規 - 新しいパーツになる新しいマテリアルを作成します。
追加 - マテリアルを作成して既存のマテリアルに追加します (この例では、[すべてとマージする] を選択)。
マテリアルを除去し、パターン化するパーツを選択して削除します。
パターン化するパーツを選択し、[交差] を選択します。
- 面またはエッジを選択してパターンの軸を設定する場合は、必要に応じて [反対方向] 矢印
 を使用して結果を反転できます。
- フィーチャーをパターン化する場合、フィーチャーリストから任意の順序で選択できます。選択した順序に関係なく、フィーチャーはフィーチャーリストに表示されている順序で適用されます。
- フィーチャーリストでパターンを選択すると、そのパターンはパターン化されますが、シードはパターン化されません。シードを含めるには、それも選択します。
- ブール演算フィーチャーをパターン化する場合は、ブール演算が適用されたフィーチャーも選択する必要があります。
- フィーチャーパターンを作成する場合、[押し出し] フィーチャーの端点の条件など、フィーチャーのすべての側面が適用されます (対照的に、面パターンはこれらのタイプの修飾子を認識しません)。
-
[フィーチャーを再適用] オプションを有効にしてフィーチャーパターンを使用すると、シードフィーチャーの外部参照がインスタンスごとに自動的に再生されます。
スケッチを選択すると、シードスケッチの寸法と原点または既定の平面 (上、正面、右) への拘束は再適用されません。この動作を利用して、パターン内でどの寸法や拘束を再適用するかを調べることができます。
- スケッチでは、寸法を記入してエンティティを原点または既定の平面に拘束することで、これらの寸法と拘束が各パターンインスタンスに再適用されないようにすることができます。
- 寸法と拘束を原点または既定平面に再適用する必要がある場合は、まず原点または既定の平面に拘束された線と点を使用して補助スケッチを作成します。次に、シードスケッチで、これらのスケッチエンティティを原点または既定の平面の寸法と拘束のプロキシとして使用します。
- 合致コネクタが Part Studio でパターン化されたパーツである場合、Part Studio を挿入するとすべてアセンブリに追加されます。Part Studio をアセンブリに挿入しても合致コネクタが表示されない場合は、そのパーツが合致コネクタ所有者エンティティとしてリストされていることを確認してください。
- 円形パターンツールをタップします。


- パターンの種類を指定:
- パーツ - 個々のパーツをパターン化します。
- [フィーチャー] - フィーチャーリストにリストされている特定の (1 つまたは複数) のフィーチャー をパターン化します。
- 面 - 特定のパーツ上の特定の面をパターン化します。
- 次のように結果ボディ操作タイプを選択します。
- 新規 - 新しいパーツになる新しいマテリアルを作成します。
- 追加 - 新しいマテリアルを作成し、既存のマテリアルに追加します。
- 削除 - パーツからマテリアルを削除します。
- 交差 - 交差が存在する場所のみマテリアルを残します。
- パターン化するエンティティ (パーツ、フィーチャー、または面) を選択します。
- パターンの軸 (エッジ、スケッチ、または円形/円錐面) を選択します。
- オプションで合致コネクタアイコンをタップして、暗黙的な合致コネクタを選択または作成します。
- 角度を指定します。この角度は、[等間隔] を選択した場合を除き、各パーツ間の距離になります (詳細は、手順 9 を参照してください)。
- インスタンス数を指定します。
- 必要に応じて、反対方向に切り替えることができます。
- 必要に応じて、等間隔を使用するように切り替えます。等間隔を指定すると、指定した角度/度内にパターンエンティティが配置されます。
- 必要に応じて、中心 を切り替えて、シードインスタンス/面/フィーチャーをパターンの中心にします。
- オプションで、[インスタンスをスキップ] を切り替えて、スキップするインスタンスを選択します。インスタンスをダブルタップすると、そのインスタンスが Part Studio に再び追加されます。
- チェックマークをタップします。
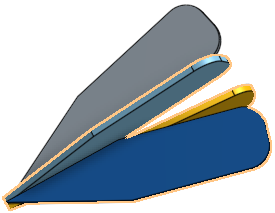
個々のパーツをパターン化します。
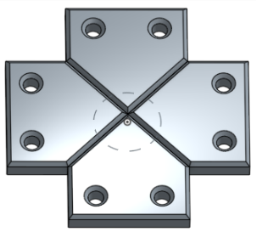
スケッチ円の軸を中心に円形状パーツパターンを使用して、パーツを 4 回パターン化し、既存のパーツにマテリアルを追加します。
フィーチャーリストにリストされている特定のフィーチャーをパターン化します。
押し出しフィーチャーは、スケッチ円の軸の周りに円形状フィーチャーパターンを使用して 4 回パターン化され、既存のパーツにマテリアルが追加されます。
特定のパーツ上の特定の面をパターン化します。
パーツの強調表示された円柱面は、円形状面パターンを使用して 4 回パターン化され、既存のパーツにマテリアルが追加されます。
新規 - 新しいパーツになる新しいマテリアルを作成します。
追加 - マテリアルを作成して既存のマテリアルに追加します。

マテリアルを取り除きます。
交差が存在する場所のみマテリアルが残ります。
- 円形パターンツールアイコン (
 ) をタップします。
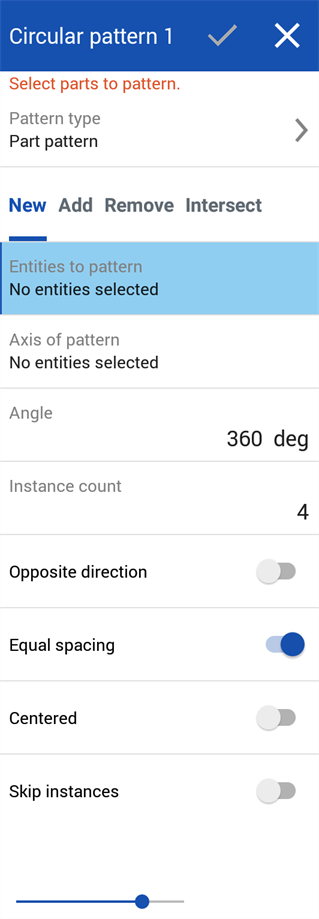
- パターンの種類を指定:
- パーツ - 個々のパーツをパターン化します。
- [フィーチャー] - フィーチャーリストにリストされている特定の (1 つまたは複数) のフィーチャーをパターン化します。
- 面 - 特定のパーツ上の特定の面をパターン化します。
- 次のように結果ボディ操作タイプを選択します。
- 新規 - 新しいパーツになる新しいマテリアルを作成します。
- 追加 - 新しいマテリアルを作成し、既存のマテリアルに追加します。
- 削除 - パーツからマテリアルを削除します。
- 交差 - 交差が存在する場所のみマテリアルを残します。
- パターン化するエンティティ (パーツ、フィーチャー、または面) を選択します。
- パターンの軸 (エッジ、スケッチ、または円形/円錐面) を選択します。
- 角度を指定します。この角度は、[等間隔] を選択した場合を除き、各パーツ間の距離になります (詳細は、手順 9 を参照してください)。
- インスタンス数を指定します。
- 必要に応じて、反対方向に切り替えることができます。
- 必要に応じて、等間隔を使用するように切り替えます。等間隔を指定すると、指定した角度/度内にパターンエンティティが配置されます。
- 必要に応じて、中心 を切り替えて、シードインスタンス/面/フィーチャーをパターンの中心にします。
- オプションで、[インスタンスをスキップ] を切り替えて、スキップするインスタンスを選択します。インスタンスをダブルタップすると、そのインスタンスが Part Studio に再び追加されます。
- チェックマークをタップします。
個々のパーツをパターン化します。
スケッチ円の軸を中心に円形状パーツパターンを使用して、パーツを 4 回パターン化し、既存のパーツにマテリアルを追加します。
フィーチャーリストにリストされている特定のフィーチャーをパターン化します。
押し出しフィーチャーは、スケッチ円の軸の周りに円形状フィーチャーパターンを使用して 4 回パターン化され、既存のパーツにマテリアルが追加されます。
特定のパーツ上の特定の面をパターン化します。
パーツの強調表示された円柱面は、円形状面パターンを使用して 4 回パターン化され、既存のパーツにマテリアルが追加されます。
新規 - 新しいパーツになる新しいマテリアルを作成します。
追加 - マテリアルを作成して既存のマテリアルに追加します。
マテリアルを取り除きます。
交差が存在する場所のみマテリアルが残ります。