![]()
![]()
![]()
Part Studio フィーチャーリストは、フィーチャーのリストとパーツのリストで構成されます。
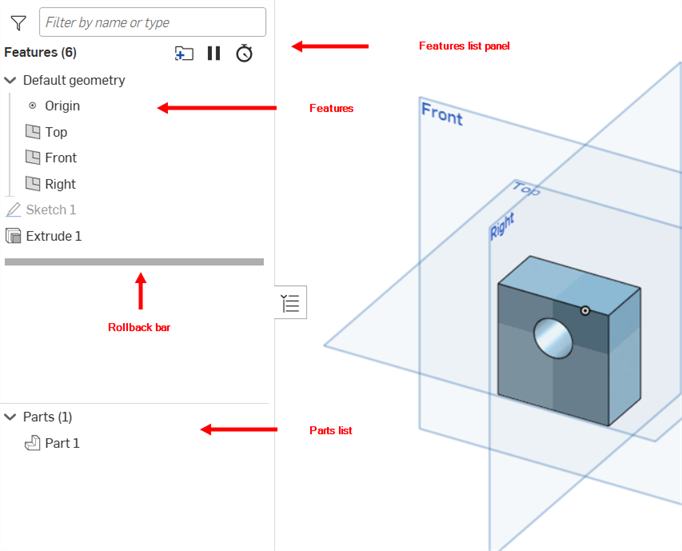
ウィンドウの左側のペインには、上部から次の内容が表示されます。
- コンフィギュレーションを作成した場合は、このリストの最上部に表示され、コンフィギュレーションを選択できるドロップダウンが表示されます。
- Part Studio のフィーチャーの数
- 検索ボックス (フィーチャー、パーツ、サーフェス、曲線を名前またはタイプで検索する)
- リスト自体には、原点と平面の既定のジオメトリが含まれています
- Part Studio の各フィーチャーには固有のツールアイコンが付いています
- ロールバックバー
- パーツ/曲線/サーフェスのリストをフィーチャーから分離するバー
- Part Studio 内のパーツ、サーフェス、メッシュ、複合部品、曲線の数と、それぞれのアイコンは以下のとおりです。
- Part

- サーフェス

- サーフェスメッシュ

- 複合部品

- Part
- Part Studio 内の各パーツ (Part Studio で作成、または派生)
- ドキュメントのリリースバージョンを表示すると、その特定のバージョンでリリースされたパーツの横に
 というインジケータが表示されます。
 - 各サーフェスおよび曲線 (Part Studio で作成、または派生)
セパレータバーをドラッグすると、[フィーチャーリスト] 領域の表示やパーツリスト領域を多く、または少なく表示できます。各領域 (フィーチャとパーツ) も、他の領域とは独立してスクロールします。
フィーチャーには、フィーチャーを作成したツールアイコンが付いています。これにより、わかりやすい名前を使用して名前を変更でき、どのようなフィーチャーが表現されているかを知ることができます。グラフィック領域に表示されるモデルは、フィーチャーリストのロールバックバーの位置まで表示されます。
ドキュメントに対するコピー権限を伴う表示権限がある場合 (つまり、ドキュメントを編集することはできませんが、表示およびコピーは可能)、[フィーチャー] ダイアログを開いて仕様を表示できます (ブラウザおよび iOS プラットフォームのみ)。モバイルプラットフォームで [フィーチャー] ダイアログを開くには、フィーチャーリストの [フィーチャー] の横にある 3 点メニューを使用します。
フィーチャーリストには、Part Studio で作成されたすべてのスケッチとフィーチャーのリストが含まれます。また、リストの下部に表示されるパーツ (サーフェスと曲線を含む) のリストも含まれています。フィーチャーリストの操作には、さまざまな方法があります。
ロールバックバーの時点でのモデルを表示します。ロールバックバーの下にリストされるすべてのフィーチャーが一時的に抑制されます。フィーチャーリストのロールバックバーを選択し、上下にドラッグして前後にロールします。また、リスト内のフィーチャーを右クリックして [ここまでロールする] を選択すると、即座に正確なロールバックを行うことができます。ロールバックバーを右クリックし、[末尾までロールする] を選択すると、ロールバックバーがフィーチャーリストの末尾に戻ります。
キーボードショートカット
ロールバックバーをドラッグする代わりに、キーボードショートカットを使用することもできます。ロールバックバーを選択し、上矢印キーと下矢印キー (↑ ↓) をクリックすると、フィーチャーリストで 1 段階ずつ前後にロールできます。
閲覧専用のアクセス許可を持つ共同作業者で、ロールバックバーの位置を変更した場合、別のコラボレータがロールバックバーに加えた変更のリアルタイム更新は表示されなくなります。これを修正するには、ブラウザをリロードしてください。
ラーニングセンターのその他のリソースについては、こちらの教員ヒント: ロールバックバーの使用 (Onshape アカウントが必要です) をご覧ください。
リスト内のフィーチャー/スケッチ名をクリックして、ダイアログの選択項目を指定します (またはグラフィック領域で選択します)。パーツリストで、パーツ、サーフェス、または曲線を選択すると、現在の選択の作成に適用または使用されたフィーチャーがクロス強調表示されます。グラフィック領域で面またはパーツを選択すると、関連するフィーチャーもクロス強調表示されます。
アイテムの順序を変更するには、フィーチャーリストでアイテムをドラッグして、パラメトリックに並べ替えます。複数のアイテムを選択する場合は、クリックするだけで追加アイテムが選択されます。フィーチャーリスト内で連続している必要はありません。
クロスハイライトは複合パーツには適用されません。
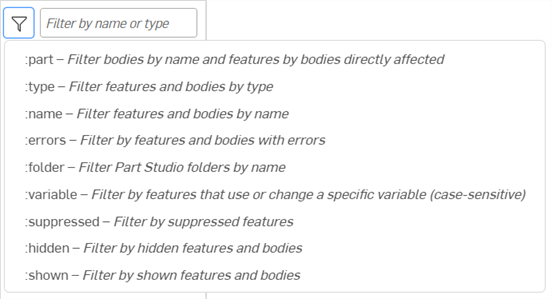
パーツ/フィーチャーの名前またはタイプの一部を入力すると、一致するパーツやフィーチャーが表示されます。さらにコントロールするには、特別なコマンド (先頭にコロン を付ける) を使用してください。)さらに制御するには:
- :part 検索文字列 - 一致するボディを名前別に表示し、それらのボディに直接影響するボディ別のフィーチャーを表示します。
- :type 検索文字列- タイプが一致するフィーチャーとボディを表示します。
- :name 検索文字列 - 名前が一致するフィーチャーとボディを表示します。
- :errors 検索文字列 - エラーのあるフィーチャーとボディを表示します。
- :folder 検索文字列 - 一致する名前の Part Studio フォルダを表示します。
- :variable 検索文字列 - 変数を使用または変更する機能を表示します (大文字と小文字が区別されます)。
- :suppressed 検索文字列 - 抑制された機能を表示します。
- :hidden 検索文字列 - 非表示のフィーチャーとボディを表示します。
- :show 検索文字列 - 非表示でないフィーチャーとボディを表示します。
たとえば、:part part 1 を検索すると、part 1、part 10、part 11、part 12 など、およびそれらのボディに直接影響するすべてのフィーチャーが表示されます。
- フィーチャー名を変更 - 名前をフィーチャーリストで右クリックし、[名前の変更] を選択して、[フィーチャー] 名をダイアログを開かずにフィーチャーリストで直接編集します。
- フィーチャーを省略 - フィーチャーのコンテキストメニューから [省略] コマンドを使用して、そのフィーチャーなしでモデルを視覚化します。
- 動的抑制 - [動的抑制] コマンドを使用して、フィーチャーを抑制するタイミングのロジックを作成します。詳細は、動的抑制を参照してください。
- フィーチャーの表示/非表示 - フィーチャーのコンテキストメニューから [非表示/表示] コマンドを使用して、グラフィック領域ビューからそのエンティティの非表示と表示を切り替えます。名前の隣にカーソルを合わせて、
 アイコンをクリックすることもできます。
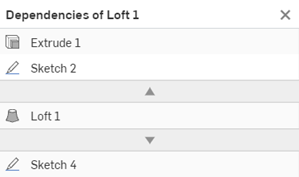
 - 依存関係を表示 - フィーチャーのコンテキストメニューから [依存関係を表示] コマンドを使用すると、選択したフィーチャーの親 (上矢印の上) と子 (下矢印の下) を示すダイアログが開きます。矢印にカーソルを合わせると、フィーチャーの関係を示すツールチップが表示されます。
-
展開 - 折りたたみ可能な矢印の付いたフィーチャーを右クリックし、[展開] オプションにカーソルを合わせると、[選択項目を展開] または [すべて展開] オプションが表示されます。
-
折りたたみ - 折りたたみ可能な矢印の付いたフィーチャーを右クリックし、[折りたたみ] オプションにカーソルを合わせると、[選択項目を折りたたむ] または [すべて折りたたむ] オプションが表示されます。
- スケッチ、フィーチャー、平面をフォルダにグループ化 - フィーチャーリストでグループ化したいアイテムを選択し、右クリックして [選択項目をフォルダに追加...] を選択します。フォルダ名ダイアログが表示され、フォルダの名前を入力できます。フォルダ名がフィーチャーリストに表示され、フォルダを展開して内容を確認するための矢印が表示されます。
- フォルダだけを右クリックして (他に何も選択せずに)、[フォルダをアンパック] を選択すると、フォルダが削除され、アイテムがフィーチャーリストに 1 つだけ表示されるようになります。
- [抑制] を選択すると、選択したアイテムフォルダなしでモデルが表示されます。フィーチャーまたはフォルダを抑制すると、抑制したアイテムに関連するすべてのフィーチャーが非アクティブになります。
- 選択してから、フィーチャーリストの上部にあるフォルダアイコン
 をクリックすることもできます。
グループ化するアイテムを選択し、右クリックして [フォルダに選択を追加] を選択します。フォルダ名を指定し、チェックマークをクリックします。
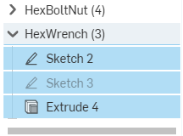
フィーチャーリストにフォルダが表示されます。展開すると、コンテンツが表示されます。
既存のフォルダ内に新しいフォルダを作成することで、ネストされたフォルダを作成できます。
エンティティが非表示になっている場合は、フィーチャーリストでそのエンティティにカーソルを合わせると、エンティティのアウトラインがグラフィック領域に表示されます。
動的抑制では、論理式を作成して、フィーチャーを抑制するか抑制解除するかを決定できます。
フィーチャーに動的抑制を追加するには、次の手順を行います。
-
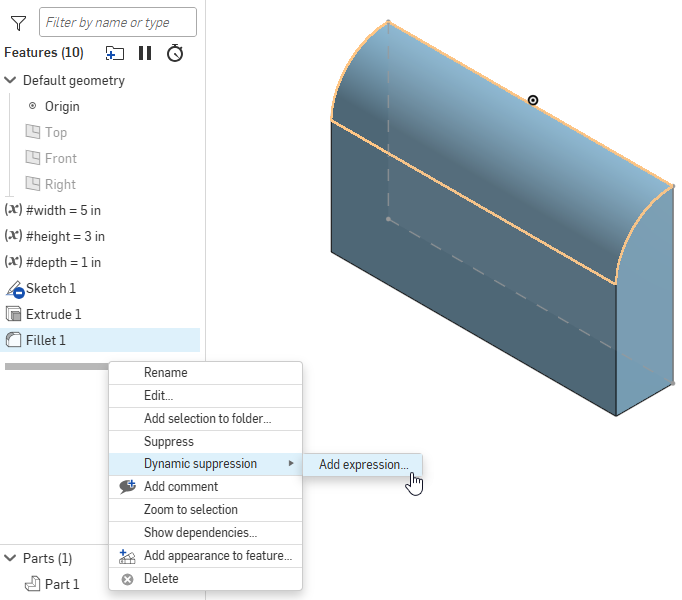
フィーチャーリストで抑制するフィーチャーを右クリックします。
-
コンテキストメニューから、[動的抑制] > [式を追加] を選択します。
-
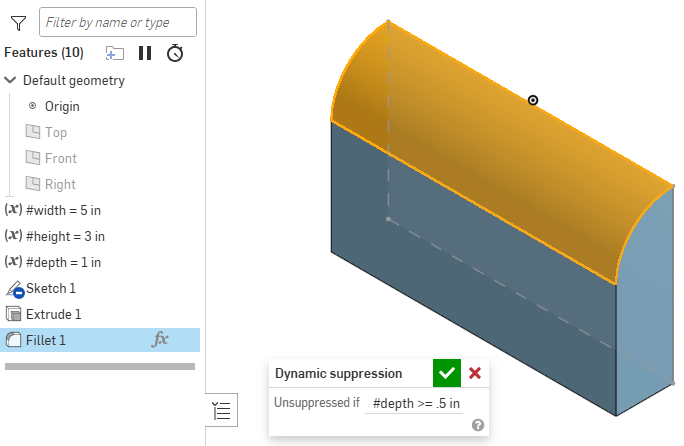
In the Dynamic suppression dialog, type the expression to use for suppression. In this example, the Fillet 1 feature is suppressed when the #depth variable is less than 0.5 inches.
-
チェックマークをクリックして式を保存し、ダイアログを閉じます。
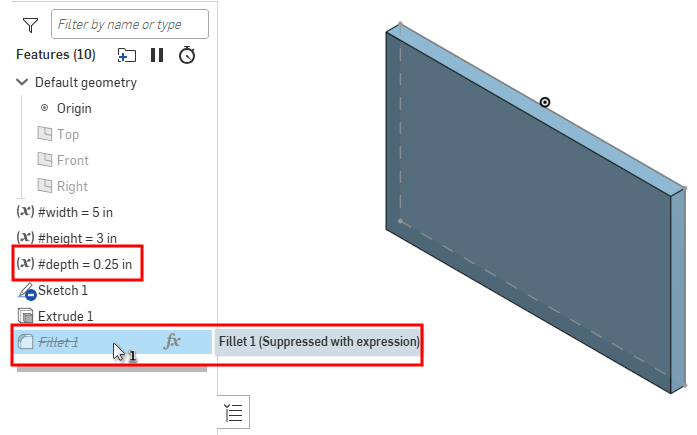
ロジックを追加すると、フィーチャーが抑制されます。式アイコン (
 ) がフィーチャーリストに表示されます。抑制すると、フィーチャー名がフィーチャーリストに取り消し線付きで表示されます。
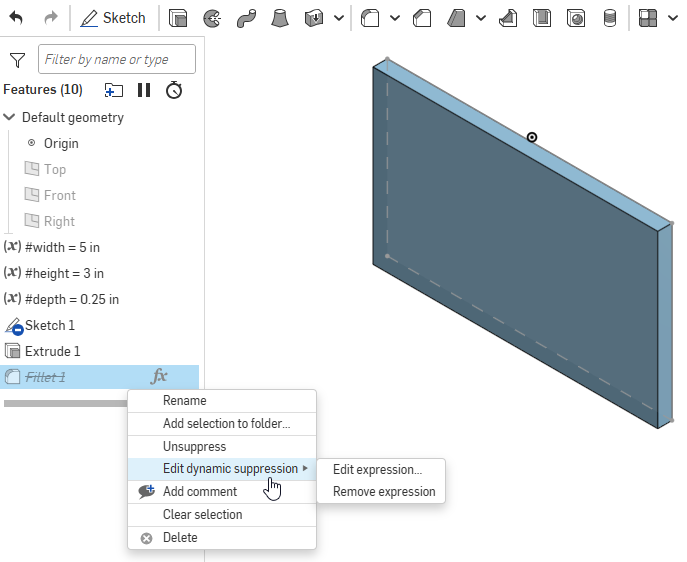
To edit the expression, click the expression icon (
 ) to open the Dynamic suppression dialog. Alternatively, right-click the feature in the Feature list and select Edit dynamic suppression from the context menu. Select either Edit expression to open the Dynamic suppression dialog, or select Remove expression to delete it.
式の構成については、動的抑制式の構成を参照してください。
- 名前を変更 - アイテムに新しい名前を入力します。
- [プロパティ] - アイテムのメタデータを編集します。
- マテリアルを割り当てる - Onshape マテリアルライブラリまたはカスタムライブラリ (使用可能な場合) を使用し、マテリアル (と密度) をアイテムに割り当てます。
- 外観を編集 - アイテムの色を変更します。
- コピー - 別の場所に貼り付けるためにアイテムのコピーを作成します。
- 図面を作成 - 選択したアイテムの Onshape 図面を作成します。
- エクスポート - エクスポートダイアログを開きます。このダイアログでは、現在選択されているパーツをデバイス上のファイル (または個々のファイル) にエクスポート (ダウンロード) できます。詳細は、ファイルのエクスポートを参照してください。
- リリース - リリース候補を作成し、選択したアイテムのリリースプロセスを開始します。
- すべてのコンフィギュレーションをリリース - リリースパッケージを作成できるユーザーの場合、このコマンドを実行すると、リリースパッケージにすべてのコンフィギュレーションがプリロードされたリリース候補ダイアログが開きます (最大 100 個のコンフィギュレーションがサポートされています)。このオプションは、リスト入力が 1 つだけのコンフィギュレーションのみで使用できます。List 入力が複数ある場合や、Checkbox または Configuration 変数入力が使用されている場合、コマンドオプションは使用できません。ダイアログが開いたら (コンテキストメニューの [リリース] コマンドをクリックした後)、いつでもリリースパッケージにコンフィギュレーションを追加できます。
- リビジョン履歴 - 選択したアイテムのリビジョン履歴を表示します。リビジョン履歴がない場合は、メッセージが表示されます。
- 非表示にする - アイテムをビューから非表示にします。
- 他を非表示にする - 選択したアイテム以外のアイテムを非表示にします。
- すべて非表示にする - 選択したアイテムを含むすべてのアイテムを非表示にします。
- 分離 - 他のアイテムの色をミュートし、選択したアイテムまでの距離または選択したアイテムへの接続性によって、不透明度を拡張する機能を選択できないようにします。
- 透明にする - 選択したアイテムを透明にします。
- コメントを追加 - コメントを追加し、選択したアイテムにタグを付けます。
- 選択を拡大 - アイテム全体が表示されるようにウィンドウを拡大し、グラフィック領域の中央に配置します。アイテムの最大ビューを作成します。
- 削除 - 選択したアイテムを破棄します。
再生を一時停止
[再生を一時停止] ボタン (![]() ) をクリックすると、編集中のパーツの再生を停止します。これは、再生に時間がかかるコンフィギュレーションテーブルや Part Studio を操作する場合に便利です。再生を一時停止すると、テーブル、コンフィギュレーションテーブル、数量とブーリアン演算 (選択していないフィールド) を変更し、編集が完了したらパーツを再生できます。
) をクリックすると、編集中のパーツの再生を停止します。これは、再生に時間がかかるコンフィギュレーションテーブルや Part Studio を操作する場合に便利です。再生を一時停止すると、テーブル、コンフィギュレーションテーブル、数量とブーリアン演算 (選択していないフィールド) を変更し、編集が完了したらパーツを再生できます。
再生の一時停止モードは多くの Onshape 操作を制限するので、必要な場合のみに使用してください。主な目的は、既存のパラメータ値を一括変更する場合です。
再生を一時停止するには、次の手順を実行します。
-
フィーチャーリストで [再生を一時停止] (
 ) をクリックします。
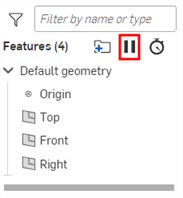
-
[再生を一時停止中] バナーが表示されたら、編集を行います。

- 変更を適用または拒否するオプションを選択します。
- 変更を適用し、再生の一時停止モードのまま Part Studio を再生するには、[Part Studio を再生] をクリックします。

- 変更を適用し、Part Studio を再生して、再生の一時停止モードを終了するには、[フィーチャーを再生して終了] をクリックします。

- 変更を破棄し、再生の一時停止モードを終了するには、[未再生の変更を破棄して終了] をクリックします。[Part Studio を再生] ボタンで適用した変更は、終了しても保持され、未再生の変更のみ破棄されることに注意してください。

- 破棄を取り消して再生の一時停止モードに戻るには、[復元] をクリックします。

- 変更を適用し、再生の一時停止モードのまま Part Studio を再生するには、[Part Studio を再生] をクリックします。
ヒント
-
再生の一時停止モードでタブを切り替えたり、ドキュメントを閉じたりすると、変更が自動的に適用されます。
- 緑のチェックマークを選択すると、再生された変更は元に戻せなくなります。これらの変更を取り消すには、再生の一時停止モードを終了し、ドキュメントを以前のバージョンに復元します。
- 再生を一時停止していると、スケッチは編集できません。
- 再生を一時停止するとジオメトリとテーブルが一致しなくなり、再生を完了すると更新されます。
- 修復モードでは再生の一時停止モードは使用できません。その逆も同様です。
再生時間の表示
[再生時間を表示] ボタン (![]() ) をクリックすると、すべてのフィーチャーとそれぞれの再生にかかる時間が表示されます。これを使用して、現在必要のないフィーチャーを再生せずにモデリング時間を最大化するため、時間のかかるどのフィーチャーを抑制すればよいかを推定できます。
) をクリックすると、すべてのフィーチャーとそれぞれの再生にかかる時間が表示されます。これを使用して、現在必要のないフィーチャーを再生せずにモデリング時間を最大化するため、時間のかかるどのフィーチャーを抑制すればよいかを推定できます。
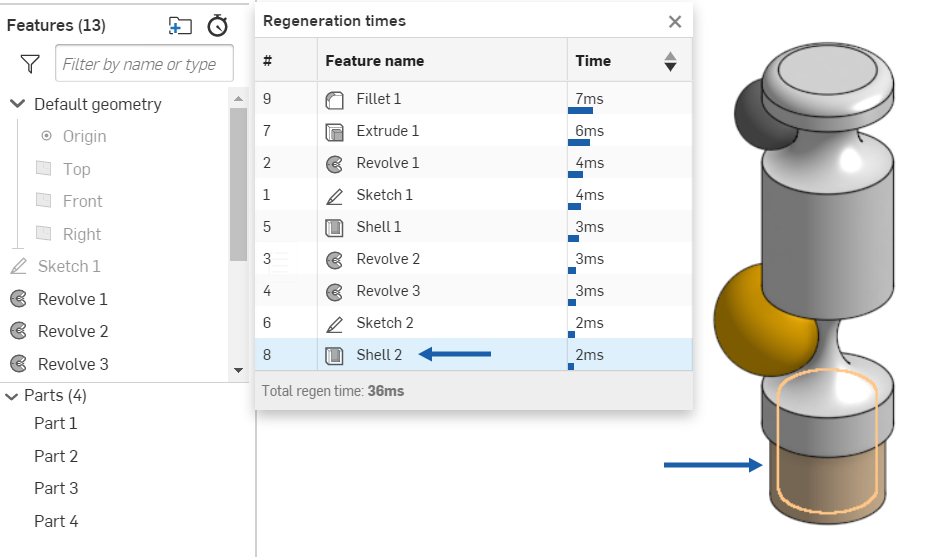
フィーチャーにカーソルを合わせると、モデル上の対応するモデルが強調表示されます (上の青い矢印で示されます)。フィーチャーリストの [コンテンツ] メニューを使用して、特定のフィーチャーを抑制します。
If there are errors in the Feature list, the ![]() icon is shown in the upper left corner of the list. To filter by errors on the Feature list, click on this icon. Hover your cursor over the icon to see the number of errors:
icon is shown in the upper left corner of the list. To filter by errors on the Feature list, click on this icon. Hover your cursor over the icon to see the number of errors:
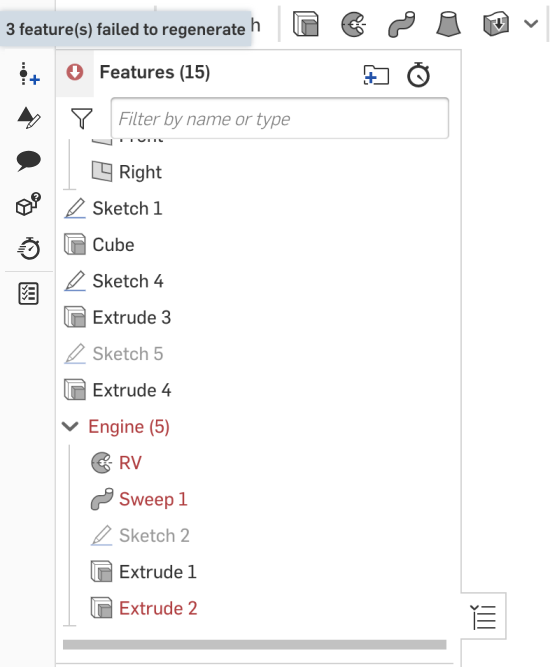
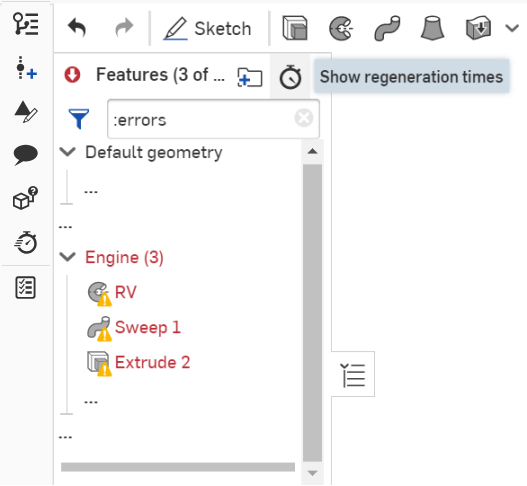
フィーチャで選択が見つからない場合、黄色い三角形のインジケータがフィーチャ上に表示されます。カーソルを合わせると、欠落している選択の数が表示されます。
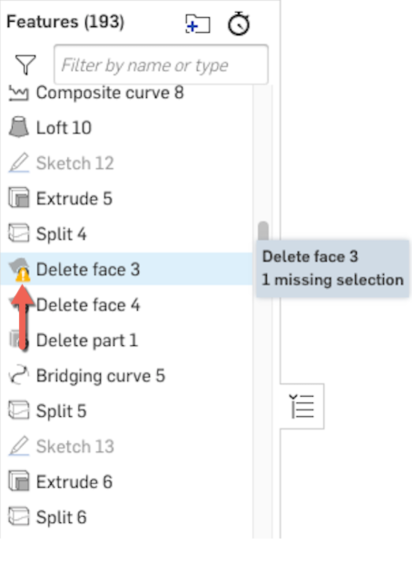
フィーチャーが完全に定義されていない場合、フィーチャーの上に青いインジケータが表示されます。
![]()
Part Studio フィーチャーリストは、フィーチャーのリストとパーツのリストで構成されます。ウィンドウの左側のペインには、上部から次の項目が含まれます。
- フィルターボタンと [名前またはタイプで絞り込む] 検索バー
- Part Studio のフィーチャーの数
- リスト自体には、原点と平面の既定のジオメトリが含まれています
- Part Studio の各フィーチャー
- ロールバックバー
- パーツ/曲線/サーフェスのリストをフィーチャーから分離するバー
- Part Studio 内の各パーツ (Part Studio で作成、または派生)
- 各サーフェスおよび曲線 (Part Studio で作成、または派生)
![]()
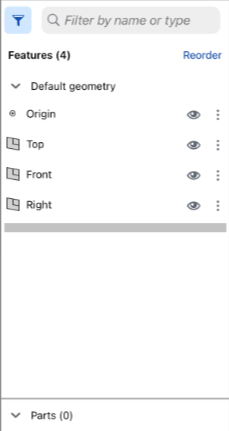
- フィーチャーリストのハンドルをタップして、フィーチャーリストを既定の幅で開きます。
- ハンドルをタッチして垂直または水平方向にドラッグし、フィーチャーリストのサイズ (高さまたは幅) を設定します。小さい画面 (スマートフォンなど) では、幅と高さを全画面サイズに拡大できます。
- ハンドルをタップしてフィーチャーリストを閉じ、もう一度タップして以前に設定した幅で開きます。
- [名前またはタイプで絞り込む] 検索バーをタップしてキーボードを起動し、名前またはタイプを入力してフィーチャーリストの特定の項目を絞り込みます。
- フィルターアイコンをタップしてフィーチャーフィルターを開きます。
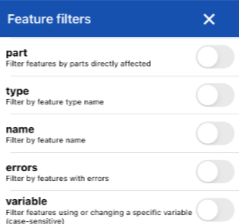
フィルターをタップしてオンにします。[X] を使用してこのフィルターダイアログを閉じ、[検索] フィールドを使用して、選択したフィルター内の名前で検索します。
フィーチャーリストが開いても、ワークスペースはアクティブなままです。
フィーチャーには、フィーチャーを作成したツールアイコンが付いています。これにより、わかりやすい名前で名前を変更でき、どのようなフィーチャーが表現されているかを知ることができます。グラフィック領域に表示されるモデルは、フィーチャーリストのロールバックバーの位置まで表示されます。
フィーチャリストには、Part Studio で作成されたすべてのスケッチとフィーチャーのリストが含まれます。また、リストの下部に表示されるように、パーツのリストも含まれています。フィーチャーリストの操作には、さまざまな方法があります。
- ロールバックバーをドラッグする - ロールバックバーのポイントでモデルを表示します。ロールバックバーの下にリストされているすべてのフィーチャーが一時的に抑制されます。また、リスト内のフィーチャーに関連付けられたオーバーフローメニューをタップし、[ここまでロールする] を選択すると、今すぐ正確にロールバックできます。
ロールバックバーをフィーチャーリストの特定のポイントまでドラッグするには、右上の [並べ替え] をタップし、ロールバックバーをドラッグします。グラフィック領域が更新されます。右上の [完了] をタップしてロールバックバーをその場所に配置し、モデリングを続行します。ロールバックバーを使用するには、ドキュメントに対するコピーまたは編集アクセス許可が必要です。
- 選択 - リストでフィーチャー、スケッチ、またはパーツ名をタップして、ダイアログの選択を指定します (またはグラフィック領域で選択します)。
- フィーチャーの並び替え - ダイアログの右上隅にあるフィーチャーの並べ替えアイコンをタップし、リスト内のフィーチャーまたはスケッチ名をタッチしてドラッグし、パラメトリックに並べ替えます。
- フィーチャーを抑制する - 抑制するフィーチャーのオーバーフローメニューをタップし、[抑制] を選択して、そのフィーチャーなしでモデルを表示します (フィーチャーの省略を解除することもできます)。
- フィーチャーの表示/非表示 - 非表示または表示するフィーチャー、スケッチ、パーツの名前の右側にある非表示/表示アイコンをタップします。平面とパーツをすべて非表示にすることもできます。
- スケッチ、フィーチャー、平面をフォルダにグループ化 - フィーチャーリストでグループ化したいアイテムを選択し、リストの一番上の選択項目の横にあるオーバーフローメニューをタップして [選択項目をフォルダに追加] を選択します。新規フォルダダイアログが表示され、フォルダ名が強調表示されます。フォルダ名を入力し、[作成] ボタンをクリックすると、フォルダ名がフィーチャーリストに表示され、フォルダを展開して内容を確認するための矢印が表示されます。
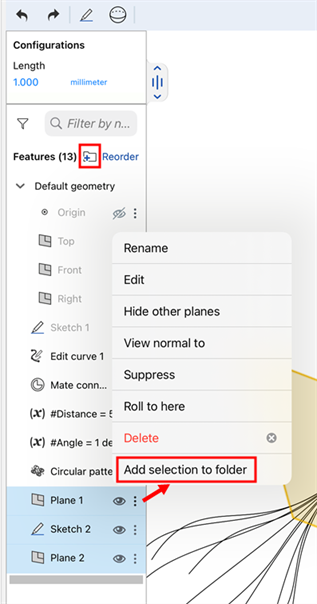
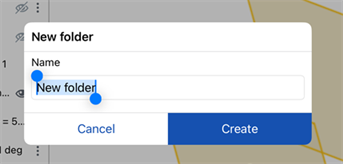
- フォルダのオーバーフローメニューをタップして (他に何も選択せずに)、[フォルダをアンパック] を選択すると、フォルダが削除され、アイテムがフィーチャーリストに 1 つだけ表示されるようになります。
- フォルダのオーバーフローメニューをタップして (他に何も選択せずに)、[抑制] を選択すると、選択したアイテムフォルダなしでモデルが表示されます。フィーチャーまたはフォルダを抑制すると、抑制したアイテムに関連するすべてのフィーチャーが非アクティブになります。
- 選択してから、フィーチャーリストの上部にあるフォルダアイコン
 (上の図を参照) をタップしてフォルダを作成することもできます。
 - フォルダの上、下、または内部のアイテムを並べ替えることができます。アイテムをフォルダに移動したり、フォルダからアイテムを移動したりすることもできます。
フォルダアイコンの右側にある [並べ替え] リンクをクリックします。フォルダを折りたたんだ状態で、その上または下の項目を並べ替えることができます。フォルダを展開すると、その中のアイテムを並べ替えることができます。アイテムをフォルダに移動したり、フォルダからアイテムを移動したりすることもできます。終了したら、フォルダアイコンの横にある [完了] ボタンをクリックします。
既存のフォルダ内に新しいフォルダを作成することで、ネストされたフォルダを作成できます。
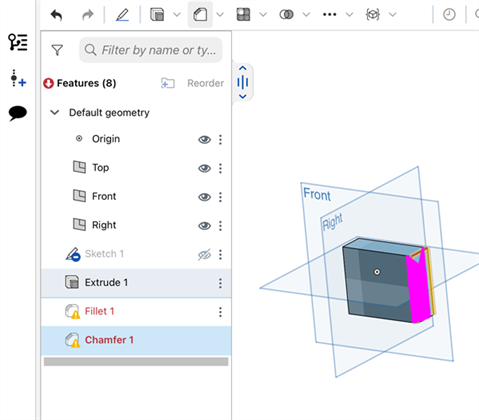
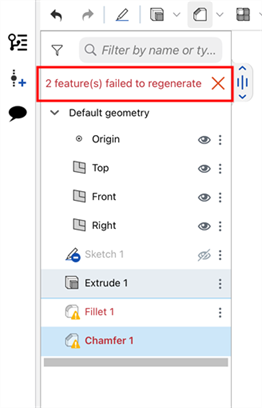
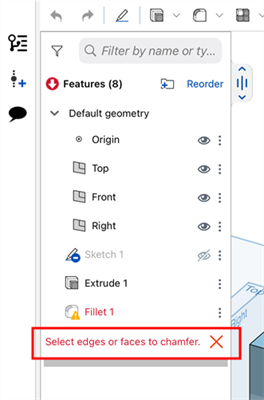
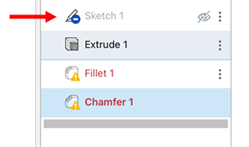
If there are errors in the Feature list, the ![]() icon is shown in the upper left corner of the list (first image below). Clicking this icon displays the number of features that failed to regenerate (second image below). Click the X to close the feature error message:
icon is shown in the upper left corner of the list (first image below). Clicking this icon displays the number of features that failed to regenerate (second image below). Click the X to close the feature error message:
When selections are missing in a feature, the yellow triangle indicator appears on the feature:
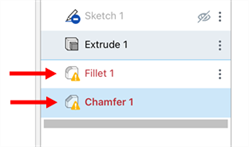
Tap on this icon to display a message that explains the reason for the issue. Click the X to close the message:
フィーチャーが完全に定義されていない場合、フィーチャーの上に青いインジケータが表示されます。
Part Studio フィーチャーリストは、フィーチャーのリストとパーツのリストで構成されます。ウィンドウの左側のペインには、上部から次の項目が含まれます。
- Part Studio で使用可能なコンフィギュレーションを一覧表示するドロップダウンメニュー (コンフィギュレーションはブラウザシステム上で作成し、Android モバイルデバイス上で表示・選択可能)
- フィルターボタンと [名前またはタイプで絞り込む] 検索バー
- Part Studio のフィーチャーの数
- リスト自体には、原点と平面の既定のジオメトリが含まれています
- Part Studio の各フィーチャー
- ロールバックバー
- パーツ/曲線/サーフェスのリストをフィーチャーから分離するバー
- Part Studio 内の各パーツ (Part Studio で作成、または派生)
- 各サーフェスおよび曲線 (Part Studio で作成、または派生)
![]()

- フィーチャーリストのハンドルをタップして、フィーチャーリストを既定の幅で開きます。
- フィーチャーリストの境界の右下隅をタッチしてドラッグし、フィーチャーリストのサイズ (高さまたは幅) を設定します。
- ハンドルをタップしてフィーチャーリストを閉じ、もう一度タップして以前に設定した幅で開きます。
- コンフィギュレーションの横にある下向き矢印をタップして (コンフィギュレーションが Part Studio に存在する場合)、特定のコンフィギュレーションを選択します。
- フィルターアイコンをタップしてフィーチャーフィルターを開きます。

フィルターをタップしてオンにします。[X] を使用してこのフィルターダイアログを閉じ、[検索] フィールドを使用して、選択したフィルター内の名前で検索します。
フィーチャーリストが開いても、ワークスペースはアクティブなままです。
フィーチャーには、フィーチャーを作成したツールアイコンが付いています。これにより、わかりやすい名前で名前を変更でき、どのようなフィーチャーが表現されているかを知ることができます。グラフィック領域に表示されるモデルは、フィーチャーリストのロールバックバーの位置まで表示されます。
フィーチャーリストの操作
フィーチャリストには、Part Studio で作成されたすべてのスケッチとフィーチャーのリストが含まれます。また、リストの下部に表示されるように、パーツのリストも含まれています。フィーチャーリストの操作には、さまざまな方法があります。
- ロールバックバーをドラッグする - ロールバックバーのポイントでモデルを表示します。ロールバックバーの下にリストされているすべてのフィーチャーが一時的に抑制されます。また、リスト内のフィーチャーに関連付けられたオーバーフローメニューをタップし、[ここまでロールする] を選択すると、今すぐ正確にロールバックできます。
フィーチャーリストの特定の点にロールバックバーをドラッグするには、ダイアログの右上隅にあるフィーチャーの並び替えアイコンをタップし、ロールバックバーをタッチしてドラッグします。グラフィック領域が更新されます。右上のアイコンをもう一度タップして、ロールバックバーを現在の位置に配置してモデリングを続行します。
- 選択 - リストでフィーチャー、スケッチ、またはパーツ名をタップして、ダイアログの選択を指定します (またはグラフィック領域で選択します)。
- フィーチャーの並び替え - ダイアログの右上隅にあるフィーチャーの並べ替えアイコンをタップし、リスト内のフィーチャーまたはスケッチ名をタッチしてドラッグし、パラメトリックに並べ替えます。
- フィーチャーを抑制する - 抑制するフィーチャーのオーバーフローメニューをタップし、[抑制] を選択して、そのフィーチャーなしでモデルを表示します (フィーチャーの省略を解除することもできます)。
- フィーチャーの表示/非表示 - 非表示または表示するフィーチャー、スケッチ、パーツの名前の右側にある非表示/表示アイコンをタップします。