特徵基本知識
![]()
![]()
![]()
Onshape 有某些獨特的特徵工具讓您用來建立零件。許多工具是「組合式」的工具並兼具多種功能,像是建立新材料、加入額外的材料、移除材料以及建立相交的材料。例如,「擠出」工具可用於上述的各種情況中。
這個主題逐步帶領您了解特徵工具對話方塊的基本知識:如何使用工具、色彩範例所代表的意義,以及造就 Onshape 功能易於使用的獨特特性。
當在 Onshape 中建立特徵時,您使用的是這個特徵工具工具列:
![]()
在 Onshape 中會於 Part Studio 內將特徵套用至 2D 草圖以建立 3D 零件。在特徵工具工具列中的所有特徵工具會以圖示或在下拉式功能表中出現。在草圖工具工具列提供了「擠出」與「旋轉」兩個特徵工具以提高效率,且可能在草圖開啟時使用。每個建立的特徵會以參數式儲存,也就是說在特徵清單中會以自己的實體顯示。
可以在圖形區域中 (沒有對話方塊開啟的情況下) 使用 S 鍵來存取特徵捷徑列:

使用您 Onshape 帳戶的喜好設定頁面來自訂這個捷徑列。
特徵工具工具列永遠出現在 Part Studio 中工作區的上方。如果您正在編輯草圖,則會看到草圖工具列,關閉草圖則會出現特徵工具列。您也可以自訂頁面上方的主特徵工具列,詳細資訊請參考 Part Studios。
您可以在 Part Studio 中建立任意數量的特徵 (進而建立零件)。
- 在 Part Studio 中已有草圖或零件的情況下,按一下來選擇您要的特徵工具,該工具的對話方塊即開啟,例如:
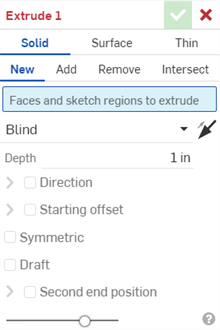
在特徵對話方塊開啟時,會有兩個啟用的欄位:第一個 (藍色) 欄位要求使用滑鼠點按在圖形區域中做出選擇,第一個 (白色) 文字欄位則需要有鍵盤的輸入。使用 Tab 鍵來從第一個啟用的文字欄位開始,依序將焦點從一個欄位移動至下一個欄位。您也可以使用方向鍵展開下拉功能表,使用 Enter 鍵來接受功能表中的選取項目。再次使用 Enter 鍵會接受輸入項並關閉對話方塊。
- 使用對話方塊與在工作區中選擇圖元 (草圖、零件面或曲面) 來填入所需的參數。
- 當您填完參數之後,使用預覽滑桿來視覺查看變更。
- 按一下
 以接受特徵。
您可以隨時按一下 ![]() 或按下 ESC 鍵來取消特徵。
或按下 ESC 鍵來取消特徵。
每個特徵工具需要有不同的資料來完成特徵的建立。關於每個工具要求條件的特定資訊請參考特徵工具。

除了用滑鼠在對話方塊中操控外,您可以:
- 使用滑鼠來調整大小或移動對話方塊。
- 使用 Tab 鍵來從一個欄位移動到另一個欄位。
- 使用方向鍵來巡覽下拉式功能表 (如上方的「給定深度」),使用 Enter 鍵則可從功能表中選擇。
- 使用空格鍵來核取/取消核取選項 (上方所示的「拔模」與「第二結束位置」)。
- 按一下
 來提交特徵 (或按下 Enter 鍵)。
 - 按一下
 來取消特徵並關閉對話方塊。
 - 標題 - 如果您沒有完整填入對話方塊要求的資訊,或填入的資訊會產生錯誤,則標題會是紅色的。這樣可避免您提交不良的特徵。

如果您已正確地指定所有的資訊,只需要完成特徵,則標題會是黑色的。這表示您應該可以成功地提交特徵。

- 藍色加底線文字 - 藍色文字與藍色底線表示是選取的項目。按一下來從水平的清單中選擇一個項目。

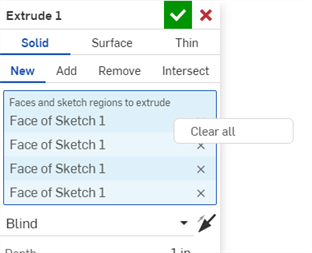
- Blue highlight - A highlighted field indicates that a selection from the graphics area is required. Click in the field, then click in the graphics area to make one or more selections. Click on the x in the right of the field to remove a selection.

To clear multiple field selections at once, right-click on the field and select Clear all from the context menu.
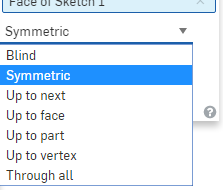
- 下拉式功能表 - 按一下來開啟下拉式功能表,然後再按一下來選擇一個選項。
- 相反方向 - 在適用的情況下,按一下圖示來切換特徵的方向。

- 輸入欄位 - 按一下來輸入值。您可以將測量單位加入到值之中來指定單位,或您可以爲所有的文件設定預設單位。

- 核取方塊 - 核取方塊表示可以套用到特徵上的可選用設定。按一下來核取或取消核取以使用選用性的設定。

在上方的圖片中,套用了拔模到擠出特徵上,但並未使用第二結束位置。
- 預覽滑桿 - 預覽滑桿是一個不透明度控制項,可讓您用從 0% (套用特徵之前) 到 100% (套用特徵之後) 的比例調整特徵的不透明顯示。


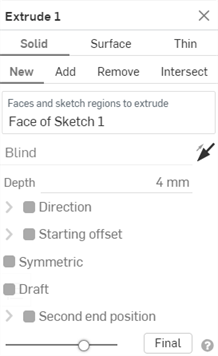
根據預設,當您編輯特徵時 Onshape 會回溯顯示特徵被建立時模型的狀態,隱藏所有之後的特徵。當您仍在編輯特徵時,「成品」按鈕可顯示最終的結果。如果您編輯的是最後一個特徵,則對話方塊中不會出現「成品」按鈕,因為您已看到了最終的結果。
如果您有複製但沒有編輯文件的權限,您仍可以開啟與檢視文件,也可以在文件中開啟特徵對話方塊。不過,在沒有「編輯」權限的情況下,所有對話方塊的欄位會是反灰且未啟用的,因此您將無法對文件進行任何變更 (除非建立一個文件的副本):
- 文意感應的說明 - 按一下對話方塊右下角的
 來開啟說明文件中的相關主題。
某些特徵對話方塊可讓您選擇多個項目 (稱為陣列參數),但要能夠建立某些幾何,選取的順序變得非常重要。例如,在選擇用於疊層拉伸特徵的輪廓時,您選取草圖的順序會定義疊層拉伸的方向。Onshape 允許您直接在對話方塊中調整這些項目的順序。
例如,如果您已為疊層拉伸選取了三個輪廓,然後要加入第四個,可是第四個輪廓會導致不正確的幾何。在第一次您建立疊層拉伸時,對話方塊中有三個輪廓,且模型是合理有效的:
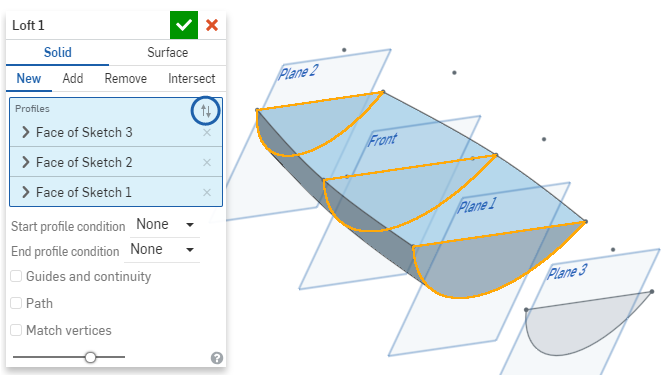
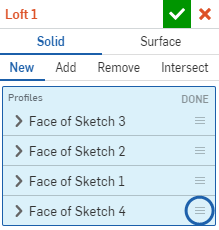
當您要加入第四個輪廓時,只要選取輪廓即會加入至輪廓清單的底部。如果輪廓出現的順序不合理,系統會顯示一個錯誤。然而,您可以點按「輪廓」欄位上方的反向箭號 (上圖中以藍色線圈出) 來啟動重新排序的機制 (下圖中以藍色線圈出):
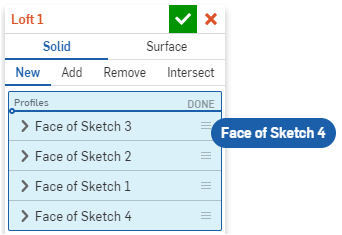
在對話方塊中按一下並拖曳重新排序圖示來重新調整所選輪廓到正確的位置上:
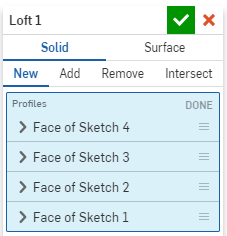
在想要的位置放下輪廓:
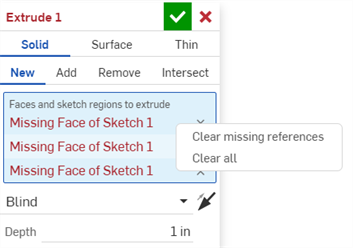
如果特徵所參考的圖元遭到刪除,Onshape 會在特徵對話方塊中以紅色顯示遺失的參考。在下方的範例中,擠出的草圖已遭刪除。
按一下遺失參考旁的 X 來移除它,或是在欄位上按右鍵,然後從環境選單中選擇清除遺失的參考來移除所有遺失的參考。
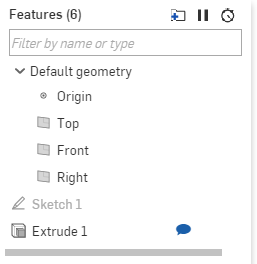
將評論放置在某一特別的特徵上以供日後或其他合作人員參考。您也可以指明要收到其他使用者對特徵做出評論的電子郵件通知。
- 在特徵清單中的特徵上按右鍵,然後選擇 [新增評論]。
- 輸入評論。選擇性地指明是否要收到其他評論的電子郵件通知。

- 按一下 [新增] 來加入評論,或按一下 [取消] 來關閉「評論」飛出視窗而不新增評論。
如果另一個使用者對文件有共享的權限,且選擇了 [接收評論電子郵件的通知],則附有您評論的電子郵件會傳送至該使用者的電子郵件地址。
按一下上方的評論圖示來開啟「評論」飛出視窗:
![]()
當「評論」飛出視窗開啟時,任何已有評論的特徵在「特徵」清單中會有一個圖示在旁邊。
可透過將布林參數轉換為表達式來以變數來取代布林參數:
-
在建立使用變數的特徵之前,請先建立變數。您可以使用「變數特徵」或「變數表格」。詳細資訊請參考變數與變數表格。
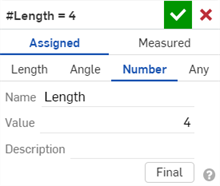
在下方的範例中,使用 4 這個任意值來建立 #Length 變數:
-
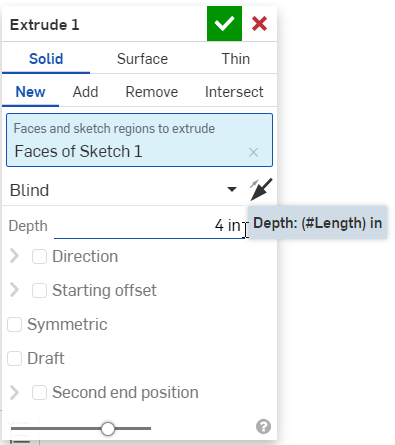
開啟特徵對話方塊 (例如下方的「擠出」對話方塊),然後在「深度」欄位中輸入 #Length 變數。系統即會將長度轉換為測量值 (此處為英吋):
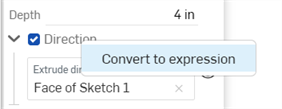
- 在方向欄位上按右鍵,然後選擇 [轉換為表達式]:
-
輸入 #Length>3 會產生一個真 (true) 的方向值:
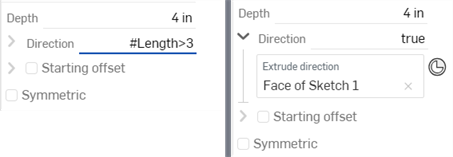
輸入 #Length<3 會產生一個假 (false) 的方向值:

-
如果您要將表達式轉換回布林值,請在「文字」欄位上按右鍵,然後選擇 [轉換為核取方塊] (下圖左側所示)。系統即會將「方向」表達式轉換回核取方塊 (下圖右側所示)。

當在 Onshape 中建立特徵時,您使用的是特徵工具列中的特徵工具。
![]()
特徵工具可建立、修改或操控 2D 與 3D 幾何,藉此來建立新零件、修改現有零件,或產生可供日後使用的建構工具。會以參數式儲存特徵,在特徵清單中會以自己的實體顯示特徵。
特徵工具列永遠出現在 Part Studio 中圖形區域的上方。如果您正在編輯草圖,會在特徵工具列提供兩個特徵工具供您快速使用:擠出與旋轉。關閉草圖即會看到並可使用其他的特徵工具。
基本工作流程
您可以在 Part Studio 中建立任意數量的特徵 (進而建立零件)。
- 在 Part Studio 中已有草圖或零件的情況下,輕觸來選擇您要的特徵工具。該工具的對話方塊即開啟:
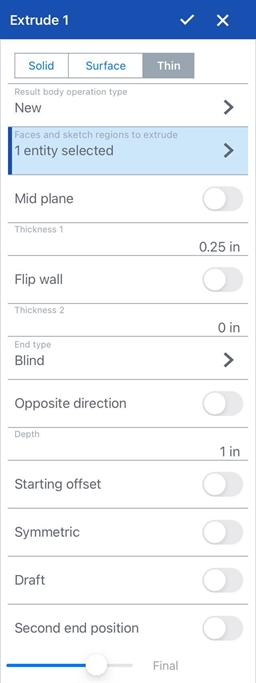
- 使用對話方塊與在工作區中選擇圖元 (草圖、零件面或曲面) 來填入所需的參數。
- 當您填完參數之後,使用預覽滑桿來視覺查看變更。
- 輕觸核取記號來接受特徵。
您可以隨時輕觸 x 來取消特徵。
每個特徵工具需要有不同的資料來完成特徵的建立。關於每個工具要求條件的特定資訊請參考特徵工具。
關於在對話方塊中填入所需參數的詳細資訊,請參考對話方塊。
當在 Onshape 中建立特徵時,您使用的是特徵工具列中的特徵工具。
![]()
特徵工具可建立、修改或操控 2D 與 3D 幾何,藉此來建立新零件、修改現有零件,或產生可供日後使用的建構工具。會以參數式儲存特徵,在特徵清單中會以自己的實體顯示特徵。
特徵工具列永遠出現在 Part Studio 中圖形區域的上方。如果您正在編輯草圖,會在特徵工具列提供兩個特徵工具供您快速使用:擠出與旋轉。關閉草圖即會看到並可使用其他的特徵工具。
您可以在 Part Studio 中建立任意數量的特徵 (進而建立零件)。
- 在 Part Studio 中已有草圖或零件的情況下,輕觸來選擇您要的特徵工具。該工具的對話方塊即開啟:
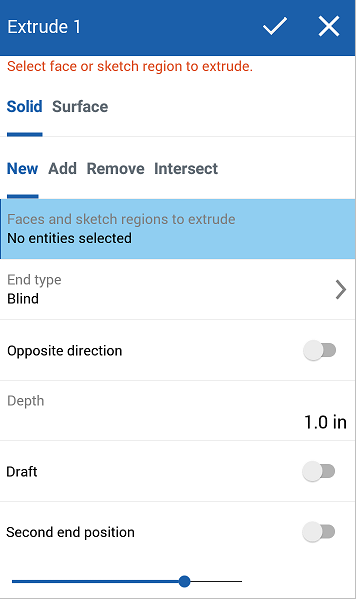
- 使用對話方塊與在工作區中選擇圖元 (草圖、零件面或曲面) 來填入所需的參數。
- 當您填完參數之後,使用預覽滑桿來視覺查看變更。
- 輕觸核取記號來接受特徵。
您可以隨時輕觸 x 來取消特徵。
每個特徵工具需要有不同的資料來完成特徵的建立。關於每個工具要求條件的特定資訊請參考特徵工具。
關於在對話方塊中填入所需參數的詳細資訊,請參考對話方塊。