![]()
![]()
![]()
Part Studio「特徵」清單中包含特徵清單與零件清單。
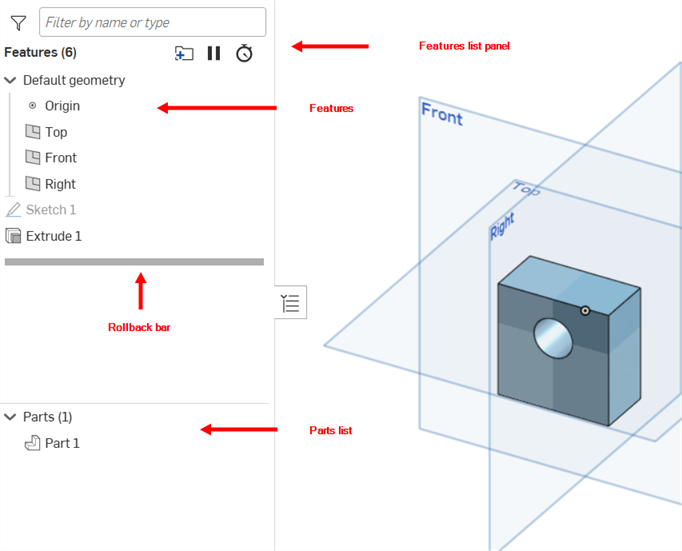
視窗左側的窗格從上到下包括:
- 如果您已建立了組態,這些組態會出現在清單的上方,提供的下拉式表單可讓您選擇組態
- Part Studio 中的特徵數量
- 搜尋方塊 (根據名稱或類型搜尋特徵、零件、曲面或曲線)
- 清單自身包括原點及平面的預設幾何
- 在 Part Studio 中的每個特徵有其獨特的工具圖示
- 回溯控制棒
- 分隔零件/曲線/曲面與特徵的橫列
- The number of parts, surfaces, meshes, composite parts, and curves in the Part Studio with their respective icons:
- Part

- Surface

- Surface mesh

- Composite part

- Part
- 在 Part Studio 中的各個零件 (在 Part Studio 中建立或衍生)
- 當檢視文件的一個發行版本時,這個指標
 會出現在該特定版本中所發行的零件旁
 - 每個曲面以及曲線 (在 Part Studio 中建立或衍生)
您可以拖曳分隔列以顯示較多或較少的特徵清單區域,以及較多或較少的零件清單區域。每個區域 (特徵與零件) 可個別獨立地捲動。
特徵伴隨有產生該特徵的工具圖示。這樣您可以使用描述性的名稱來重新命名特徵,並仍能夠分辨所代表的特徵為何。在圖形區域中的模型是根據「特徵」清單上回溯控制棒所在的位置來顯示。
如果您在文件上有「檢視」加上「複製」的權限 (表示您無法編輯文件但可以檢視與複製),您仍可以開啟一個特徵對話方塊並檢視其中的設定 (僅可在瀏覽器與 iOS 平台上執行)。若要在行動裝置平台上開啟特徵對話方塊,請使用特徵清單中特徵旁的三點功能表。
特徵清單包含在 Part Studio 中建立的所有草圖與特徵的清單,同時也包含出現在清單底部的零件清單 (包括曲面與曲線)。有許多操作特徵清單的方式:
視覺查看模型在回溯控制棒所在處的樣子;會暫時抑制在回溯控制棒之下的所有特徵。在特徵清單中選擇回溯控制棒並向上和向下拖曳來向前或向後回溯。您也可以在清單中的特徵上按右鍵,然後選擇「捲至此處」來馬上與精準地回溯。在回溯控制棒上按右鍵然後選擇 [捲至尾端] 來將回溯控制棒移回至特徵清單的結束處。
鍵盤快速鍵
另一個拖曳回溯控制棒的方式是使用鍵盤快速鍵。選擇回溯控制棒然後按一下向上跟向下方向鍵 (↑ ↓) 來在「特徵」清單中一次向前或向後回溯一步。
如果您是僅有唯檢視權限的合作人員,然後您變更了回溯控制棒的位置,則將無法再看到其他合作人員對回溯控制棒所做變更的即時更新。要解決這個問題,請重新載入您的瀏覽器。
關於「學習中心」的其他資源,請參照此處的教師提示:Using the Rollback Bar (需要有 Onshape 帳戶)。
按一下清單中的特徵/草圖名稱來提供做為對話方塊中的選取項目 (或是在圖形區域中做出選擇)。在零件清單中選擇一個零件、曲面或曲線會交叉強調顯示套用至選取項目的特徵或用來建立目前選取項目的特徵。在圖形區域中選擇一個面或零件也會交叉強調顯示相關的特徵。
若要重新排序項目,請拖曳「特徵」清單中的一個項目 (或多個項目;只要點按即可選擇其他的項目,項目在「特徵」清單中不需要是連續的) 來參數式重新調整特徵的順序。
交叉強調顯示並不適用於複合零件。
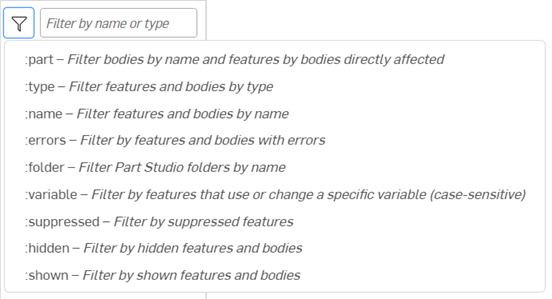
Enter a partial part/feature name or type to show matching parts and features. Use a special command (prefixed with a colon : ) for further control:
- :part search string - Show matching bodies by name and features by bodies that directly affect those bodies.
- :type search string - Show features and bodies with matching type
- :name search string - Show features and bodies with matching name
- :errors search string - Show features and bodies with errors
- :folder search string - Show Part Studio folders with matching name
- :variable search string- Show features that use or change a variable (case-sensitive)
- :suppressed search string - Show suppressed features
- :hidden search string - Show hidden features and bodies
- :shown search string - Show non-hidden features and bodies
For example, :part part 1 will display Part 1, Part 10, Part 11, Part 12, etc., and all features that directly affect those bodies.
- 重新命名特徵 - 在「特徵」清單中於名稱上按右鍵,然後選擇重新命名來直接在「特徵」清單中編輯特徵名稱,而不需要開啟對話方塊。
- 抑制特徵 - 藉由特徵的環境選單來使用抑制的指令,以視覺化不包含特徵時模型的樣子。
- 動態抑制 - 使用動態抑制命令來建立何時應抑制特徵的邏輯。詳情請參考動態抑制。
- 隱藏或顯示特徵 - 使用特徵環境選單中的隱藏/顯示指令來在圖形區域中隱藏該圖元 (或顯示圖元);您也可以在名稱旁暫留,然後按一下
 圖示。
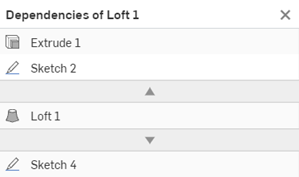
圖示。 - 顯示依存項 - 藉由特徵的環境選單來使用顯示依存項指令以開啟對話方塊,其中指出所選特徵的父項目 (向上箭號之上) 與子項目 (向下箭號之下)。將游標移動到每個箭號上暫留會顯示表明特徵關係的工具提示。
-
展開 - 在任何有可摺疊箭頭的特徵上按右鍵,然後移動游標在展開選項上暫留以存取展開所選項目或全部展開選項。
-
摺疊 - 在任何有可摺疊箭頭的特徵上按右鍵,然後移動游標在摺疊選項上暫留以存取摺疊所選項目或全部摺疊選項。
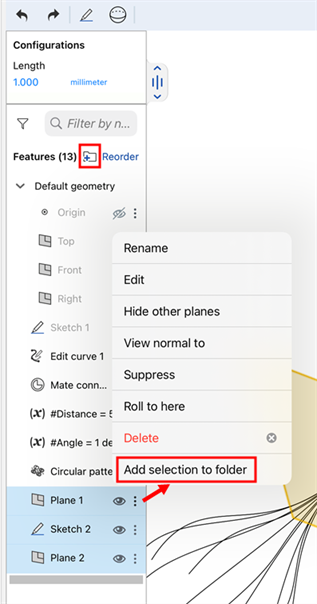
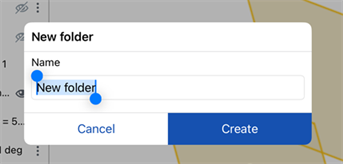
- 將草圖、特徵、與平面群組至資料夾中 - 在「特徵」清單中選擇您要群組在一起的項目,然後按右鍵並選擇將選取項目加入至資料夾...。一個資料夾名稱對話方塊會出現,可於其中輸入資料夾的名稱。資料夾名稱會出現在 「特徵」清單中,並附有箭頭可展開資料夾以查看內容。
- 您可以只在資料夾 (在未做出其他選擇的情況下) 上按右鍵,然後選擇拆開資料夾來移除資料夾並將項目歸還為「特徵」清單中單獨列出的。
- 選擇抑制來在沒有所選項目資料夾的情況下視覺檢視模型。在特徵或資料夾受抑制時,與受抑制項目相關的所有特徵會變為非啟用的。
- 您也可以選擇項目,然後按一下「特徵」清單上方的資料夾圖示
 。
。
選擇要組成群組的項目,然後按右鍵再選取 [將選取項目加入至資料夾...],接著指定資料夾名稱,最後按一下核取記號
資料夾出現在特徵清單中;展開資料夾可查看內容
您可以在現有的資料夾中建立新的資料夾來產生嵌套式的資料夾。
在圖元是隱藏的情況下,將游標移動至清單中該圖元上暫留即可查看在圖形區域中出現的圖元輪廓。
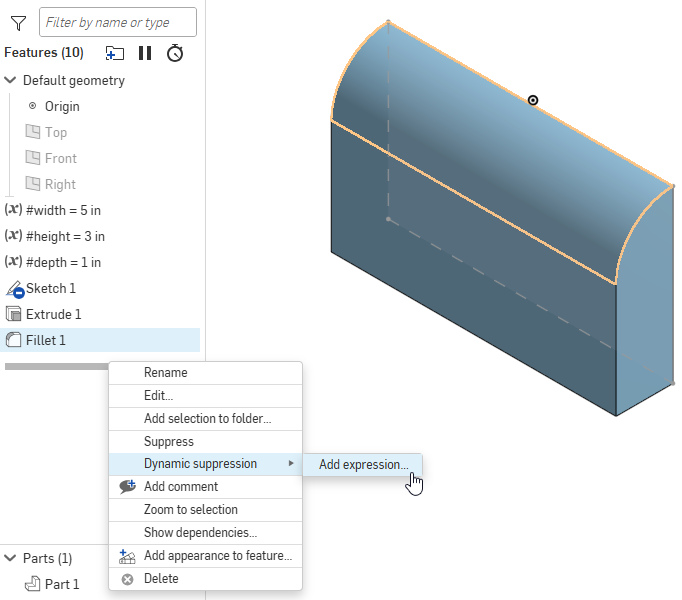
動態抑制可讓您建立邏輯的表達式以決定何時應抑制或取消抑制特徵。
將動態抑制加入至特徵中:
-
在「特徵」清單中於要抑制的特徵上按右鍵。
-
從環境選單中選擇動態抑制 > 加入表達式。
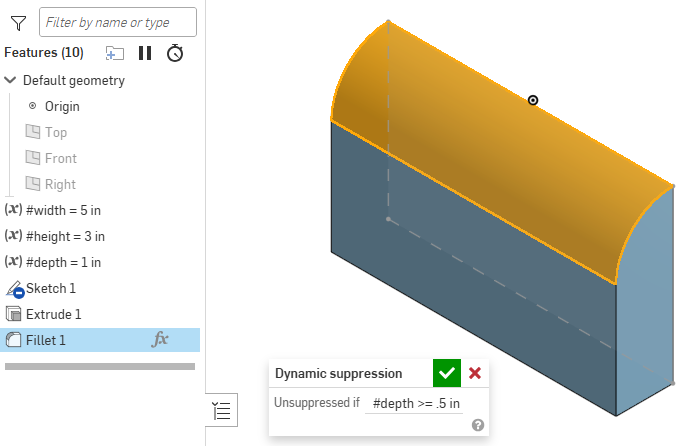
-
在動態抑制對話方塊中,輸入要用於抑制的表達式。在這個範例中, Fillet 1 特徵會在 #depth 變數小於 .5 英吋時受到抑制。
-
按一下核取記號來儲存表達式並關閉對話方塊。
取決於您加入的邏輯,特徵現在會受到抑制。表達式圖示 (![]() ) 會出現在「特徵」清單中。當抑制時,特徵名稱在「特徵」清單中會有一條刪除線。
) 會出現在「特徵」清單中。當抑制時,特徵名稱在「特徵」清單中會有一條刪除線。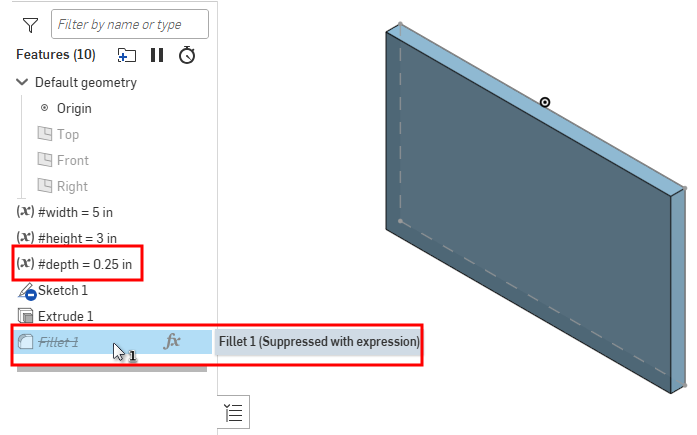
若要編輯表達式,按一下表達式圖示 (![]() ) 來開啟動態抑制對話方塊。另一個方式是在「特徵」清單中的特徵上按右鍵,然後從環境選單中選擇編輯動態表達式。選擇編輯表達式來開啟動態抑制對話方塊,或是選擇移除表達式來刪除它。
) 來開啟動態抑制對話方塊。另一個方式是在「特徵」清單中的特徵上按右鍵,然後從環境選單中選擇編輯動態表達式。選擇編輯表達式來開啟動態抑制對話方塊,或是選擇移除表達式來刪除它。
![在特徵上按右鍵 > [編輯動態抑制] 環境選單](Resources/Images/feature-tools/dynamic-suppression-edit-01.png)
若要組態設定一個表達式,請參考組態動態抑制表達式。
- 重新命名 - 輸入項目的新名稱。
- 屬性 - 編輯項目的中繼資料。
- 指定材料 - 使用 Onshape 材料資源庫或自訂的資源庫 (如果有的話) 來將材料 (因此有密度) 指定給項目。
- 編輯外觀 - 變更項目的色彩。
- 複製 - 製作項目的副本以將其貼至它處。
- 建立工程圖 - 建立所選項目的 Onshape 工程圖。
- 匯出 - 開啟「匯出」對話方塊,您可於其中將目前所選零件匯出 (下載) 到您裝置的一個檔案 (或個別檔案) 上。詳細資訊請參考匯出檔案。
- 發行 - 建立發行候選並開始所選項目的發行流程。
- 發行所有組態 - 對於可建立發行套件的使用者,這個指令會開啟「發行候選」對話方塊,其中已將所有組態預先載入至發行套件中 (可支援多達 100 個組態)。僅為有單一「清單輸入」的組態提供這個選項。如果有多個「清單輸入」,或是使用了「核取方塊」或「組態變數」輸入,則無法使用這個指令選項。在開啟對話方塊之後(於環境選單中按一下 [發行] 指令後),您隨時可以將組態加入至發行套件中。
- 修訂歷程記錄 - 顯示所選項目的修訂歷程記錄。如果沒有任何修訂歷程記錄,會有一個訊息出現。
- 隱藏 - 從視圖中隱藏項目。
- 隱藏其他 - 隱藏除了選取項目之外的項目。
- 全部隱藏 - 隱藏包括所選項目的所有項目。
- 隔離顯示 - 柔化其他項目的色彩並將其設定為無法選取的,可以根據至所選項目的距離或與所選項目的連接性來擴展不透明度。
- 設為透明 - 將所選的項目設定為透明。
- 新增評論 - 加入評論並在評論中標記所選的項目。
- 縮放至選取範圍 - 縮放視窗來將整個項目顯示與置中於圖形區域內,就像是項目可能建立的最大視圖。
- 刪除 - 捨棄所選的項目。
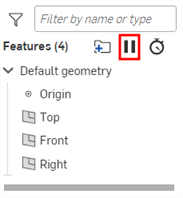
暫停重生成
按一下暫停重生成按鈕 (![]() ) 來避免 Onshape 在編輯時重新產生零件。這在操作需要長時間重生成的組態表格或 Part Studio 時相當有用。當暫停重生成時,您可以在表格、組態表格、與數量和布林運算 (不可選欄位) 中做出變更,然後在編輯完成時一次重新產生零件。
) 來避免 Onshape 在編輯時重新產生零件。這在操作需要長時間重生成的組態表格或 Part Studio 時相當有用。當暫停重生成時,您可以在表格、組態表格、與數量和布林運算 (不可選欄位) 中做出變更,然後在編輯完成時一次重新產生零件。
暫停重生成的模式會限制許多 Onshape 的操作且應僅當在需要時使用。使用暫停重生成的主要狀況會是以批次修改現有參數值時。
暫停重生成:
-
按一下「特徵」清單中的暫停重生成 (
 )。
)。
-
當已暫停重生成橫幅出現時,可進行您的編輯。

- 選擇套用或拒絕您變更的選項:
- 當仍在「已暫停重生成」模式中時要套用您的變更並重新產生 Part Studio,請按一下重生成 Part Studio。

- 若要套用變更,重新產生 Part Studio,然後退出「已暫停重生成」模式,請按一下重生成特徵並退出。

- 若要捨棄您的變更並退出「已暫停重生成」模式,請按一下捨棄未重生成的變更並退出。請注意,當您退出時,系統會保留使用重生成 Part Studio 按鈕所套用的變更;只會捨棄尚未被重生成的變更。

- 若要取消您的捨棄並回到「已暫停重生成」模式,請按一下還原。

- 當仍在「已暫停重生成」模式中時要套用您的變更並重新產生 Part Studio,請按一下重生成 Part Studio。
提示
-
當在「已暫停重生成」模式中切換分頁或關閉文件會自動套用變更。
- 在選取了綠色的核取記號之後,無法撤銷已重生成的變更。若要撤銷這些變更,請退出「已暫停重生成」模式,然後將文件還原至前一版本。
- 在暫停重生成時無法編輯草圖。
- 在暫停重生成時,幾何與表格會是不一致的,但在您完成重生成時會有所更新。
- 當在「修復」模式中無法使用「已暫停重生成」模式,反之亦然。
顯示重生成時間
按一下顯示重生成的時間 按鈕 (![]() ) 來開啟所有特徵的顯示以及重生成各個特徵的時間。您可以使用這個資訊來決定要抑制那些費時的特徵,不重生成目前並不需要的特徵來加快模型重新建立的時間。
) 來開啟所有特徵的顯示以及重生成各個特徵的時間。您可以使用這個資訊來決定要抑制那些費時的特徵,不重生成目前並不需要的特徵來加快模型重新建立的時間。
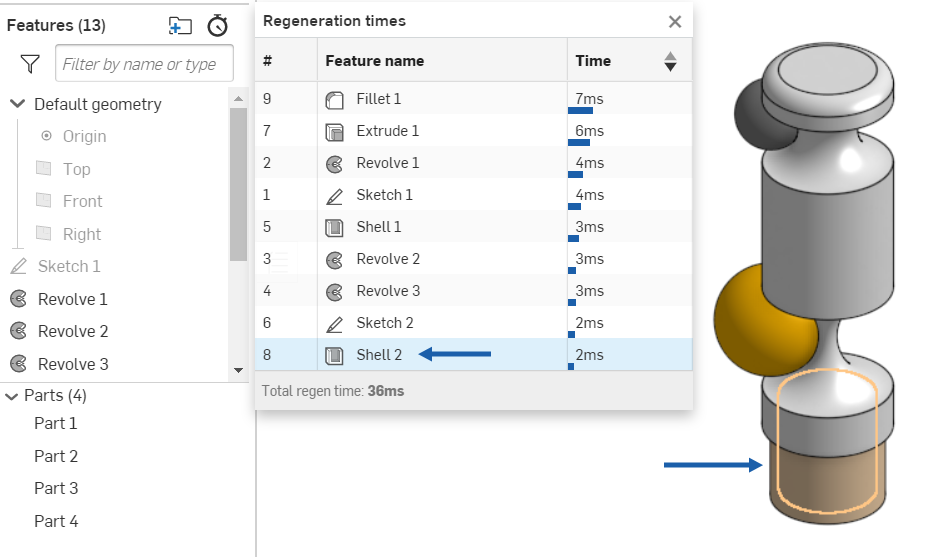
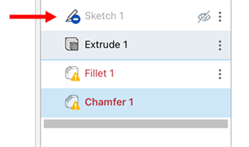
將游標移動到一個特徵上暫留以查看在模型中相對應的強調顯示 (上圖中藍色箭頭所指)。使用「特徵」清單中的環境選單來抑制特定的特徵。
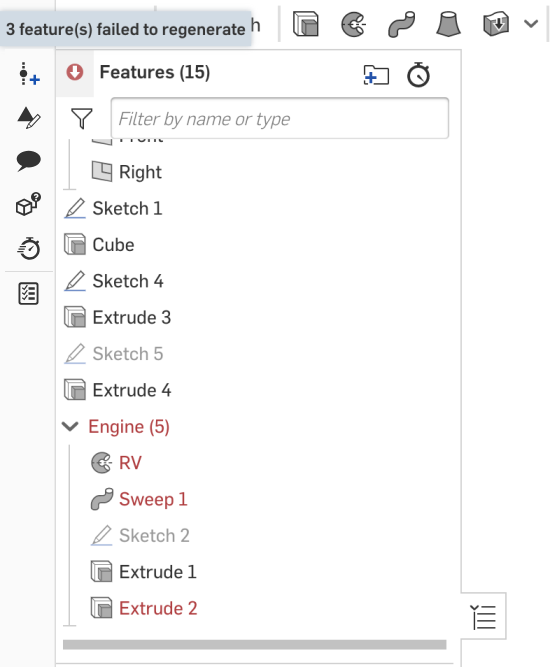
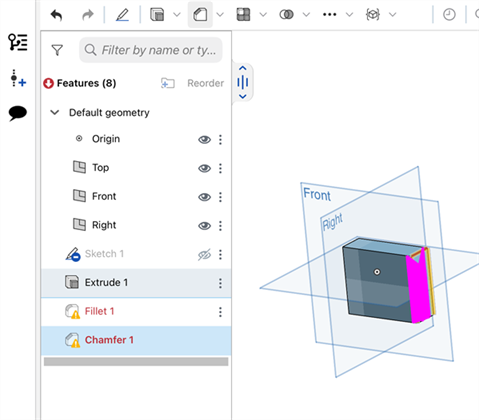
If there are errors in the Feature list, the ![]() icon is shown in the upper left corner of the list. To filter by errors on the Feature list, click on this icon. Hover your cursor over the icon to see the number of errors:
icon is shown in the upper left corner of the list. To filter by errors on the Feature list, click on this icon. Hover your cursor over the icon to see the number of errors:
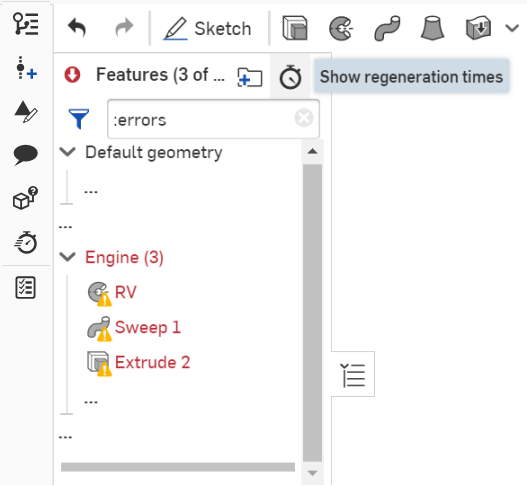
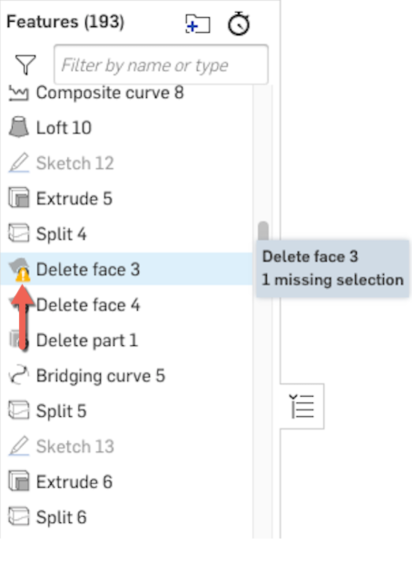
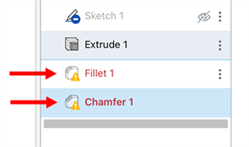
當在特徵中有遺失的選取項目時,會在特徵上出現黃色的三角形指標。移動游標暫留可查看遺失選取項目的數量:
當特徵不是完全定義時,會有藍色的指標出現在特徵上:
![]()
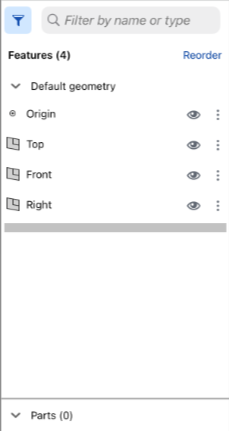
Part Studio 特徵清單是由「特徵清單與「零件」清單所組成。視窗左側的窗格從上到下包括:
- 一個篩選器按鈕與一個根據名稱或類型來篩選的搜尋列
- Part Studio 中的特徵數量
- 清單自身包括原點及平面的預設幾何
- Part Studio 中的各個特徵
- 回溯控制棒
- 分隔零件/曲線/曲面與特徵的橫列
- 在 Part Studio 中的各個零件 (在 Part Studio 中建立或衍生)
- 每個曲面以及曲線 (在 Part Studio 中建立或衍生)
![]()
- 輕觸「特徵」清單控制點來將「特徵」清單以預設的寬度開啟。
- 輕觸並垂直或水平拖曳控制點來設定「特徵」清單的大小 (高度或寬度)。在較小的螢幕中 (例如,智慧型手機),可以將寬度或高度展開至全螢幕大小。
- 輕觸控制點來關閉特徵清單,再次輕觸則會開啟為之前設定的寬度。
- 輕觸根據名稱或類型來篩選搜尋列來啟用鍵盤,然後輸入以在「特徵」清單中根據特定字詞篩選。
- 輕觸篩選器圖示來開啟特徵篩選器:
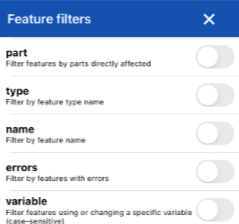
輕觸篩選器來開啟。使用 X 來關閉這個篩選器對話方塊,然後使用「搜尋」欄位來在選取的篩選器中根據名稱篩選。
當特徵清單開啟時,工作區仍是啟用的。
特徵伴隨有產生該特徵的工具圖示。這樣您可以使用描述性的名稱來重新命名特徵,並仍能夠分辨所代表的特徵為何。在圖形區域中的模型是根據「特徵」清單上回溯控制棒所在的位置來顯示。
特徵清單包含在 Part Studio 中所建立的所有草圖與特徵的清單,同時也包含出現在清單底部的零件清單。有許多操作特徵清單的方式:
- 拖曳回溯控制棒 - 視覺查看模型在回溯控制棒所在處的樣子;會暫時抑制在回溯控制棒之下的所有特徵。您也可以輕觸清單中與特徵關聯的溢位功能表,然後選擇 [捲至此處] 來馬上與精準地回溯。
若要將回溯控制棒拖曳至特徵清單中的某一特定點上:輕觸右上角的重新排序,然後拖曳回溯控制棒。圖形區域即會更新。輕觸右上角的完成來於該處放置回溯控制棒然後繼續建構模型。您對文件必須有「複製」或「編輯」的權限才能使用回溯控制棒。
- 做出選擇 - 輕觸清單中的特徵、草圖或零件名稱來提供做為對話方塊中的選擇 (或在圖形區域中做出選擇)。
- 重新排序特徵 - 輕觸對話方塊右上角的重新排序特徵圖示,然後輕觸並拖曳清單中的特徵或草圖名稱來參數式的重新排列特徵順序。
- 抑制特徵 - 輕觸您所要抑制特徵的溢位功能表,然後選擇 [抑制] 來視覺顯示不包含該特徵的模型 (您也可以取消抑制特徵)。
- 隱藏或顯示特徵 - 輕觸您要隱藏或顯示的特徵、草圖或零件名稱右邊的隱藏/顯示的圖示。您也可以隱藏所有的平面與零件。
- 將草圖、特徵、與平面群組至資料夾中 - 在「特徵」清單中選擇您要群組在一起的項目,然後輕觸清單中最上方選取項目旁的溢位功能表,接著選擇 將選取項目加入至資料夾。一個新資料夾對話方塊出現,其中強調顯示新資料夾名稱。輸入資料夾的名稱,然後按一下 建立 按鈕。資料夾的名稱會出現在「特徵」清單中,並附有可展開資料夾的箭頭以查看內容。
- 輕觸資料夾的溢位功能表 (在未做出其他選擇的情況下),然後選擇拆開資料夾來移除資料夾並將項目歸還為「特徵」清單中單獨列出的。
- 輕觸資料夾的溢位功能表 (在未做出其他選擇的情況下),然後選擇抑制來在沒有所選項目資料夾的情況下視覺檢視模型。在特徵或資料夾受抑制時,與受抑制項目相關的所有特徵會變為非啟用的。
- 您也可以選擇項目,然後輕觸「特徵」清單上方的資料夾圖示 (上圖中所示的 ) 來建立資料夾。
- 您可以將項目重新排列至資料夾之上、之下、或資料夾內。 您也可以將項目移入與移出資料夾。
按一下資料夾圖示右側的重新排序連結。在資料夾是摺疊時,您可以重新排序其上方或下方的項目。在資料夾是展開時,您可以重新排續其內部的項目。您也可以將項目移入與移出資料夾。完成時,按一下資料夾圖示旁的完成按鈕。
您可以在現有的資料夾中建立新的資料夾來產生嵌套式的資料夾。
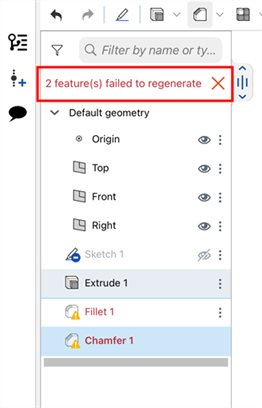
If there are errors in the Feature list, the ![]() icon is shown in the upper left corner of the list (first image below). Clicking this icon displays the number of features that failed to regenerate (second image below). Click the X to close the feature error message:
icon is shown in the upper left corner of the list (first image below). Clicking this icon displays the number of features that failed to regenerate (second image below). Click the X to close the feature error message:
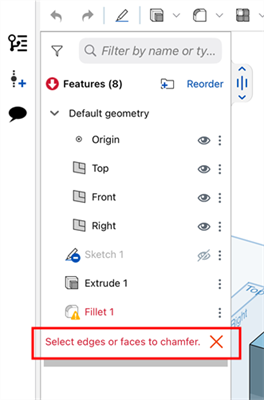
When selections are missing in a feature, the yellow triangle indicator appears on the feature:
Tap on this icon to display a message that explains the reason for the issue. Click the X to close the message:
When a feature is not fully defined, the blue indicator appears over the feature:
Part Studio 特徵清單是由「特徵清單與「零件」清單所組成。視窗左側的窗格從上到下包括:
- 一個下拉式功能表會列出 Part Studio 可用的組態 (組態是在瀏覽器系統上建立的,可以在 Android 行動裝置上查看與選取)
- 一個篩選器按鈕與一個根據名稱或類型來篩選的搜尋列
- Part Studio 中的特徵數量
- 清單自身包括原點及平面的預設幾何
- Part Studio 中的各個特徵
- 回溯控制棒
- 分隔零件/曲線/曲面與特徵的橫列
- 在 Part Studio 中的各個零件 (在 Part Studio 中建立或衍生)
- 每個曲面以及曲線 (在 Part Studio 中建立或衍生)
![]()
- 輕觸「特徵」清單控制點來將「特徵」清單以預設的寬度開啟。
- 輕觸並拖曳特徵清單邊框的右下角來設定特徵清單的大小 (高度或寬度)。
- 輕觸控制點來關閉特徵清單,再次輕觸則會開啟為之前設定的寬度。
- 輕觸朝「組態」旁的下箭頭 (如果有組態出現在 Part Studio 中) 來選取特定的組態。
- 輕觸篩選器圖示來開啟特徵篩選器:
輕觸篩選器來開啟。使用 X 來關閉這個篩選器對話方塊,然後使用「搜尋」欄位來在選取的篩選器中根據名稱篩選。
當特徵清單開啟時,工作區仍是啟用的。
特徵伴隨有產生該特徵的工具圖示。這樣您可以使用描述性的名稱來重新命名特徵,並仍能夠分辨所代表的特徵為何。在圖形區域中的模型是根據「特徵」清單上回溯控制棒所在的位置來顯示。
操作特徵清單
特徵清單包含在 Part Studio 中所建立的所有草圖與特徵的清單,同時也包含出現在清單底部的零件清單。有許多操作特徵清單的方式:
- 拖曳回溯控制棒 - 視覺查看模型在回溯控制棒所在處的樣子;會暫時抑制在回溯控制棒之下的所有特徵。您也可以輕觸清單中與特徵關聯的溢位功能表,然後選擇 [捲至此處] 來馬上與精準地回溯。
若要將回溯控制棒拖曳至特徵清單中的某一特定點上:輕觸對話方塊右上角的重新排序圖示,然後輕觸並拖曳回溯控制棒。圖形區域即會更新。再次輕觸右上角的圖示來於該處放置回溯控制棒並繼續建構模型。
- 做出選擇 - 輕觸清單中的特徵、草圖或零件名稱來提供做為對話方塊中的選擇 (或在圖形區域中做出選擇)。
- 重新排序特徵 - 輕觸對話方塊右上角的重新排序特徵圖示,然後輕觸並拖曳清單中的特徵或草圖名稱來參數式的重新排列特徵順序。
- 抑制特徵 - 輕觸您所要抑制特徵的溢位功能表,然後選擇 [抑制] 來視覺顯示不包含該特徵的模型 (您也可以取消抑制特徵)。
- 隱藏或顯示特徵 - 輕觸您要隱藏或顯示的特徵、草圖或零件名稱右邊的隱藏/顯示的圖示。