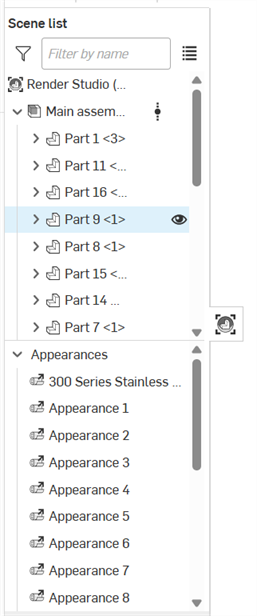
Render Studio 介面 - Scene List
![]()
僅為 提供
位在頁面的左側,場景清單提供關於目前 Render Studio 場景的零件、Part Studio 和組合件資訊。
當選取了「場景清單」中的一個選項時,在右側的「Scene」、「Appearance」與「Environment」面板中會顯示相關的子功能表與可編輯的參數。關於參數選項的完整清單,請參考 Scene、Appearance 與 Environment 面板的部分。
如果只選取了單一的場景清單項目,「外觀」面板會僅顯示可用的參數。按下鍵盤空格鍵來取消選取所有的項目,然後在「場景清單」中選擇一個項目。
除了 Transform 與 Projector 之外,您可以在場景清單中選取多個個體 (在群組選擇中一起選取)。Transform 與 Projector 是僅能單獨選取的。
「場景清單」分為兩個可捲動的部分:
-
Scene list geometry (upper section) - Contains all the geometry in the scene, as well as any Transforms, Projectors, and Volumes (Render Studio Advanced only).
-
外觀 (下半部) - 包含場景中幾何使用的所有外觀。
若要調整「場景清單」的寬度,將游標移動至面板右邊暫留,當游標變為雙邊箭頭時,按一下並拖曳來調整大小。
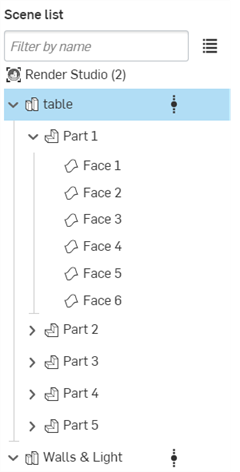
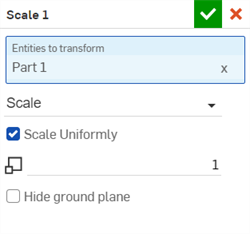
在「Scene list」中對場景採用階層式的處理方式,可想像為各種層級。例如,在下方圖片中,Render Studio 是最上方的層級,table 則是在 Render Studio 下一層,然後 Part 1 則是 table 零件下一層的零件。
這個層級的概念在設定優先順序時是相當重要的。最上方層級屬性的優先順序會高於下方的所有層級。如果在最上層沒有設定屬性,但在其下一層有設定,則該屬性會有優先權,屬性會套用至所有較低的層級中。對此規則唯一例外情形是如果較上層的屬性有覆寫設定。如果設定有覆寫,則會覆寫所有下方的層級,改用較上層的屬性。
例如在下方的圖片中,如果 table Part Studio 已設定有屬性,則下方的所有圖元 (Part 1 到 Part 5) 都會使用這個屬性。反之,如果 table 並未設定有任何屬性,但 Part 1 有,則會將設定在 Part 1 的屬性用於下方所有的層級中。如果任何上層之中有覆寫存在 (例如在 table 上),那麼該階層的屬性設定會優先於其下方階層的設定, (例如 table 與其下的所有零件),即使這些項目已有自己的屬性設定。
無法將「Scene list」中的圖元從一個層移動另一層 (例如:在「Scene list」中上下移動)。決定空間中項目所在位置的變換矩陣是儲存在圖元中 (做為圖元實例)。會在將變換加入至每個圖元時累積變換。變換最上層的圖元也會相對應變換所有較低層圖元;其會以群組一起移動。
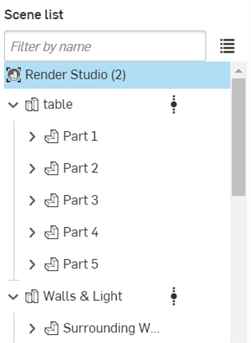
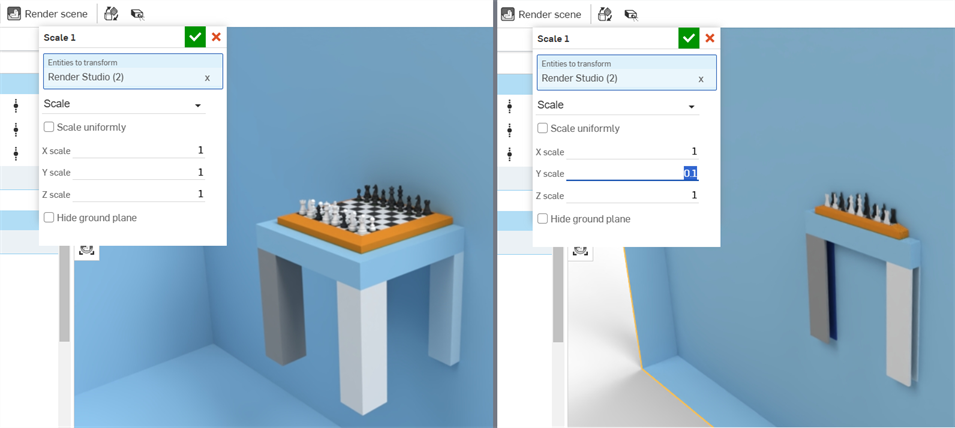
例如,在「Scene list」中選擇最上層的 Render Studio ,然後使用 Transform 工具將 y 軸從 1 縮放至 0.1。在場景中的所有零件都會一起縮小 (下方中第二個圖片所示):
關於零件、Part Studio 與組合件變換的詳細資訊,請參考變換一個「Scene list」的圖元。
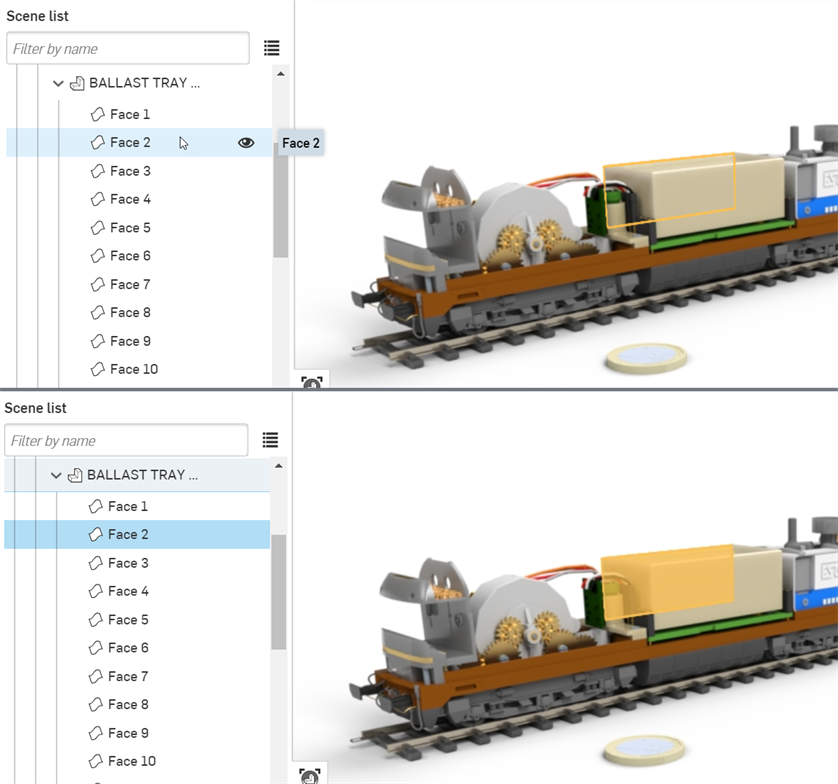
將游標移動暫留至「Scene list」中的圖元上,暫留處的圖元背景會變為淺藍色。在圖形區域中會有黃色的輪廓線圍繞著該圖元 (請見下方第一個圖片)。
按一下「Scene list」中的圖元,被點按圖元的背景會變為深藍色。在圖形區域中會在圖元上填入黃色 (請見下方第二個圖片)。
即使圖元是在另一個圖元後方,輪廓線與填入的色彩仍是顯示的,如同在下方圖片中的情況,選取的是火車貨櫃的背面:
另一個方式是直接在圖形區域中選擇圖元。
選擇是切換式的。按一下來選擇,再按一下即取消選擇。您也可以點按來遞增選擇項目及取消選擇項目 (就像使用 Ctrl+按一下一樣)。
詳細資訊請參考選擇。
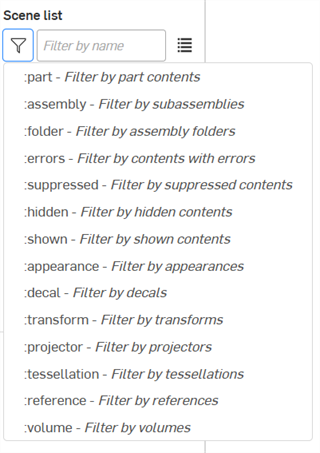
使用「Filter by name」欄位來根據「Scene list」圖元的名稱來搜尋「Scene list」。按一下篩選器切換按鈕 (![]() ) 來根據特定的篩選指令 (以英文冒號為前置) 篩選「Scene list」:
) 來根據特定的篩選指令 (以英文冒號為前置) 篩選「Scene list」:
-
:part - 根據零件篩選,以及選擇性地根據名稱篩選
-
:assembly - 根據次組合件篩選,以及選擇性地根據名稱篩選
-
:folder - 根據組合件資料夾篩選
-
:errors - 根據有錯誤的內容篩選
-
:suppressed - 篩選受抑制的內容
-
:hidden - 篩選隱藏的內容
-
:shown - 篩選顯示的內容
-
:appearance - 根據外觀篩選
-
:decal - 根據印花篩選
-
:transform - 根據變換篩選 (平移、旋轉、縮放)
-
:projector - 根據投影機篩選
-
:tessellation - 根據鑲嵌篩選
-
:reference - 根據參考篩選
-
:volume - 根據體積篩選
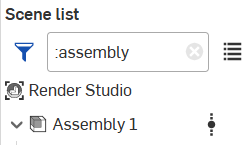
您可以合併篩選器來獲得更詳細的結果,譬如:
-
:assembly :errors 來找出有錯誤的所有組合件,可以選擇性地包括組合件名稱
-
:part :hidden 找出所有隱藏的零件,以及選擇性地包括名稱來精細篩選
當在篩選欄位中輸入篩選器或名稱時,篩選器圖示 (![]() ) 會變為藍色,表示正在使用一個篩選器。使用篩選欄位右側的清除圖示 (
) 會變為藍色,表示正在使用一個篩選器。使用篩選欄位右側的清除圖示 (![]() ) 來清除篩選器:
) 來清除篩選器:
從清單中選擇一個篩選指令會移除/取代篩選欄位中現有的篩選器。
在篩選欄位中輸入篩選器 (例如 :errors) 會與從清單中選擇篩選器產生相同的結果。


「Scene list」中的組成項目:
-
篩選器按鈕與欄位 - 篩選「Scene list」中的項目。這對包含許多零件、Part Studio 或組合件的全景是相當有用的。並無法篩選面。關於進階的篩選選項,請參考篩選「Scene list」。
-
以清單顯示搜尋結果 (
 ) - 以齊平的清單而非階層來顯示搜尋結果:
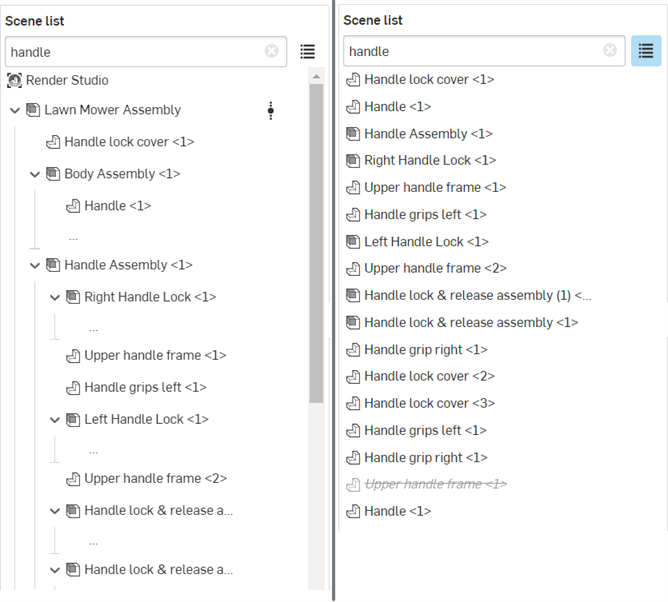
使用預設階層檢視 (左圖) 與清單檢視 (右圖) 的「Scene list」結果
-
Render Studio - 目前場景的根目錄。所有其他的場景節點會列在 Render Studio 下方:像是插入的零件、Part Studios、組合件與 Projector。
-
Part Studio/組合件父群組 - 在建立場景時,系統會將零件、Part Studios 或組合件插入至場景中。對於包含在零件、Part Studios 或組合件中的零件或面來說,這是最上層的群組。
在 Part Studio 或組合件父群組下方可找到的項目如下:
-
次組合件 - 在父組合件中的一個組合件。次組合件包含零件、曲面與面。
-
零件 - 有著多個面的單一封閉實體。零件會位在 Part Studio/組合件父群組之下的第一層或次組合件之下。
-
曲面 - 有一或多個面但沒有體積的個體,且是獨立於零件的。曲面會位在 Part Studio/組合件父群組之下的第一層。
-
面 (網格) - 零件或曲面的一部分有由邊線界定的區域。例如,一個矩形零件有六個面。面不一定需要由邊線所界定,像是球體即不需要。當點按零件名稱左側的箭頭時,會於下方展開各個面。
-
資料夾 - 在將組合件插入至 Render Studio 時,系統會維持所有的資料夾與資料夾結構。與任何其他場景清單的組成項目一樣,可以顯示、隱藏、隔離顯示或抑制資料夾。
無法在 Render Studio 中重新排列或移動資料夾。不過您可以在組合件中重新排序資料夾,建立一個新的版本,然後在 Render Studio 中更新參考。詳細資訊請參考更新 Render Studio 場景圖元。
-
-
Transforms - 顯示在場景中使用工具列的 Transform 工具執行的所有變換的清單 (平移、旋轉、縮放)。請參考 變換一個「Scene list」的圖元。
-
Appearances - 顯示場景中所有匯入 (連結的) 與已套用零件/面外觀的清單。如果選取了一個外觀,則可在「Appearance」面板中編輯外觀參數。如果選取了多個外觀,這些外觀會以清單顯示在「Appearance」面板中。詳細資訊請參考選擇多個外觀。
-
Projectors - 顯示場景中所有投影機的清單。投影機可以影響場景中的任何圖元,甚至是整個場景。投影會決定當投影至場景面和/或零件上時,外觀紋理如何對應變換、旋轉與縮放。
-
Volumes (僅適用於 Render Studio Advanced) - 顯示場景中所有體積的清單。體積是在外觀體積部分的存在與渲染處的立方體區域。體積可以選擇性地是 OpenVDB 3D 紋理。非進階的使用者可以開啟包含有體積的場景但無法編輯其屬性。
您可以從「Appearances」清單中拖曳一個外觀,然後將其直接放置在「Scene list」中的圖元上 (Render Studio、Part Studio、組合件、零件和或面)。這是從「Scene list」內直接分配外觀的快速方式。請參考將外觀加入至「Scene list」圖元中。
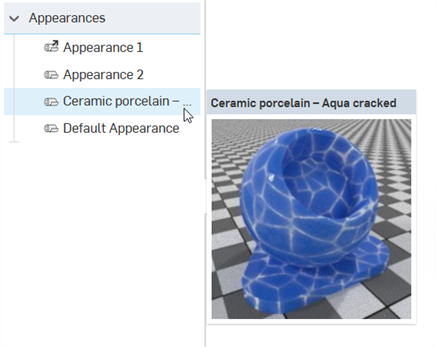
將游標移動至外觀上暫留會在右側顯示其縮圖。這樣可讓您直接從「Appearances」清單中預覽外觀:
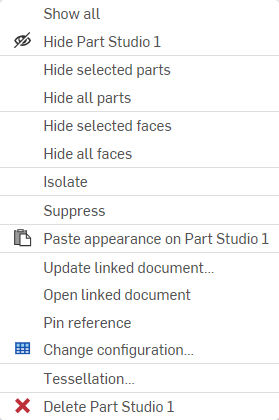
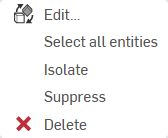
在「Scene list」的圖元 (Render Studio、Part Studio、組合件、組合件資料夾、零件或面) 上按右鍵,系統會提供下列的環境選單選項:
並不會為所有場景清單圖元提供全部的選項。選項是取決於於其上按右鍵的場景清單圖元為何。
-
Show all - 顯示「Scene list」中的所有項目。
-
Hide (
 ) / Show (
 ) - 除了 Transforms、Appearances 與 Projectors 之外,您可以在任何「Scene list」項目上使用,這個選項會切換場景中零件或實例的顯示與否。例如,在選取零件的情況下,會在零件名稱旁出現眼睛的圖示,點按這個圖示來在場景中隱藏零件的顯示,再次點按圖示即可顯示零件。
 -
Hide all parts - 隱藏目前所選項目與下方的所有零件。
-
Hide all faces - 隱藏目前所選項目與下方項目中的所有面。
-
Isolate - 僅能在選取了「Scene list」中一或多個零件、Part Studio 或組合件的右鍵環境選單時使用 (無法在 Render Studio 或面圖元上使用)。當選擇了 Isolate 時,所有選取的圖元在圖形區域中是可見的,其他的圖元則是隱藏的。
會有一個橫幅出現在圖形區域中間上方,表示您是在隔離顯示模式中。按一下 Done 來退出這個模式。

也可以從「Transforms」 與「Projectors」的各自環境選單套用隔離顯示。詳細資訊請參考「Transforms」環境選單與「Projectors」環境選單。
-
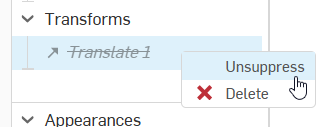
Suppress/Unsuppress - 從場景中隱藏一或多個圖元。當抑制時,圖元在圖形區域中是不可見的。可以抑制除了面之外的任何圖元。抑制有子項目的圖元會抑制所有的子項目。
當抑制圖元時,圖元的名稱會以斜體的暗色字體顯示,文字上會有一刪除線。按右鍵並選擇 Unsuppress 來將個體切換回啟用的狀態:

當抑制時,不會從「Scene list」中移除任何相關場景清單的外觀、變換與投影。不過,這些項目在圖形區域中是不可見的。
-
Paste appearance - 如果您已從「Appearances」資源庫、「Appearances」清單或圖形區域中複製了一個外觀,可使用這個選項來將其貼到目前選取的「Scene list」圖元上。請參考複製與貼上外觀。
-
Unassign appearance - 從所選個體中移除外觀。
-
Link to Part Studio appearance - 如果插入至場景中的零件有指定的 Part Studio 材料/外觀,但目前並未指定零件外觀,這個選項會將重新連結原始的 Part Studio 外觀。
可以選擇零件和/或面 (個別或是多重選取),然後重新與原始的 Part Studio 外觀連結。
零件必須是完全沒有指派外觀的,這個選項才會出現在零件的環境選單中。如果零件有指定與未指定外觀面的混合,必須選取面才能讓選項出現在零件的環境選單中。
當在面上使用這個選項時會有兩種情況。在此處的範例中,指定了一個 Render Studio 外觀給零件,指定了另一個不同的 Render Studio 外觀給面。
-
如果零件的面並沒有 Part Studio 指定的外觀,在面上按右鍵並選擇 [Link to Part Studio appearance] 會使其與零件的 Render Studio 外觀連結,而不是與 Part Studio 外觀連結。
-
如果零件的面有 Part Studio 指定的外觀,在面上按右鍵並選擇 [Link to Part Studio appearance] 會使其與 Part Studio 的 (面) 外觀連結。
詳細資訊請參考 Part Studio 材料與 Render Studio 外觀的對應。
-
-
Update linked document - 開啟「參考管理員」對話方塊,您可於其中更新至最新的版本,或選擇性地更新文件版本。詳細資訊請參考更新連結的場景圖元。
-
Open linked document - 在新的瀏覽器分頁中開啟連結的文件 (Part Studio 或組合件)。
-
Pin / Unpin reference - 當釘選時,會將實例連結至其分支的最新版本上,且是釘住的。
-
Exploded view - 如果匯入的組合件有一或多個爆炸視圖,使用這個選項來開啟對話方塊以於其中選擇與組合件關聯的爆炸視圖。隨即可在圖形區域中看到所選的爆炸視圖。請參考存取組合件的爆炸視圖。
-
Change configuration - 開啟選擇組態對話方塊,您可於其中為 Part Studio 或組合件選擇一個不同的組態。請參考插入有組態的 Part Studio 或組合件。
-
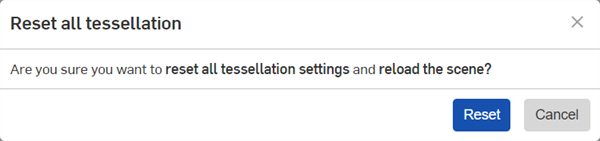
Reset all tessellation - 僅可從在最上層 Render Studio 圖元上按右鍵的環境選單來存取,這樣會開啟一個訊息提示,說明會重設 Auto 之下所有圖元的自訂鑲嵌設定。按一下 Reset 按鈕來重設所有鑲嵌,或按下 Cancel 來關閉訊息提示而不做出任何變更:
-
Select matching instances - 僅在已插入組合件下方的零件或次組合件上可用,這會選取零件或次組合件所有相配的實例。其中一個用途是針對經複製排列的零件,這個選項會選擇所有複製排列的零件實例。
-
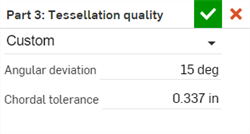
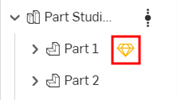
Tessellation - 開啟「Tessellation」對話方塊,於其中為目前所選的「Scene list」圖元 (Render Studio、Part Studio、組合件或零件) 選擇一個不同的鑲嵌值。選項有:「Auto」、「Coarse」、「Medium」、「Fine」、「Very fine」或「Custom」。如果選擇了「Custom」,系統會提供其他額外的選項:
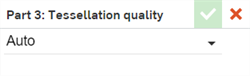
系統會將鑲嵌設定套用至下方沒有明確設定的所有圖元上。例如,套用「Fine」的鑲嵌設定到組合件上會將相同設定套用至組合件下方沒有明確設定的所有圖元上。
如果套用了 Auto 之外的鑲嵌值,鑲嵌圖示會顯示在「Scene list」中的元素旁:
-
Angular deviation - 控制在鑲嵌過程中要將曲面分割為多少片段。例如,10 度的值會產生一個有 36 個平坦面的圓柱。
-
Chordal tolerance - 可允許鑲嵌幾何與下方曲面不同的最大距離。
-
-
Delete - 刪除一或多個所選的最上層零件、Part Studio 或組合件。您不能刪除 Part Studio/組合件下方的面或零件。
在重新載入頁面或登出之後,不會持續隱藏場景清單中的個體。在重新入頁面或重新登入之後,系統會顯示之前隱藏的個體。
「Transforms」環境選單
在「Scene list」「Transforms」中的變換縮圖上按右鍵,以顯示有下列選項的環境選單:
-
Edit - 開啟「Transforms」對話方塊,您可於其中對目前的變換做出其他的編輯。
-
Select all entities - 選擇屬於變換操作的所有零件。
-
Isolate - 當選取時,與所選變換一起的所有圖元都會顯示,其他的圖元則會在圖形區域中隱藏。
會有一個橫幅出現在圖形區域中間上方,表示您是在隔離顯示模式中。按一下 Done 來退出這個模式。
-
抑制/取消抑制 - 抑制會移除目前所選變換對場景造成的效果。
當抑制一個變換時,變換的名稱會以斜體的暗色字體顯示,文字上會有一刪除線。按右鍵並選擇 Unsuppress 來將變換重新套用到場景中:
-
Delete - 將零件的狀態還原至變換之前的原始位置,並從「Scene list」中移除目前的變換。
如果您不小心刪除了變換,可以使用工具列上的「undo」(![]() ) 選項來還原變換。
) 選項來還原變換。
「Appearances」環境選單
在「Scene list」「Appearances」中的外觀縮圖上按右鍵,以顯示有下列選項的環境選單:
-
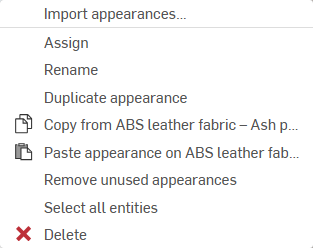
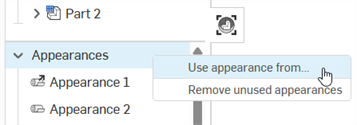
Use appearance from... - 可讓您從目前或其他文件中選擇一個 Render Studio 分頁,然後從其中將已套用的外觀帶入到目前的 Render Studio 分頁中。詳細資訊請參考使用來自另一個 Render Studio 分頁的外觀。
-
Assign - 將外觀分配給零件,並清除「Scene list」中任何之下的屬性。
-
Rename - 重新命名目前的外觀。
-
Unlink appearance - 取消在 Part Studio 中與原先指定給零件材料的連結,然後在將零件帶入至新場景中時,建立與 Render Studio 外觀的對應。請參考 Part Studio 材料與 Render Studio 外觀的對應。
-
Duplicate appearance - 複製目前的外觀與其所有參數。系統會將副本ˋ直接放置在「Appearances」清單中目前所選的外觀之下。
-
Copy from [Appearance] (
 ) - 將在「Scene list」中目前選取的外觀複製到剪貼簿中。
 -
Paste Appearance on [Appearance] (
 ) - 將來自剪貼簿 (來源外觀) 的外觀貼到「Scene list」中目前選取的外觀 (目標外觀)。來源外觀會取代目標外觀。
如果之前沒有重新命名目標外觀,系統會使用來源外觀的名稱。如果之前已重新命名目標外觀,則在將來源外觀取代目標外觀時,系統會保留這個名稱。
-
Remove unused Appearances - 如果在清單中有任何未於場景中使用的外觀,這個選項會將其從「Appearances」清單中全部移除。這樣可幫助精簡有許多未使用外觀的冗長清單。如果沒有任何未使用的外觀,會有藍色的資訊訊息提醒您沒有移除任何項目。
-
Select all entities - 選擇場景中套用這個外觀的所有零件/面。
-
Delete - 從「Appearances」清單中刪除一或多個未使用的所選外觀。無法刪除已使用的外觀。
無法重新命名連結的外觀。
「Projector」環境選單
在「Scene list」「Projectors」中的投影機縮圖上按右鍵,以顯示有下列選項的環境選單:
-
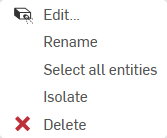
Edit - 開啟「Projectors」對話方塊,您可於其中對目前的投影機做出其他的編輯。
-
Rename - 重新命名目前的投影機。
-
Select all entities - 選擇在場景中套用這個投影機的所有圖元與零件。
-
Isolate - 當選取時,與所選投影機一起的所有圖元都會顯示,其他的圖元則會在圖形區域中隱藏。
會有一個橫幅出現在圖形區域中間上方,表示您是在隔離顯示模式中。按一下 Done 來退出這個模式。
-
Delete - 刪除投影機並移除其在場景中對相關圖元與零件的影響。
如果您不小心刪除了投影機,可以使用工具列上的「undo」(![]() ) 選項來恢復投影機。
) 選項來恢復投影機。
「Volume」環境選單 (僅適用於 Render Studio Advanced)
在「Scene list」中「Volume」的縮圖上按右鍵,以顯示有下列選項的環境選單:

-
Edit - 開啟「Volume」對話方塊,您可於其中對目前的體積做出其他的編輯。
-
Rename - 重新命名目前的體積。
-
Show all - 顯示「Scene list」中的所有項目。
-
Hide (
) / Show () - 切換場景中體積的顯示與否。 -
Hide all parts - 隱藏目前所選項目與下方的所有零件。
-
Hide all faces - 隱藏目前所選項目與下方項目中的所有面。
-
Hide all volumes - Hides all volumes from the current selection and below.
-
Isolate - 當選取時可檢視目前的體積,所有其他的圖元則會在圖形區域中隱藏。
會有一個橫幅出現在圖形區域中間上方,表示您是在隔離顯示模式中。按一下 Done 來退出這個模式。
-
Suppress/Unsuppress - 抑制會移除目前所選體積對場景造成的效果。
當抑制一個體積時,體積的名稱會以斜體的暗色字體顯示,文字上會有一刪除線。按右鍵並選擇 Unsuppress 來將體積重新套用到場景中:

-
Delete - 刪除體積並移除其在場景中對相關圖元與零件的影響。
-
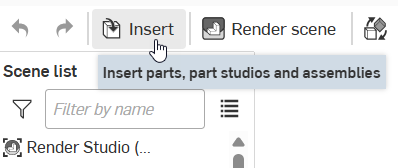
若要將零件、Part Studio 或組合件插入至 Render Studio 場景中:
-
按一下工具列上的「Insert」按鈕 (
 ):
):
-
「Select part, Part Studio, or Assembly」對話方塊開啟:
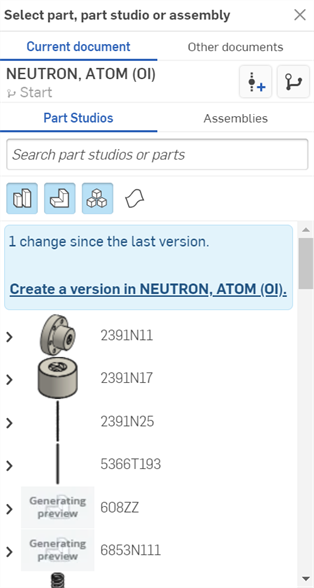
在首次將圖元匯入至場景中時,可將 Render Studio 場景視為文件當時的一個快照 (版本)。因此,在匯入元素之前必須先要有一個版本。按一下「Create a version in [Document]」的連結,然後在「Create version」對話方塊中填入資訊,接著按一下 Create 按鈕。在完成這個操作之後,即可使用文件所有的內容,且您可以從選擇對話方塊中匯入任何零件、Part Studio 或組合件。
在將圖元匯入至 Render Studio 分頁之後,除非建立新的版本,否則在這個 Render Studio 外建立於 (或匯入至) 文件中的任何項目將都無法被這個 Render Studio 場景存取。您也可以按一下文件面板中的「Create version」按鈕 (
 ) 來開啟建立版本對話方塊,然後隨時建立文件的版本。詳細資訊請參考版本與歷程。
 -
點按您要插入至場景中的圖元來選擇它。這可以是來自「目前文件」或「其他文件」中的零件、複合零件、曲面、Part Studio 或組合件。
每次當您存取「Select part, Part Studio, or Assembly」對話方塊時,僅能插入一個圖元;不過,您可以將任意數量的圖元插入到相同的場景中。

關於插入 (Select part, Part Studio, or Assembly) 對話方塊的詳細資訊,請參考插入零件與組合件。


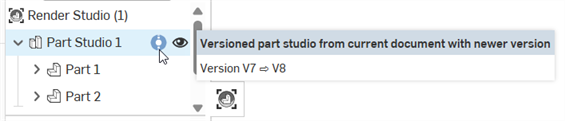
如果用於 Render Studio 場景中的圖元在 Render Studio 分頁之外被更新,會在場景圖元旁顯示一個更新連結的圖示 (![]() )。這樣表示需要更新被參考的圖元。
)。這樣表示需要更新被參考的圖元。
如果已更新的圖元是在目前的工作區中,則不需要一個新的版本/更新,且可立即使用新的圖元。僅針對在目前工作區外更新的圖元要求一個新的版本/更新。
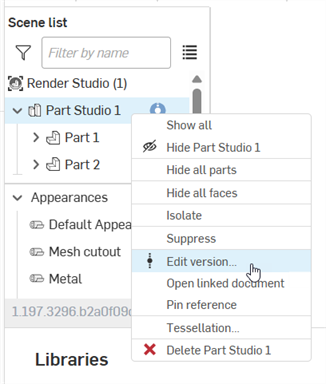
更新場景圖元:
-
如果文件有較新版本,更新參考的圖示顯示在「Scene list」中的圖元旁:
-
在圖元上按右鍵,然後環境選單中選擇 Update linked document:
-
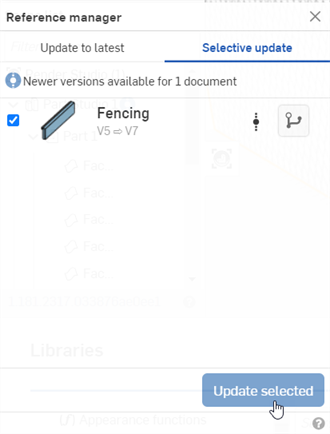
「參考管理員」對話方塊開啟。核取要更新的圖元,然後按一下 Update selected 按鈕:
-
套用有更新版本的 Render Studio 分頁於瀏覽器中重新載入。
-
按一下右上角的 x 來關閉對話方塊。
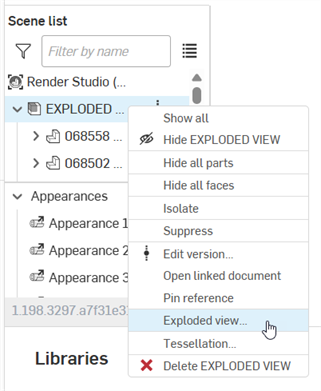
如果您的組合件包含一或多個爆炸視圖,在將組合件插入至場景中後,您可以存取任何的爆炸視圖以在圖形區域中檢視。
-
在「Scene list」中的組合件上按右鍵,然後選擇 Exploded view:
-
「Exploded view」對話方塊開啟:

-
按一下「Default」下拉清單來選擇所需的爆炸視圖。請注意,此清單可以包含數個爆炸視圖:
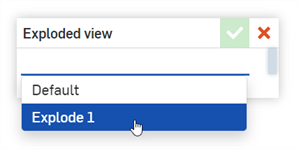
-
按一下核取記號 (
 ) 來接受新的視圖。
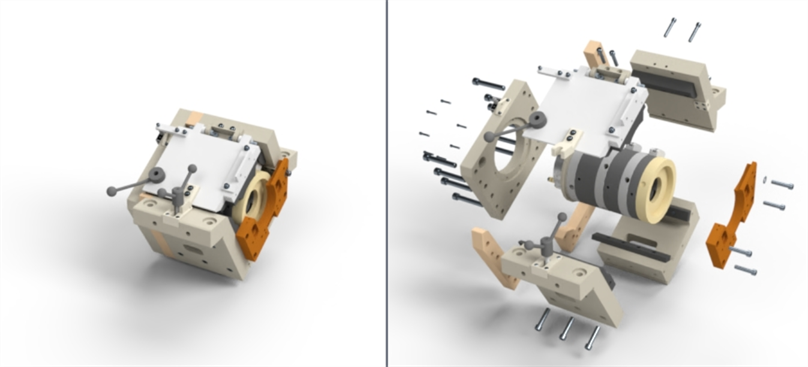
預設 (非爆炸) 視圖 (左圖),爆炸視圖 (右圖)
您可以在其他爆炸視圖間切換,或是隨時回到預設 (非爆炸視圖) 中。方法是再次存取對話方塊,然後從下拉清單中選擇 Default,最後再次點按核取記號 (![]() )。
)。
-
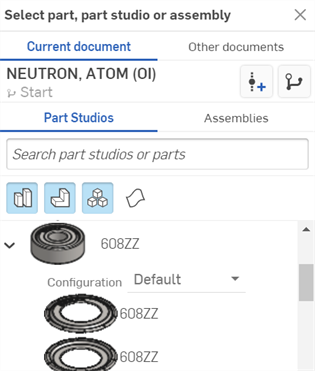
按一下工具列上的「Insert」按鈕 (
):
-
「Select part, Part Studio, or Assembly」對話方塊開啟:
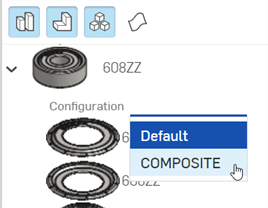
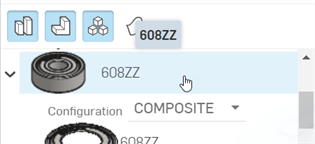
-
找出有其他組態的 Part Studio 或組合件 (下方中第一個圖片所示)。按一下下拉清單並選擇想要的組態 (下方中第二個圖片所示):
-
按一下已組態的 Part Studio 或組合件來將其插入至場景中。
-
若要將 Part Studio 或組合件插入場景之後選擇一個不同的組態,請在「Scene list」中的 Part Studio 或組合件上按右鍵,然後從環境選單中選擇 Change configuration:
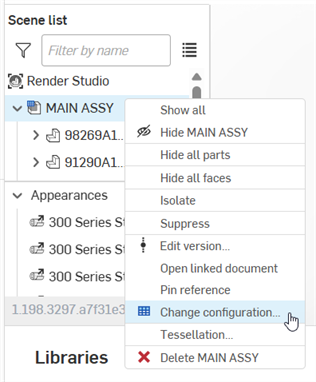
-
「Select configuration」對話方塊開啟:
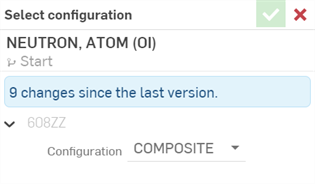
-
按一下下拉清單來選擇一個新組態,然後按下核取記號 (
) 來接受新組態,並在場景中更新 Part Studio 或組合件:
若要變換一個或多個「Scene list」的圖元:
-
按一下工具列上的「Transform」按鈕 (
 )。
)。 -
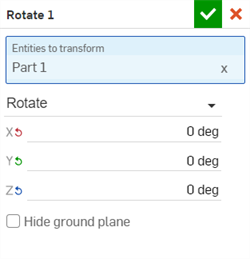
這樣會開啟下列的對話方塊,您可以在其中修改圖元的「Translation」、「Rotation」與「Scale 」:
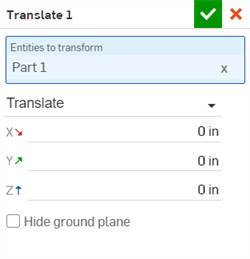
-
Entities to transform - Select all entities you would like transformed. This includes the top level Render Studio, Part Studios, Assemblies, parts, and volumes (Render Studio Advanced only). Faces cannot be transformed.
用做於變換的原點是要變換的所有圖元的中心。例如,如果選擇了一個零件,系統會將該零件的中心用做為原點。如果使用了 2 個零件,則系統會使用兩個零件中心的合併來做為原點。
會有一個邊界方塊出現,顯示包括在變換選取項目中的原點和所有圖元。
-
Transform 下拉清單 - 選擇「Translate」、「Rotate」或「Scale」。每個「Transform」對話方塊僅能執行一個變換的操作,但您在同一場景中可以有多個變換。所有的變換都是位在「Scene list」中。變換的選項有:
-
Translate - 根據場景的原點沿著 x、y 與 z 軸移動選取的項目。測量的單位是米,可以是負數或正數。
-
Rotate - 根據場景的原點沿著 x、y 與 z 軸旋轉選取的項目。測量的單位是度,範圍是從 -360 到 +360 度。
-
Scale - 根據選取項目的中心點沿 x、y 與 z 軸放大 (更大) 或縮小 (較小) 選取的項目。測量是根據選取項目的原始大小。例如,1.000 x 與 1.000 y 的比例表示縮放是零件原始大小 100%。從 0.001 到 1 的分數值會降低所選項目的大小。無法將縮放軸設定為 0。
-
Scale uniformly - 如果選取了「Scale」變換,保持啟用這個核取方塊可根據輸入的值統一地縮放圖元與零件。取消核取可沿著 X、Y 與 Z 軸個別地縮放。
-
-
-
Hide ground plane - 隱藏環境的虛擬地平面。關於「Ground」設定的詳細資訊,請參考「Environment」面板。
另一個方式是,您可以在使用「Transform」對話方塊之前,先從「Scene list」或圖形區域中選擇圖元。當您點按工具列中的「Transform」按鈕 (
) 時,系統會將所選圖元自動填入「Entities to transform」欄位中。 -
-
當使用「Transform」工具時,如果在對話方塊中選取的是「Translate」或「Rotate」,則可以在圖形區域中調整操控器:
平移操控器 (左圖);旋轉操控器 (右圖)。
「Scale」變換是在對話方塊中輸入數值,在圖形區域中並沒有相關的操控器。
-
完成時按一下核取記號 (
) 來接受新的變換。
會以建立變換的順序套用多個變換,並列在「Scene list」中。
如果變換了在組合件中的圖元,然後在 Render Studio 中更新了該組合件,則 Render Studio 的變換會被再次套用到最上層的新組合件變換中。這樣,Render Studio 的變換是非破壞性的。
對於每個變換,您可以編輯、選擇所有變換圖元、隔離顯示、抑制與刪除變換。詳細資訊請參考「Transforms」環境選單。
任何「Scene list」圖元或圖元群組 (整個 Render Studio、Part Studios、組合件、零件與面) 可以有與自己相關的投影機。投影機會影響套用至圖元的外觀/紋理,但不會影響圖元本身。
建立投影機與圖元的關聯:
-
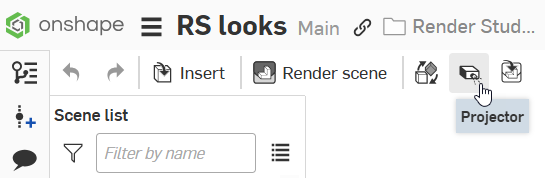
按一下工具列上的「Projector」圖示 (
 ):
):
-
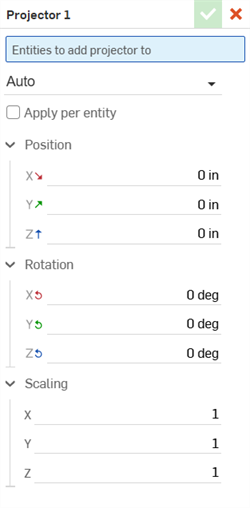
「Projector」對話方塊開啟。在對話方塊中輸入下列資訊:
-
名稱 [Projector 1] - 提供投影機的名稱
-
Entities to add projector to - 受這個投影機影響的所有圖元。在對話方塊開啟時,從「Scene list 」或圖形區域中選擇任何「Scene list 」的圖元。這可包括整個 Render Studio、Part Studio、組合件、零件與面。系統會將這些圖元加入至投影機的影響項目中。
-
Projection type - 選擇一個投影類型:Auto、Planar、Cubic、Cylindrical、Spherical 或 Surface。
-
Normalized (僅適用於 Cylindrical 或 Spherical 投影類型) - 不論圓柱或球體的大小為何,核取來使得投影的繞水平軸的 1 個旋轉涵蓋紋理的 2 個重覆。
-
Capped (僅適用於 Cylindrical 投影類型) - 核取來將平面的投影加入至圓柱投影的上方與底部。
-
Apply per entity - 核取來將所選圖元的變換列入考量,以便其與圖元一起移動。
-
Position (X/Y/Z) - 輸入沿 X、Y 和 Z 軸位置變換的長度測量值。
-
Rotation (X/Y/Z) - 輸入繞 X、Y 和 Z 軸旋轉變換的度數。
-
Scaling (X/Y/Z) - 輸入比例值的縮放變換,值 1 是沿著 X、Y 和 Z 軸的原始比例。
另一個方式是,您可以在使用「Projector」對話方塊之前,先從「Scene list」或圖形區域中選擇圖元。當您點按工具列中的「Projector」按鈕 (
) 時,系統會將所選圖元自動填入「Entities to add projector to」欄位中。 -
-
使用投影機變換工具來調整投影機的「Position」、「Rotation」、與 「Scaling」。另一種方式是在對話方塊中改變投影機的數值:
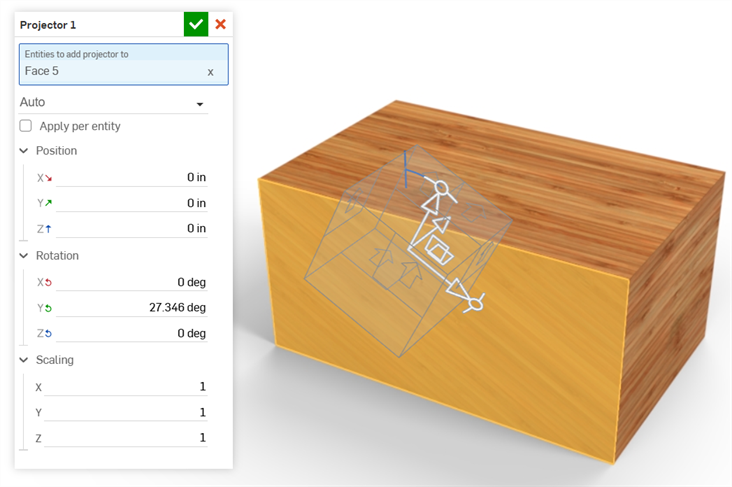
變換後的投影機套用到模型中的 Face 5 上。
-
取決於所選的「Projection type」,投影機的變換工具會相對應變更:
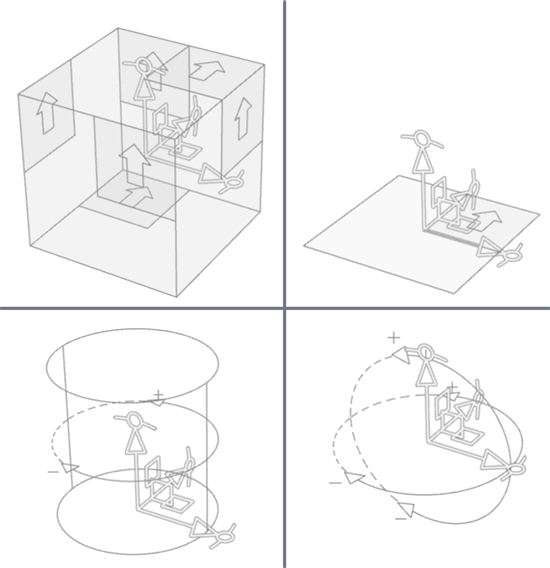
從左上順時鐘分別是:Auto/Cubic、Planar、Spherical、與 Cylindrical 變換工具
-
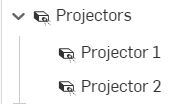
投影機與所選的圖元及零件相關聯,並位在「Scene list」底部「Projectors」下拉清單之下:
在目前的 Render Studio 分頁中使用來自目前或其他文件 Render Studio 分頁內已套用至圖元的外觀:
從您要帶進外觀的 Render Studio 分頁中:
-
在「Appearances」清單或「Appearances」清單中的一個外觀上按右鍵,然後從環境選單中選擇 Use appearance from... :
-
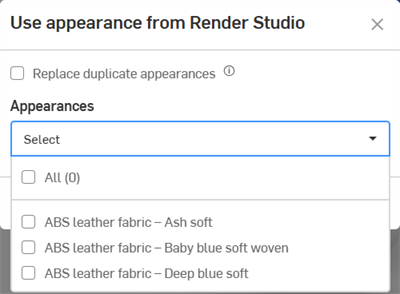
Select Render Studio 對話方塊開啟。從目前文件或其他文件中選擇一個 Render Studio 分頁:

-
Use appearance from 對話方塊開啟。請從下列選項中選擇:
-
Replace duplicate appearances - 當核取時,如果目前 Render Studio 分頁有與在所選 Render Studio 分頁中完全相同名稱的外觀,會以來自所選 Render Studio 分頁的外觀覆寫在目前 Render Studio 分頁中的外觀。所有指定了先前外觀的零件/實例現在會有來自所選 Render Studio 分頁中的指定外觀。
如果未核取這個選項,從所選 Render Studio 分頁帶入的相同名稱外觀會有加入其名稱後的連續數字來使其為獨特的。
- Appearances (選擇下拉清單) - 如果您要將所有外觀帶入至目前的 Render Studio 中,請核取 All。另一種方式是核取個別的外觀來將其帶入至目前的 Render Studio 中。
-
-
在對話方塊中做出選擇之後,按一下 Apply 來將外觀帶入至目前的 Render Studio 外觀清單中。或者是按一下 Cancel 來結束對話方塊而不做出任何變更。
帶入至目前 Render Studio 分頁的外觀在「Appearances」清單中會根據英文字母順序排列。
提示
-
不像在 favorite 資料夾中的外觀,系統會保留來自所選 Render Studio 分頁中自訂外觀的參數設定。
-
如果任何外觀使用了使用者沒有許可存取的資源,外觀核取方塊會是反灰的,且無法被選取。
-
您可以建立一個空的 Render Studio 分頁來用作為外觀容器,以放置來自目前和/或其他文件 Render Studio 分頁的您常用外觀。
-
在 Use appearance from 對話方塊中,如果核取了 All 然後又取消核取,會維持選取所有的外觀。
當使用印花的零件、Part Studio 或組合件被插入到 Render Studio 中時,在 Part Studio 中建立的印花會被匯入至 Render Studio 中。關於如何在 Part Studio 中建立印花的詳細資訊,請參考 Decal。
在將零件、Part Studio 或組合件插入到 Render Studio 之後,系統會將印花轉換為位在「Scene list」中「Appearances」清單內的外觀:
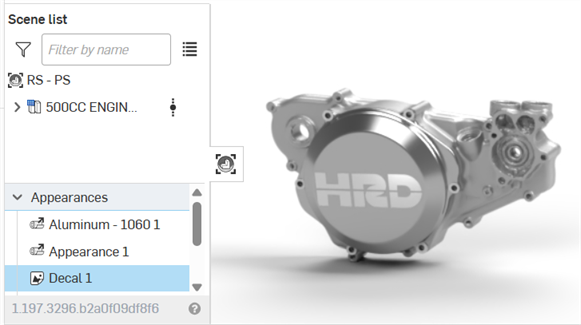
Decal 是與 Part Studio 的特徵連結的,會以「Decal」圖示 (![]() ) 上的箭頭來表示。在建立文件版本以及於 Render Studio 中更新參考之後,在 Part Studio 中對印花的編輯會於 Render Studio 中更新。
) 上的箭頭來表示。在建立文件版本以及於 Render Studio 中更新參考之後,在 Part Studio 中對印花的編輯會於 Render Studio 中更新。
如果在「Appearance」面板中編輯了印花的任何參數,連結的圖示會顯示為未連結的印花 (![]() )。不過,不像其他的外觀,印花外觀會持續追蹤印花的投影與 UV 放置 (如果在來源 Part Studio 中修改的話)。
)。不過,不像其他的外觀,印花外觀會持續追蹤印花的投影與 UV 放置 (如果在來源 Part Studio 中修改的話)。
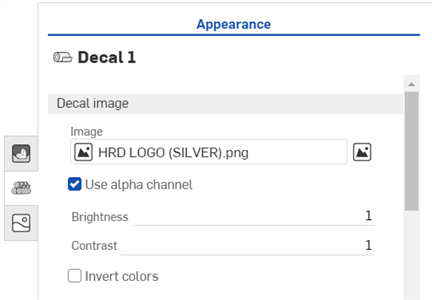
下方概述在「Appearance」面板中可編輯的印花參數:
-
Decal image
-
Image - 印花的影像檔案。按一下「Image」欄位來開啟「Select image」對話方塊,可以從目前文件、其他文件或匯入至您電腦的影像中選擇以取代現有的影像。
-
Use alpha channel - 當核取時,如果影像有透明的 alpha 色板,則會使用它來修剪印花。
-
Brightness - 指定從 0-1 範圍中的影像光亮度。
-
Contrast - 指定從 0-1 範圍中的影像對比。
-
Invert colors - 反轉影像的顏色。
-
-
印花外觀
-
Diffuse roughness - 印花外觀粗糙度的值。較高的粗糙度會趨向粉狀的外表。
-
Metallic appearance - 印花的金屬值。1.0 的值會有顏色的反射,並與視圖的方向無關。0.0 的值則會有白色的反射,且是方向相依的。在這個情況中,方向的依存性是基於 IOR (菲涅耳效應)。
-
Reflection roughness - 印花外觀反射粗糙度的值。較高的值會產生比較模糊的反射。
-
Reflection weight - 控制反射的量。
-
Reflection anisotropy - 印花外觀的反射異向性值。較高的值會拉長強光。
-
Anisotropy rotation - 變更異向性的方位。1 的值會 360 度旋轉方位。
-
IOR - 根據體積決定折射。同時會影響非金屬印花的反射程度。
-
Bumps - 透過「Appearances」資源庫中的 Bump 函式來將凹凸或法線貼圖附加在外印花上。
-
-
印花透射
-
Transmission color - 無關於印花厚度的透射色彩效果,類似於彩繪玻璃。
-
Transmission weight - 相較於漫射反射,決定會有多少光穿透印花。
-
Transmission roughness - 透射粗糙度的值。較高的值會讓透過外觀看到的印花較為模糊。
-
提示
-
不像其他的外觀,無法從「Appearances」資源庫中選擇印花。因此,無法將印花指定給 Render Studio 中的任何圖元。僅能將其以外部參考從來源 Part Studio 插入。
-
無法複製或移除印花。
-
無法隱藏印花。若要解決這個問題,您可以將印花的 Transmission weight 設定為 1。印花即會變為透明;不過,這僅在 Transmission color 是設為白色,且印花是霧面 (沒有任何外觀參數使其為光澤的) 時有效。否則,面可能看起來不正確。
-
您無法在平坦面上套用多於 3 個的重疊印花,或套用多於 3 個印花到圓柱面上。系統仍會將多餘的印花匯入至 Render Studio 中,但在面上是不可見的。
-
在來源 Part Studio 中建立印花的順序決定了匯入時在 Render Studio 套用印花的順序。
詳細資訊請參考 Render Studio 範例與資源。