Company/Classroom/Enterprise Settings - Preferences
![]()
Only available for
Select your Onshape Preferences settings, where you have the ability to require that users use approved drawing templates, make use of company/classroom/enterprise-owned material libraries in their own accounts, or show a view only toolbar to all users of a document with view only permissions, as well as additional preference settings.
This page is where you set company/classroom/enterprise-wide preferences. For information on setting your user account preferences, see My account - Preferences.
To navigate to your Preferences settings in Onshape, click on your Account user icon (![]() ) in the top right corner of your Onshape window. This opens a dropdown menu. Click Company/Classroom/Enterprise settings.
) in the top right corner of your Onshape window. This opens a dropdown menu. Click Company/Classroom/Enterprise settings.
Click Preferences in the list on the left side of the page:
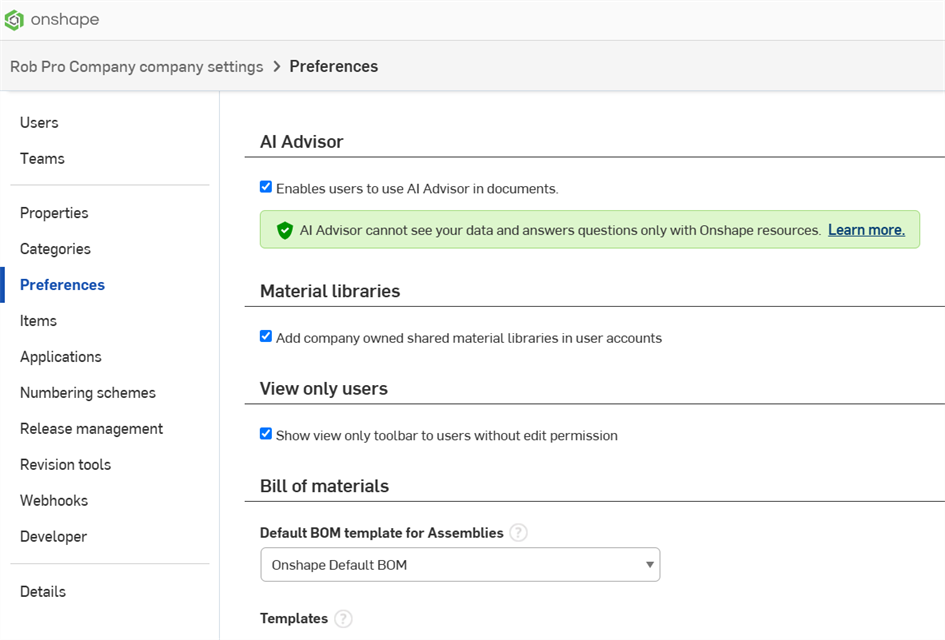
Company settings > Preferences
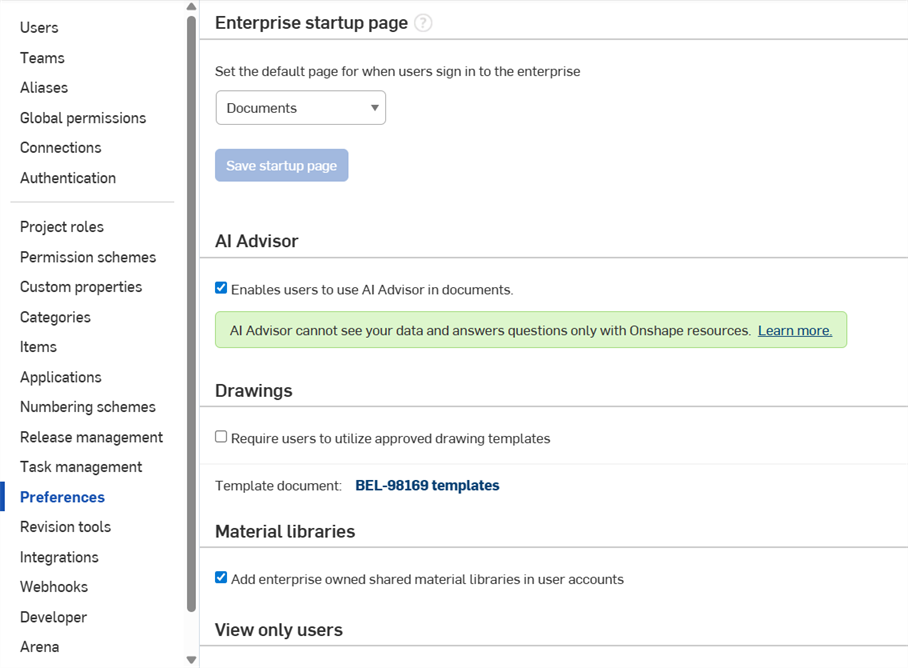
Enterprise settings > Preferences
You can set up a common startup page for your enterprise, under Enterprise Startup page. This takes precedence over a user's personal account Startup page settings.
Enable users to access the AI Advisor panel in Documents. The AI Advisor does not use your document data and answers questions only with Onshape resources such as Help, the Learning Center, and blogs.
For information on drawing templates, see Custom Drawing Templates.
For information on how to edit the watermark in your drawing, see Release Management: Watermarks.
Supply company-owned material libraries for other users in their own accounts. For more information on custom material libraries, see Customizing Parts: Materials.
Show a view only toolbar to all users of a document with view only permissions. For information on the simplified user interface, see Using the View Only Toolbar.
Use this field to enter regex (regular expressions) by which to enforce document name syntax (or prevent duplication of names) enterprise-wide. You can enter any valid java regex. For example:
- To prevent any duplication of document names, enter ^.*$ in the field and click Save.
- To ensure that all document names are unique unless the names starts with 'test', enter ^(?!test).*$
- To enforce that all document names contain only numbers, enter ^[0-9]+
If you enable this and there are already existing documents with duplicate names, you will see a message to that effect when you open the document. You always have the option to change the document name to a unique name; Onshape will not change existing document names automatically.
Enabling the Single sign on (SSO) method allows Enterprise Administrators to assign users as Light users when they sign into an Enterprise for the first time. By selecting the "Assign auto-provisioned users as Light users" option, all newly-added users signing into their account through the SSO become Light users:

Only Enterprise Administrators can enable or disable the "Assign auto-provisioned users as Light users" option. By disabling, or deselecting the option, users signing in through the SSO for the first time become Full users. Administrators can manage the status of their users at any time. For more information about Light and Full users, see Getting Started as a Light User.
Administrators of an enterprise can add custom features to the toolbar for all enterprise users if this box is checked. Checking this box activates the display of the Add enterprise custom features button on the Part Studio toolbar for all administrators of the enterprise.
![]()
To add custom feature icons to your enterprise and make them available for all users:
- Check the box as described above to enable this ability for all administrators of an enterprise.
- Navigate to a Part Studio in a document owned by the enterprise.
- Click
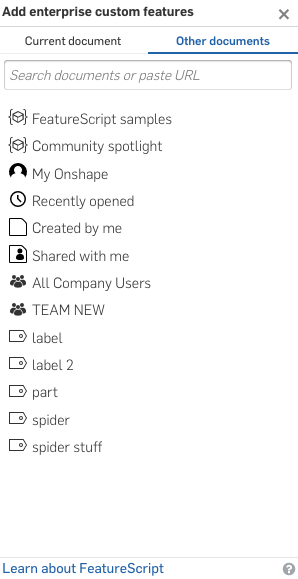
 to open the dialog for selecting custom features:
-
In the dialog, locate the document in which the desired custom feature is defined:
- Search in the Current document or Other documents, by selecting the tab at the top of the dialog.
- FeatureScript samples - This filter lists all Onshape-supplied documents containing FeatureScript samples for you to try.
- Onshape standard filters - Use these filters as you do on the Documents page to locate a specific document.
- Search box - Enter the name of a document or paste the URL of a document containing FeatureScript (usually acquired through a Share action).
Custom features are linked from specific versions of other documents; the latest version is selected by default. If there is no version, you can request that the document owner (or someone with write access) create one.
Clicking on any document name displays the custom features defined in it.
- Select the top level icon to insert all custom features inside it (each represented by its own icon on your toolbar), or select one feature.
The custom feature icon appears on the Feature toolbar.
To remove the custom feature before closing the dialog, select the custom feature in the dialog again. (This toggles the custom feature in and out of the toolbar.)
-
If there is more than one version of the document, the latest version is displayed by default. Click
 to access the version graph and select a different version.
- Click the X in the upper-right corner of the dialog to close it.
When you, as the administrator, add custom features to your Feature toolbar, the custom features are added to enterprise users' toolbars upon signin to their account, for all users with Link permissions to the document containing the custom features.
When there is a newer version of the tool available, it will show as out-of-date for you (the admin), but not for other users in the enterprise.
If a feature in a user's Feature list corresponds to a tool added by the admin, the feature will not show as out-of-date (even if the tool is) but if it is not from the same version as the tool it will show as out-of-sync
![]() .
.
The Reference manager Update all command updates out-of-sync features to the version in the toolbar, even if that version is lower than the latest version or lower than the version the feature is currently from. A user can click the icon and use the Update command to update the tool:
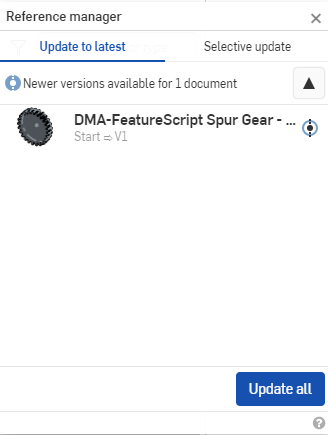
Any user can move custom features around when customizing the toolbar, the same as standard feature tools. The one restriction is that standard tools can't be added to the toolsets where the custom features are initially added, and enterprise custom tools can’t be added to standard tools toolsets.
Adding custom features on Android
On your Android device, as an administrator of the enterprise:
- Sign in to the enterprise domain.
- Open the Part Studio feature toolbar.
- Click on the Add enterprise custom features option.
- Navigate to the custom feature and select it.
Selecting the custom feature adds it to the toolbar for all enterprise members that have Link permission to the document that contains the custom feature.
Here, you can select the default Bill of Materials (BOM) template for Assemblies in your company/classroom/enterprise, and view available BOM templates. See Bill of Materials for more information.
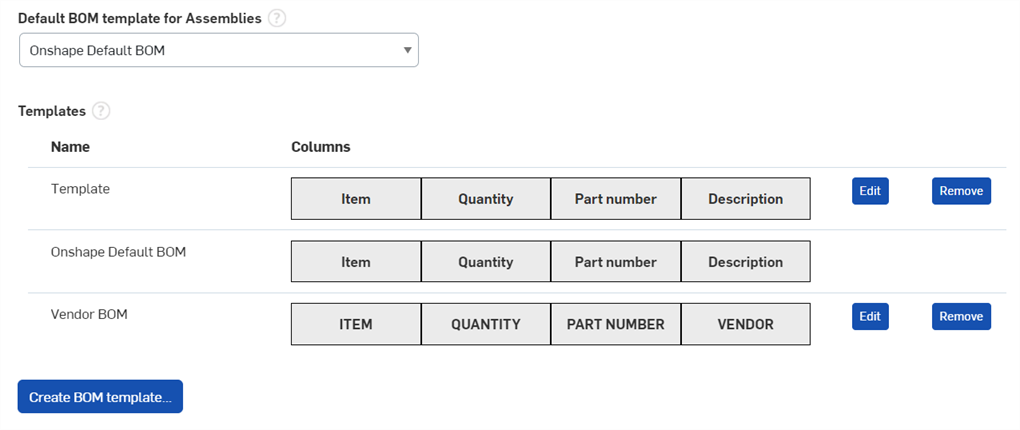
Creating a BOM template
-
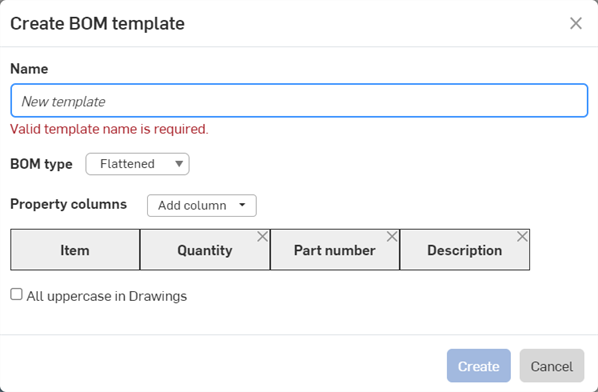
Click the Create BOM template button. The Create BOM template dialog opens:
-
Provide a Name for the template. This is mandatory.
-
Select the BOM Type, either Flattened or Structured. This is used as the template default when a new BOM is created using this template.
-
Using the Property columns dropdown list, add the columns you require. The Item column is required and cannot be removed.
-
Check All uppercase in Drawings to enforce uppercase column headings and Property strings when inserting BOM tables using this template in Drawings.
-
Click Create to create the template. Click Cancel to close the dialog without creating the template.
Once anyone in your company/classroom/enterprise has created and saved a BOM template, it will show up in the dropdown list under Default BOM template for Assemblies (shown below).

You cannot Edit or Remove the Onshape Default BOM template.
If anyone in your company/classroom/enterprise has edited and saved a Bill of Materials template, it appears in the Templates section.
Editing a BOM template
-
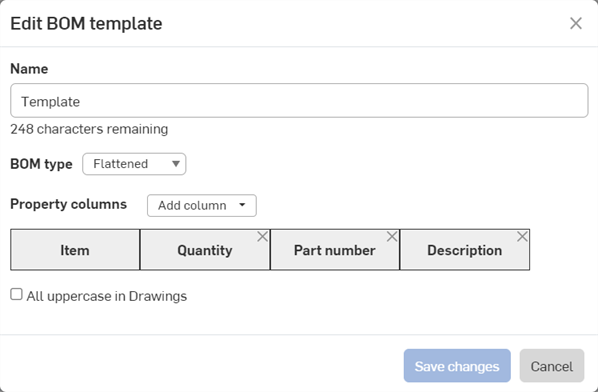
Click the Edit button. The Edit BOM template dialog opens:
-
Update the name, BOM type, Property columns, and/or All uppercase in Drawings flag, as described in the Creating a BOM template section above.
When finished editing, click Save changes. Click Cancel to close the dialog without edits to the template.
If you edit a template, any Assemblies that currently use this template need to have the template reapplied in order to see the edited changes. This is done from the BOM table in the assembly:
Removing a BOM template
Click the Remove button to remove the template from the Templates list. The changes are saved throughout your entire company/classroom/enterprise.
Customize the template for all inspection tables. For more information on inspection tables and the customization options available, see Inspection Item.
Add custom export rules based on object type, category, and file format to automatically generate metadata-driven file names when exporting objects including Part, Part Studios, Drawings, and Assemblies. To create export rules, you must be an administrator.
-
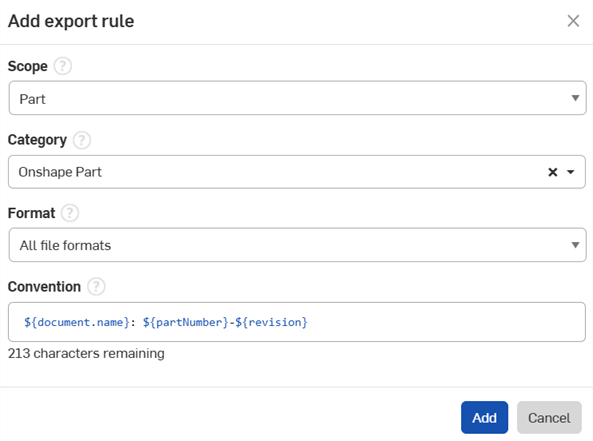
Click Add export rule.
-
Select a Scope, that is, the type of part for which this export rule will apply: Part, Assembly, Drawing, Part Studio, or File.
-
Optionally, select a previously-defined Category. If a category is selected, the export rule applies to all applicable objects within that category. If no category is selected, the export rule applies to all objects in all categories. The category available corresponds to the selected scope.
-
Select a file format (or all file formats).
-
Specify a Convention for the file name. This convention is used for all file names for the applicable objects and specified file format.
-
Some default Onshape properties, and all custom properties, can be used in export rule conventions. See Export Rule Conventions for a partial list.
-
Rules can also be applied to part faces (when being exported to DXF and DWG), sheet metal flat patterns, and can include sheet reference for a part in a drawing when the property is the part property associated with the drawing on the primary sheet (using ${reference.<property>}).
-
Only one rule may be created per category.
To use custom properties in an export rule:
-
Navigate your user menu > Company/Classroom/Enterprise settings.
-
Click Custom Properties.
-
Click Create custom property:
-
Fill out the required fields.
-
Optionally, set a Display name. If a Display name is set, the name is referenced when creating the rule. If no Display name is set, the Name is used.
-
Important: The Publish state must be Active in order for the custom property to be available for export rules.
-
Under the Categories section, if there is an existing Category to add the property to, add that here. Otherwise, proceed to the next step.
-
-
While in the Company/Classroom/Enterprise settings, click Categories.
-
Click Create category:
-
Select a Scope (Part, Assembly, Drawing, Part Studio, or File).
-
Fill out the required fields.
-
Publish State must be Active to use the Category in export rules.
-
Optionally, under Parent categories, add a category to act as a parent category (for the child to inherit properties from).
-
Under Properties, add the desired custom property. This may be an existing/default property or a newly created property from the previous steps.
-
-
Once created, follow the basic workflow, and select the corresponding Scope, Category, Format, and under Convention, add the rule of the custom property just created.
When multiple rules are set up, the rule with more specificity takes precedence. For example, if you have two rules set up: one rule for all categories in the Part scope, and another rule for a specific category in the Part scope, the rule set up for the single category takes precedence. This is valid across all rules set up in the system, whether they are set up by individual users or as Company/Classroom/Enterprise-wide rules.
If a user rule and a Company/Classroom/Enterprise-wide rule are of equal specificity, the Company/Classroom/Enterprise rule takes precedence.
Special characters entered into the Export dialog's File name field and/or generated by Export rules, such as back slash (\), forward slash (/), asterisk (*), colon (:), pipe (|), greater than (>), less than (<), question mark (?), and quote (") are automatically replaced with a hyphen (-) when exported, to prevent different operating systems file manager issues.
Select a Date type format to determine how the date is displayed for areas of Onshape that use Date type properties.
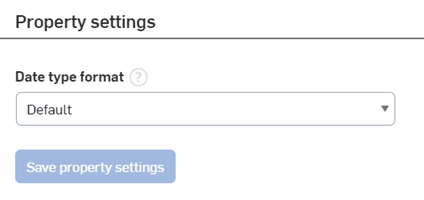
The following areas are affected by the Date type format setting (if Date type properties are referenced):
-
Export rules
-
Drawing Notes, Callouts, and Drawing table cell text
-
Search filters
-
Part, Assembly, and Property dialogs
-
Property creation page fields
To select a new date format:
-
Click the Date type format dropdown, and select a date format from the available formats in the dropdown list.
-
Click the Save property settings button to have the new property settings take effect.
The default Date type property format depends on the language option you choose under My Account > Preferences > Language.
Date type format and Drawings
Default date format changes will affect callouts with date references in already released Drawings.
A Drawing callout that references a Date type property is formatted based on the Date type format setting. Their format cannot be independently edited from the drawing's callout dialog.
-
If the Date type format is not changed from its Default setting or the user does not belong to a Company/Classroom/Enterprise, formatting of Date type properties in Drawing callouts, notes, and table cell text is dependent on the Drawing template standard; MM/DD/YYYY for ANSI templates, and YYYY-MM-DD for ISO templates.
-
If the Date type format setting is changed to something other than Default,
-
Formatting of Date type properties in newly inserted Drawing callouts, notes, and table cell text use the new setting.
-
Formatting of Date type properties in existing Drawing callouts (including released drawings) use the new setting.
-
Date type format and Export rules
-
For users that belong to a Company/Classroom/Enterprise, the Export rules follow the date format defined by the Administrator in the Property settings Date type format dropdown. For users that do not belong to a Company/Classroom/Enterprise, the Export rules always follow the default Date type format YYYY-MM-DD.
-
If the Date type format has characters that can cause issues with the file name, such as a forward slash (/), comma (,) or period (.), these characters are replaced with a dash (-).
See Export rules for more information.
Administrators can grant users or teams permission to create, edit, and delete non-geometric items and standard content, which can both be inserted into the Bill of Materials (BOM). Add users or teams by clicking on the Search field and selecting them from the dropdown list. Administrators can also remove users and teams from the permissions list by clicking the x icon to the right of the user's name.
