![]()
![]()
![]()
You can use the Versions and history panel to create versions (which are View only) and branch a version to create a new workspace. You can also compare history entries in workspaces and versions, and any combination of the two. For more information, see Comparing.
You can create a version from the
Document panel;
click
![]() to create a new version without leaving the workspace.
to create a new version without leaving the workspace.
You can also create a version through Versions and history, also located on the Document panel:
-
With a document open, click
 to open Versions and history.
- Click the workspace from which to create a version; this makes that workspace active.
-
Click the Create version icon
 .
.
- In the dialog that appears, enter a name and description for the new version.
- If any drawings in the document have updates pending, as indicated by a bright yellow Update icon
 , a message is included in the dialog:
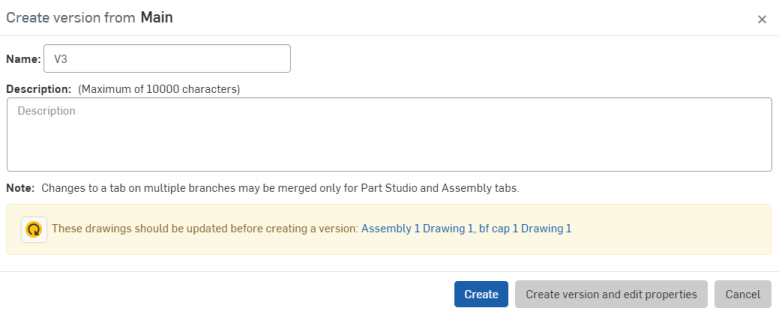
Click the icon in the message
 to update all drawings that are listed so the version will contain the most recent version of the drawings. Note that if you click the Update icon and then cancel the dialog, the drawings are still updated.
- Click either:
- Create - Creates the new version and remain in the currently active workspace
- Create version and edit properties - Creates the new version and also open the Properties dialog for the new version. This Properties dialog includes names and descriptions for each tab and part of the new version.
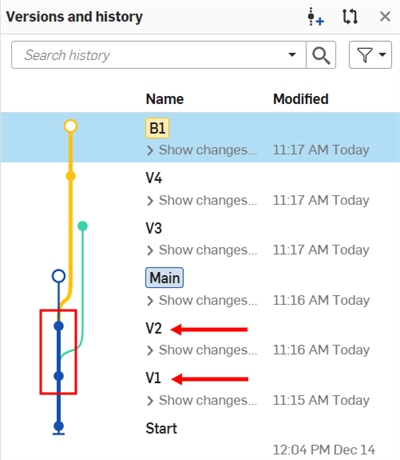
The new version is shown in the Versions and history graph:
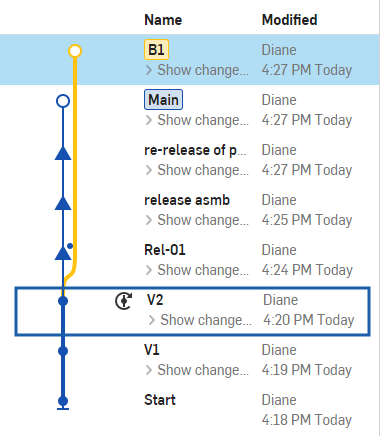
Onshape may also create a version automatically when updating document references. In that case, you will see an automatic version icon in the graph, as shown below:
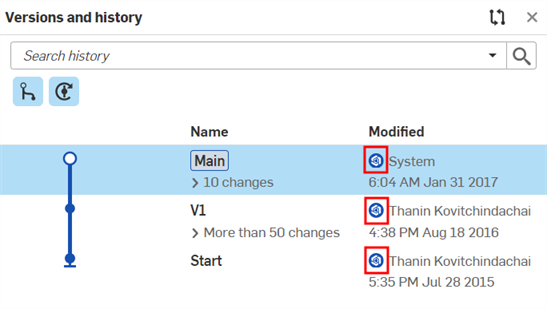
If the user is an Onshape employee, an Onshape logo icon is displayed to the left of the User's name under the Modified column in the graph:
For more information about automatic versioning, see Updating References.
The Versions and history context menu contains several useful commands. This explains all the commands found in this menu. Note that options change, depending on where you right-click, either over the change, version, or branch:
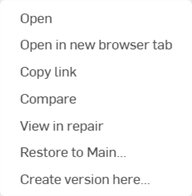
Context menu when in the Main branch, and right-clicking on a change in another version
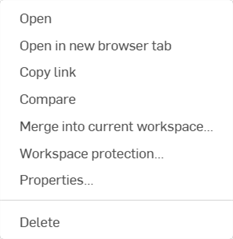
Context menu when in the Main branch, and right-clicking on another branch title

Context menu when in the Main branch, and right-clicking on one of the Main branch changes
-
Open - Opens the current change, version, or branch in the current tab.
-
Open in new browser tab - Opens the current change, version, or branch in a new browser tab.
-
Copy link - Copies the current change, version, or branch URL to the clipboard. Useful to send a specific point in history or a specific branch or version to other users.
-
Compare - Compare a version and workspace at any history point. See Comparing for more information.
-
Merge into current workspace - Merge changes from a document version or workspace (source) into the currently active document workspace (target). See Merging for more information.
-
View in repair - Opens the Repair panel, which graphically aids in repair of broken references at any history point. In most cases, View in repair is initiated after editing a Derived or Import feature to a new base part, causing broken references in the Part Studio. See Repairing for more information.
-
Restore to main - Restore from a previous point in a document branch (source) into the same branch (target). See Restoring for more information.
-
Create version here - Create a version at the current location. See Creating a version for more information.
-
Workspace protections - Protect workspaces from certain types of changes. When workspace protections are enabled, all changes to a document must be completed on a branch and then merged into the protected workspace. See Workspace protections for more information.
-
Properties - Opens the Properties dialog for the current branch, where the Name and Description can be edited. The branch Category and tab tree are also displayed. Each tab can be selected and edited from this dialog.
-
Publish FeatureScript - If the Document contains a custom feature, this option makes it available to the public. See Publish a custom feature for more information.
-
Delete - Delete the current branch. The Main workspace and versions cannot be deleted.
When you branch from a version, you are creating a new branch that can contain additional versions, as well as a new workspace at the tip (end) of the branch.
-
With a document open, click
 to open Versions and history.
- Right-click on the version entry from which to create a workspace and select Branch to create workspace from the context menu:
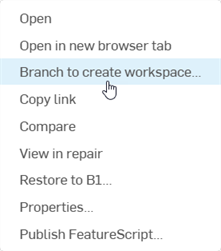
- In the Properties dialog that appears, enter the name and description for the workspace:
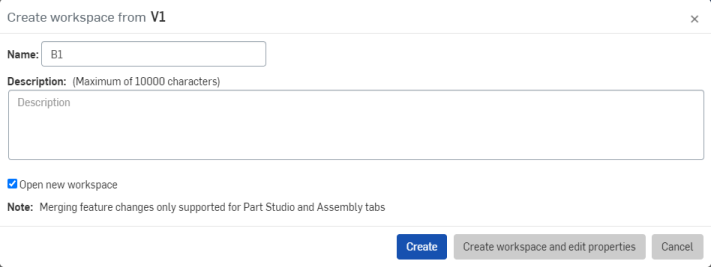
- Click either:
- Create - Creates the workspace and optionally open it (check box)
- Create version and edit properties - Creates the workspace (optionally open it) and also open its Properties dialog. This Properties dialog includes names and descriptions for each tab and part of the new document workspace.
You can compare two workspaces, two versions, or a version and a workspace. You are also able to merge one or more branches.
If a user owns the document, they can delete the workspace.
If a document is shared with a user, and "Delete" is enabled under the document's share permission settings, that user can delete the document's workspace.
Deleting a document's workspace deletes the workspace from the tip (end) of a branch:
-
If no version on the branch exists, then the workspace and the branch are deleted.
-
If the branch contains one or more versions, the workspace is deleted, and the branch reverts to the latest version.
To delete the workspace:
-
With a document open, click
 to open Versions and history.
- Right-click on the branch to delete (B1 in the image below).
- Select Delete.
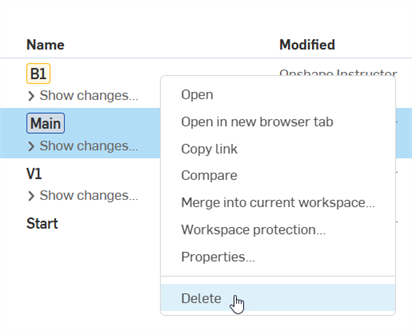
- Click Delete to confirm.

To restore a deleted workspace:
- Open the document with the deleted workspace.
- Expand the Document menu
 :
:
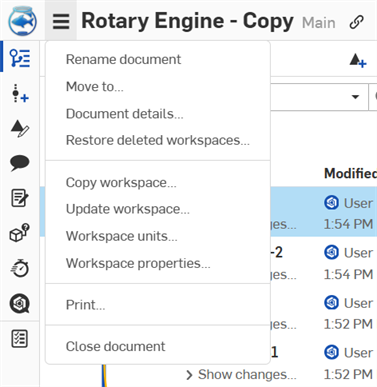
- Select Restore deleted workspaces.
- In the dialog, select the branch(es) you want to restore.
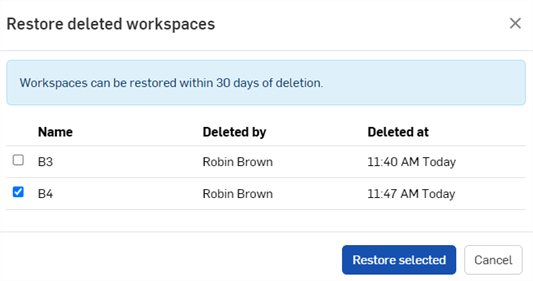
- Click Restore selected.
A team is working on a bicycle and has reached a stable design base for the frame. Now it's time for the team to experiment with various component designs. Begin by marking the basic frame design document as a version.
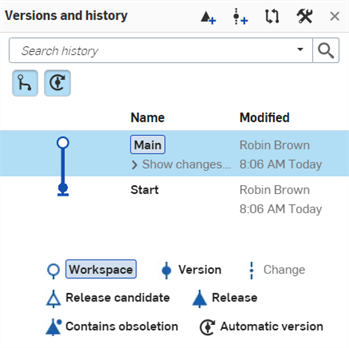
- Click the Versions and history icon
 to open Versions and history in the Document panel:
-
Click the Create Version icon
 .
.
- Name the first version Base Frame; click
Create:

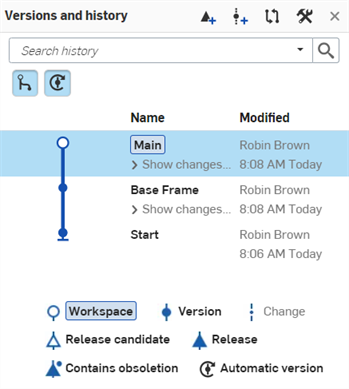
Each designer is then able to create their own workspace from the Base Frame version, perhaps labeled Seat, Brakes, Shocks.
- Right-click the Base Frame version, then click Branch to create workspace:
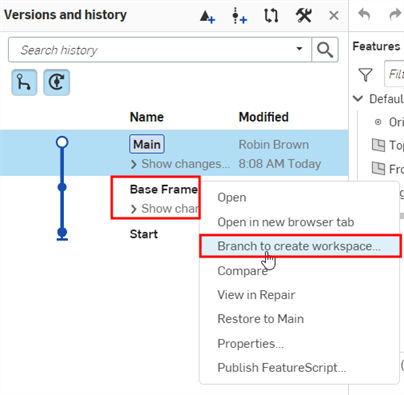
- Name the new workspace, Seat; click
Create:
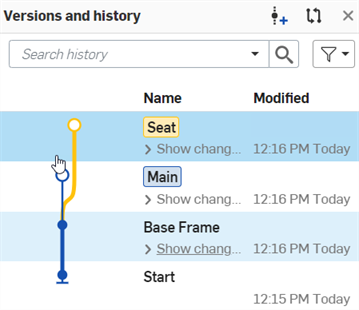
The Base Frame version still exists as well as the original workspace (Main). In addition, there is a second workspace, Seat, so the designer making changes for the seat won't affect the Base Frame workspace.
- The Shocks and Brakes designers each create their own workspaces, from the same Base Frame version:
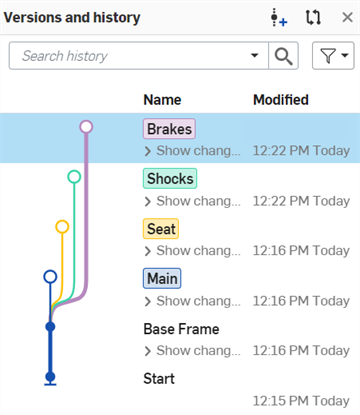
The workspace of each designer is, at this point, identical to the Base Frame version. - As they continue to design in their own branches, their designs evolve, independently of the Base Frame version and independently of each other. As they work, they are free to create versions of the workspaces.
When the independent work is complete, each branch is merged back into the Main workspace, bringing all the independent work together.
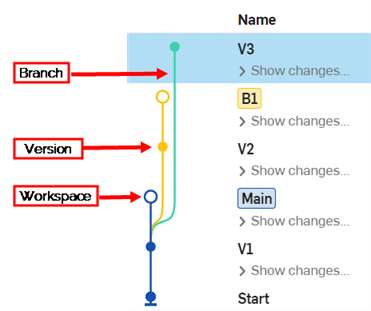
Legend
A typical Versions and history graph contains icons that indicate the type of workspace, branch, version, or revision each node is. To more fully understand how to read the graph, consider this table:
| Icon | Indication |
|
|
version |
|
|
change node |
|
|
A version containing a release that has been approved. |
|
|
A version containing a release containing an obsoleted item. |
|
|
A workspace. |
|
|
A version with a revision pending. |
|
|
A version in the Versions and history that was created automatically by Onshape; for example, when using the Update to latest option as explained later in this topic. |
Terms
- Version
- A named and saved state of the document. Versions are immutable and separate from workspaces. Create a version to capture a workspace at a particular point in time. You can open and branch a version.
Indicated by normal text and a solid dot on the version graph.
- Workspace
- A modeling/design space.
The active workspace is indicated by a blue box to the left of it in the version graph list, and an open dot at the end of the associated branch.
- Branch
- Where the document is split and a new workspace is created. A branch can have zero or more versions, and up to one workspace. You can open and delete a branch.
Indicated by bold and italic text and a dot on the version graph. If the dot is open, the branch has one associated workspace. If the dot is closed, the workspace associated with that branch has been deleted.
Merge lines
All merges are displayed explicitly in the Versions and history graph, which updates automatically as changes are made to the document.
Showing and hiding merge lines
To make the Versions and history graph easier to visualize, toggle the Show/Hide merges and Show/Hide automatic versions buttons as needed:
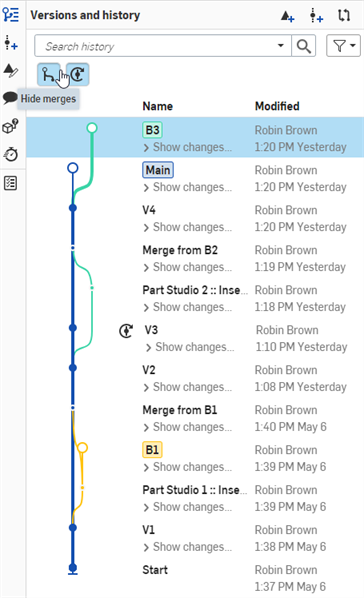
A Versions and history graph with merge lines and automatic versions shown on the Onshape browser application (above).
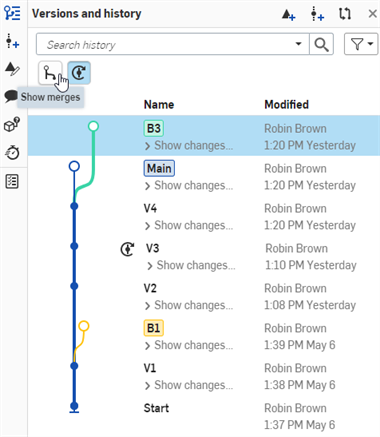
A Versions and history graph with merges hidden on the Onshape browser application (above).
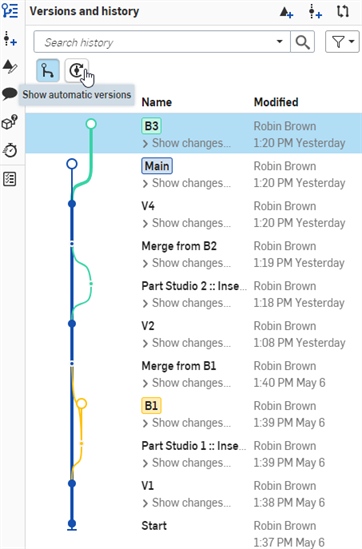
A Versions and history graph with automatic versions hidden on the Onshape browser application (above).
Merge lines example
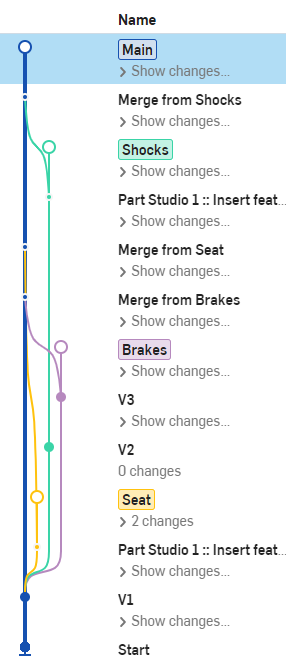
The example below shows a complex Versions and history graph with several branches. Each branch was created from the Main workspace, and then individual work was done on each branch. As work on each branch was completed, the branches were merged back into Main. The flow of lines to and from the Main branch shows the merging workflow, making it easy to see which changes were merged when.
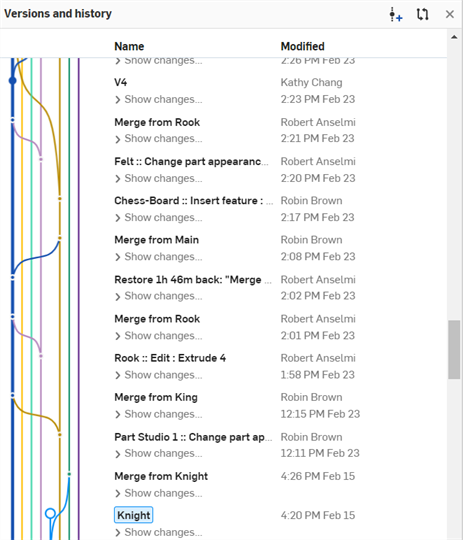
A Versions and history graph with several branches shown on the Onshape browser application (above).
To automatically scroll to the top or bottom of a branch, right-click on a branch to access the context menu and select either the Scroll to branch top or Scroll to branch bottom option.
If a Document version contains a published custom feature, the bracket indicator ({}) is displayed around the Version node in the Versions and history graph:
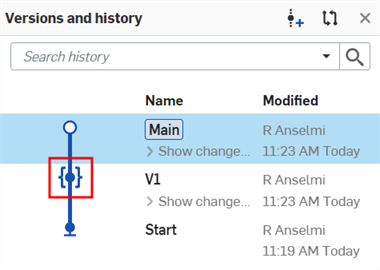
See Publish a custom feature for more information.
Search history allows you to search history entries across all versions and branches. The result is a filtered list of entries based on your search term. Version names and version descriptions are not included in the search.
To search history:
-
Enter a search term in the Search history field. All history entries including the search term are displayed in the Versions and history list:
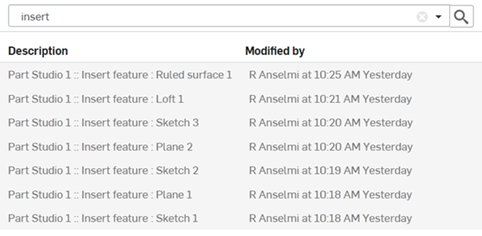
-
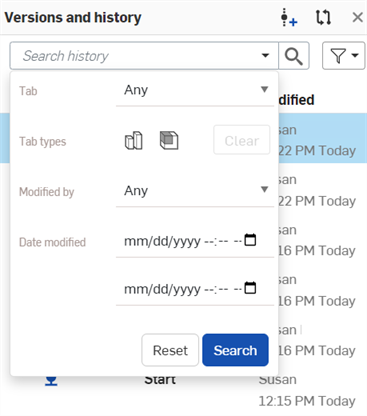
Optionally, to further narrow your search, click the dropdown arrow in the search history field. This allows you to filter the search using the following criteria:
-
Tab - Narrow the search by selecting a specific document tab. Default is Any tab.
-
Tab types - Narrow the search by selecting either Part Studio, Assembly, or Drawing. Default search uses all tab types. Click the Clear button to reset the tab type filter. Both tab types are included in the search.
-
Modified by - Narrow the search by selecting the person who made the history change. Options are Only me, Not me, or Any (default).
-
Date modified - Narrow the search by selecting the Start and End dates. Default searches all dates.
-
Once the criteria are selected, click the Search button. The search term is filtered according to the new criteria. At any point, you can click the Reset button to set all filter criteria to their default values.
When searching, results are presented from all branches, even if you have selected Active branch above the search field.
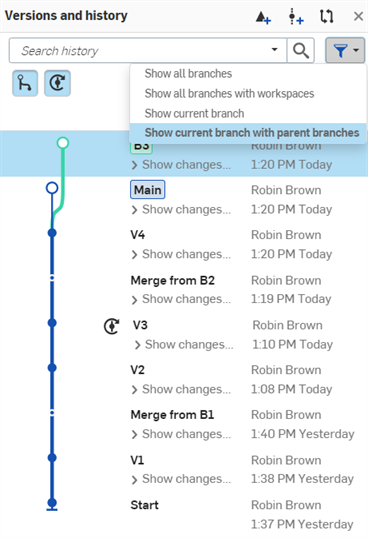
The Filter branches button changes which branches are displayed in your version graph.
To filter branches:
- Open the Versions and history panel.
- Click the Filter branches button.
- Select a filter option:
- Show all branches - Display all branches in the Version graph. Default view.
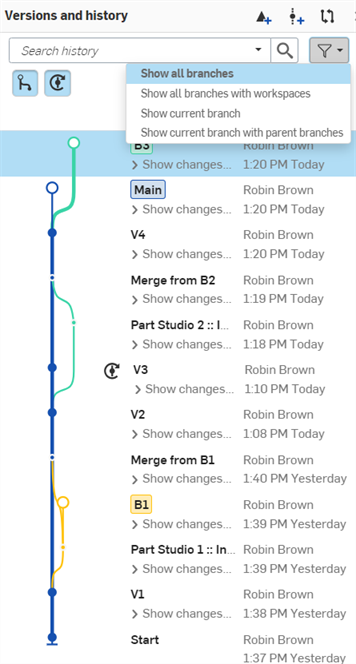
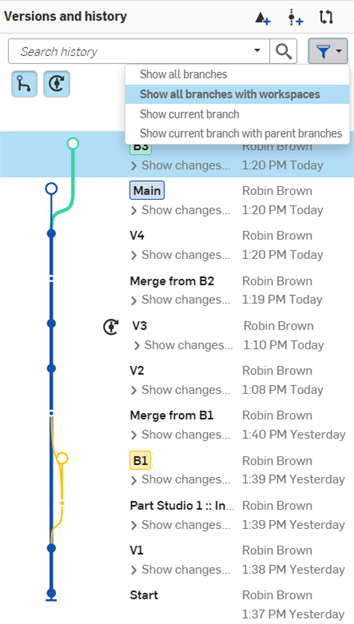
- Show all branches with workspaces - Hide all branches that belong to deleted workspaces. In the image below, you'll see that the bottom green branch (in the image above) has been hidden. This option can be used to clean up large version graphs.
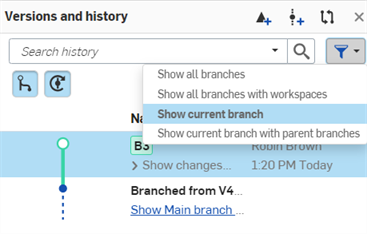
- Show current branch - Display only the current branch.
- Show current branch with parent branches - Display only the current branch and its parent branches.
- Show all branches - Display all branches in the Version graph. Default view.
With the Versions and history panel, you can create versions (which are read-only) and branch a version to create a new workspace.
You can open the Versions and history panel from the Documents page or from within the document:
- From the Documents page - Select the Information panel icon that corresponds with the document for which you want to open the Versions and history panel, then tap Versions.
- From within the document, tap the Versions and history icon
 on the left side of the graphics area.
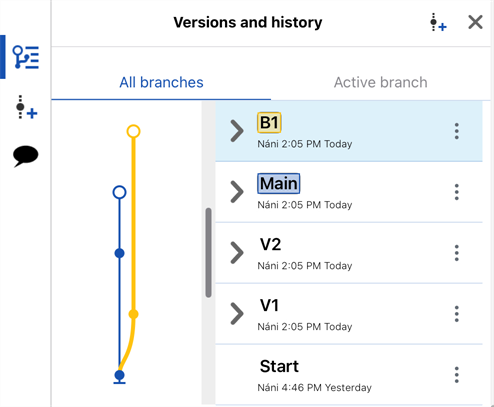
- The Versions and history panel displays the default version graph for a document,
- A Main workspace and a Start version exist by default.
- Tap to switch between viewing All branches and the Active branch (workspace that is active, or open, in the graphics area).
- Tap Create version
 to create a version.
 - Tap the X to close the Versions and history panel.

The graph displays all versions and workspaces of a document, in tree form. The graph is color-coded by branch. Each branch is one color, and every branch ends with a workspace, which are depicted as open dots. Branch names are shown with bold and italic text. Versions are depicted as solid dots, and normal text, and are View-only.
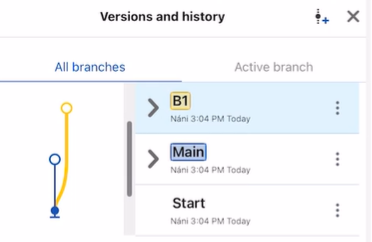
The active branch, which is the currently open workspace, is indicated by a blue highlight. In the image above, branch B1 is the active branch.
- Version
- A named and saved state of the document. Versions are immutable and separate from workspaces. Create a version to capture a workspace at a particular point in time. You can open and branch a version.
Indicated by normal text and a solid dot on the version graph.
- Workspace
- A modeling/design space.
The active workspace is indicated by a blue box to the left of it in the version graph list, and an open dot at the end of the associated branch.
- Branch
- Where the document is split and a new workspace is created. A branch can have zero or more versions, and up to one workspace. You can open and delete a branch.
Indicated by bold and italic text and a dot on the version graph. If the dot is open, the branch has one associated workspace. If the dot is closed, the workspace associated with that branch has been deleted.
To create a version of a document:
- Open the Versions and history panel
 .
. - Tap the workspace or branch from which to create a version to select it.
-
Tap
 .
.
-
Add a name and description for the version, then select
Create version.
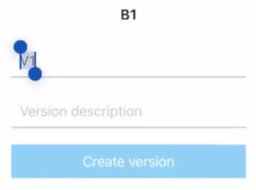
- The newly created version appears in the Versions and history panel.
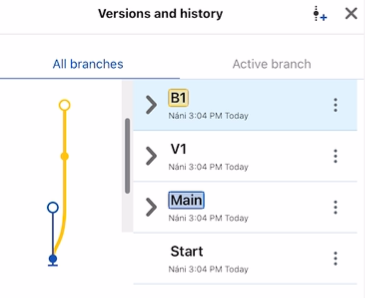
A workspace (branch) is indicated by an open dot.
When you branch from a version, you are creating a new branch that can contain additional versions, as well as a new workspace at the tip (end) of the branch.
- Open the Versions and history panel
 .
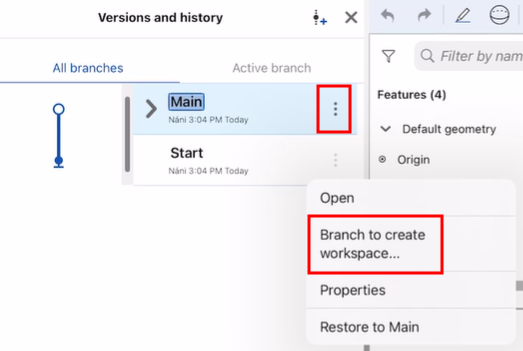
. - Tap the three-dot menu icon next to the version (other than Main) you want to branch from (Start, in the image below), then tap Branch to create workspace.
- Add a name and description for the branch, and then select Create workspace.
- The newly created branch appears in the Versions and history panel.
Onshape keeps a history of all the changes made to every document by every user. This enables you to view those changes in one list in the document history, and also to restore a document to a specific point in history at any time.
When restoring, the workspace you are in is the one being restored. If you wish to restore to another workspace, open that workspace first.
To restore a version to the currently active workspace:
- Open the Versions and history panel
 .
. - Tap the version you wish to restore to.
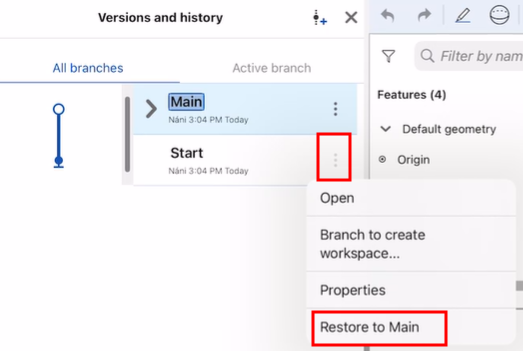
- Tap the three-dot menu icon next to the version you want to restore, then tap Restore to [Target].
For more information about restoring versions, see Document Management.
With the Versions and history panel, you can create versions (which are read-only) and branch a version to create a new workspace.
You can open the Versions and history panel from the Documents page or from within the document:
- From the Documents page:
Select the Information panel icon that corresponds with the document for which you want to open the Versions and history panel. From here tap Versions.
- From within the document:
Tap the Versions and history icon
 on the left side of the graphics area.
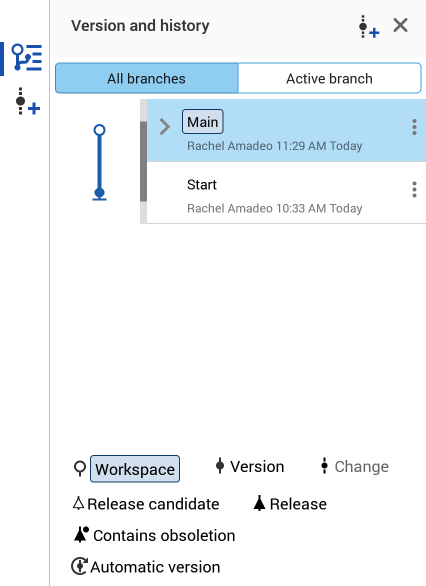
- The Versions and history panel displays the default version graph for a document. There is a Main workspace and a Start version by default.
- There are two icons in the upper right of the Versions and history panel:
![]() - Create a version
- Create a version
![]() - Close Versions and history panel
- Close Versions and history panel
- Tap the labels at the top of the panel to switch between viewing All branches and the Active branch (the workspace that is currently open in the graphics area):
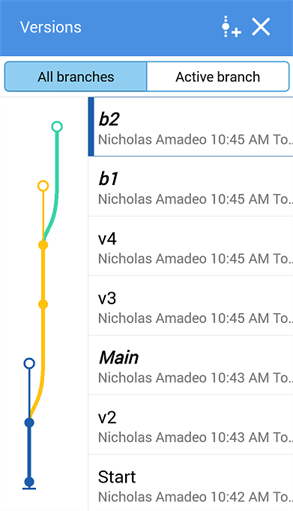
The graph displays all versions and workspaces of a document in tree form. The graph is color-coded by branch. Each branch is one color, and branch names are shown with outlined, color-coded text. The workspace associated with a branch is displayed as an open dot. Versions are depicted as solid dots (and normal text) and are View only.
The active branch, which is the currently open workspace, is indicated by a blue box around the title. For example, in the image above, B2 is the active branch name.
- Version
- A named and saved state of the document. Versions are immutable and separate from workspaces. Create a version to capture a workspace at a particular point in time. You can open and branch a version.
Indicated by normal text and a solid dot on the version graph.
- Workspace
- A modeling/design space.
The active workspace is indicated by a blue box to the left of it in the version graph list, and an open dot at the end of the associated branch.
- Branch
- Where the document is split and a new workspace is created. A branch can have zero or more versions, and up to one workspace. You can open and delete a branch.
Indicated by bold and italic text and a dot on the version graph. If the dot is open, the branch has one associated workspace. If the dot is closed, the workspace associated with that branch has been deleted.
To create a version of the current active document:
- On the left side of the graphics area, tap the Create version icon
 .
. - Enter the name (and optionally, description) of the new version and tap Create.
To create a version from another workspace or branch:
- Tap the Versions and history icon
 to open the Versions and history panel.
 - Tap the workspace (or branch) from which to create a version to open that workspace.
-
Tap the Create version icon
 at the top of the panel.
A workspace (branch) is indicated by an open dot.
- Add a name and description for the version, then tap Create.
- The newly created version appears in the Versions and history panel.
Tap the three dot menu next to a version to see options such as Properties, Open, and Branch to create workspace.
When you branch from a version, you are creating a new branch that can contain additional versions, as well as a new workspace at the tip (end) of the branch.
- Tap the Versions and history icon
 to open the Versions and history panel.
 - Tap to select the version from which to create a branch.
- Tap the three dot menu next to the version, then tap Branch to create workspace.
- Add a name and description for the branch, and then tapCreate.
- The newly created branch appears in the Versions and history panel.
Onshape keeps a history of all the changes made to every document by every user. This enables you to view those changes in one list in the document history, and also to restore a document to a specific point in history at any time.
When restoring, the workspace you are in is the one being restored. If you wish to restore to another workspace, open that workspace first.
To restore a version to the currently active workspace:
- Open the Versions and history panel.
- Tap the version you wish to restore.
- Tap the three dot menu next to the version and tap Restore to Main.
For more information about restoring versions, see Document Management.
For additional Learning center resources, follow the self-paced courses here: Branching and Merging (Onshape account required) and Document History and Versions (Onshape account required). You can also follow the learning pathway course here: Onshape Fundamentals: Data Management (Onshape account required) and the technical briefing articles here: Understanding and Working with a Document’s Historical Data (Onshape account required) and Gitflow Version Management (Onshape account required).