![]()
![]()
Onshape provides a mechanism for merging changes from a document version or workspace (referred to as the Source) into your currently active document workspace (referred to as the Target).
When you merge a selected Source (workspace or version) into the currently active Target (workspace), you can (1) Replace all changes from the Target with the Source, (2) Merge all changes from the Source into the Target, or (3) Keep all changes from the Target. In addition, you can specify how each individual tab in the workspace is merged, using these same 3 merge strategies.
You cannot select individual changes within a tab. All changes from each tab must be either kept, merged, or replaced.
Onshape’s branching feature enables the creation of new workspaces for design experimentation without impacting other workspaces. Changes can be easily copied from one branch to another using Merge.
This document has two workspaces: the original design in the Main workspace and another workspace named Square Base. The team wants to move forward with the Square Base. With the Main workspace active, right-click on the Square Base workspace and select Merge into current workspace.
The Merge dialog is sorted into two sections: tabs with changes and tabs without changes. At the top, you can select an overall merge strategy for changes. Below the Keep and Replace options, there is a link to Compare with base. This compares that branch with the state the document was in at the branch point.
Keep retains the target workspace tab, leaving it in its current condition. This means no changes are made to that tab on the Main branch during this merge.
Merge combines changes from both branches. This option is only available for Part Studios and assemblies, and only if both branches contain changes for a specific tab. It is not available for drawings or other tab types. In Part Studios, changes include creating, modifying, or deleting features, configuration inputs, materials, or appearances. In assemblies, changes include modifying, adding, or removing components, mate connectors, or configurations. It is important to use this option carefully, as changes from different branches can be incompatible, causing errors.
Replace updates the target with the source. If any changes exist in the target branch, they are completely overwritten. Next to each changed tab, you can override the overall strategy with one specific to the tab. Any tab with a differing merge strategy is indicated with yellow.
Choose the overall merge strategy of Replace. This replaces the original base with the square one in the Main branch. Click the Show or Hide merges icon to toggle the visibility of merge lines.
When activated, the graph depicts each merge operation visually. Merge lines connect each merge from its source to its target, clearly showing how changes are combined and propagated throughout the document’s history. If the changes to the design are unexpected or not desired, you can always undo the merge by restoring the workspace to the last action before the merge.
This example showed a merge between two workspaces, but you can also merge a version from another branch into the current workspace using the same process.
-
Open the Versions and history panel:

-
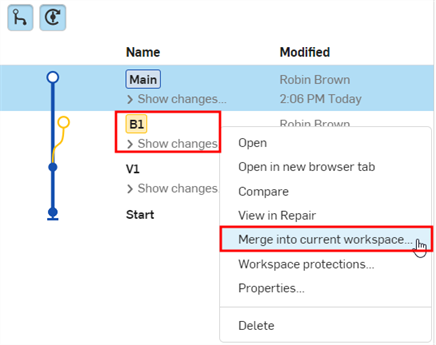
The currently active workspace is highlighted dark blue (this is referred to as the Target; Main in the image below). To merge another workspace or version (the Source; B1 in the image below) into the Target, right click on the Source and select Merge into current workspace:
-
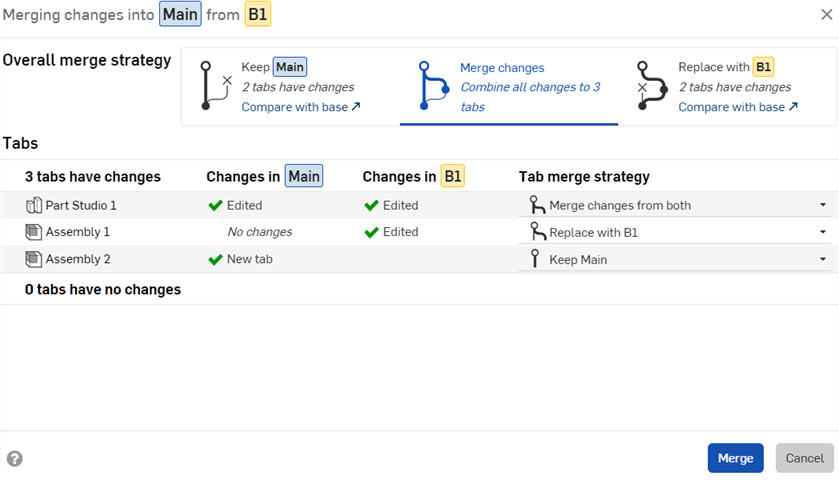
The merge dialog opens, showing changes made since the Source and Target branches diverged:
-
Optionally, select the Overall merge strategy:
-
Keep [Target] - Changes in the Target are kept.
-
Merge changes - This is the default. Changes in both the Source and Target are merged.
When merging changes, the base of the merge is either the change at which the branches diverged (for example, the version where the branch was created), or, if it exists, the last point where the same Source branch was previously merged into this Target (provided that merge was not reverted).
-
Replace with [Source] - Changes in the Source will replace changes in the Target.
-
-
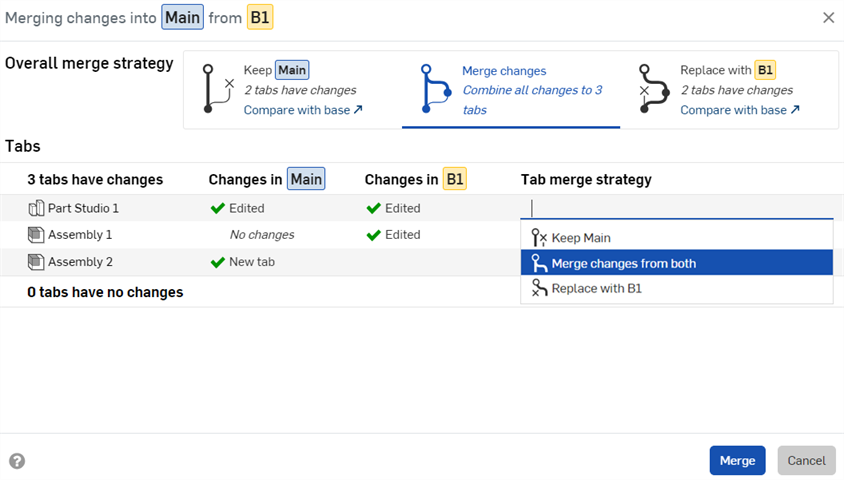
Optionally, select a merge strategy for each tab to override the Overall merge strategy. The merge strategy options are the same as the Overall merge strategy, except where a tab is created or deleted, or for tab types that do not support the Merge changes from both option (see the first tip below). In these instances, you can only elect to (1) Keep [Target] or (2) Replace with [Source]:
-
A change with a green checkmark icon
 indicates edits to the tab in that workspace are kept in the Target workspace after the merge.
-
A change with a red x icon
 indicates discarded edits (deleted features, for example) in the workspace tab are kept in the Target workspace after the merge.
-
A change denoted with an exclamation mark icon
 indicates the tab will not exist in the Target workspace after the merge.
-
An information icon
 indicates that for this tab type, changes from separate branches cannot be merged (a drawing, for example). You must select either the Target (Keep [Target]) or Source (Replace with [Source]). See
Tabs where changes from separate branches cannot be merged.
-
-
Click Merge. In the Versions and history graph, the merge lines show that branch B1 has been merged into the Main branch.
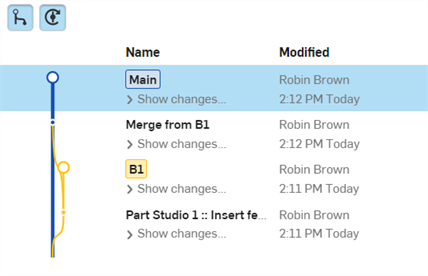
All merges are displayed explicitly in the Versions and history graph, which updates automatically as changes are made to the document.
Showing and hiding merge lines
To make the Versions and history graph easier to visualize, toggle the Show/Hide merges and Show/Hide automatic versions buttons as needed:
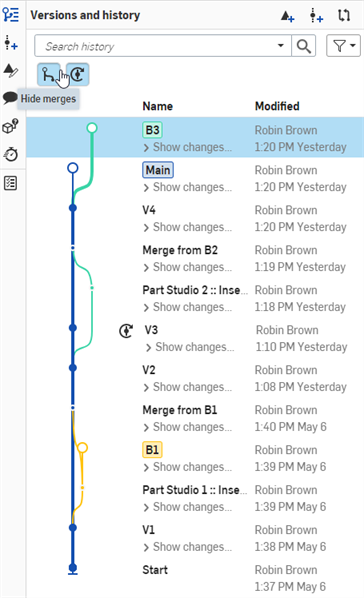
A Versions and history graph with merge lines and automatic versions shown on the Onshape browser application (above).
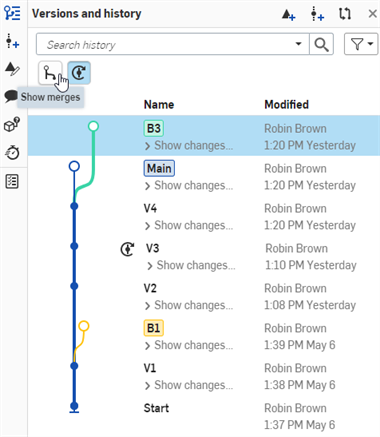
A Versions and history graph with merges hidden on the Onshape browser application (above).
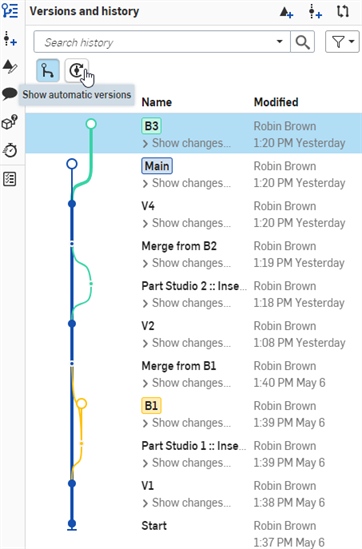
A Versions and history graph with automatic versions hidden on the Onshape browser application (above).
Merge lines example
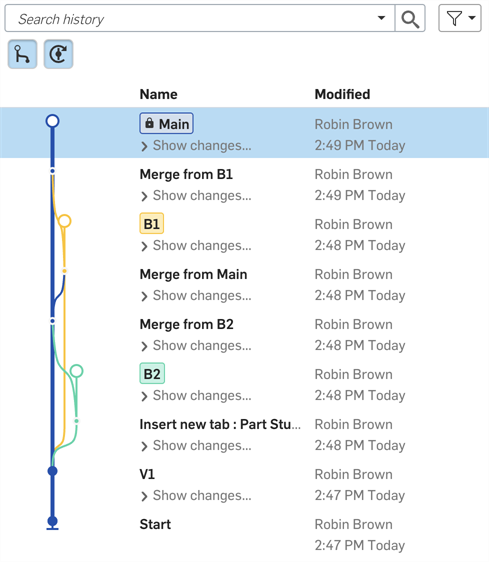
The example below shows a complex Versions and history graph with several branches. Each branch was created from the Main workspace, and then individual work was done on each branch. As work on each branch was completed, the branches were merged back into Main. The flow of lines to and from the Main branch shows the merging workflow, making it easy to see which changes were merged when.
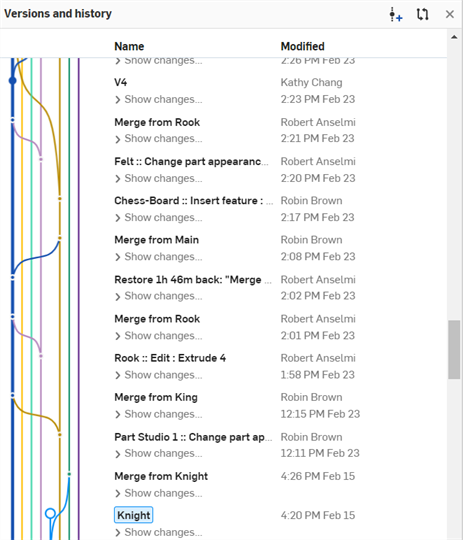
A Versions and history graph with several branches shown on the Onshape browser application (above).
When selecting tabs to merge, the Merge changes from both option is available for all tab types except Drawings and PCB Studios. When working with Drawings and PCB Studios, it is recommended you work in one workspace (branch) and merge from that branch into other branches. Working on two or more branches simultaneously may result in lost changes when you merge from one branch to another.
For example:
-
Create a drawing (Drawing 1) in the Main (Target) and insert a part.
-
Create a version (V1), and then a Branch from this version (B1; the Source).
-
In the B1 workspace, add a dimension to one side of the part in the Drawing 1 tab.
-
In the Main workspace, and add a dimension to a different side of the same part in the same Drawing 1 tab.
-
Merge changes into the Main (Target) workspace from the B1 (Source) workspace.
-
In the merge dialog, selecting the Tab merge strategy for the Drawing 1 tab prompts you to select one of the following:
-
Keep Main - This keeps the Drawing 1 tab from the Main workspace. The dimension added in the Main workspace is retained and the dimension added in B1 is overwritten.
-
Replace with B1 - This Replaces the Main workspace Drawing 1 tab with the B1 workspace drawing 1 tab. The dimension added in the Main workspace is overwritten, replaced with the dimension added in B1.
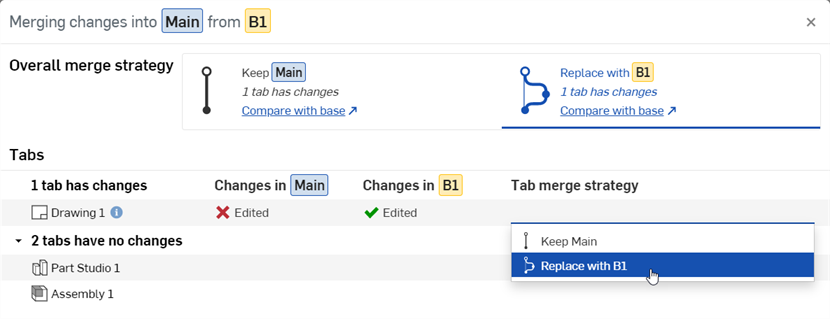
In both scenarios above, one dimension is retained and the other is overwritten. To avoid this situation, do all your work for the Drawing 1 tab in only one workspace (Main, for example). Then select Keep Main when merging B1 into Main. In this way, all changes on the Drawing 1 tab are retained.
If the target and source branches are the same, and all tabs use a Keep merge strategy, no updates are needed. The Merge button will be unavailable.
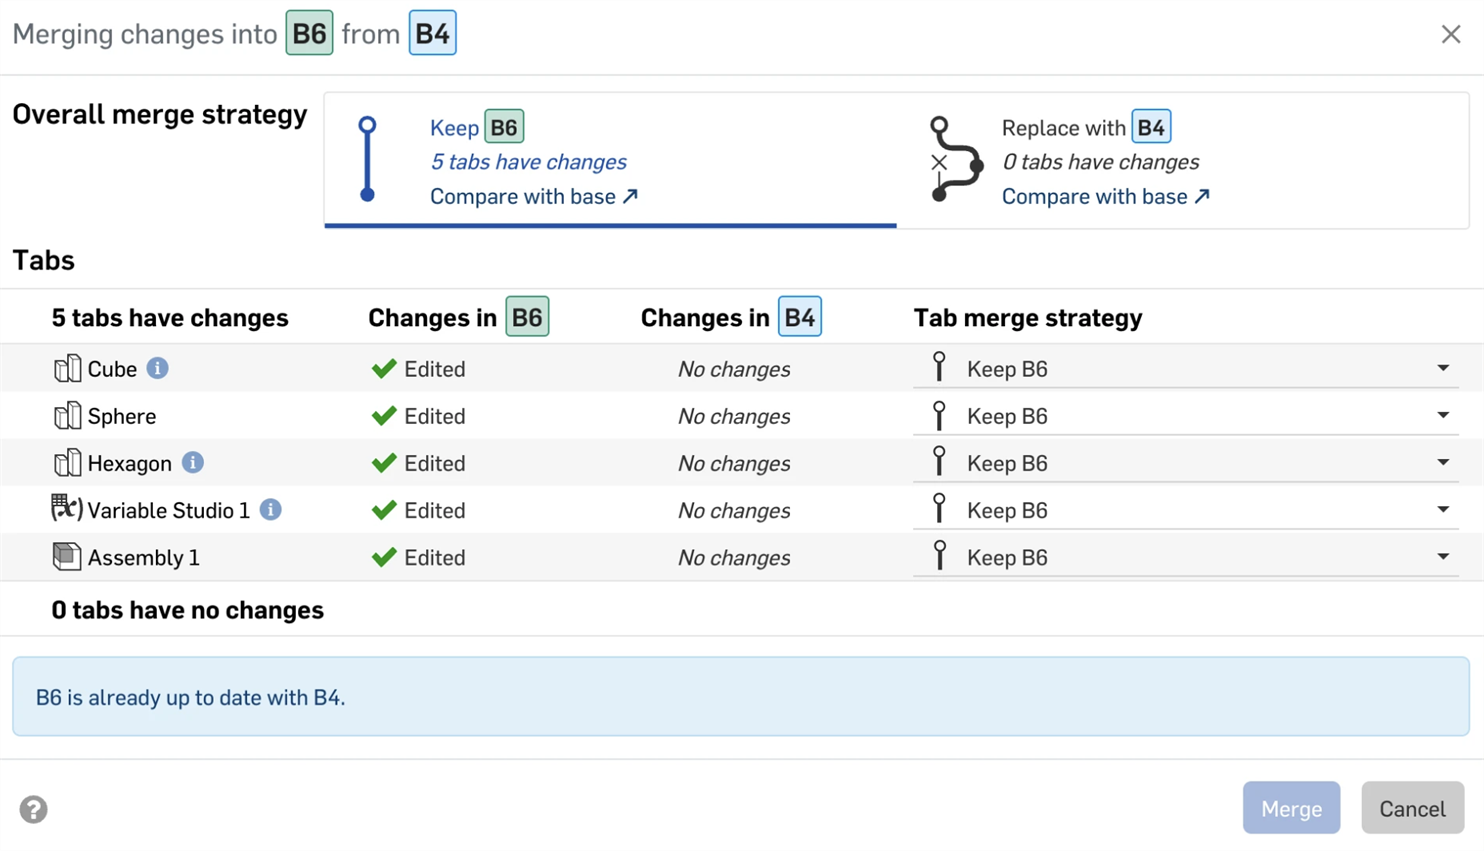
-
To replace the target branch with the source branch, change the Tab merge strategy to Replace.
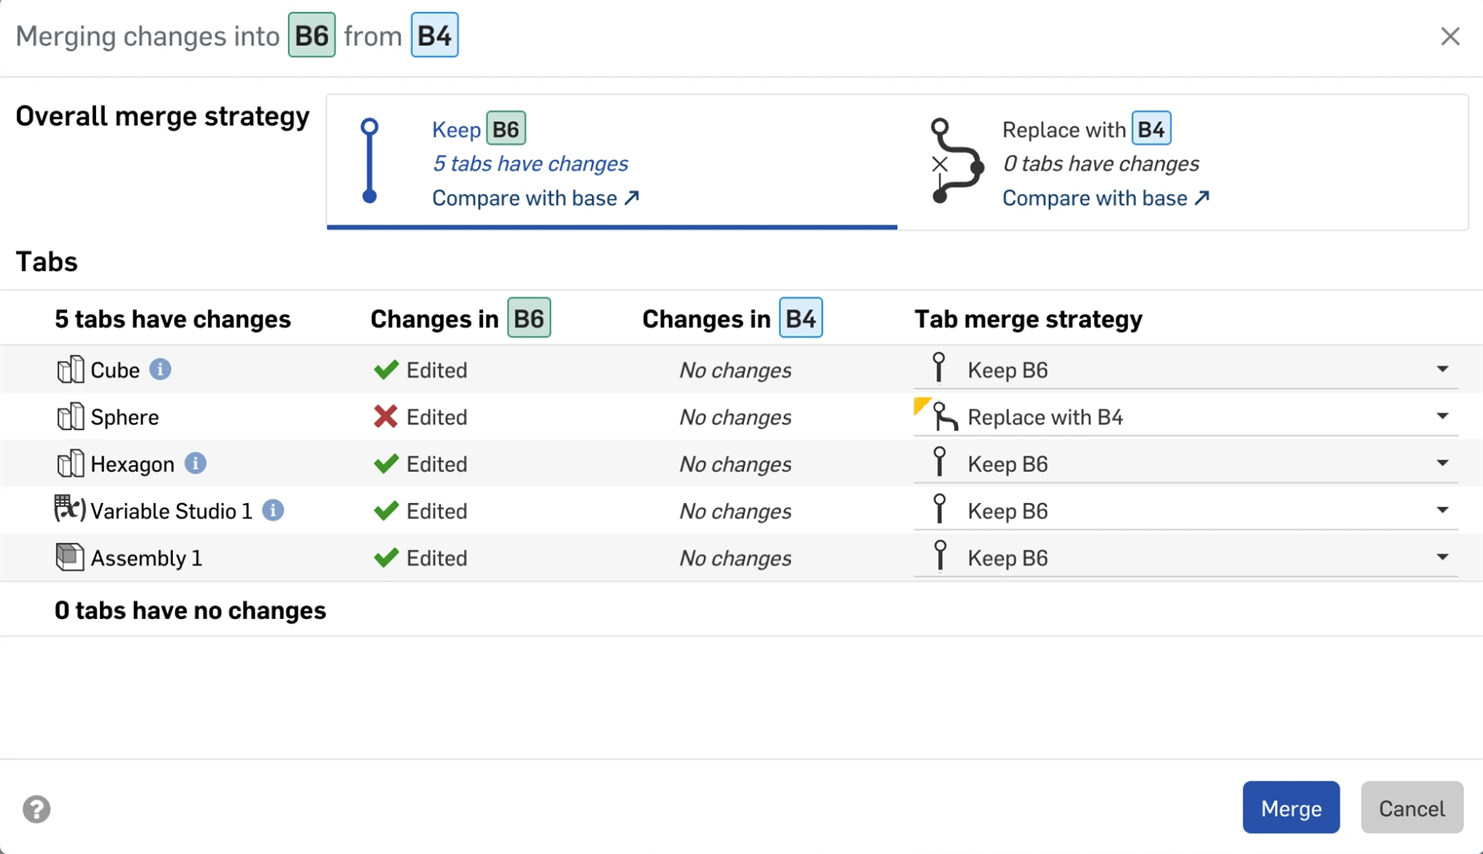
-
Click Merge.
When working with protected branches, the working branch must be kept up-to-date with the protected branch before a merge can occur. If the Merge button in the Merge dialog is disabled and you see the Workspace protections are enabled warning:
- Close the Merge dialog to return to the document.
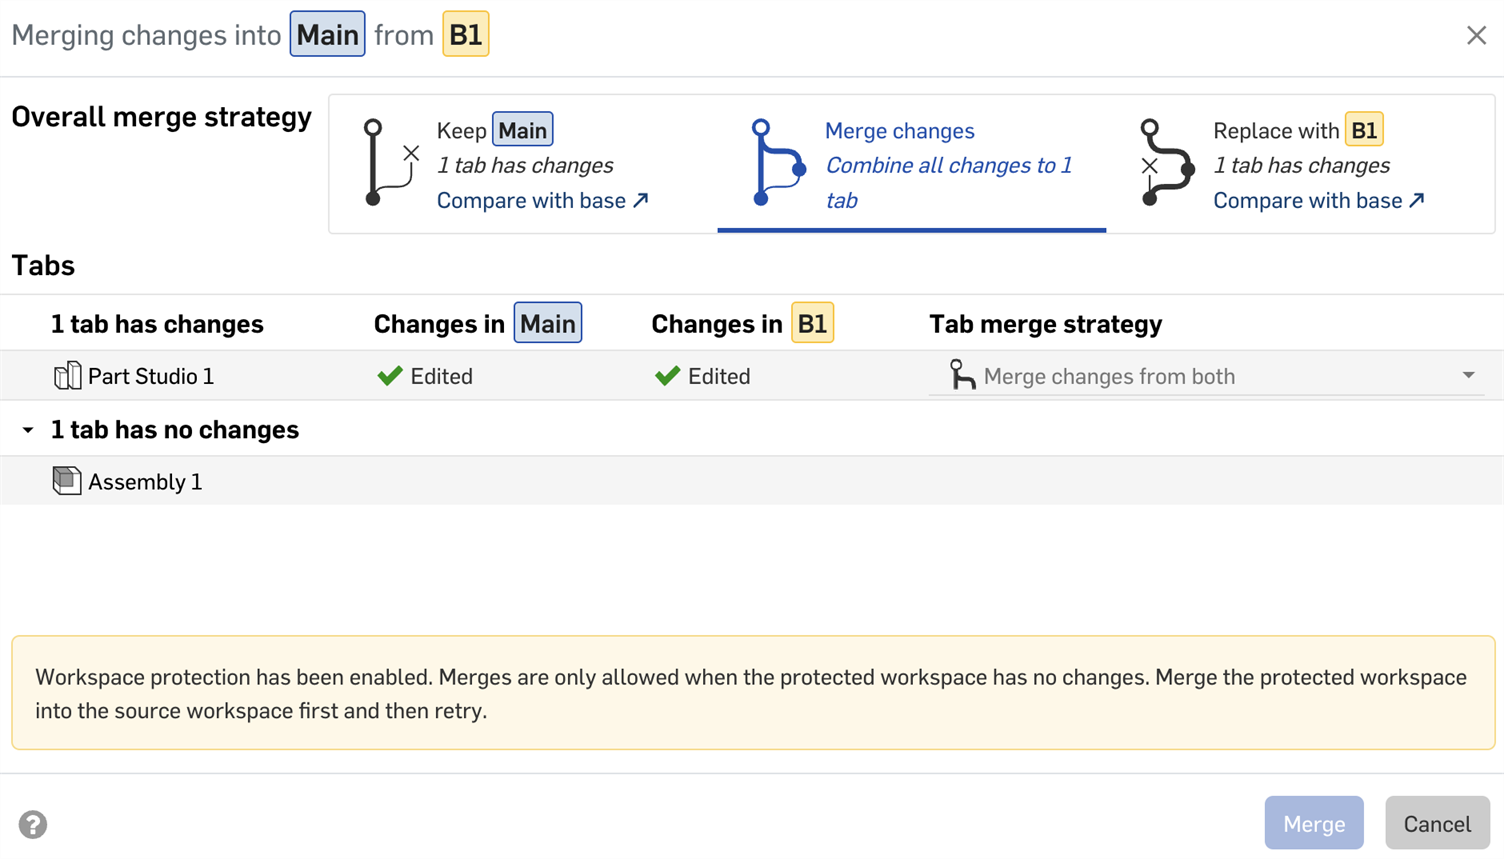
- Select the working branch in the Versions and history graph.
- With the working branch selected, right-click the protected branch and select Merge into current workspace from the context menu.
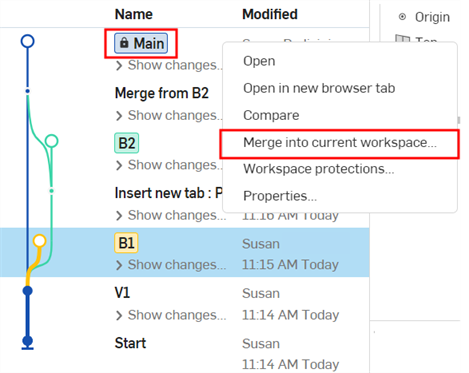
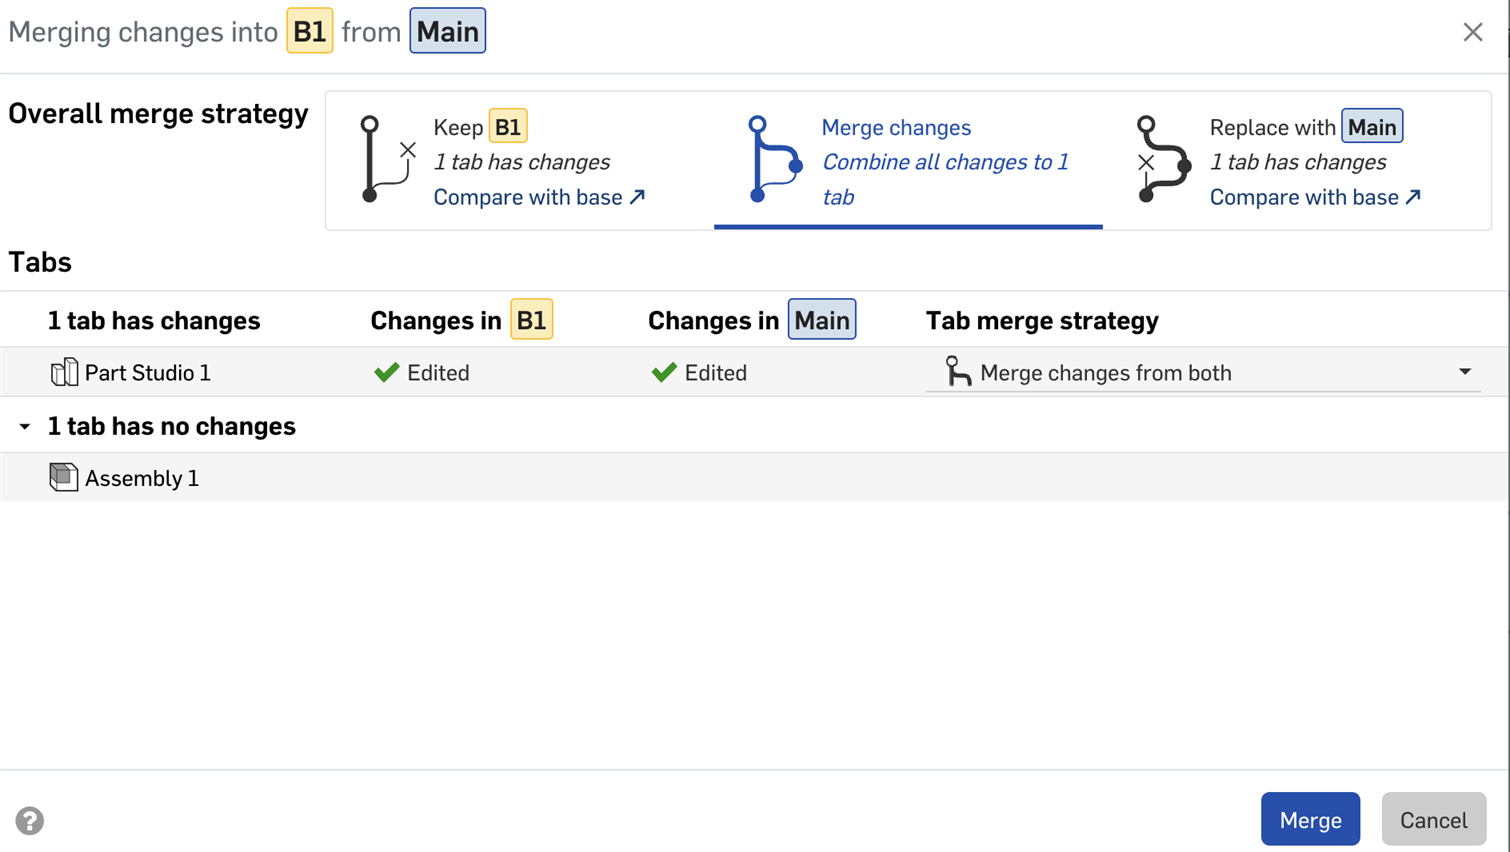
- In the Merge dialog, confirm that you are merging the protected branch into the working branch, then click Merge. The working branch is updated with the changes from the protected branch.
- In the Versions and history graph, select the protected branch.
- With the protected branch selected, right-click the working branch and select Merge into current workspace.
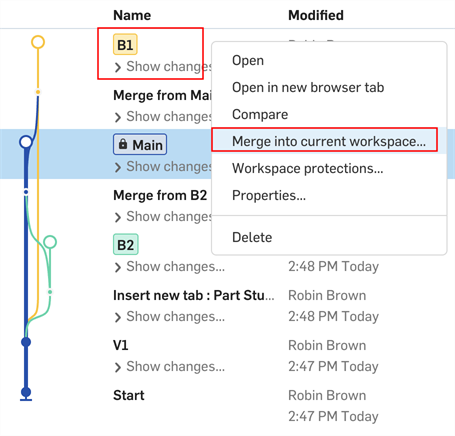
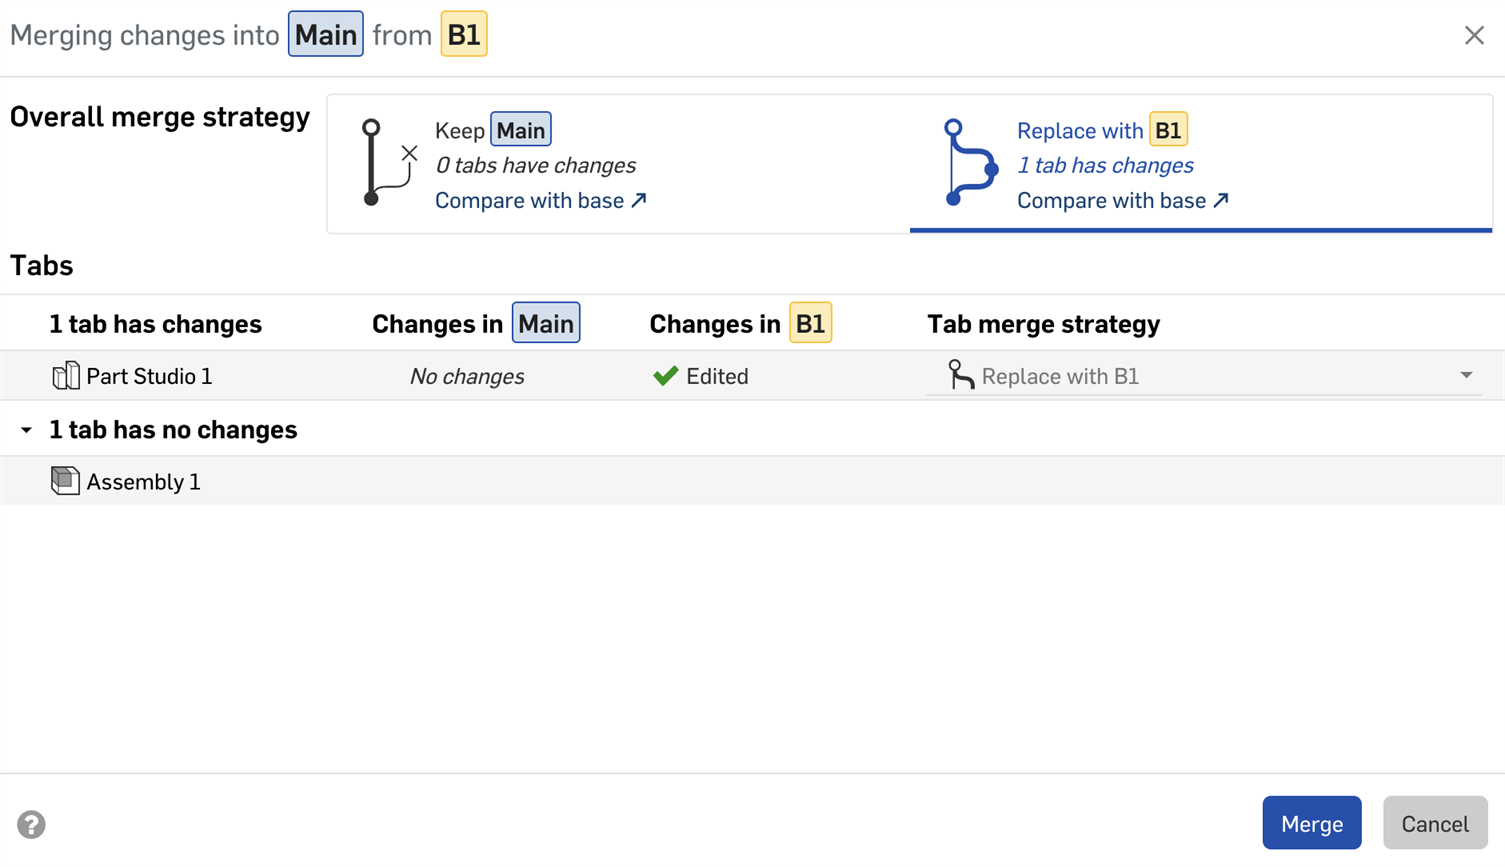
- You should now be able to merge your changes into the protected branch.
Branches with outdated versions of FeatureScript cannot be merged. If one or more branches uses an old version of FeatureScript, you will see a warning message about this version mismatch in the Merge dialog.
-
Click the Update FeatureScript icon
 to update the FeatureScript versions in both the target and source branches to the latest.
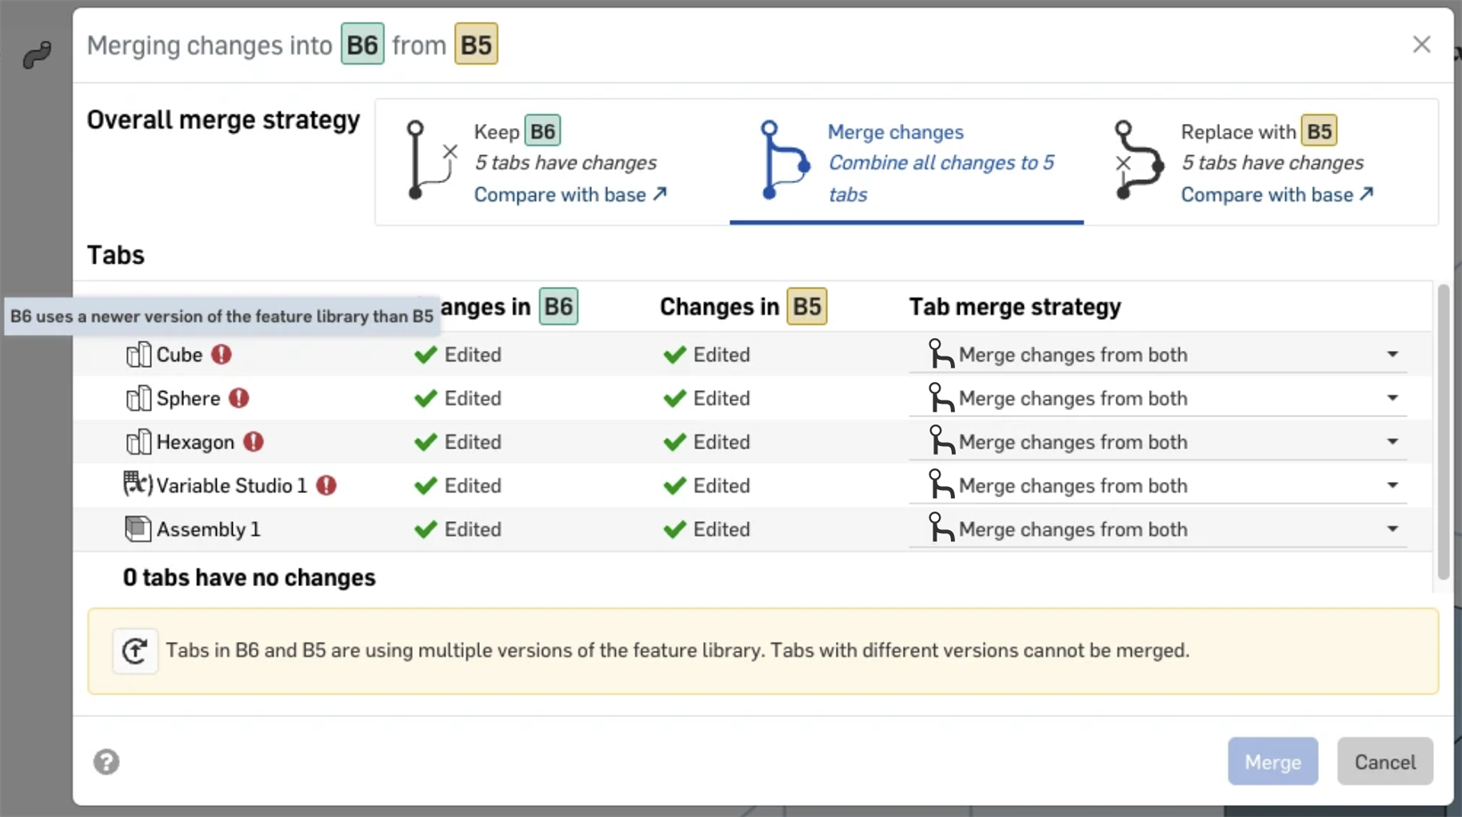
- Click Update now in the window that opens to complete the update.
- Click Merge.
Branches cannot be merged if the document is in use. If another user has the document open, or if you have the document open in multiple browser windows or tabs, you will see an error that lists the users and number of open instances.
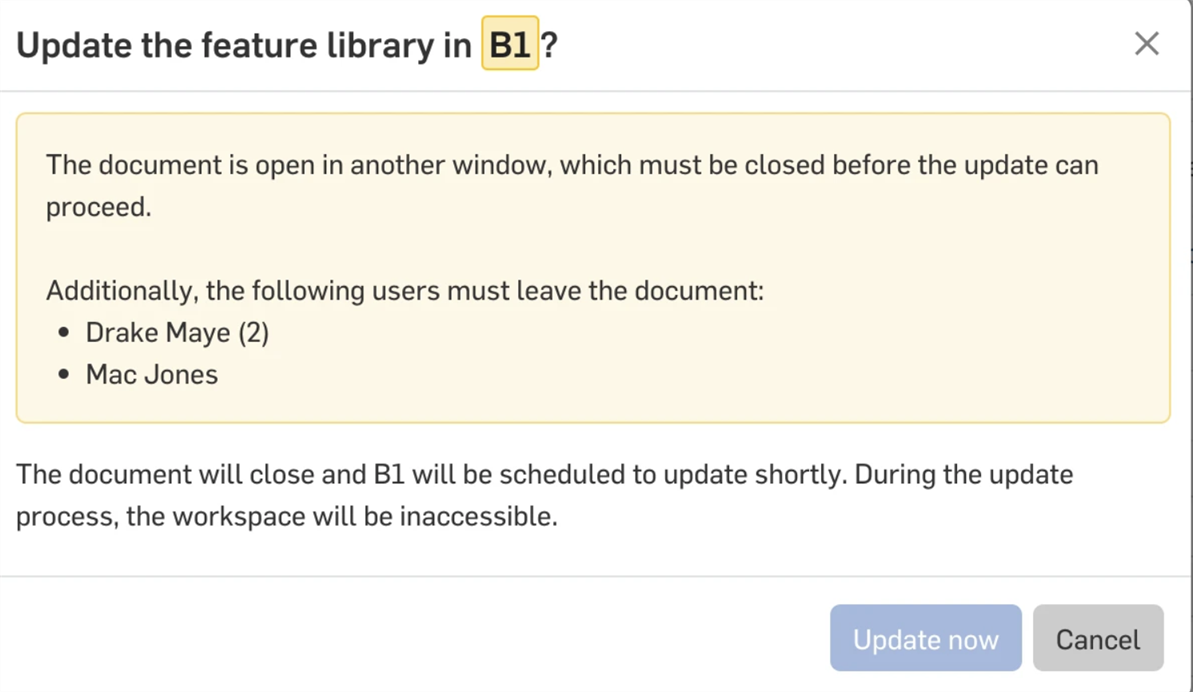
- Ensure that you and other users have closed out of the document.
- The dialog will automatically refresh, and you can click Update now.
- If Onshape is unable to verify that the document is not in use (i.e., due to network connectivity issues) you will see the warning below:
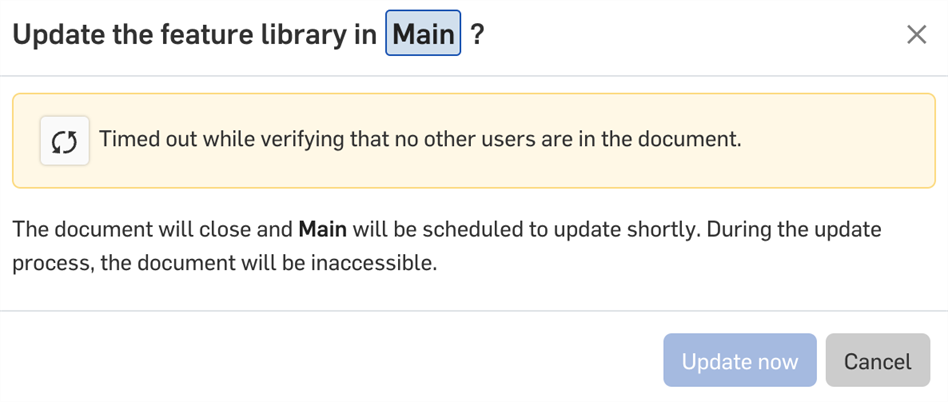
- Click the Retry icon
 in the dialog to attempt verification again.
- If Onshape is unable to verify that the document is not in use (i.e., due to network connectivity issues) you will see the warning below:
- Click Merge.
Merges cannot be completed while updates are still in progress. Try again later after the current update is complete.

-
Since a merge cannot be undone using the
 undo icon, after a merge is performed, a message opens where you can click a link to revert the merge. This message persists when switching tabs, workspaces, and comparing between workspaces, so you can inspect the results of the merge. Press the
 close icon to accept the merge and exit the message:

If you or another user makes a change to the document after you merge the document, and then you revert the merge, that change is lost.
-
If there are no changes that require a merge between the Source and Target, the only options in the merge dialog are (1) Keep [Target] or (2) Replace with [Source]. Replace with [Source] is the default selection:
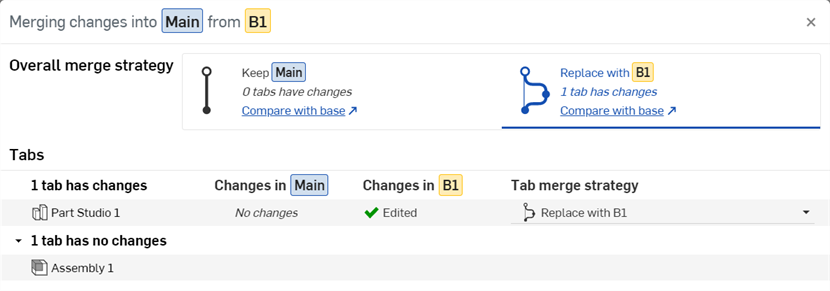
-
Click the Compare with base link in the merge dialog to open a new browser tab where both Source and Target are compared. See Comparing for more information.
-
To merge one or more tabs' changes without changing anything else in the current workspace, select Keep [Target] for the Overall merge strategy, and select Replace with [Source] or Merge changes from both (for each tab), depending on your specification.
-
Tabs in the merge dialog are ordered by those that have changes at the top, and those that have no changes at the bottom. Each section is then ordered top-to-bottom according to their left-to-right location in the tab bar, with the Target branch first, and the Source branch second. Folders are not displayed.
When you merge a selected Source (workspace or version) into the currently active Target (workspace), all changes made in the Source are merged into the Target, including any additional features, tabs, etc.
-
Tap the Versions and history icon
 to open the panel:
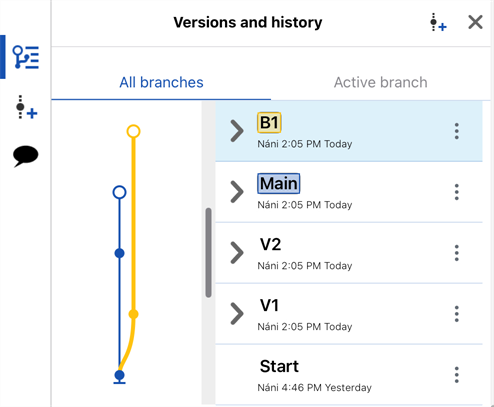
-
Select the target branch (the branch to merge into) in the Versions and history panel.
- With the target branch still selected, tap the three-dot menu to the right of the source branch (the branch to merge), then tap Merge into current workspace.
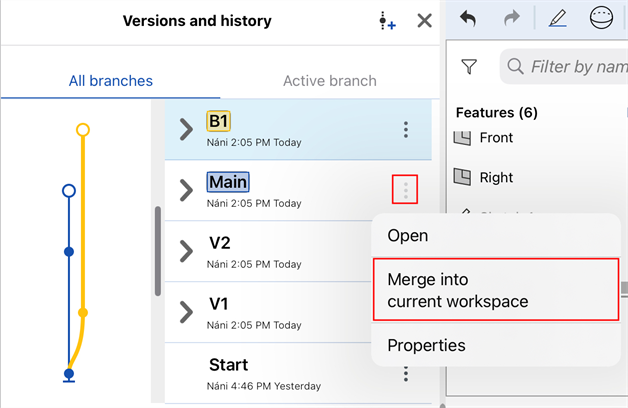
All changes made in the Source are merged into the currently active workspace (Target). This action is recorded in the Versions and history panel entries and you can restore from a previous record to reverse the merge action, if necessary. For more information about restoring versions, see Document Management.
When merging workspaces containing drawings, images, PDFs or other tabs that are not Part Studios or Assemblies, if changes have been made to the tab in both Source and Target branches, then the changes in the Source branch overwrite the changes in the Target branch. For example, if you update a PDF tab in both branches (Source and Target) and then merge the branches, the PDF in the Source branch will be in the Target branch after the merge.
All merges are displayed explicitly in the Versions and history graph, which updates automatically as changes are made to the document.
Showing and hiding merge lines
To make the Versions and history graph easier to visualize, toggle the Show/Hide merges and Show/Hide automatic versions buttons as needed:

A Versions and history graph with merge lines and automatic versions shown on the Onshape browser application (above).

A Versions and history graph with merges hidden on the Onshape browser application (above).

A Versions and history graph with automatic versions hidden on the Onshape browser application (above).
Merge lines example
The example below shows a complex Versions and history graph with several branches. Each branch was created from the Main workspace, and then individual work was done on each branch. As work on each branch was completed, the branches were merged back into Main. The flow of lines to and from the Main branch shows the merging workflow, making it easy to see which changes were merged when.

A Versions and history graph with several branches shown on the Onshape browser application (above).
When merging workspaces containing drawings (as in a Drawings tab), the drawing that has changes is favored during the merge, and when the drawing has changes in both the Source and Target branches, the Source drawing will be favored, specifically:
- If a drawing in the Source has changes that are not in the drawing in the Target, then the drawing in the Source is copied into the Target, replacing the drawing in the Target. Any changes made in the drawing in the Target that are not in the Source will be overwritten.
- If a drawing in the Source workspace has no changes (compared to the drawing in Target), then the drawing in Target is left unchanged.
We recommend that you work in a drawing in one workspace (branch) and merge from that branch into other branches. Working in a drawing on two or more branches simultaneously may result in lost changes when you merge the drawing from one branch into another.