![]()
![]()
![]()
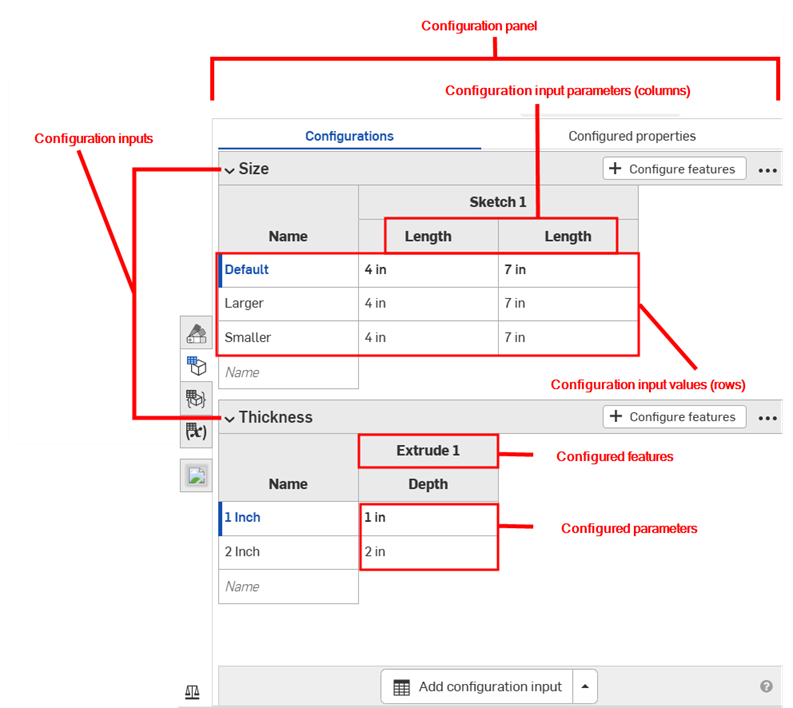
Create part families by creating variations of an entire Part Studio or specific part. You can configure any feature or input value and even part properties, custom part properties, face and part appearance, and sketch text. For example, can configure the depth of an extrude feature, the application of a fillet feature, the faces selected for a fillet, the FeatureScript of a custom feature, and part numbers, colors, and materials.
All of the features and inputs you configure in one Part Studio are referred to as a configuration. Each Part Studio can have one configuration. You can, however, create multiple configuration inputs within one configuration. This is especially helpful when the feature or input values you want to configure are not necessarily related to each other. For example, when the length and diameter of a part are not related to whether a fillet is applied, you can use two configuration inputs. This allows more flexibility and can aid in keeping each configuration input from becoming unnecessarily complicated.
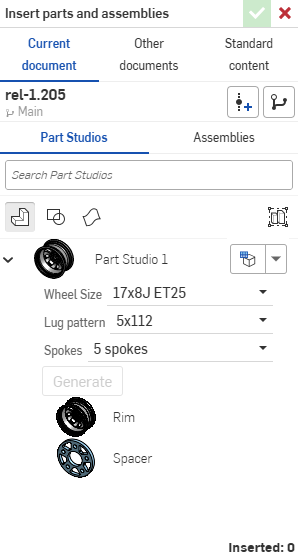
The configuration inputs you define in a Part Studio become options in the Insert dialog when you are inserting parts into an assembly or drawing. For example, you can create configuration inputs for creating different wheel options. When inserting the Part Studio into an assembly, you select an option for each configuration input to specify the overall Part Studio configuration to insert.
Configurations are created only on a browser but can be viewed on iOS and Android. See Using configurations for more details on working with configured parts and Part Studios. See also Assembly Configurations, Variable Studio Configurations, and Release Configurations.
When more than one person is working in the same document, each sees their own selected configuration, except when working in Follow Mode; at that point the follower sees the configuration selected by the leader.
Configurations are created only on a browser (in a Part Studio or an Assembly). Create part families by creating variations of an entire Part Studio or specific part. You are able to configure any feature or parameter value and even part properties, custom part properties, face and part appearance, and sketch text. For example, you are able to configure the depth of an extrude feature, the application of a fillet feature, the faces selected for a fillet, the FeatureScript of a custom feature, and part numbers, colors, and materials.
All the features and parameters you configure in one Part Studio is a Configuration. Each Part Studio can have one Configuration; however, you can create multiple Configuration inputs within one Configuration.
The Configuration inputs you define in a Part Studio become options in the Insert dialog when you are inserting parts into an Assembly or Drawing.
In this example, two configurations are created: a new sheet thickness configuration, and an alternate flange configuration. With the model in the workspace, click the Configuration icon to open the Configuration panel. Click the Configure Part Studio button. Enter Sheet thickness as the configuration name. Click tab to create a new row, and enter Alternate flange as the second configuration name. Each row is a different configuration.
With the Sheet thickness row selected, click the Configure features button. Double-click the feature that contains the parameter in the Features list. Select the parameter to outline it with a dashed yellow line, in this case the Sheet thickness parameter. A new column for the parameter is created in the table. Double-click the table cell, and provide a new value. Next, select the Alternate flange configuration row and do the same, using the Flange feature, and providing alternate values for the Distance and Bend angle in the table.
To test the inputs with the model, click the dropdown arrow in the Configurations area of the Features list, and select the new configurations to see the results. The model updates, using the new input parameters.
With a model or sketch in the workspace, open the Configuration panel:
- Click the Configuration panel icon (
 ) below the View cube.
-
The Configuration panel opens. Click Configure Part Studio to add an input:
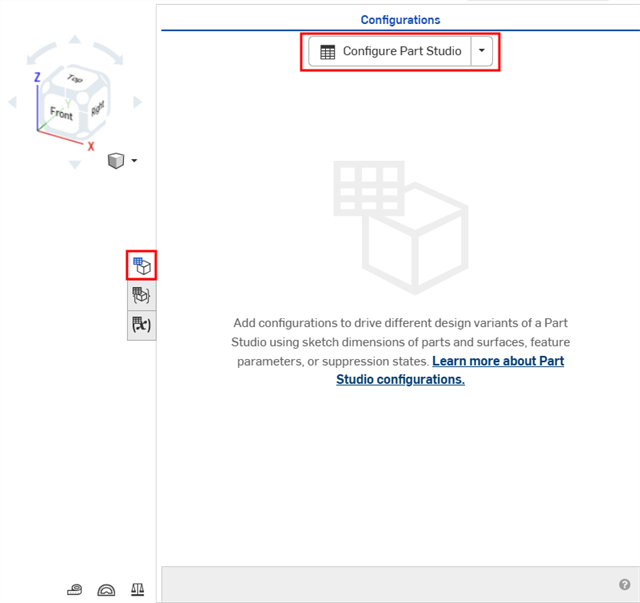
By default, the caret to the left of 'Configuration' is expanded, click the caret when you are done with a section of the panel to collapse that section.
- Click in the first row to activate it, and enter the input value names in the first column. Press Tab to move to the next row. The blue bar to the left of the row indicates the currently selected configuration in the Part Studio.
This example has 3 possible configurations: Short, Medium, and Tall.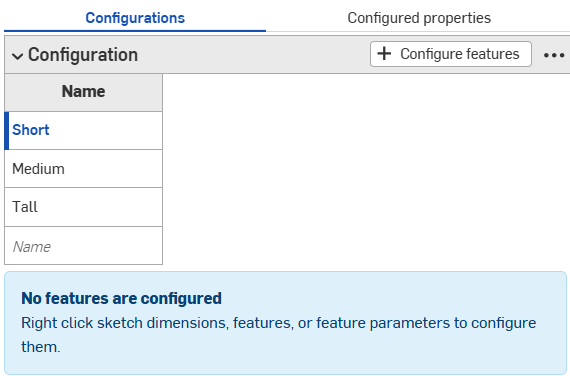
- To configure a feature for the selected input value, click Configure features.
- In the Features list, click the feature to configure and select the parameter. The parameter is outlined with a broken yellow line and a new column is created for that parameter.
For example, click the Extrude feature in the Features list, and select the Depth parameter in the Extrude dialog. The parameter is highlighted in yellow in the dialog, and a new column appears in the table.
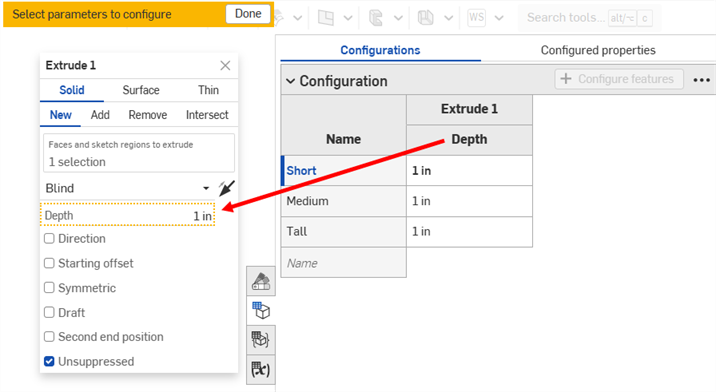
The column name defaults to the feature name (as a top-level heading) plus the parameter name (as the subordinate-level heading), in this case Extrude 1 is the Feature name and Depth is the field name.
Hover over the fields in the feature dialog to see which parameters can be configured. Parameters available for configuration are highlighted in yellow when you hover over them.
- To edit a configured parameter:
- To edit a value, double-click it, and enter the new value.
For this example, set the depths for the 3 input values: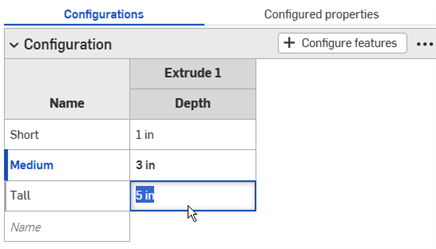
- To edit a selection in a dialog, double-click the configured parameter in the table to open the feature dialog.
The parameter in the feature dialog is highlighted in blue. Remove any unwanted selections, and make the new selections on the model or sketch. Click the green checkmark in the feature dialog to close it.
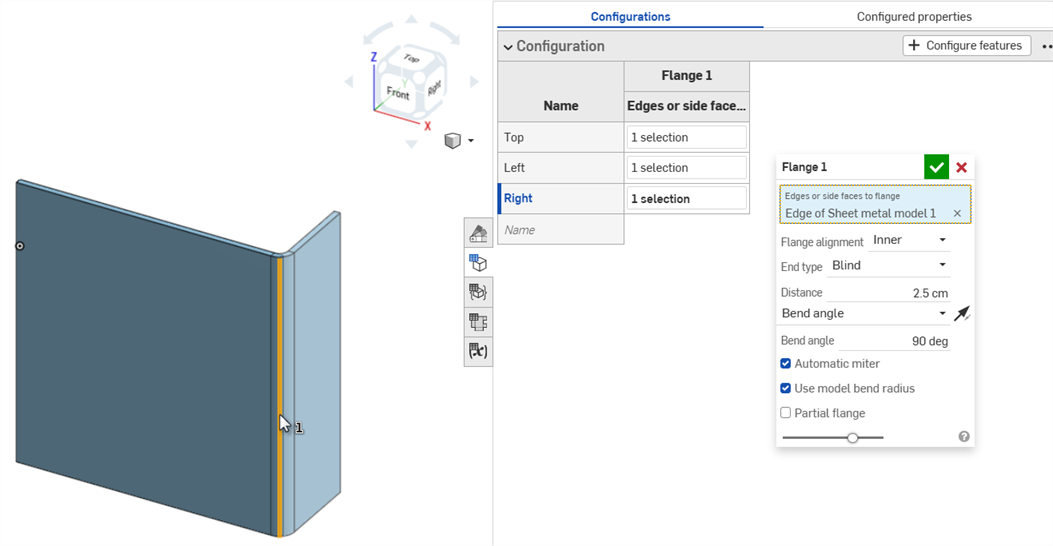
- To edit a value, double-click it, and enter the new value.
- When finished defining the configurations, click the Done button in the yellow banner.
- To add another parameter (column) to the input, repeat Steps 4-7.
- To test the inputs with the model, under
Configurations in the left panel, use the down arrow to select from the menu:
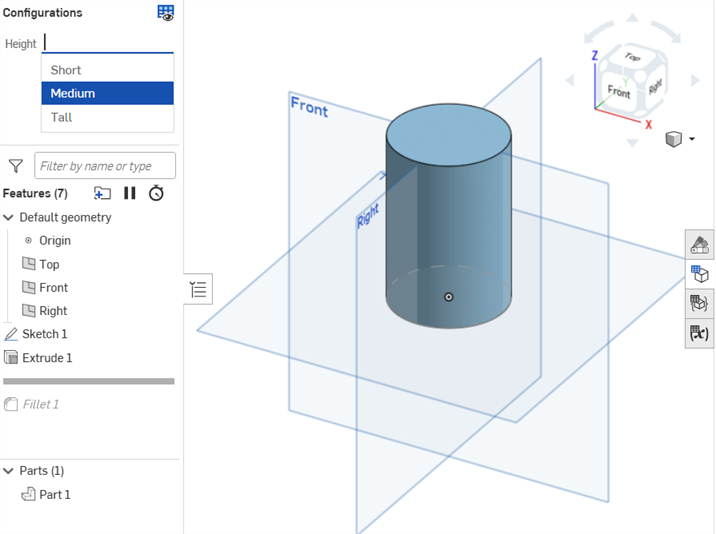
The model should update accordingly. If it does not, check the model for design intent and the configurations definition for accurate selection.
Cross referencing configured features
Hover over a feature in the configured table to see the feature in the model space (as shown below):
A Part Studio configuration can contain one or more configuration inputs. The steps above explain how to create a list type configuration input which results in a list of configuration choices when inserting a part into an assembly or drawing. You can create more than one of these configuration inputs (to keep one input from becoming too complicated or duplicating inputs) and also create different types of inputs. Other types of inputs you can configure are Configuration variable and Checkbox. You can also paste inputs from another Part Studio or Assembly in the current document or an external document.
Once you have a configuration input defined (using the steps above), you can create additional configuration inputs using the
![]() button at the bottom of the Configuration panel:
button at the bottom of the Configuration panel:
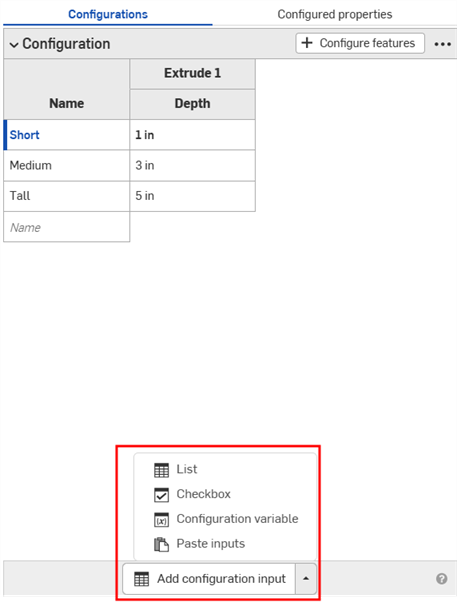
When creating configuration inputs, you can specify the type of input to add:
- List - Creates a list of feature inputs in the Part Studio and presents as a list of selections when inserting the part (or parts) into an Assembly or Drawing. (This type is explained above.)
- Checkbox - Creates a checkbox to turn features on or off, like fillets and chamfers, and suppress or unsuppress features. This type presents a checkbox to check/uncheck during insertion time. Once created, use the +Configure features button to select the associated features.
- Configuration variable - Creates a variable that can be used in any feature and in FeatureScript. Types of variables include: Length, Angle, Integer, Real, and Text. Enter the value of the variable at insertion time.
- Paste inputs - Paste inputs from another Part Studio or Assembly in this document or another document. See Copying and pasting inputs.
When created this way, a List input dialog is displayed. The name you give the configuration input becomes a variable in the system. This is different from the name when created using the basic steps above; that name is not a variable in the system.
- Click the
 arrow and select List . A new input is added to the Configuration panel.
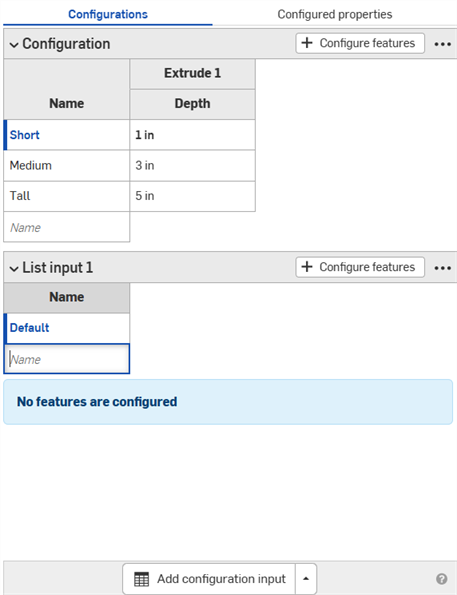
- Configure parameters following the steps provided in the Basic Steps section above.
- Click the
 arrow and select Checkbox.
The Checkbox input dialog opens.
- Enter a name for the input.
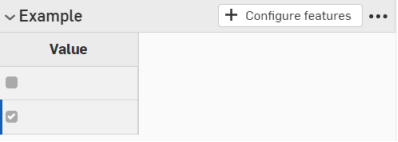
The configuration input has one column with an empty checkbox row and a checked checkbox row:
-
To configure a parameter, click
 .
.
- In the Feature list, click the feature that contains the parameter and select the parameter. The parameter is then outlined with a broken yellow line and a new column is created for that parameter in the table. (Parameters that are configured in another input are outlined with a broken yellow line and are unavailable for configuration.)
In this example, Unsuppressed is selected as a configuration input parameter.
-
Click
 to close the feature dialog.
- In the configuration input, the parameter column has two rows, both with checked check boxes. Uncheck the check box next to the unchecked box in the first column so the table resembles this:
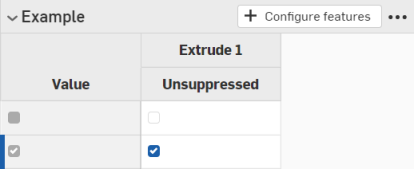
In the Configurations list, above the Feature list, this configuration input presents a checkbox to turn the Extrude on (unsuppressed) or off (suppressed).
-
Click the arrow to the right side of the
 button.
-
Select
 .
.
- Enter a name for the variable input in the Variable input dialog. This becomes an actual variable in the system, referenced as #variableName.
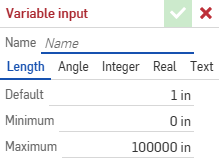
- Select a type for the variable: Length, Angle, Integer, Real, Text. Text can be any type of text that can be used in custom FeatureScript.
- Enter values for the type of variable you selected.
- Click the checkmark to save your definition.
- Apply the variable to a feature:
- Double-click a feature in the Feature list to open it.
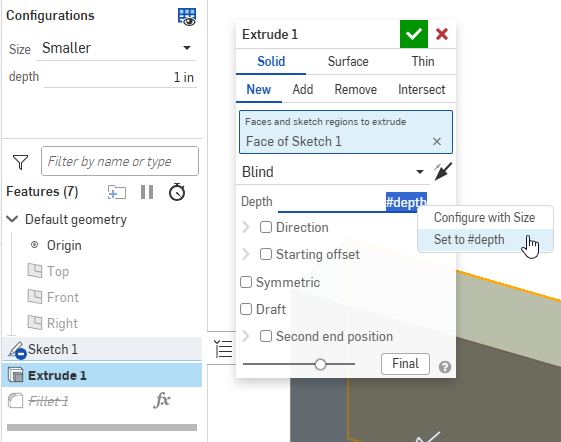
- Right-click the input, and click
Set to #variableName. You can also type the variable name (preceded by #) directly into any expression.
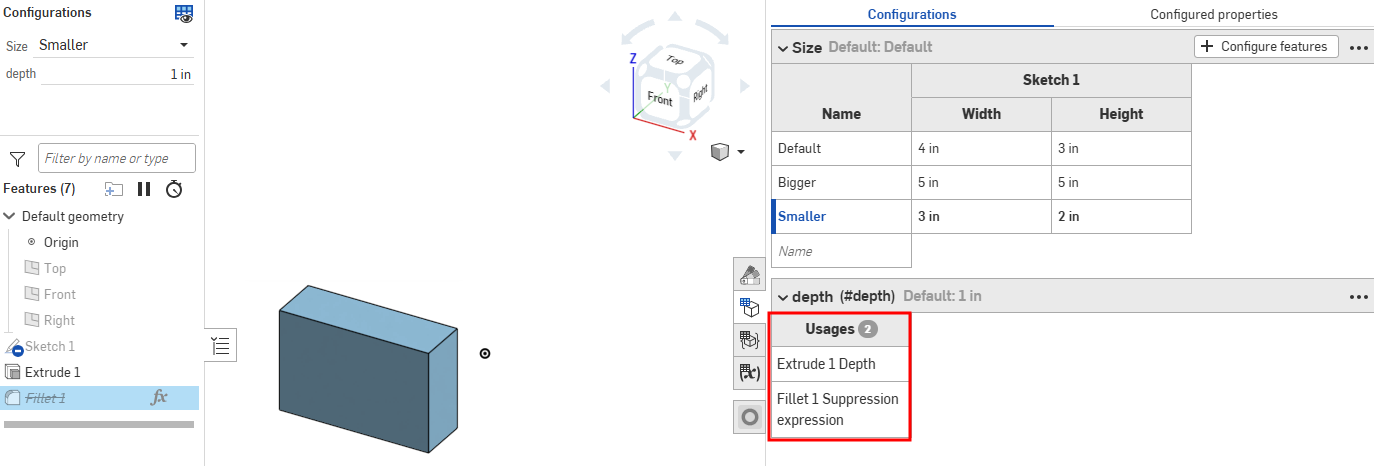
- Close the feature dialog. The variable input's usages are listed in the Configuration panel.
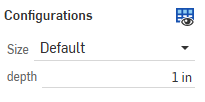
- Test the value by selecting it in the Configurations list above the Feature list on the left side of the page:
Configuration tables and inputs in a Part Studio that is derived from an Assembly mirror are view only, and are referenced from the source Part Studio. These configuration tables and inputs must be edited from their source Part Studio tab.
To rename a configuration input or input parameter (column), hover over the current name to display the I-cursor. Click to select the current text, type the new text, then press Enter.
Renaming configurations
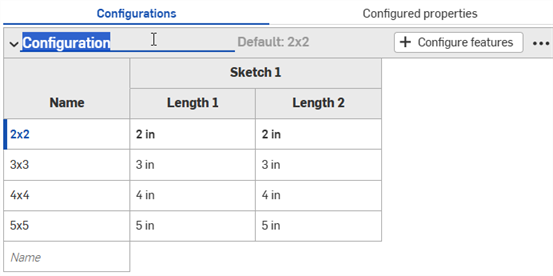
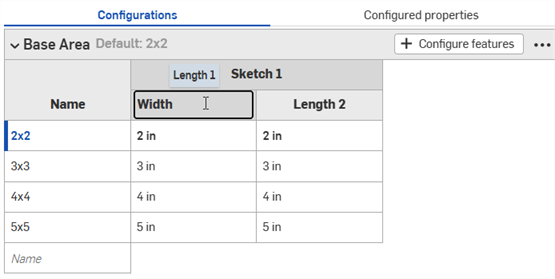
Configuration input parameters (columns) can be renamed for sketch features only.
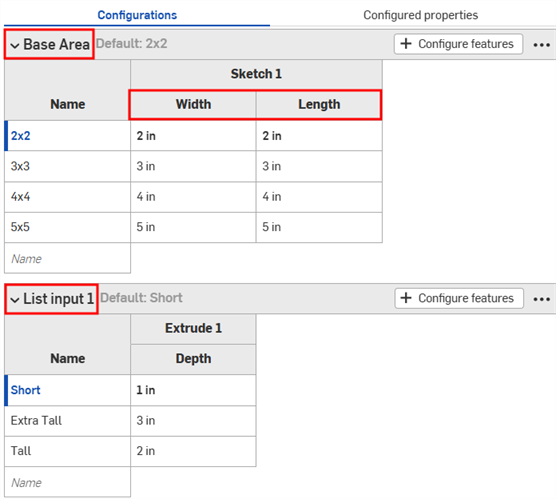
Configuration inputs can also be renamed via the context menu. See the Context menus section below.
Configuration context menus
To make adjustments to a configuration input, click three-dot button
![]() . The options on the context menu will vary depending on if you're configuring a Part Studio, Assembly, or Variable Studio:
. The options on the context menu will vary depending on if you're configuring a Part Studio, Assembly, or Variable Studio:
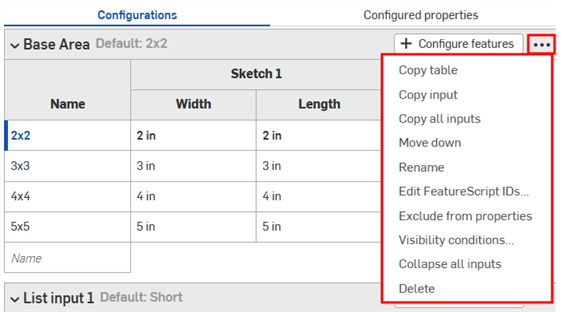
- Copy table - Copy the entire configuration input. You can then paste it into a spreadsheet for record-keeping or editing. You can likewise paste from a spreadsheet back into a configuration input. See the Copying and pasting input values and parameters section on this page.
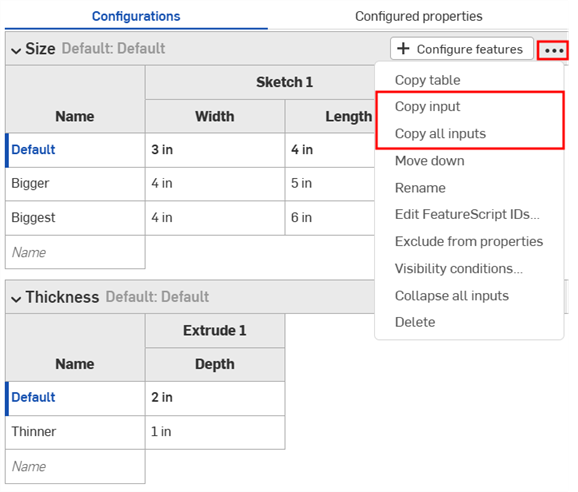
- Copy input - Copy the input and values (rows). You can then paste it into another Part Studio or Assembly's Configuration panel, and add parameters using the Copy table command. See the Copying and pasting inputs section on this page.
- Copy all inputs - Copy all the inputs and values (rows) in the Configuration panel. You can then paste it into another Part Studio or Assembly's Configuration panel, and add parameters using the Copy table command. See the Copying and pasting inputs section on this page.
- Move up/down - Reorder the input in the Configuration panel. You can also click and drag the inputs to reorder them.
- Rename - Rename the configuration input. You can also rename the input as described in the Renaming configurations section above.
- Edit FeatureScript IDs
- (Parts and Part Studios only) This dialog will change the internal FeatureScript identifiers of the configuration input. Click inside the dialog boxes to change IDs. When finished, select Break reference and change IDs in the lower right corner.
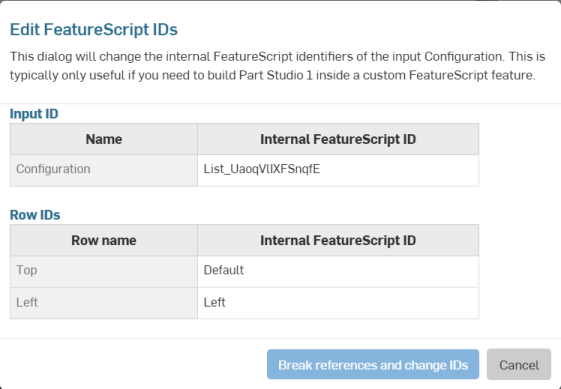
This dialog is typically only useful if you need to build a Part Studio inside a custom FeatureScript feature.
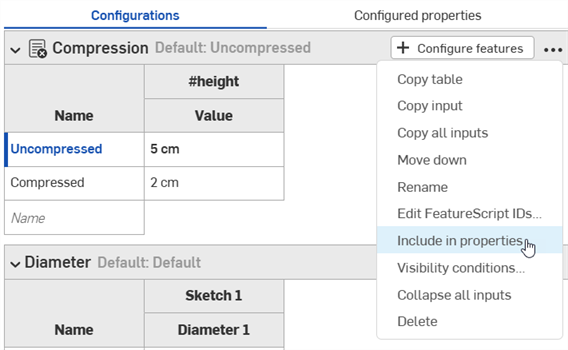
- Exclude from properties - (Parts and Part Studios only). See Configurations: Excluding configurations from affecting properties.
- Collapse/Expand all inputs - Collapse or expand all the configuration inputs in the Configuration panel.
- Visibility conditions - See the Setting visibility conditions section on this page.
- Delete - Select this action to immediately delete the configuration input; no warning is given.
For all tables, use the context menu (right-click) to operate on rows or columns:
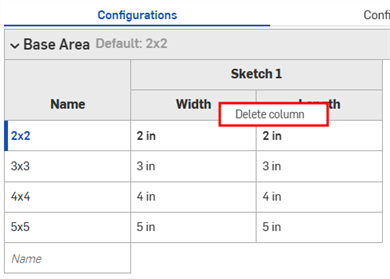
Column context menu
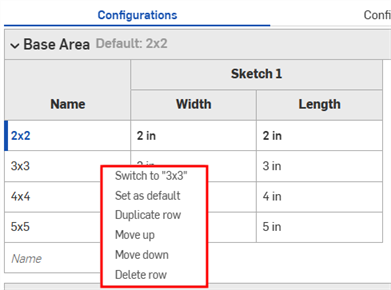
Row context menu
- Switch to - When right-clicking a row that is not the currently selected input, the menu item is prefaced with Switch to a different input.
- Set as default - If a row is not currently the default input value, set it as the new default. The current default is displayed next to the input name.
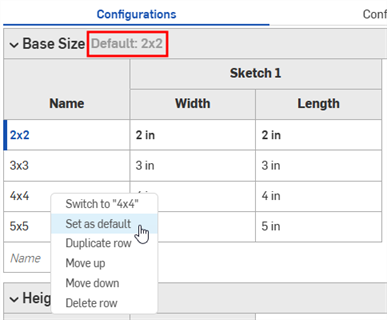
- Duplicate row - Create a duplicate row; this is especially convenient when preparing to paste a new input into this one. See the Copying and pasting tables into and out of Configuration Inputs section on this page.
- Move up/down - Move the selected row up or down one row. You can also click and drag to reorder the rows.
- Rename - Rename the input.
- Delete column/row - Delete the selected column or row.
You can click and drag individual column edges in the table to resize them; in the case of stacked column labels, click and drag the bottom label, indicated in the illustration above by the blue arrow.
The Configuration visibility conditions dialog enables you to add logic to your configurations, so you can control when certain inputs and options are available.
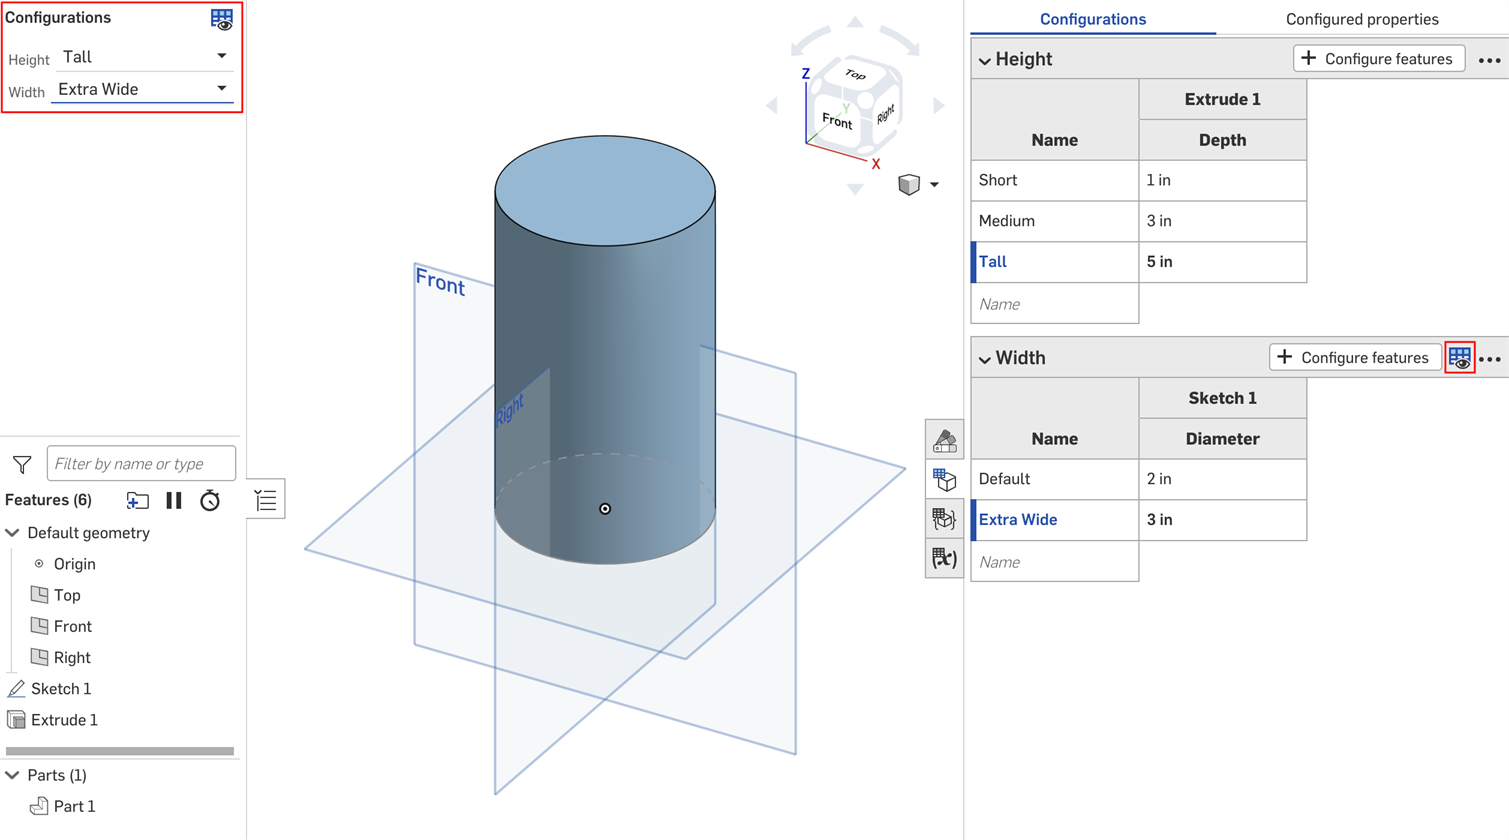
Consider a part with two inputs: Height and Width.
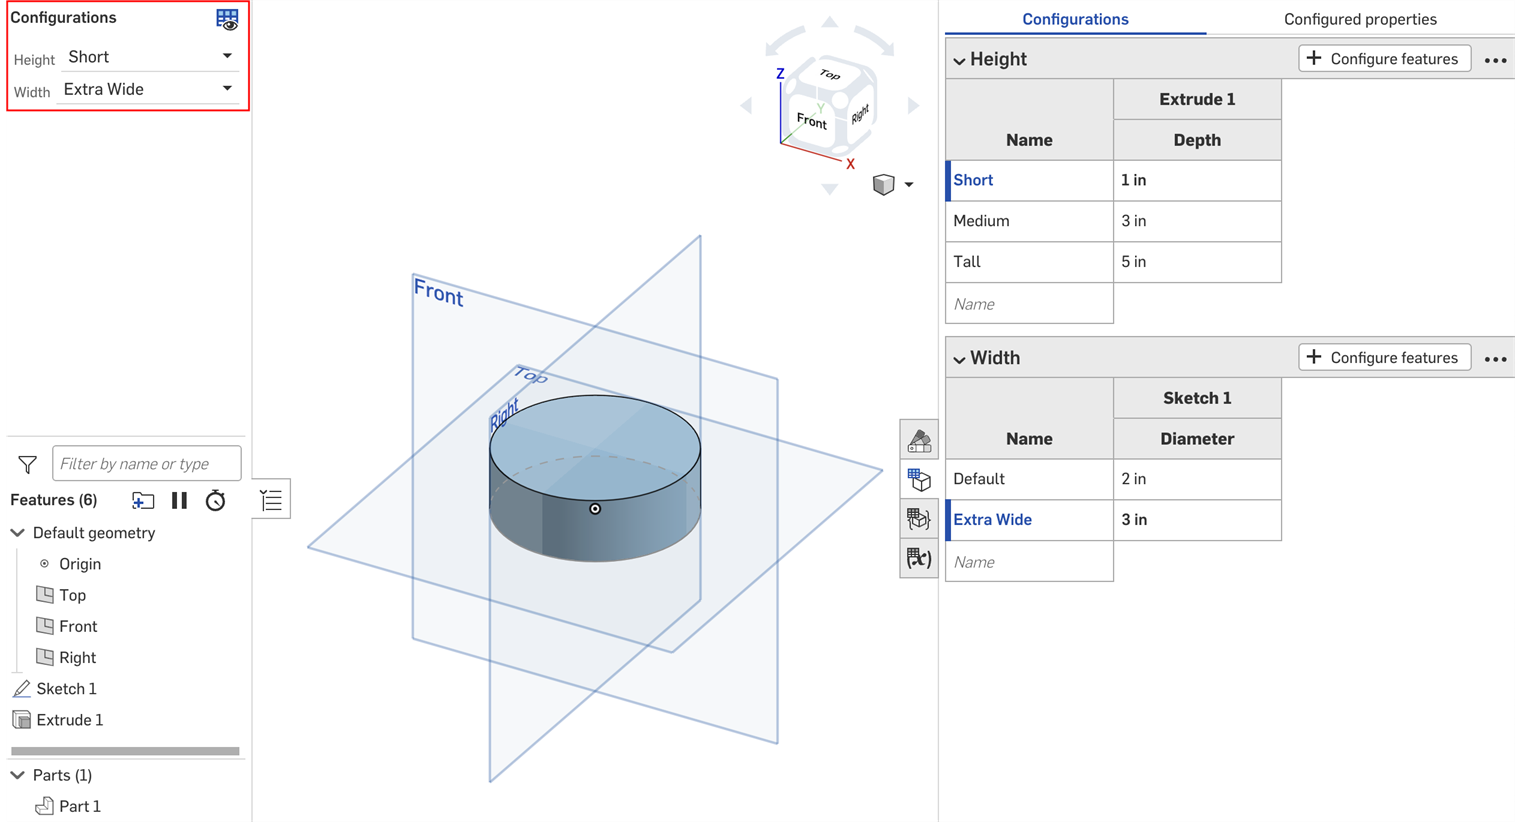
By default, a part of any height can have any width. But let's say the Extra Wide width is only available for the Tall height. In that case, we can set the conditions under which the Width input is visible.
- In the Configuration panel, click the input's three-dot button, and select Visibility conditions from the menu.
The Configuration visibility conditions dialog opens. The right panel shows a preview of the currently selected configurations. You can change the selected options directly in this panel to preview your settings.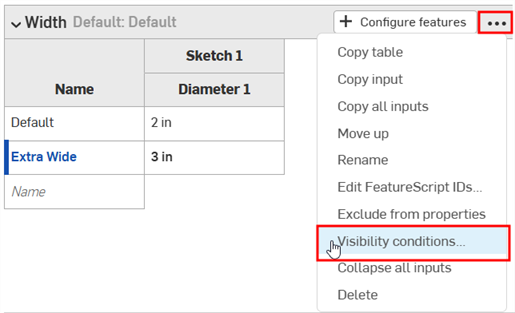
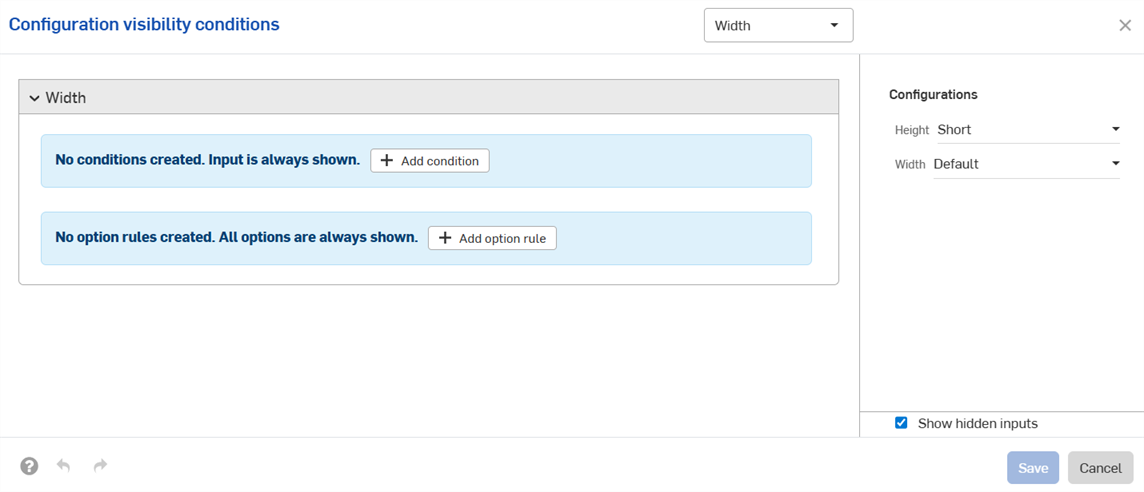
- Click Add condition.
- Click the first dropdown, and select the input that should control the visibility of this input. In this example, we'll select the Height input.
- In the second dropdown, choose either is to select specific options, or is between to select a range of options:
- Is: Click the third dropdown that appears and select the allowed option(s) for the input.
- Is between: Click the third dropdown and select the first allowed option in the range. Click the fourth dropdown and select the final allowed option in the range.
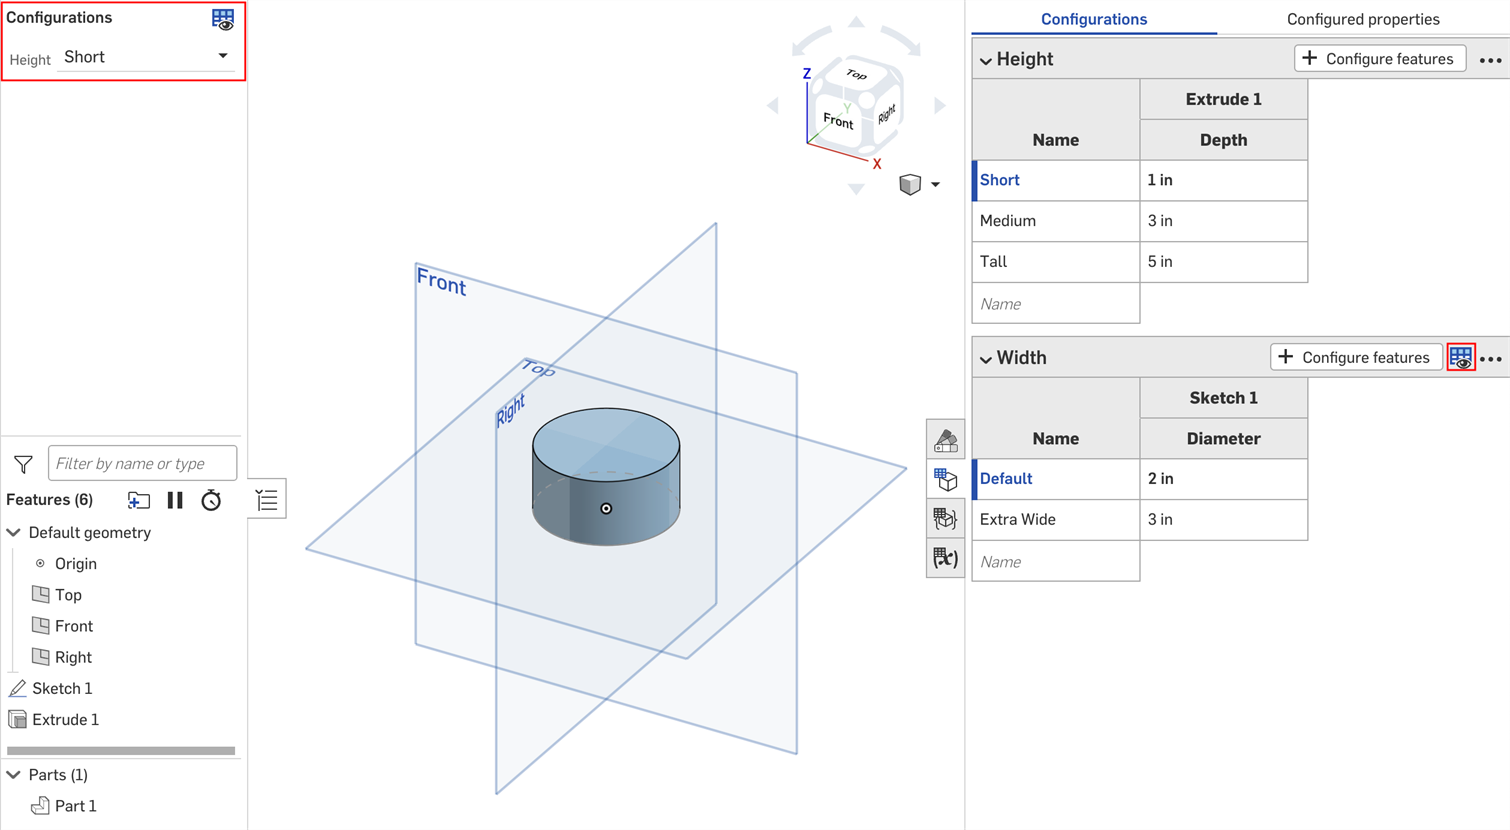
In this example, the Width input is only available for the Tall height. The preview on the right updates to reflect your selections. You can see that the Width input is no longer available for the Default height in the image below.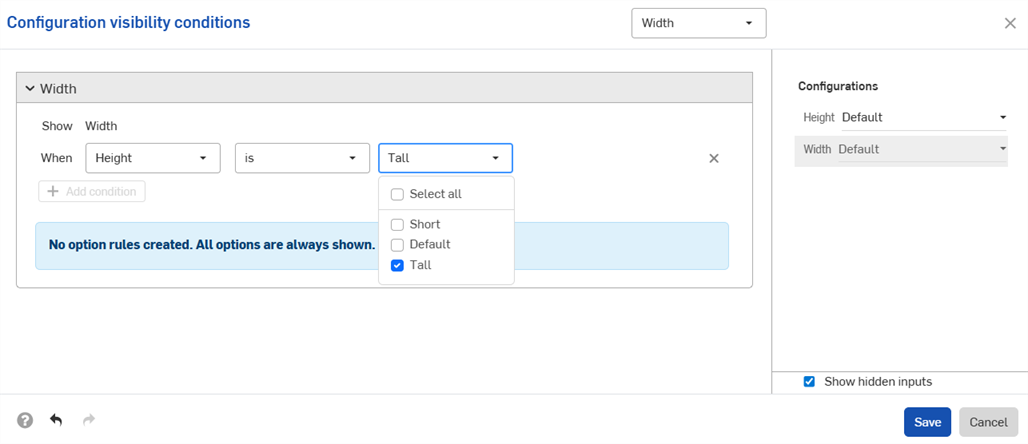
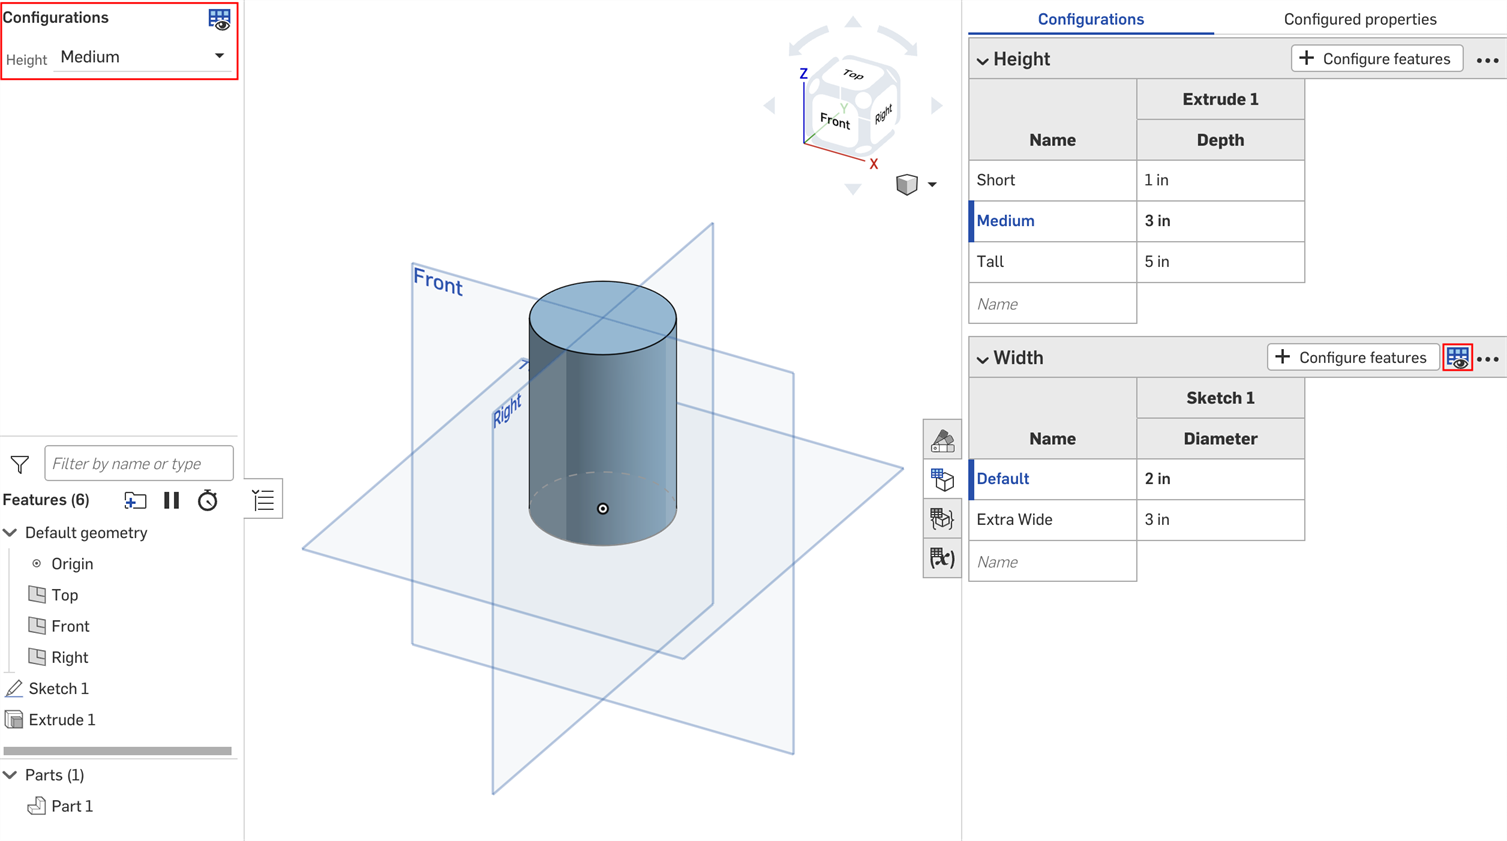
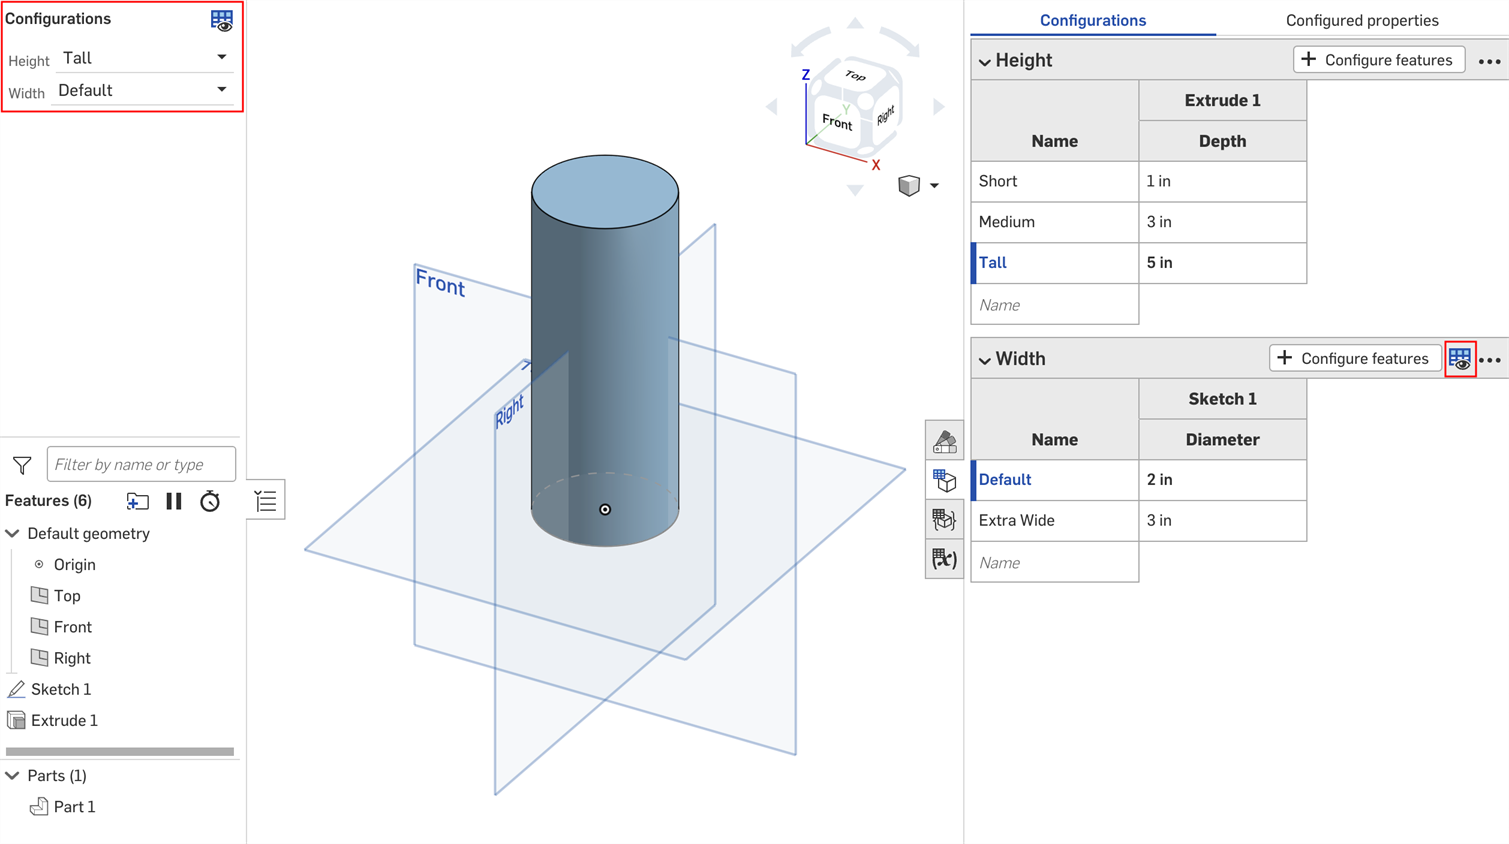
- Click Save. Now, the Width input is only visible when the Tall height is selected, and the Width input table displays the Visibility conditions icon
 .
.
You can use the option rule settings in the Configuration visibility conditions dialog to specify the conditions under which certain options should appear.
Option rule logic can be set for list inputs only.
- In the Configuration visibility conditions dialog, expand an input and click Add option rule. A new section appears in the dialog:
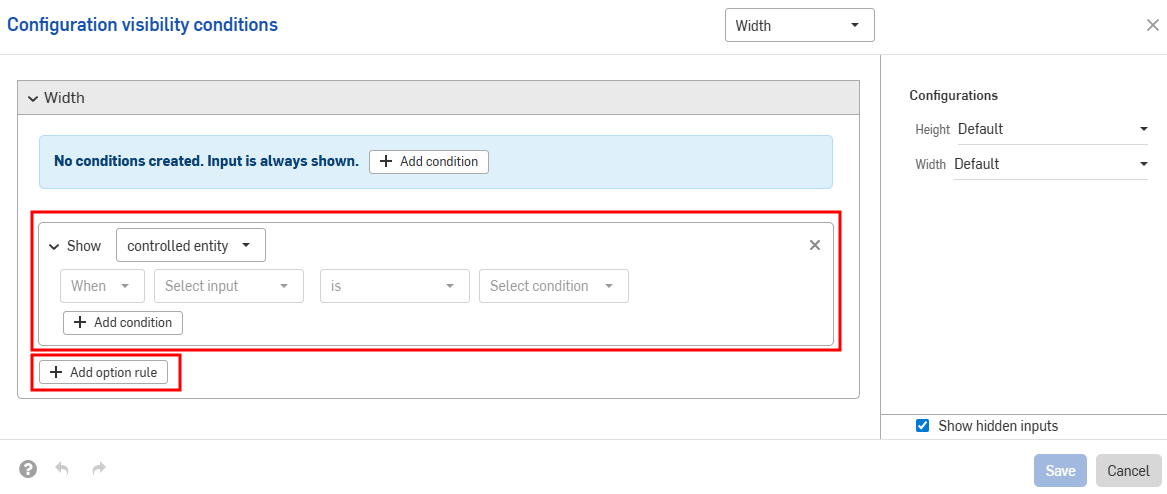
- In the Show line, choose the options that are being controlled.
- Options: Click the dropdown that appears and select the option(s) to set conditions for.
- Range: Click the first dropdown and select the first option in the range. Click the second dropdown and select the final option in the range. Ranges are inclusive of the specific options, and overlapping ranges are allowed.
- In the When line, click the When dropdown and select Always (to always show the option) or When (to set option conditions). If you choose When, you must also:
- Select the input from the second dropdown.
- Choose either is to select specific options, or is between to select a range of options.
- Is: Click the dropdown that appears and select the allowed value(s) for the option.
- Is between: Click the first dropdown and select the first allowed option in the range. Click the second dropdown and select the final allowed option in the range.
-
Continue to add logic within the configuration by clicking Add condition and repeating this set of steps.
Conditions within an option rule are combined together as AND statements; all conditions must be met for the controlled options to be visible.
- Add conditions for other options by clicking Add option rule again.
- Click Save.
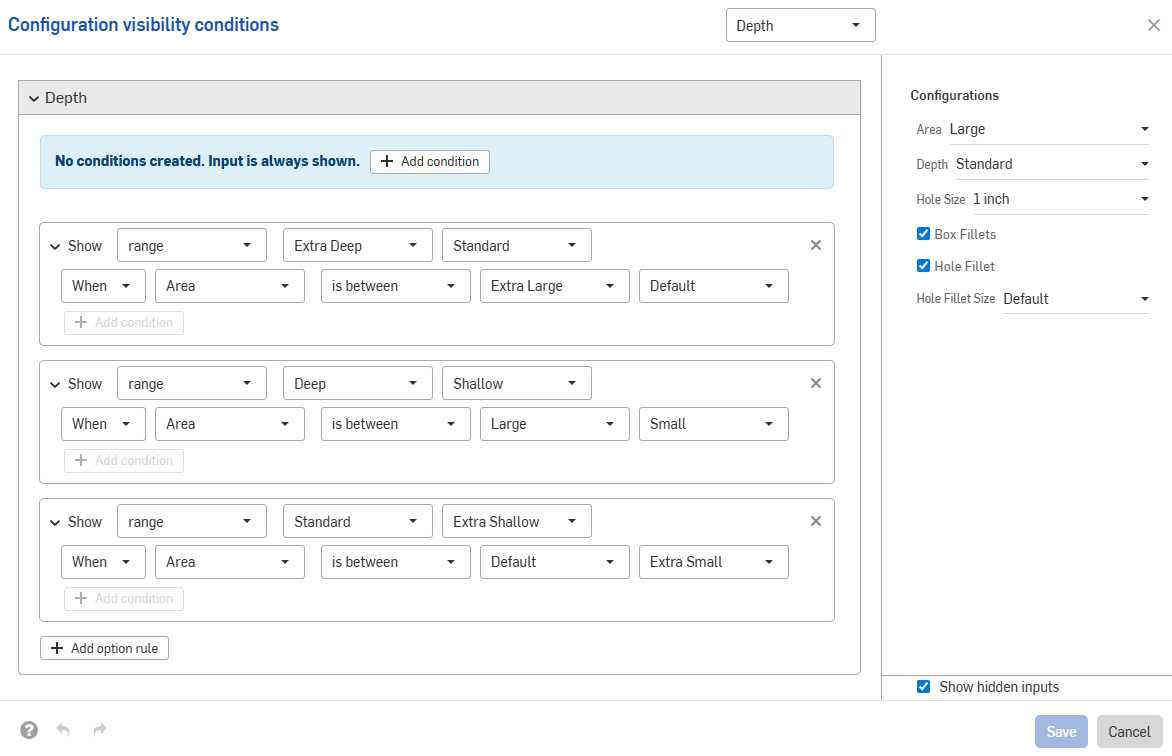
In the example below, the "Thin" option is only allowed when the Hole Size is .8 inches. The Default option is always allowed:
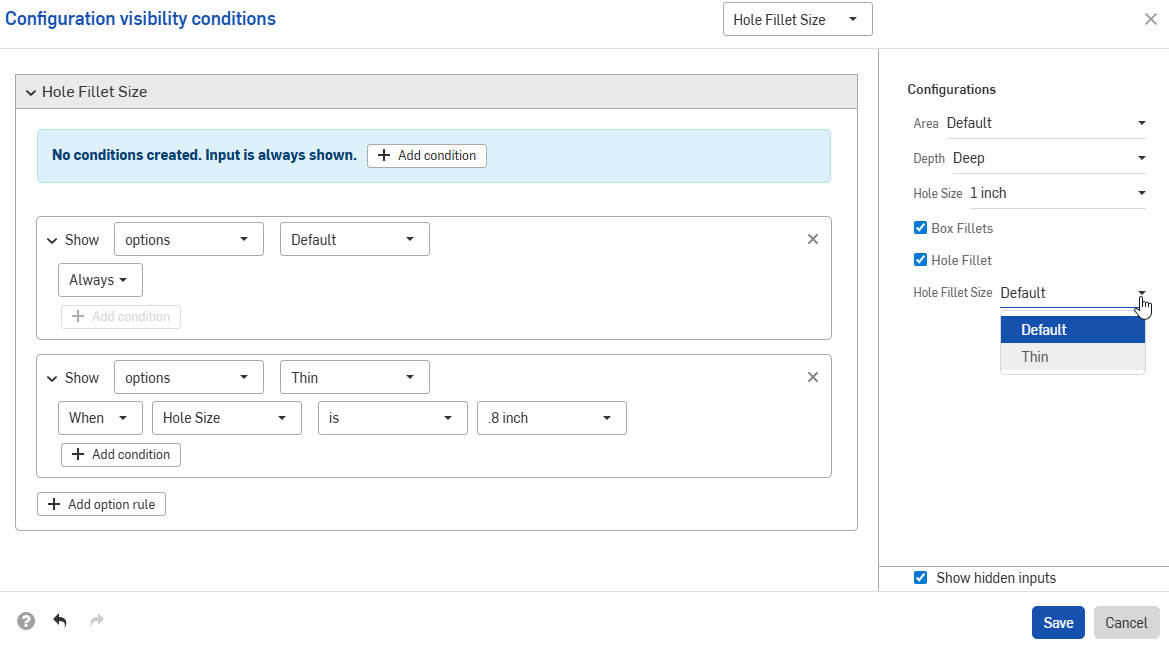
The next example uses overlapping ranges to specify visibility conditions:

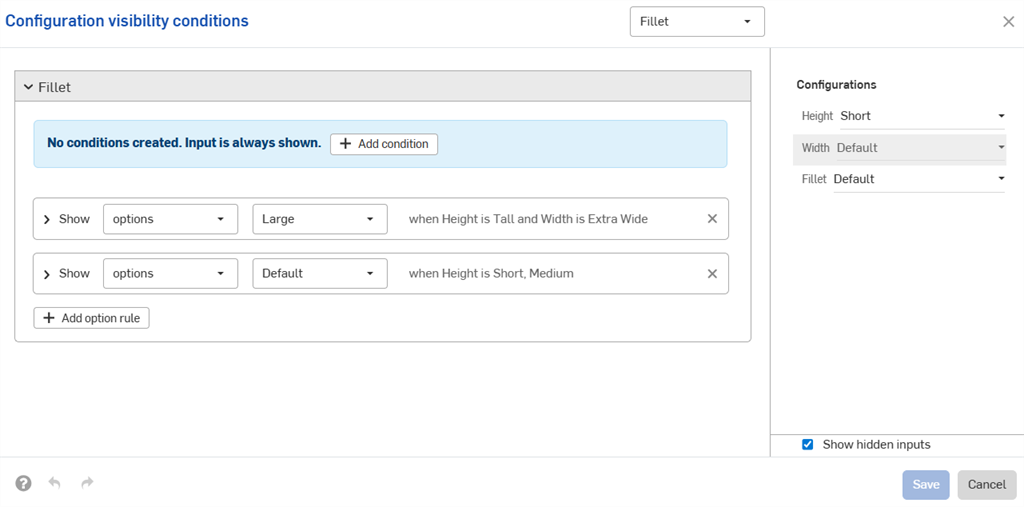
The example below uses a combination of option and range controls to set the required logic.
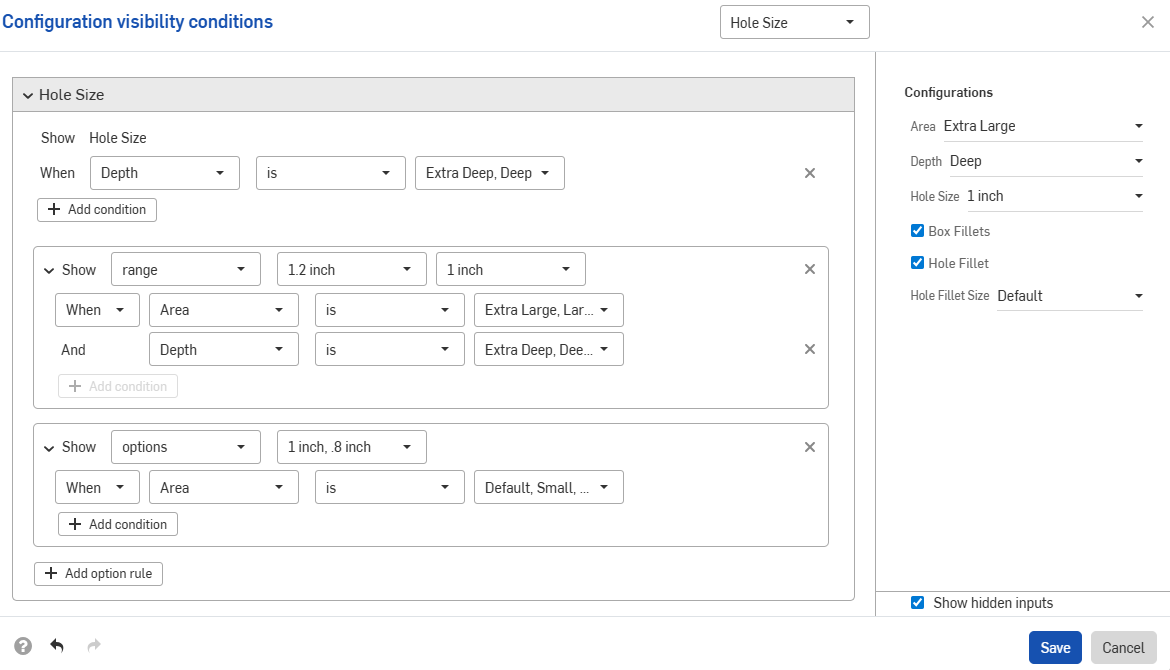
Input conditions are additive; if we add a third configuration to the above example and set the conditions shown in the image below, the Large Fillet option will only be available for parts that have both the Tall height and Extra Wide width inputs.
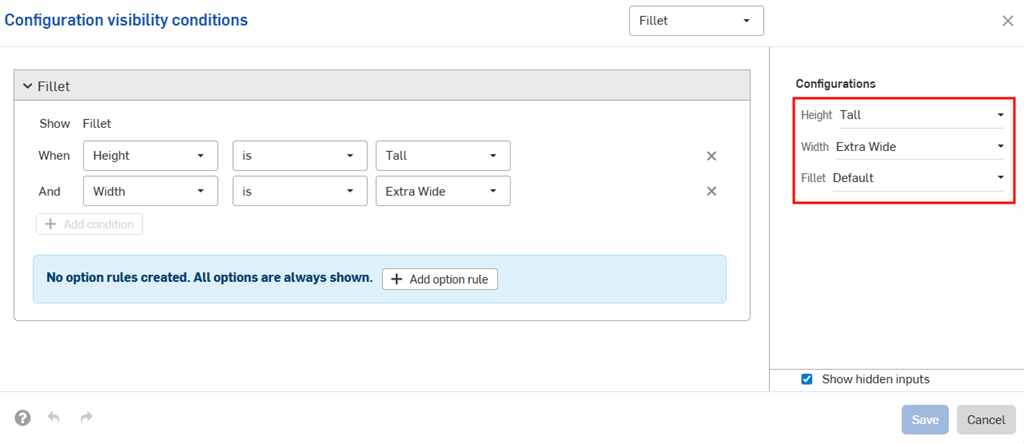
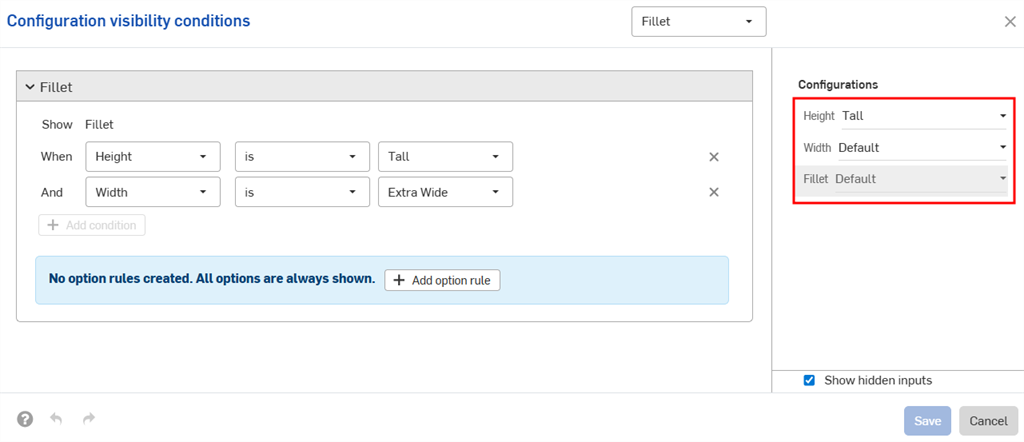
When the Default width is set for the Tall height, the Fillet configuration is hidden.
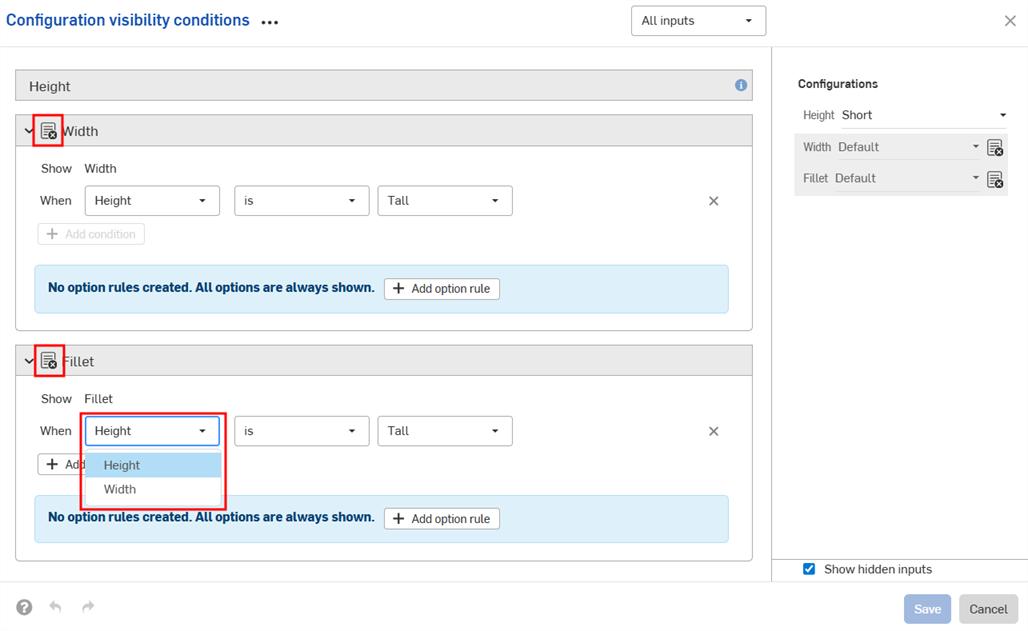
Configuration inputs can only control the visibility of inputs that appear below them in the Configurations panel. In the example, the Width input can be controlled by the Height input, but not by the Fillet input.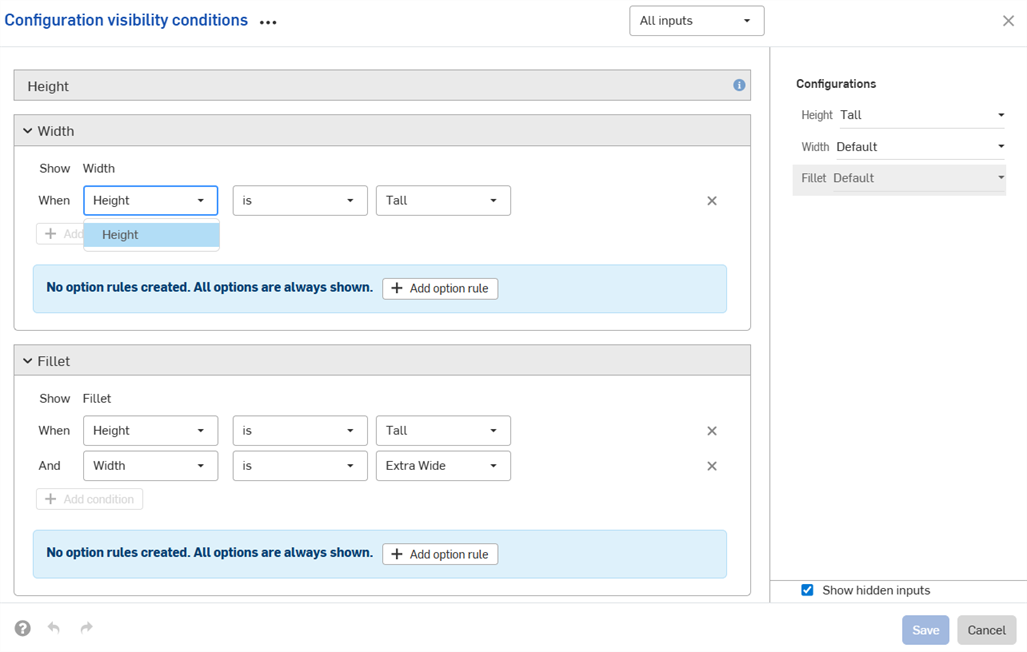
Visibility conditions are automatically repaired (removed) if the necessary inputs or options cannot be found.
For example, if the visibility of the Width input depends on the Height input, and the Height input is deleted, the visibility conditions for Width are automatically removed. The same applies for individual options that are deleted or moved. In this example, the Height input has also been removed from the Fillet options.
You'll see a warning in your workspace, and the conditions are removed in the dialog:

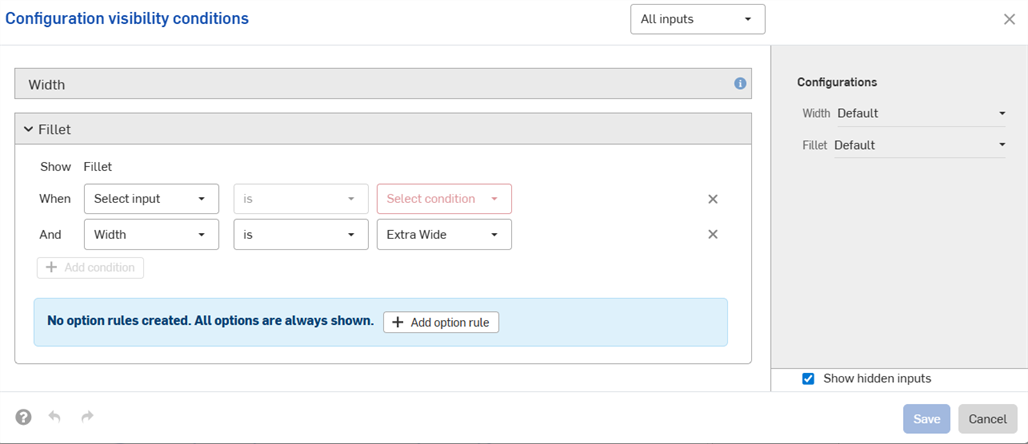
-
The visibility conditions and option rules you set are available in all Insert dialogs (i.e., when inserting a configured part into an assembly). Changes made to visibility conditions are automatically reflected in all existing documents that reference the configured element.
-
Hidden inputs always have their default value. In the first example on this page, Short and Medium height parts have the Default width, even though no width options are set.
-
If a configuration input has no visible options, it is hidden and assumes its default value.
-
-
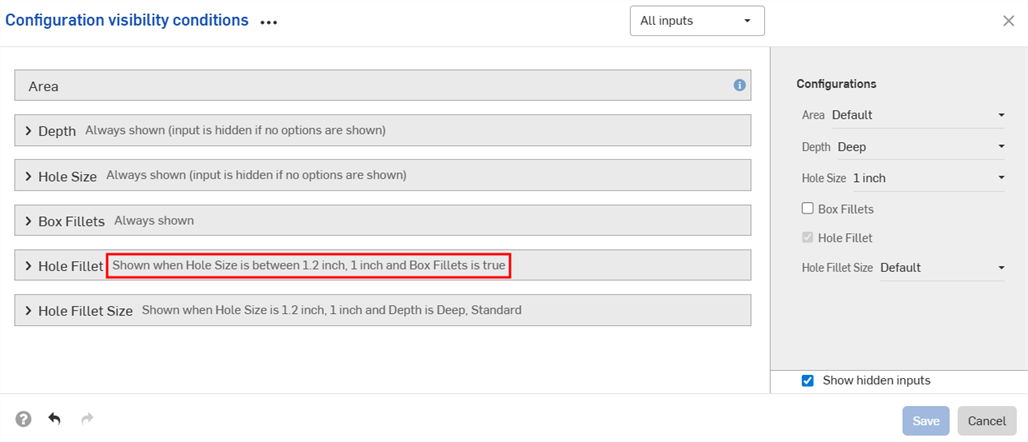
A summary of the visibility conditions is shown in the dialog when the input or option is collapsed.
-
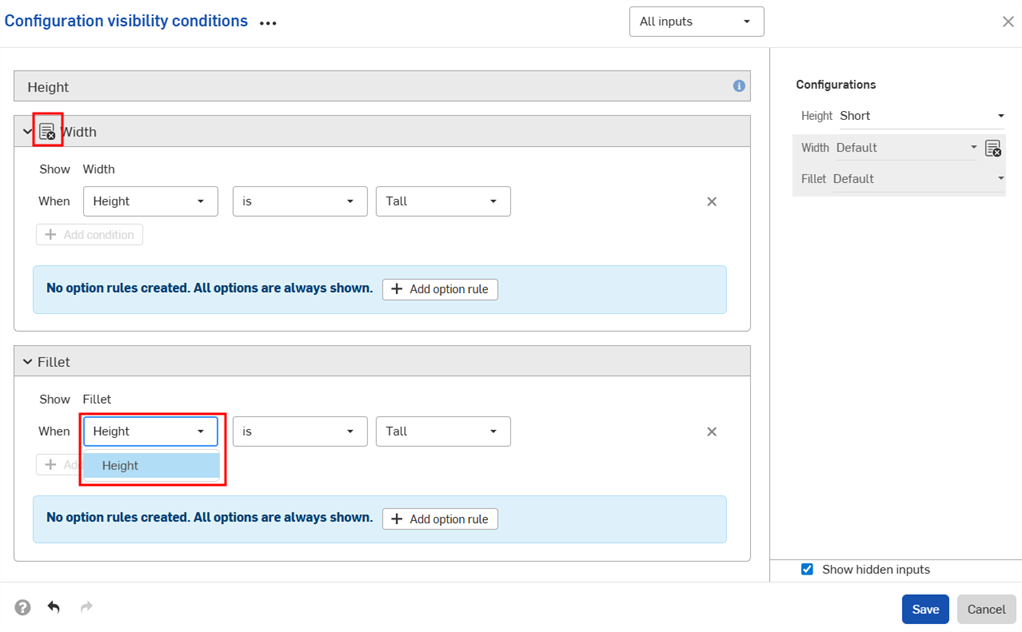
(Parts and Part Studios only): Configuration inputs that have been excluded from properties can only control the visibility of other inputs below them that have also been excluded from properties. In the example below, if Width is excluded from properties (indicated by the
 icon), it can only control the Fillet visibility if Fillet is also excluded from properties.
-
(Parts and Part Studios only): Configuration inputs that have been excluded from properties are treated as having their default values in release packages and revision references values. If visibility conditions prevent using the default value, the first visible value is used.
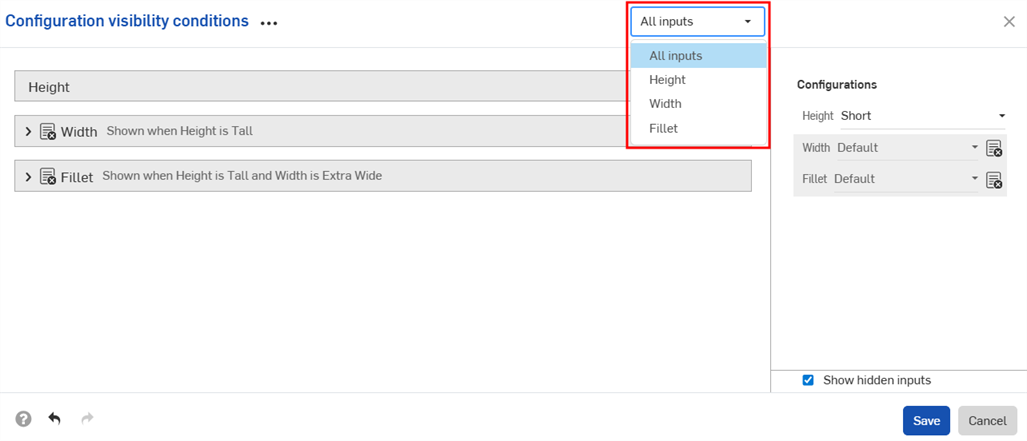
- Use the Inputs dropdown in the Configuration visibility conditions dialog to view other inputs. You can select All inputs to view all inputs available.
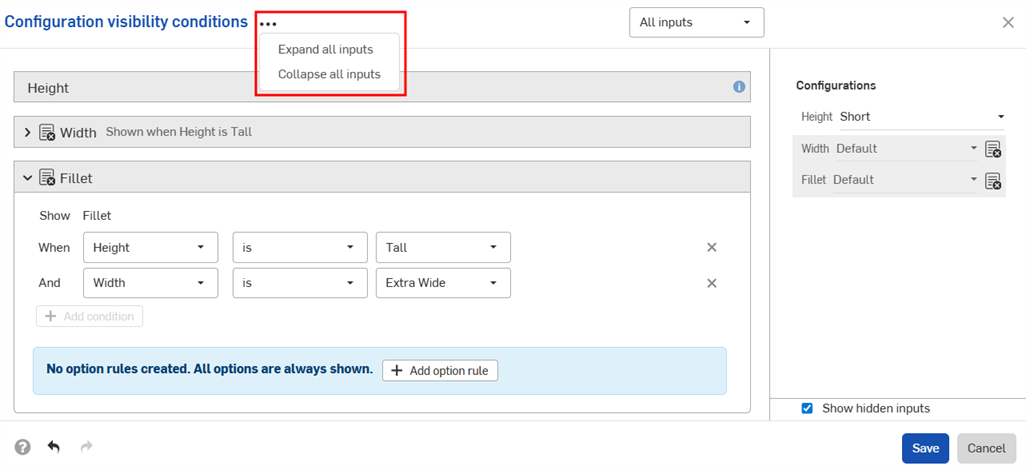
- When multiple inputs are displayed in the dialog, click the three-dot button to expand or collapse all inputs.
- You can use the preview section of the Configuration visibility conditions dialog as a playground to test your configurations.
- Deselect the Show hidden inputs checkbox to remove the grayed-out inputs from the dialog.
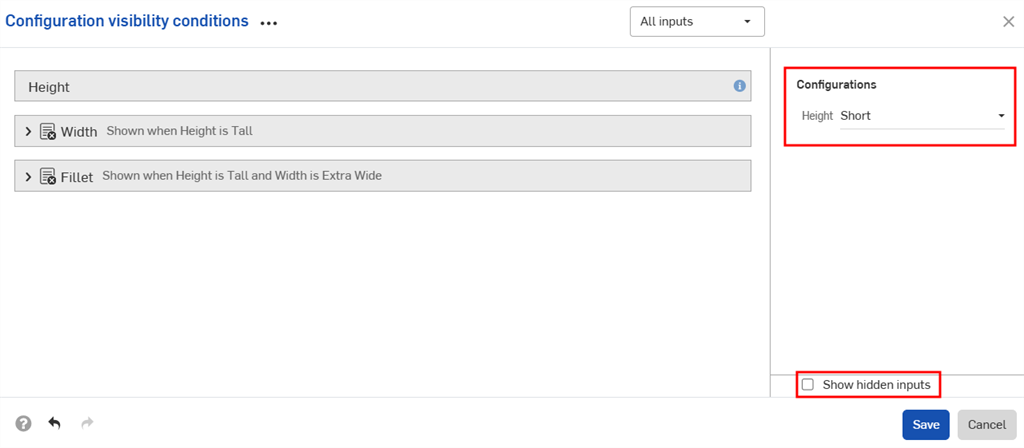
- Deselect the Show hidden inputs checkbox to remove the grayed-out inputs from the dialog.
-
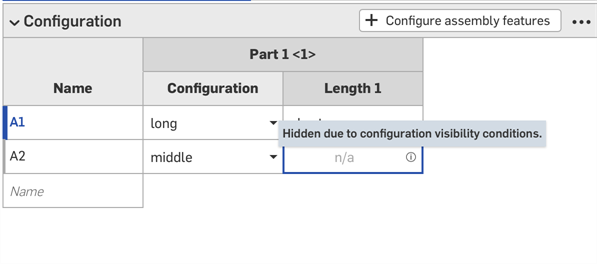
When adding configured parts to assemblies, hidden inputs are grayed out in the Configurations panel.
-
Click
 in the Configurations selector to open the Configuration visibility conditions dialog for all inputs. Click
  in the Configurations panel to open the dialog for that input.
You can copy and paste a configuration input into and out of Part Studios, assemblies, and Variable Studios. This makes it quick and easy to share configurations between designs.
-
Open the Configuration panel in the Part Studio, assembly, or Variable Studio that contains the input to copy.
-
Click the input's three-dot menu and select Copy input or Copy all inputs.
-
Open the Configuration panel in the tab to paste the input.
-
Click the arrow next to Configure Part Studio/Assembly/Variable Studio and select Paste inputs.
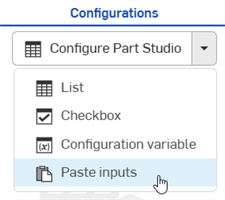
The inputs are inserted into the Configuration panel.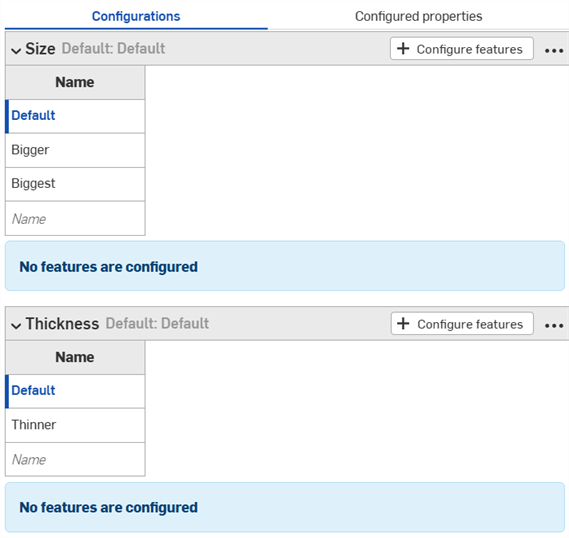
-
Select the parameters to configure from the new tab. Continue reading to learn how to now copy input values and parameters into the input tables.
Notes:
- You can copy and paste configuration inputs: between Part Studios, assemblies and Variable Studios; within the same document; and between different documents.
- All names, visibility conditions, FeatureScript IDs, and variable definitions are copied with the input.
- Copied inputs are available until the user logs out.
- References between the copied input and pasted input are NOT maintained; after pasting, changes to the original configuration input are NOT reflected in the pasted inputs.
- Pasted visibility conditions are automatically repaired (removed) if the target configuration does not have all the inputs needed to compute the visibility.
- Configuration inputs with the same internal FeatureScript IDs are not pasted. To fix this, you can delete the configuration input with the same internal FeatureScript ID and paste again.
You can copy and paste into and out of a configuration, to aid in entering or editing values.
To copy values and parameters:
-
Open the
 menu in the upper right corner of the Configuration panel.
- Select Copy table:
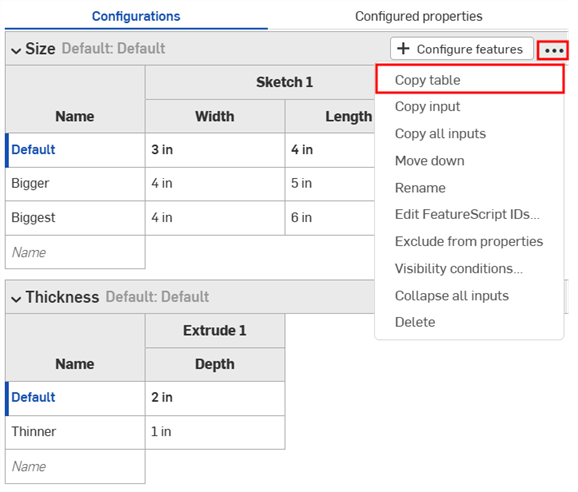
- Once you have copied the table, you can paste it into a spreadsheet:
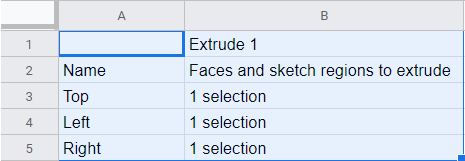
Note that the column names also come in with the table, as shown above. Now you can edit the table and copy/paste it back into Onshape:
- Select just the rows and columns with data (not the column names or headings), as shown in blue below:
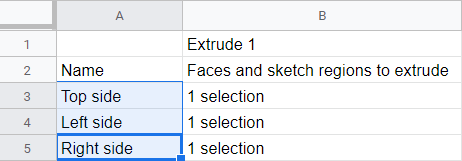
You can also pad your table with extra empty rows, if you wish. Just include the extra rows in the spreadsheet when selecting for the copy command.
- Issue a Copy command.
- In the Onshape Configuration table, click the top, left cell of the table.
- Issue a keyboard Paste command:
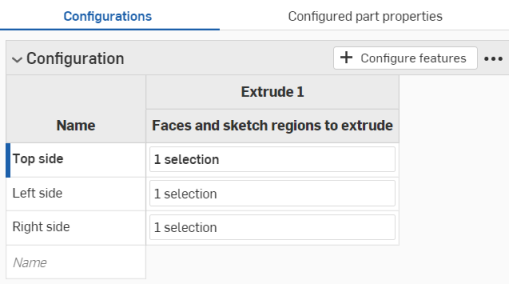
Onshape automatically replaces whatever data was in the rows and columns of the configuration input table with the data that was copied. Onshape also includes the default units for each input, automatically.
Note that if there are more rows copied from the spreadsheet than are in the Onshape configuration input table, those rows are included in the paste. Onshape creates the rows on the fly.
However, if there are more columns copied from the spreadsheet than are in the Onshape configuration input table, those columns are not included in the paste. Onshape does not yet create columns on the fly. You can, however, create additional columns (parameters) in the configuration table before pasting.
Onshape has a mechanism for also configuring properties for each of the configuration inputs and options you have previously defined, directly from the Configuration panel. You can configure part properties or appearance properties. If you have a Professional or Enterprise account, you can also configure custom properties.
- With an existing configuration input in the Configuration panel, click
Configured properties at the top of the panel.
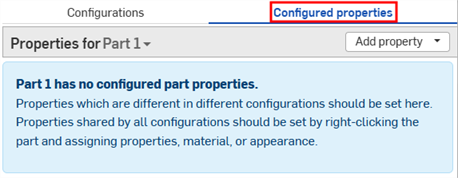
- Click the Properties for drop down to select the part or appearance to configure.
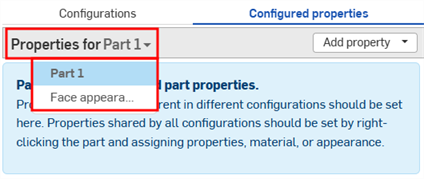
Parts and appearances that include configured properties are displayed with a checkmark in the list: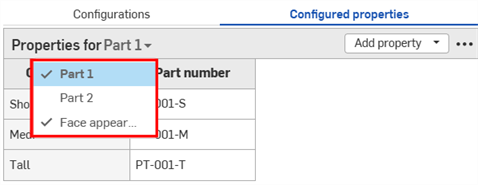
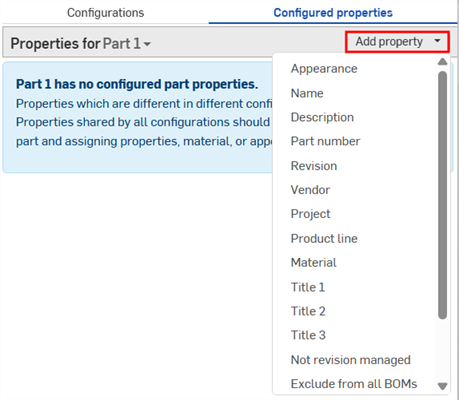
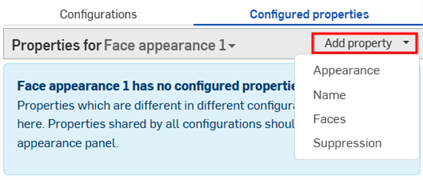
- Click Add property.
-
Select the property you wish to configure; properties are available for parts, appearances, and for custom properties. All the configuration inputs are added to the table.
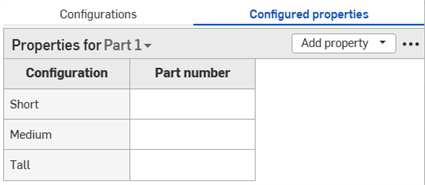
- Double-click a cell in the Property column to edit it. Press Tab to move to the next row.
- To edit a value, type the new value and hit Enter to accept.
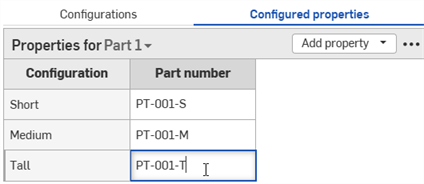
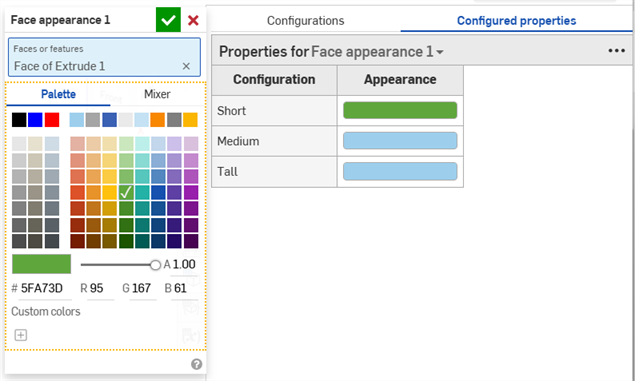
- To edit a dialog selection, make the new selections in the dialog, then click
 to close the dialog.
- To edit a value, type the new value and hit Enter to accept.
-
Repeat as necessary to configure additional properties. The example below has both had part number and face appearance properties configured.

If you have automatic part number generation turned on (through your Professional company numbering schemes or Enterprise numbering schemes), you can right-click in the Part number property column and select Generate next part number:
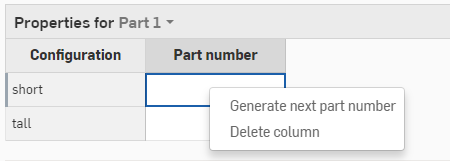
If any properties in the table are made read-only, you cannot delete the table, add properties to the table, or remove the read-only property column. Cell values for editable properties can still be modified. Make the read-only property editable again to modify the table.
Some configuration tables can be excluded from properties. This is useful when you don't want to repeat configuration inputs in the Configured properties table. Excluded configurations are treated as always having their default values.
For example, consider a spring. Configurations are available for both the spring's diameter and height.
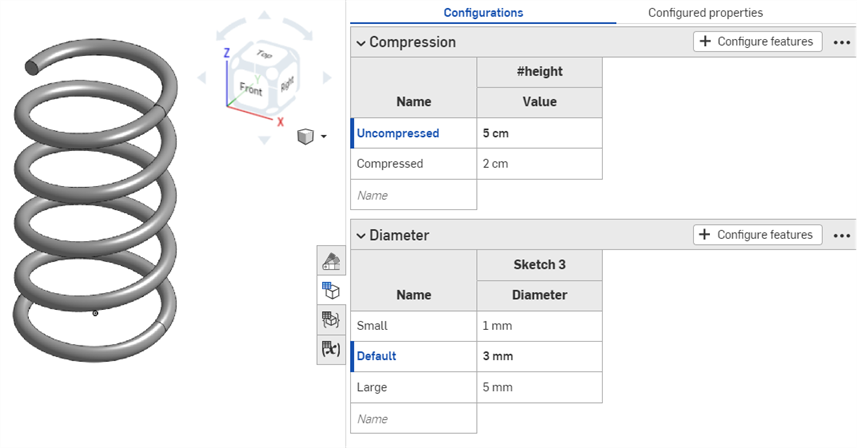
Whether or not the spring is compressed impacts geometry, but not part number; it is the same part when it's compressed and uncompressed. To specify that all part numbers should be assigned irrespective of spring height, you would have to individually add each input to the Configured properties table and specify the part number for each.
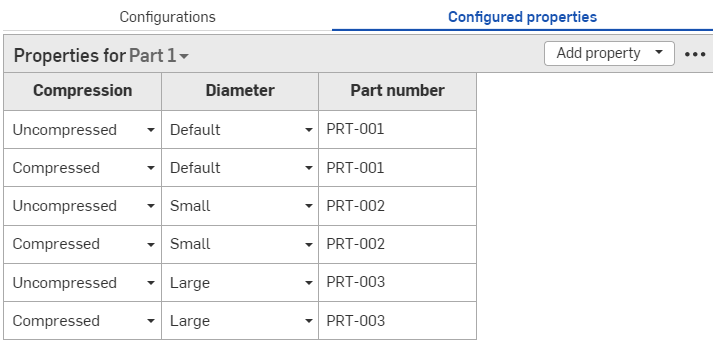
Part number set for each configuration possibility.
If you instead exclude the Compression configuration from the properties, you can specify part numbers based only on diameter:
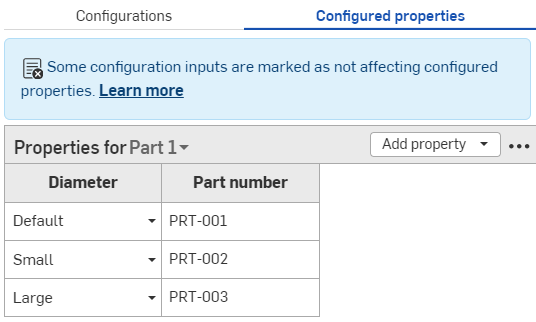
Compression configuration table excluded from the Configured properties table. Part numbers are set regardless of spring height.
Steps: Excluding a configuration input from properties
-
In the Configuration panel, click the configuration's three-dot button, and select Exclude from properties from the menu. The Excluded from properties icon
 appears next to the configuration's name.
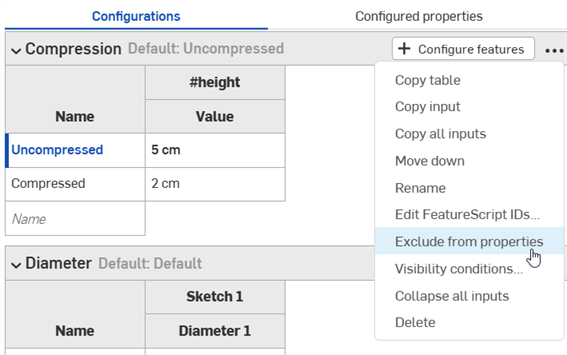
Steps: Adding an excluded configuration back to properties
-
In the Configuration panel, click the configuration's three-dot button, and select Include in properties from the menu.
Excluded configuration notes
-
Excluded configurations are treated as having their default values. Release packages and revision references use those defaults. If visibility conditions prevent using the default value, the first visible value is used.
- Parts that only differ in excluded configurations are treated as the same part by the Bill of Materials (BOM) and release management.
- If something with an excluded configuration is released, it is considered released for all values of that configuration.
- Excluded configurations are still included in:
- Geometry calculations
- Computed properties
- The Mass Properties tool
- If you see discrepancies between the mass provided in the BOM and the mass provided in the Mass Properties tool, it is likely due to some configurations being ignored in the BOM.
-
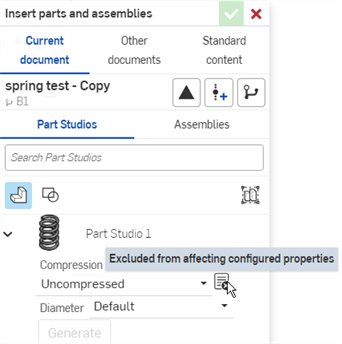
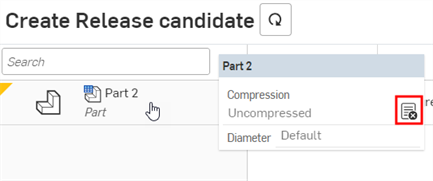
When using a part with excluded configurations, you'll see the Excluded from affecting configured properties icon.
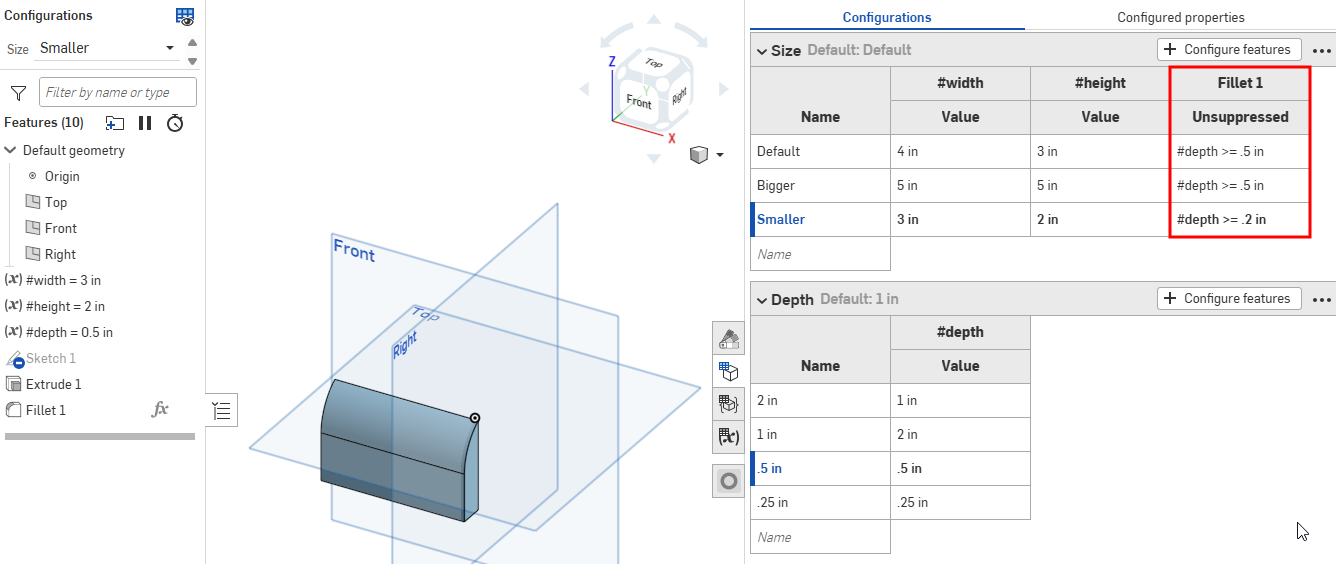
To configure a dynamic suppression expression, click Configure features in the desired input, then right-click the corresponding feature in the Feature list and select Configure suppression (or Configure suppression with...) from the context menu to add the feature to the Configuration panel. You can then edit the expression directly in the Configuration panel.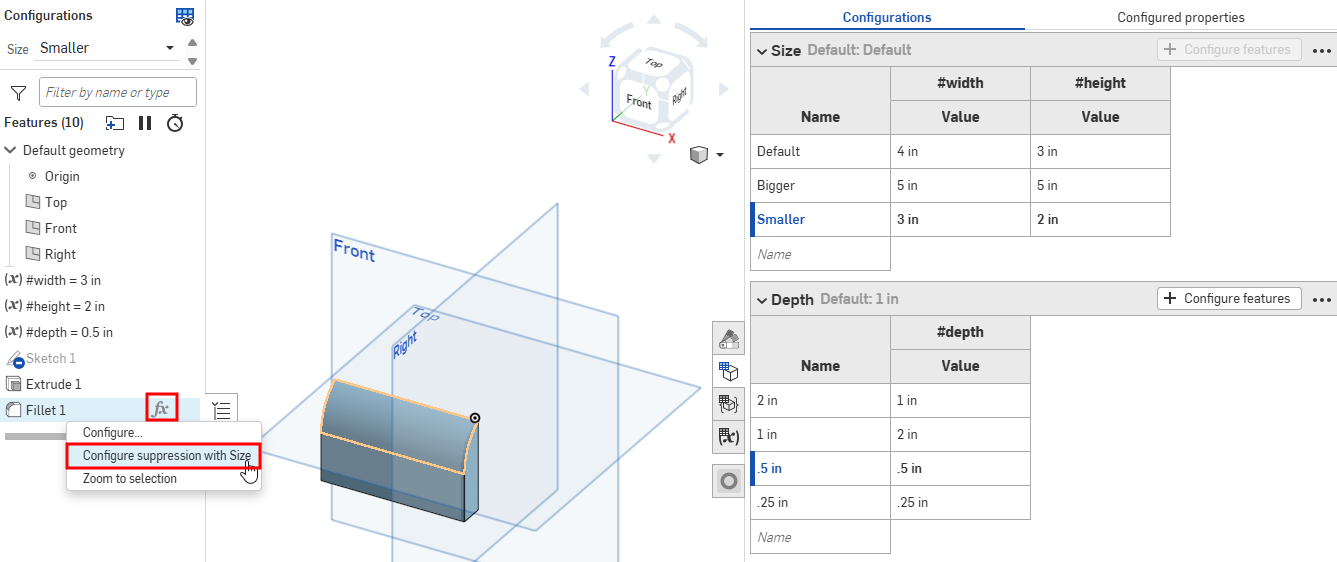
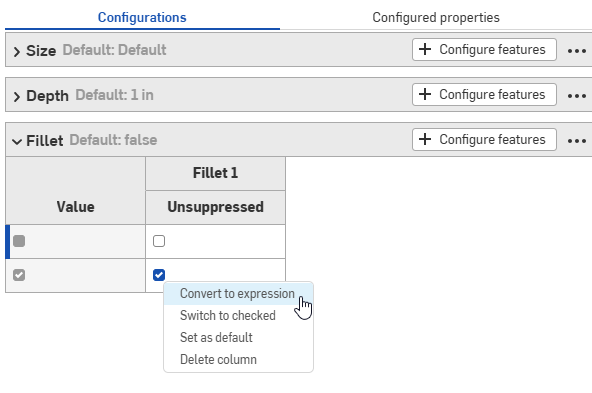
To convert a checkbox into an expression, right-click the checkbox in the Configuration panel, and then click Convert to expression. You can then edit the expression directly in the Configuration panel. To convert back to a checkbox, right-click the expression and click Convert to checkbox.
If a configured dynamic suppression is removed from the feature, the expression automatically converts to a checkbox in the Configuration panel.
You can use the configuration inputs you create directly in the Part Studio or assembly to preview their design. The main use for creating configuration inputs, however, is to select specific configurations to insert into other assemblies, drawings, releases, etc.
Previewing configurations
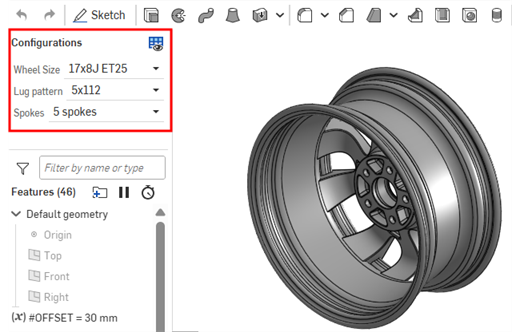
Use the Configurations area at the upper-left of the screen to select configuration inputs to see how they affect the overall design. The design updates to match the selected inputs so you can preview the final design. Every permutation of possible configuration inputs is one configuration.
Inserting configurations
You can insert configured parts, Part Studios, or assemblies into assemblies, releases, and drawings via the Insert Part Studios and Assemblies dialog
-
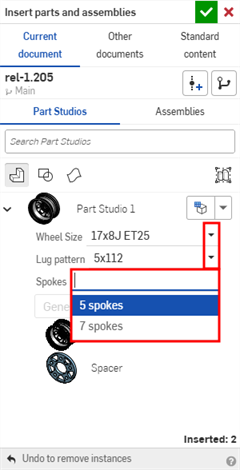
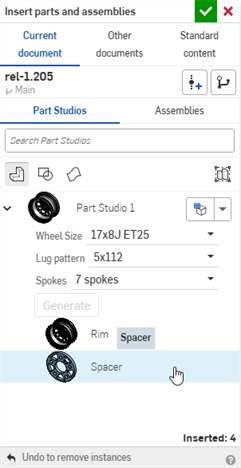
Select the desired inputs directly in the Insert dialog:
-
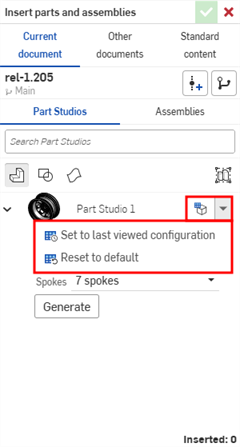
Click the Set to last viewed configuration icon (
 ) to select the last active configuration previewed in the Part Studio or assembly tab, or click the arrow and select Reset to default to set all inputs to their default values.
-
When you are satisfied with the configuration, click Generate.
-
Click the configuration to insert.
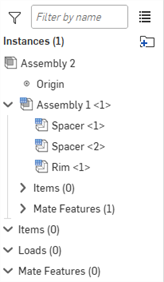
In an Assembly, configured parts and assemblies are indicated by the
![]() icon in the Instances list:
icon in the Instances list:
Changing configurations
After a configured part or assembly has been inserted into an assembly, you can change the configuration:
- Right-click on the part or assembly in the Instances list and select
Change configuration.
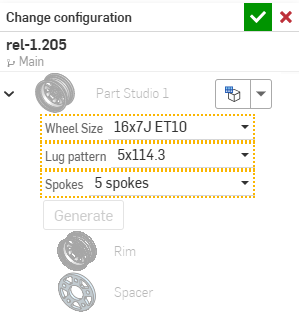
- Select the new configuration values.
-
Click
 when you are satisfied with your selection. (Use
 to cancel the operation.)
To see which configuration is currently active in the Assembly, hover over a part in the Instances list and a tooltip appears with the configuration information:
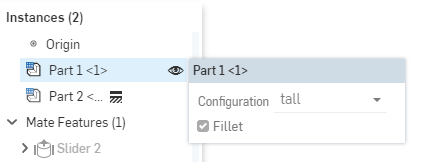
iOS and Android support for configurations is limited to the following:
-
Viewing the Configuration panel (
 ) on the right.
 -
Selecting between Configurations in the left side panel (above the Features list):
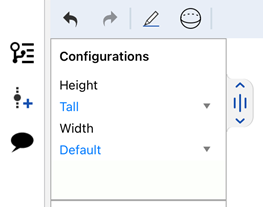
Selecting Configurations on iOS
-
(iOS only) Visibility conditions are applied, if they are present in the configuration.
You cannot create or edit configurations or visibility conditions from the iOS or Android platforms. This can only be done from the desktop (browser) platform.
For additional Learning center resources, see: Self-Paced Courses > Configurations. You can also follow the learning pathway course here: Introduction to Part Configurations (Onshape account required), and the technical briefing article here: Parametric Variables vs Configuration Variables (Onshape account required).
