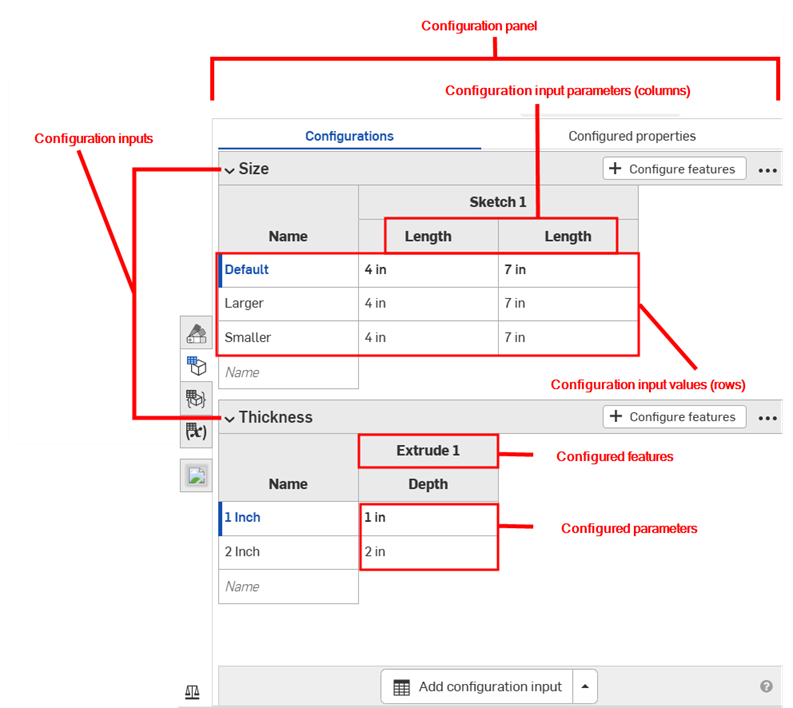
Variable Studio Configurations
![]()
![]()
In Onshape, you can configure Variable Studios similar to the way you can configure Part Studios and Assemblies.
You can configure any variable value or description. All values and descriptions you configure in one Variable Studio are referred to as a configuration. One configuration can include multiple configuration inputs.
The configuration inputs you define in a Variable Studio become options in the Insert dialog when you insert the Variable Studio into another tab or document.
- Click the
 icon on the right side of the Variable Studio window to open the Configuration panel.
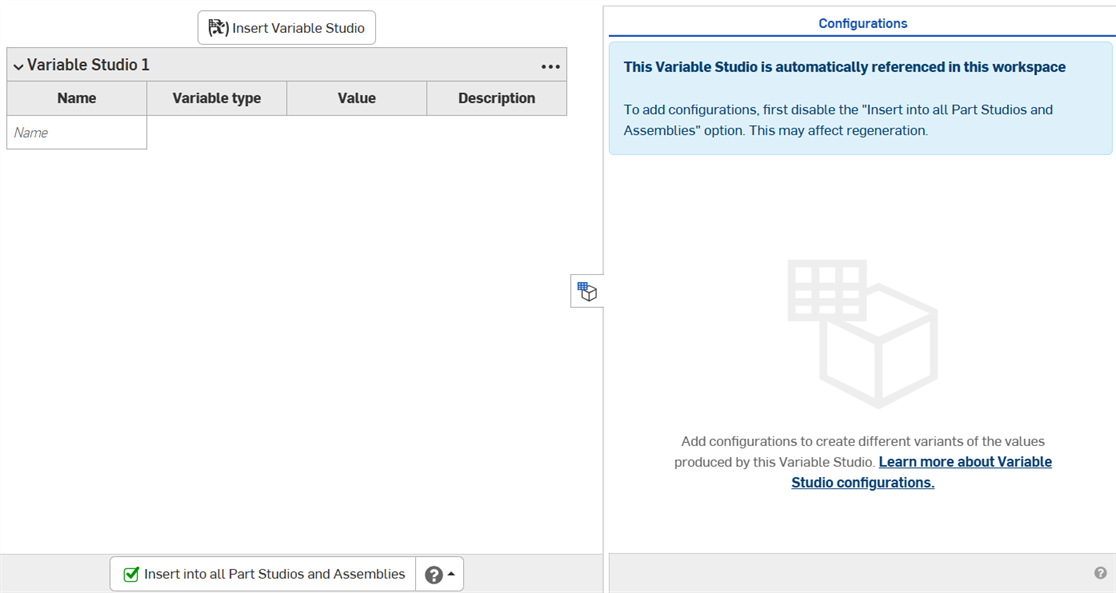
- The Variable Studio cannot be configured while being automatically referenced. Deselect the Insert into all Part Studios and Assemblies checkbox.
(When you insert a configured variable table into a Part Studio or assembly, you must choose which configurations to insert.)
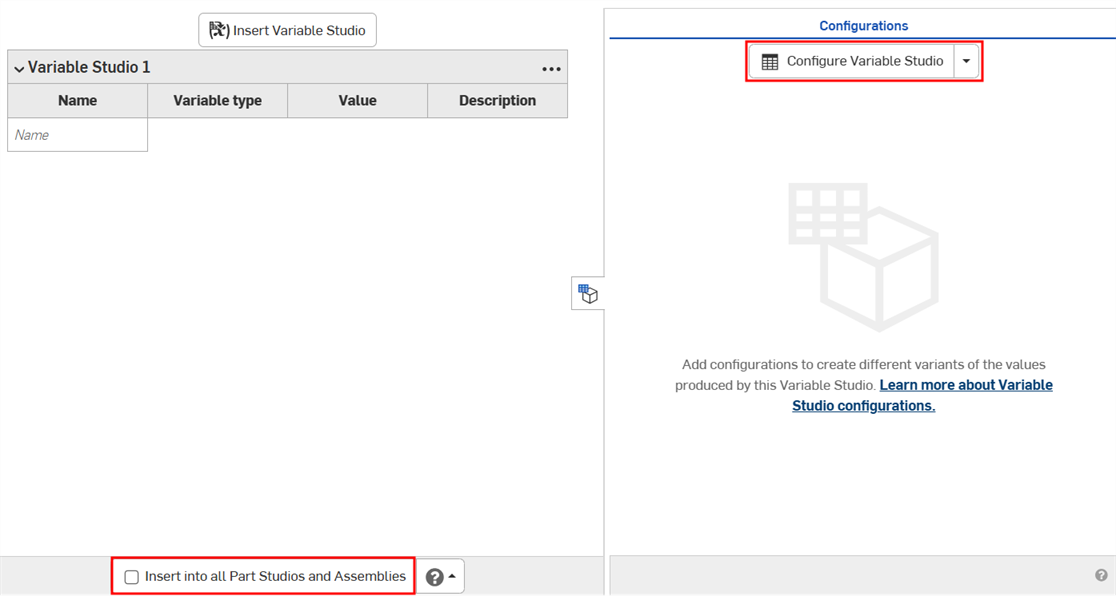
- Click Configure Variable Studio. A configuration input table appears in the Configuration panel.
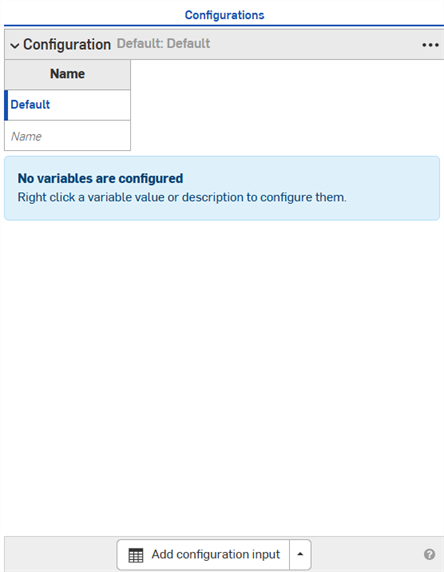
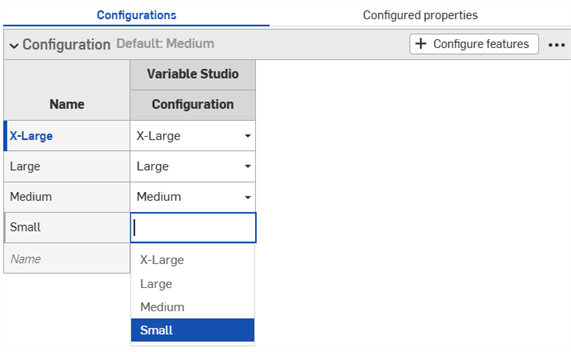
- Click in the first row to activate it, and enter the input value names in the first column. Press Tab to move to the next row. The blue bar to the left of the row indicates the currently selected configuration in the Variable Studio.
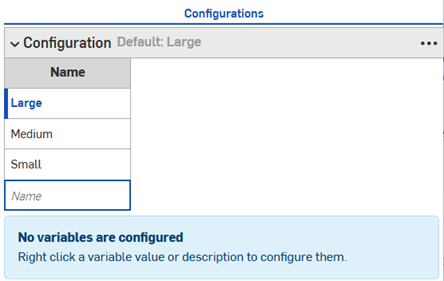
- Right-click a variable value or description and click Configure on the context menu to add it to the configuration table.

- Continue right-clicking and selecting Configure to add additional values or descriptions to the table. The selections are added to the table with their default values, and are highlighted in orange in the Variable Studio.

- Double-click and edit the values in the configuration table as necessary.
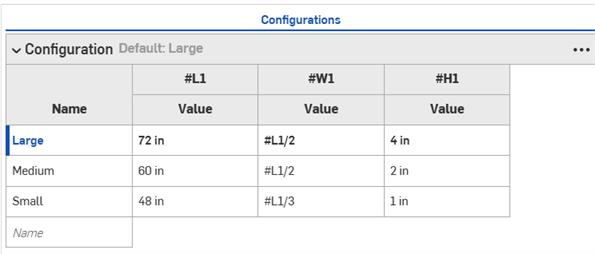
- At the bottom of the Configuration panel, click the Add configuration input arrow and select the type of configuration to add. Clicking the button instead of the arrow automatically inserts a List configuration type.
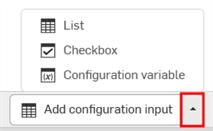
- Select an option from the menu:
- List - Creates a list of selectable values to present at insertion.
Checkbox - Creates a checkbox to check/uncheck during insertion.
Configuration variable - Creates a variable that can be used in any feature or in FeatureScript.
-
Edit the values in the configuration input table as needed.
- Click the Add configuration input arrow and select Checkbox.
- Add a Name for the input in the dialog that appears.

- Use the Default option to specify if the configuration should be checked or unchecked by default. This can be changed later.

- Click the green check mark to add the input to the Configuration panel.
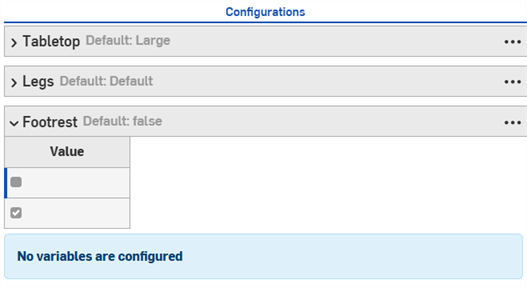
- Right-click the value or description to configure in the Variable Studio, and click Configure with to add the value to the input.

- Edit the values in the input as needed.

- Click the Add configuration input arrow and select Configuration variable.
- Add a Name for the variable in the dialog that appears.
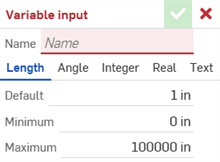
- Select a type for the variable. Choose from Length, Angle, Integer, Real, or Text.
- Enter the values for the variable.
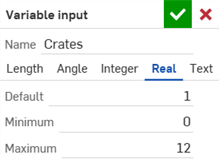
- Click the green check mark to add the input to the Configuration panel.
- Enter the values for the variable.
- Right-click a value or description in the Variable Studio and select Set to...
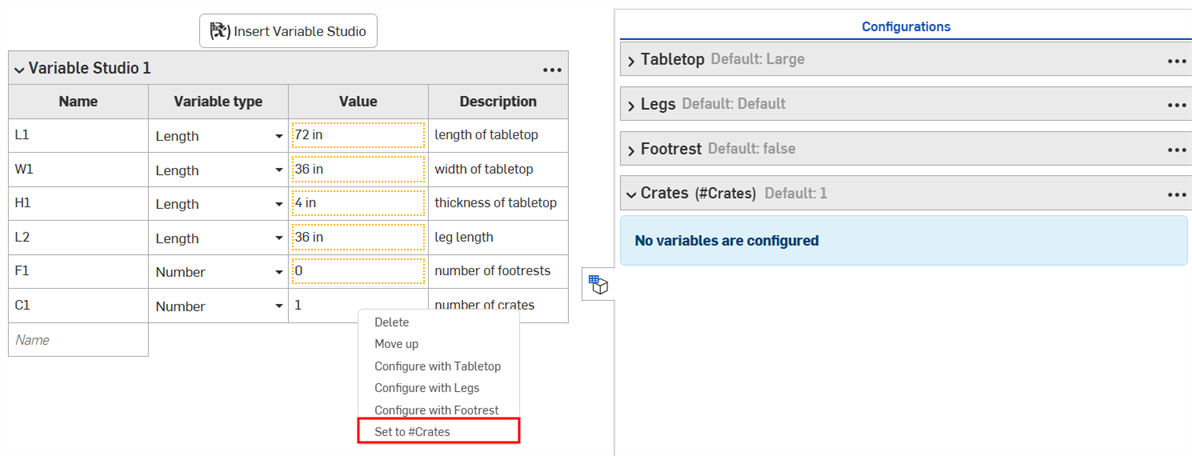
The value is added to the Configuration panel
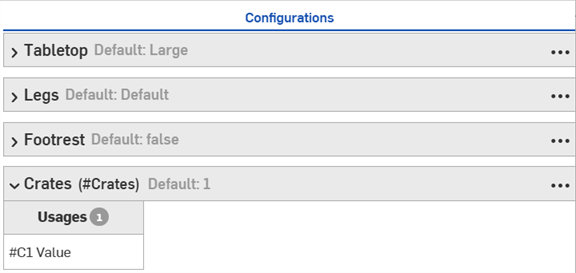
Configured Variable Studios cannot be released.
-
In the Insert Variable Studio dialog, select the configured Variable Studio.
-
Make selections in the dialog to specify which configurations you want, then click Generate.
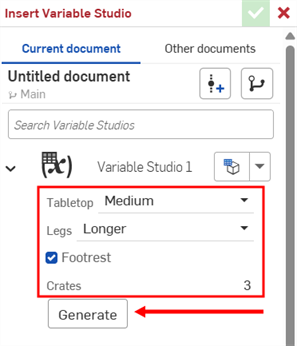
Click the Set to last viewed configuration dropdown (
 ) to select the last active configuration in the Variable Studio, or select Reset to default to set all inputs to their default values.
 -
Click the Variable Studio to insert it into your Variable table, or select individual variables from the generated list.
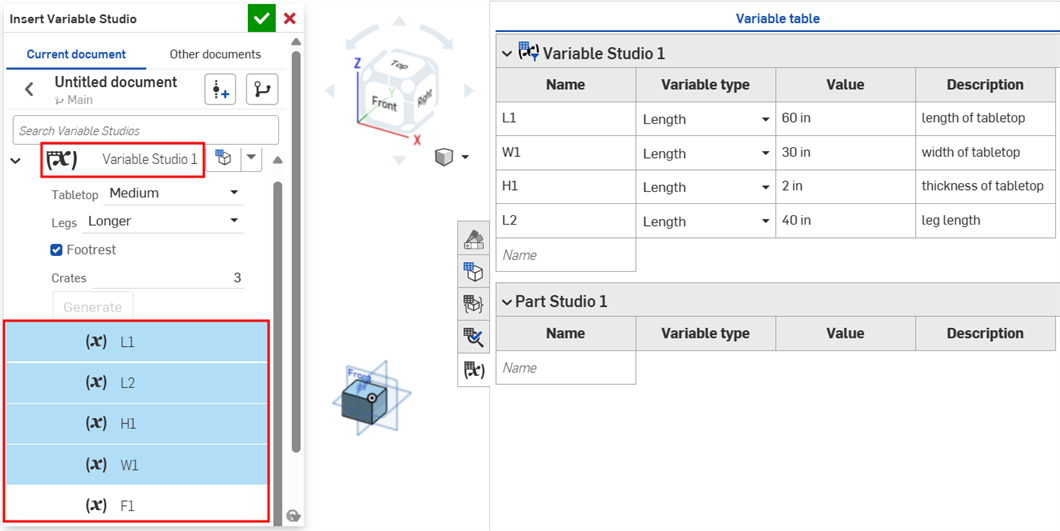
- Insert the configured Variable Studio into the Variable table as described in the last section.
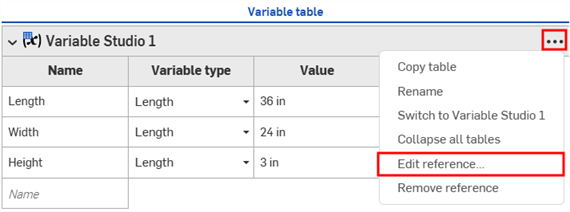
- In the Variable table, click the three-dot menu button and select Edit reference.
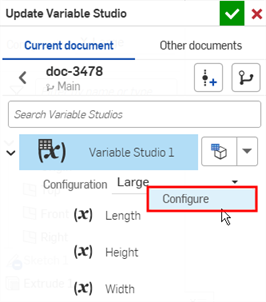
- In the Update Variable Studio dialog, right-click the configuration and select Configure (or Configure with if multiple configuration inputs exist in the Part Studio or assembly).
- A notification appears that the Variable Studio has been added to the Part Studio/Assembly configuration. Click the checkmark to close the dialog.
- Open the Configuration panel in the Part Studio or assembly. The Variable Studio configuration becomes a feature (column) in the Configuration panel.
The examples in this section show a configured Part Studio. Functionality is the same for configured Variable Studios.
The Configuration visibility conditions dialog enables you to add logic to your configurations, so you can control when certain inputs and options are available.
Consider a part with two inputs: Height and Width.
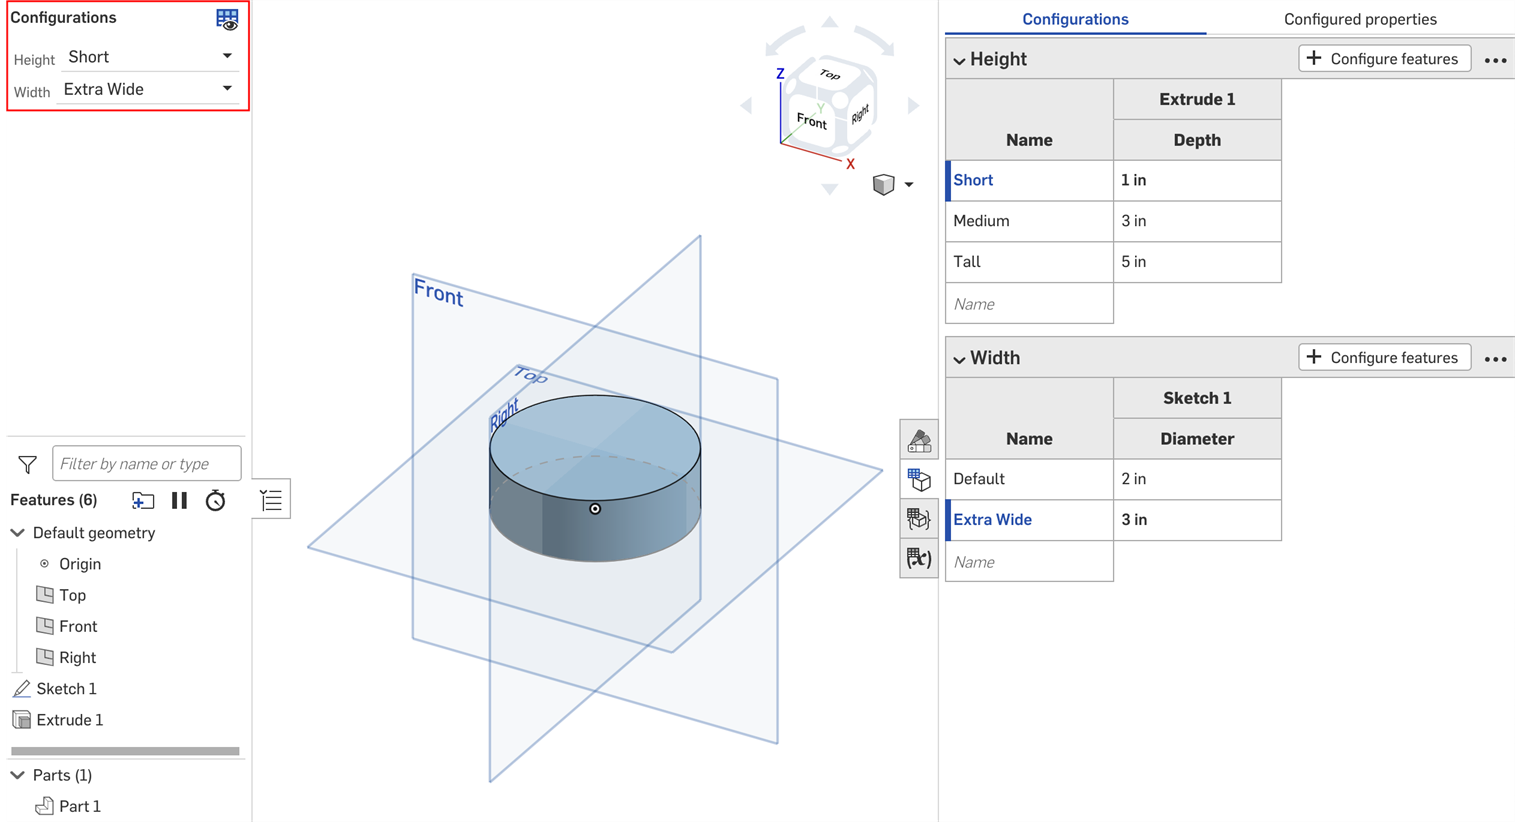
By default, a part of any height can have any width. But let's say the Extra Wide width is only available for the Tall height. In that case, we can set the conditions under which the Width input is visible.
- In the Configuration panel, click the input's three-dot button, and select Visibility conditions from the menu.
The Configuration visibility conditions dialog opens. The right panel shows a preview of the currently selected configurations. You can change the selected options directly in this panel to preview your settings.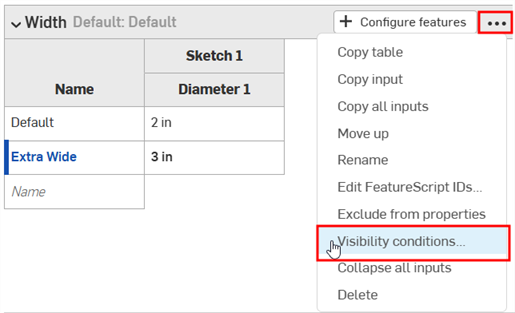
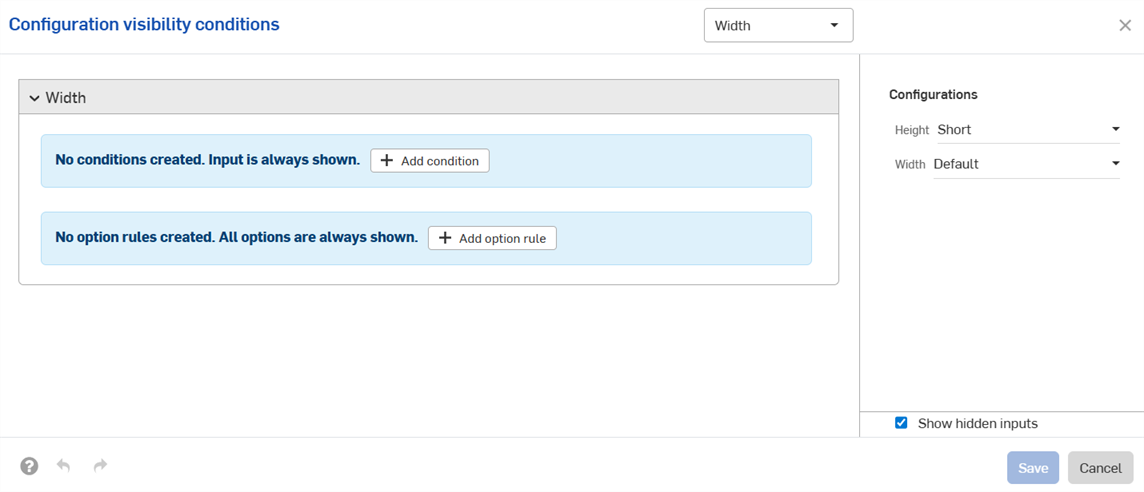
- Click Add condition.
- Click the first dropdown, and select the input that should control the visibility of this input. In this example, we'll select the Height input.
- In the second dropdown, choose either is to select specific options, or is between to select a range of options:
- Is: Click the third dropdown that appears and select the allowed option(s) for the input.
- Is between: Click the third dropdown and select the first allowed option in the range. Click the fourth dropdown and select the final allowed option in the range.
In this example, the Width input is only available for the Tall height. The preview on the right updates to reflect your selections. You can see that the Width input is no longer available for the Default height in the image below.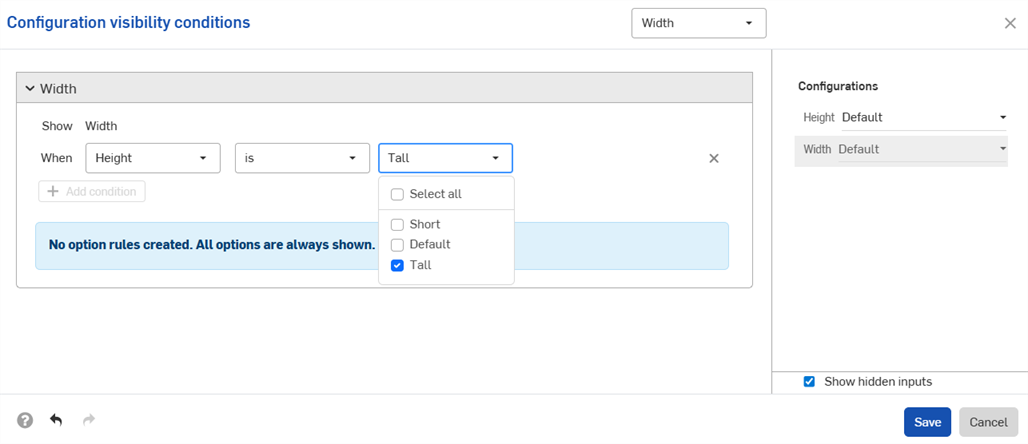
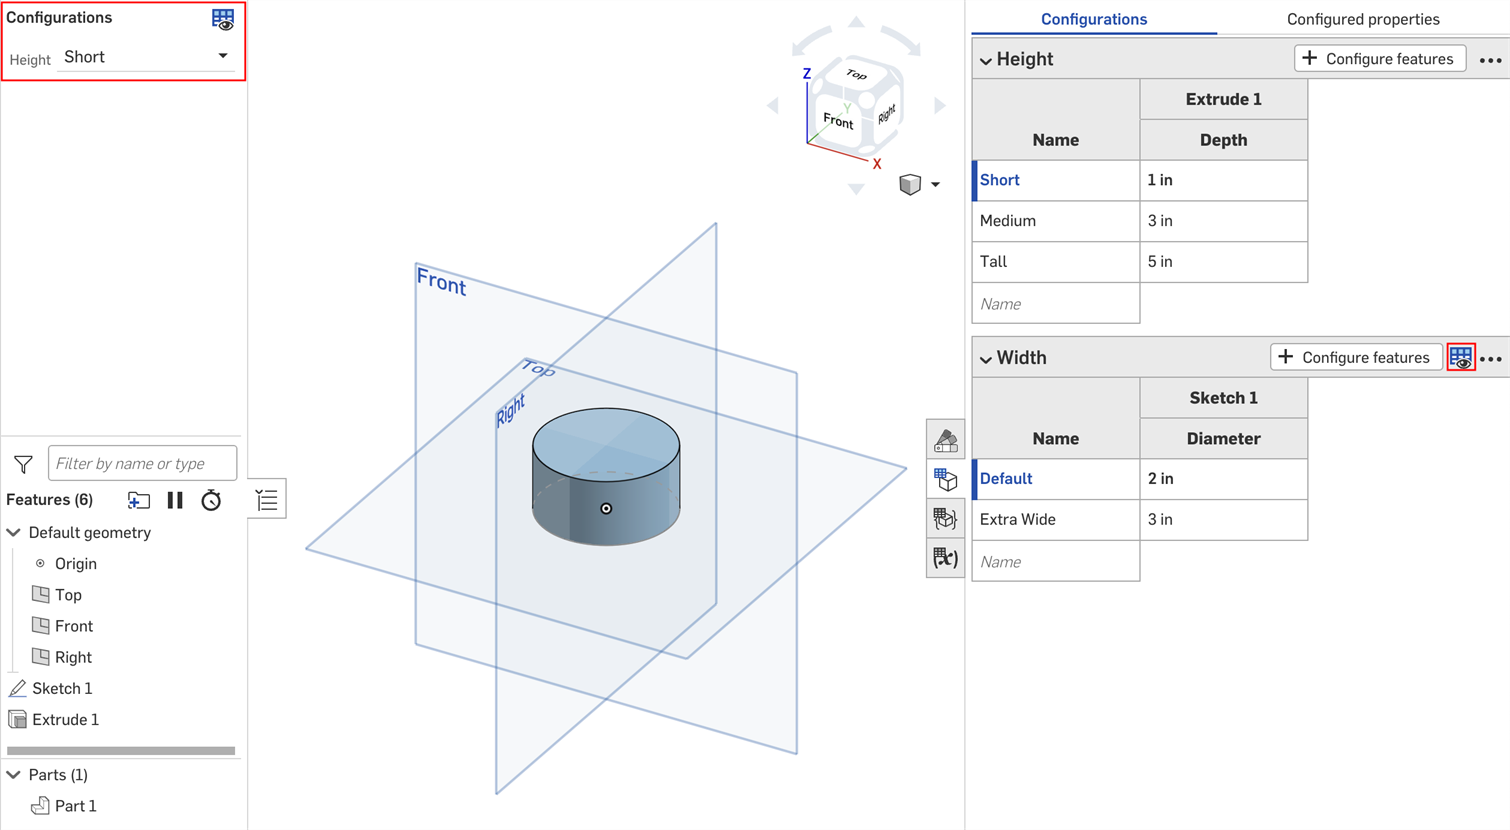
- Click Save. Now, the Width input is only visible when the Tall height is selected, and the Width input table displays the Visibility conditions icon
 .
.
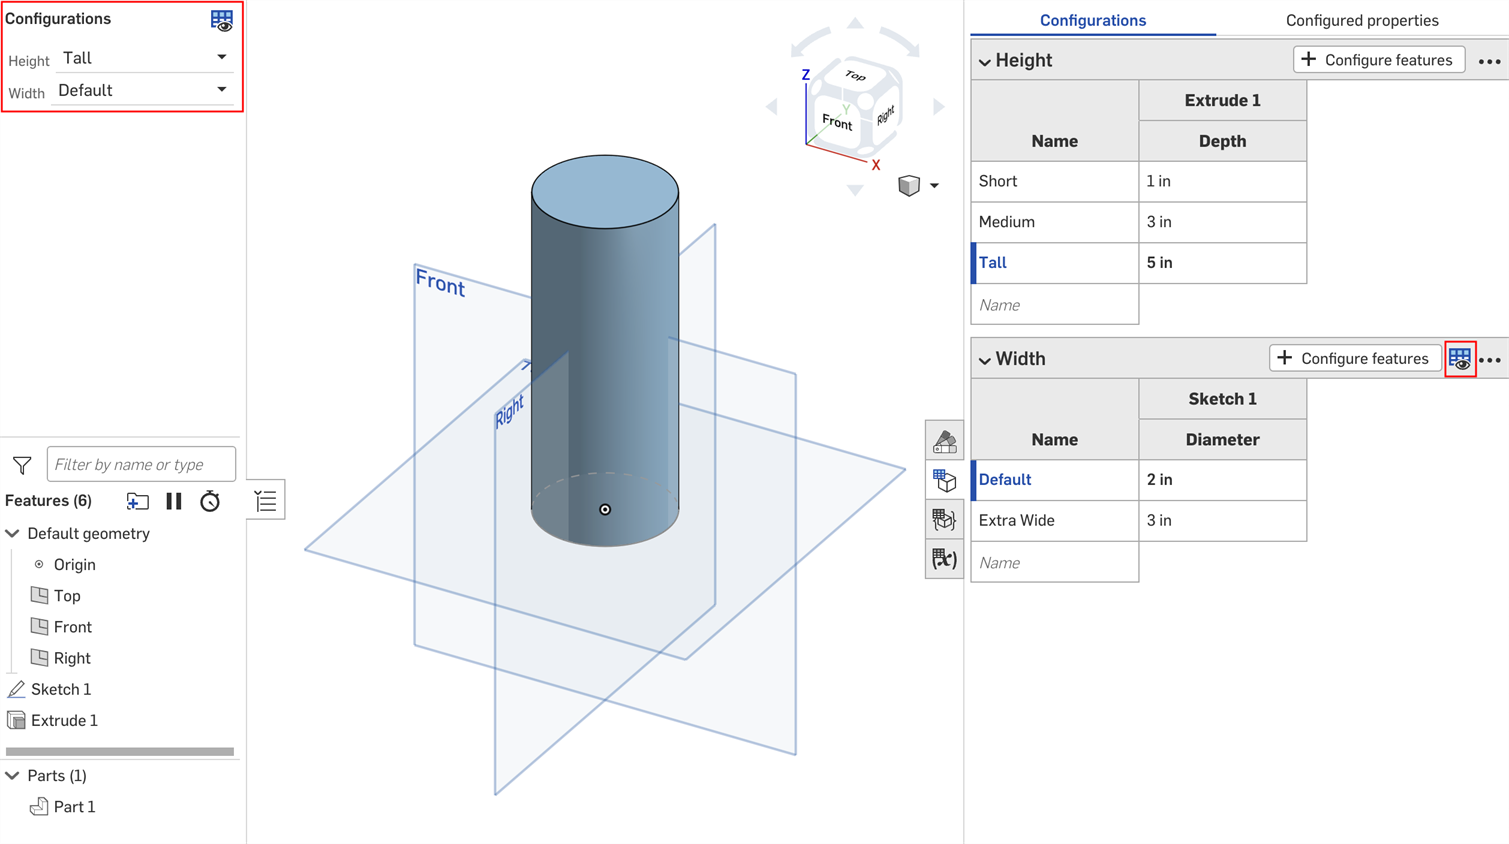
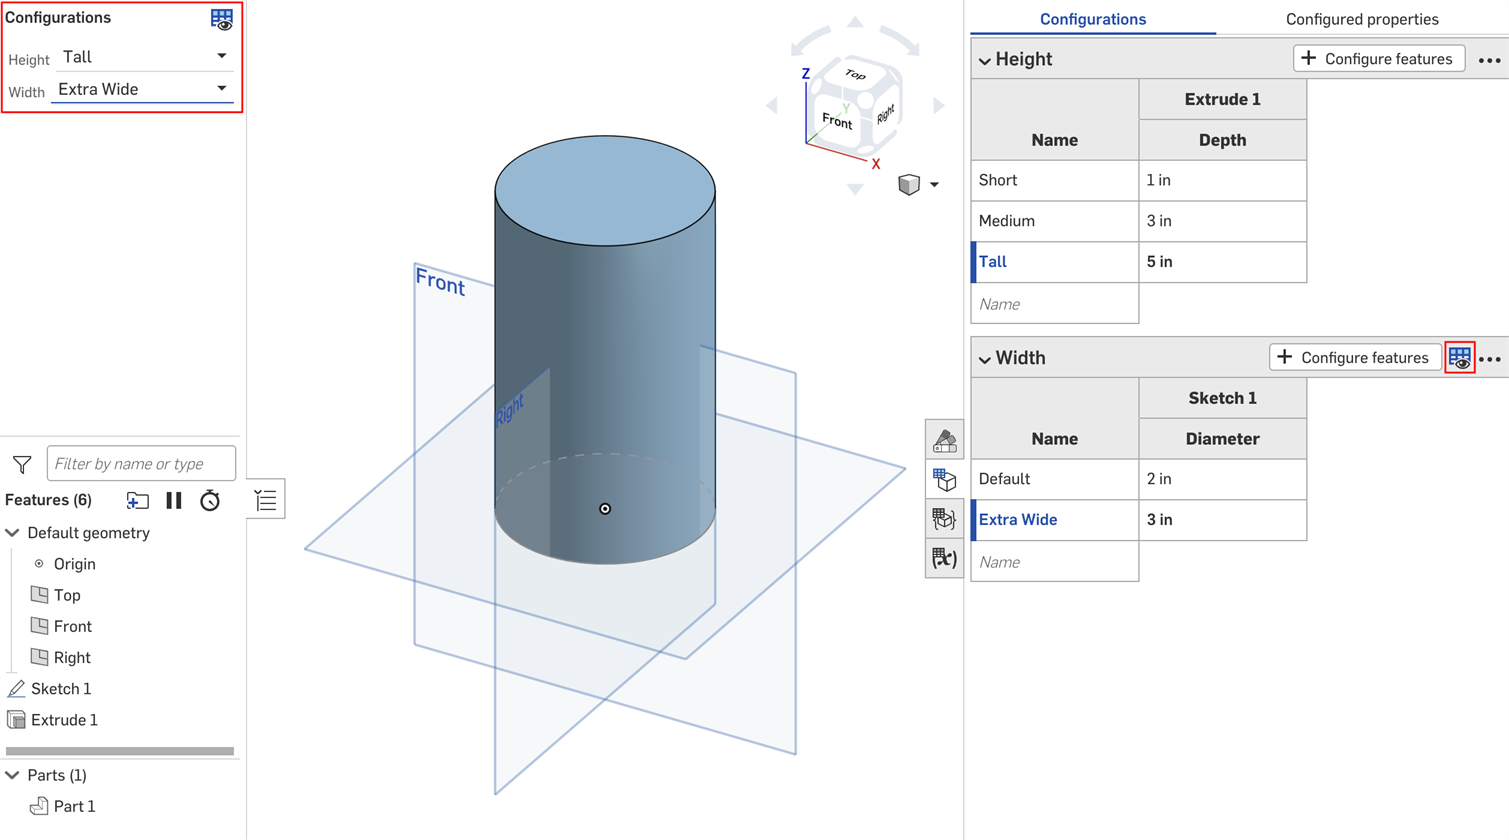
You can use the option rule settings in the Configuration visibility conditions dialog to specify the conditions under which certain options should appear.
Option rule logic can be set for list inputs only.
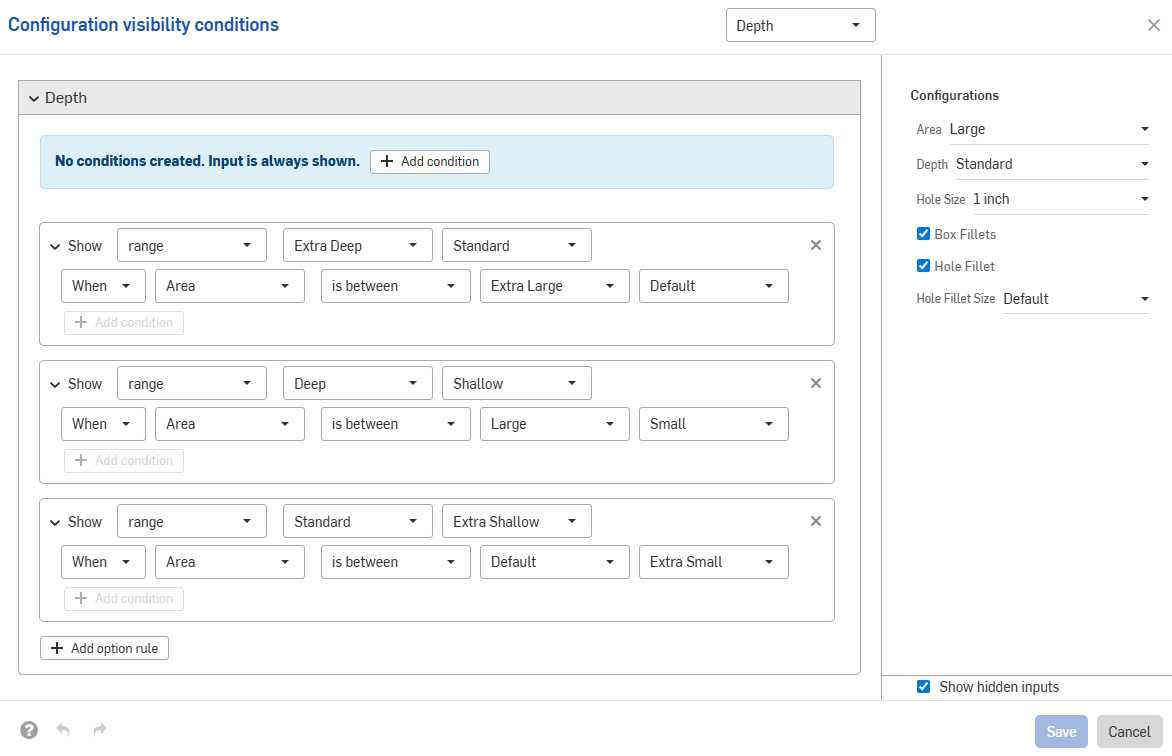
- In the Configuration visibility conditions dialog, expand an input and click Add option rule. A new section appears in the dialog:
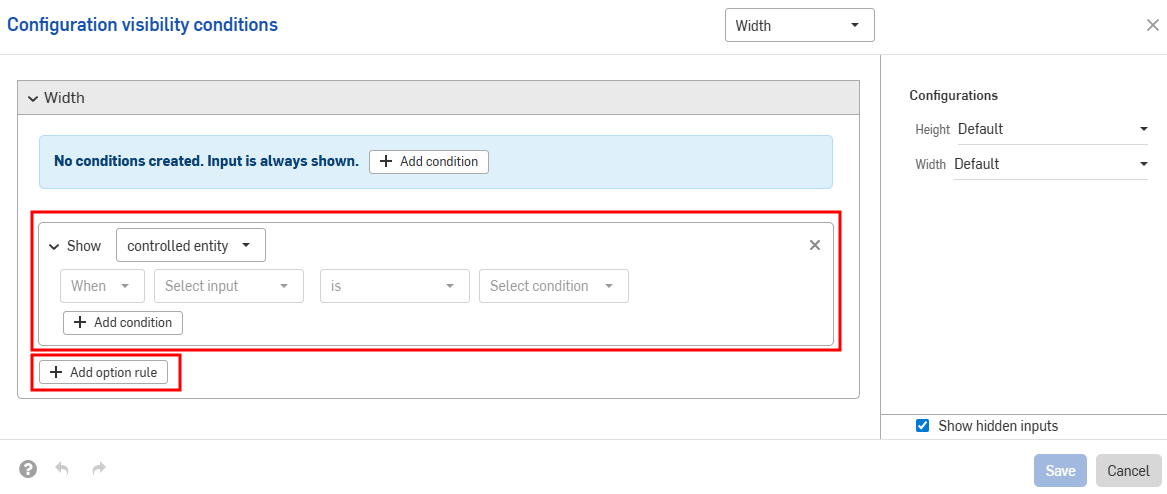
- In the Show line, choose the options that are being controlled.
- Options: Click the dropdown that appears and select the option(s) to set conditions for.
- Range: Click the first dropdown and select the first option in the range. Click the second dropdown and select the final option in the range. Ranges are inclusive of the specific options, and overlapping ranges are allowed.
- In the When line, click the When dropdown and select Always (to always show the option) or When (to set option conditions). If you choose When, you must also:
- Select the input from the second dropdown.
- Choose either is to select specific options, or is between to select a range of options.
- Is: Click the dropdown that appears and select the allowed value(s) for the option.
- Is between: Click the first dropdown and select the first allowed option in the range. Click the second dropdown and select the final allowed option in the range.
-
Continue to add logic within the configuration by clicking Add condition and repeating this set of steps.
Conditions within an option rule are combined together as AND statements; all conditions must be met for the controlled options to be visible.
- Add conditions for other options by clicking Add option rule again.
- Click Save.
In the example below, the "Thin" option is only allowed when the Hole Size is .8 inches. The Default option is always allowed:
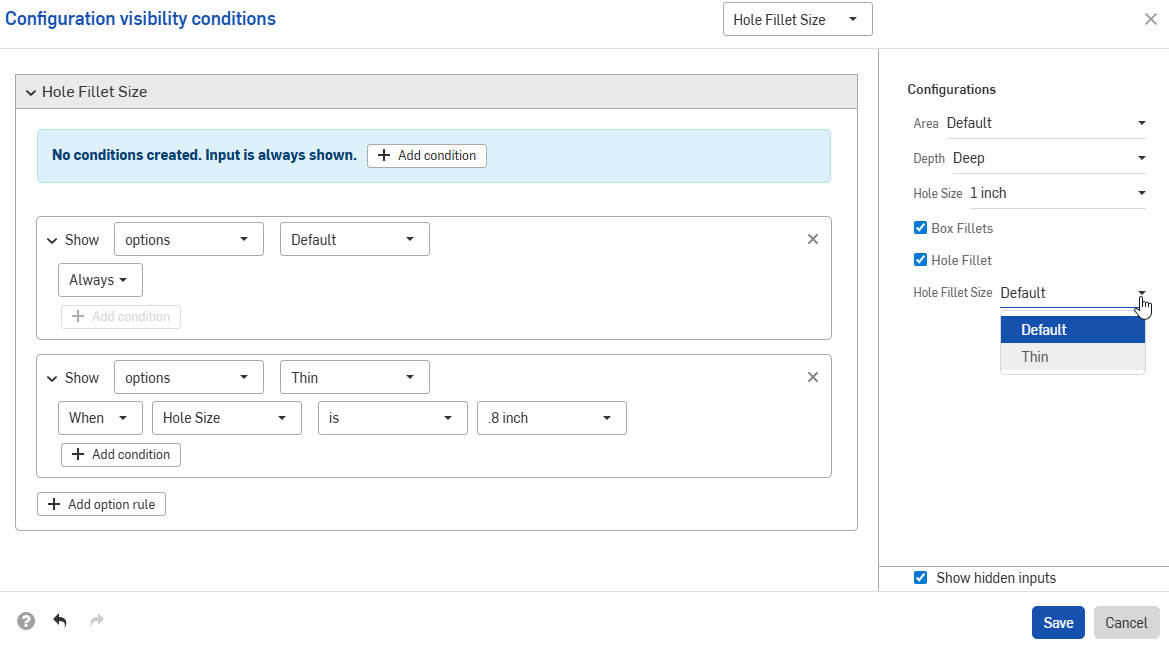
The next example uses overlapping ranges to specify visibility conditions:

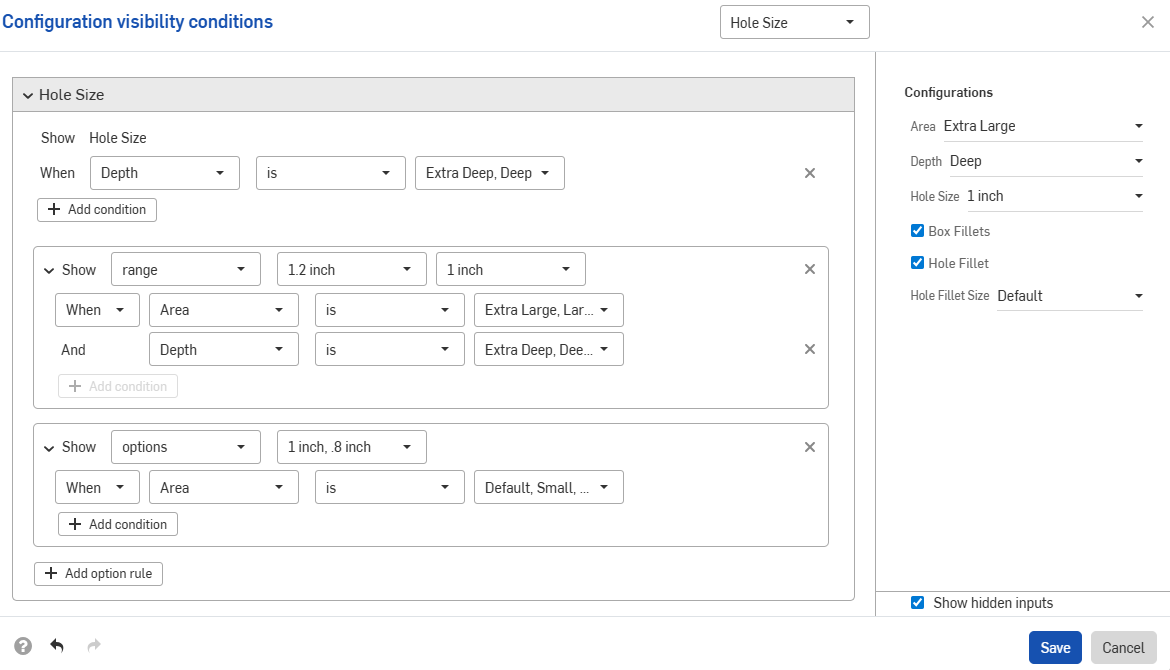
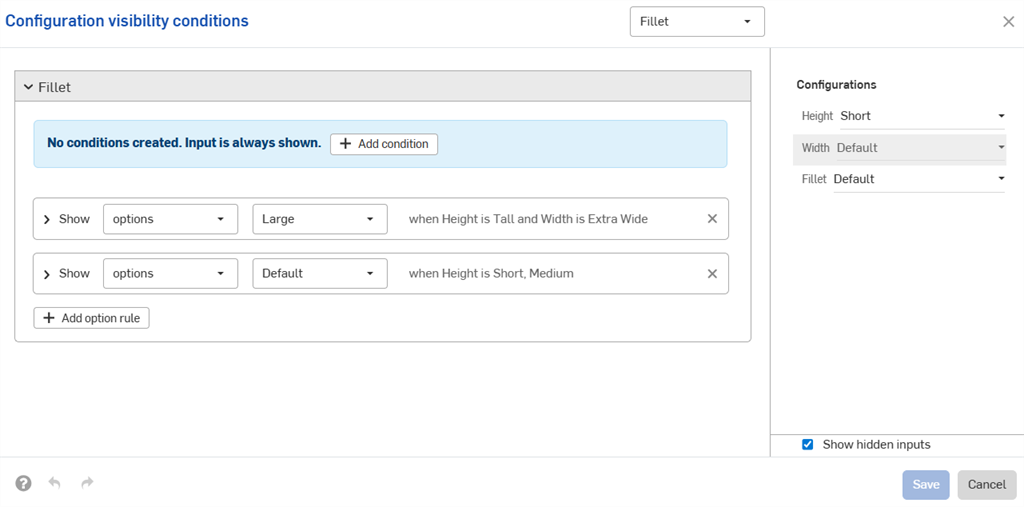
The example below uses a combination of option and range controls to set the required logic.
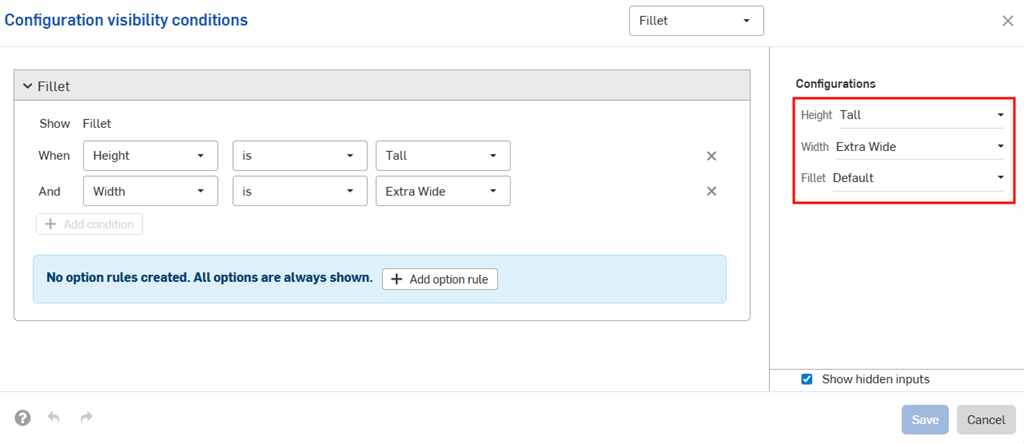
Input conditions are additive; if we add a third configuration to the above example and set the conditions shown in the image below, the Large Fillet option will only be available for parts that have both the Tall height and Extra Wide width inputs.
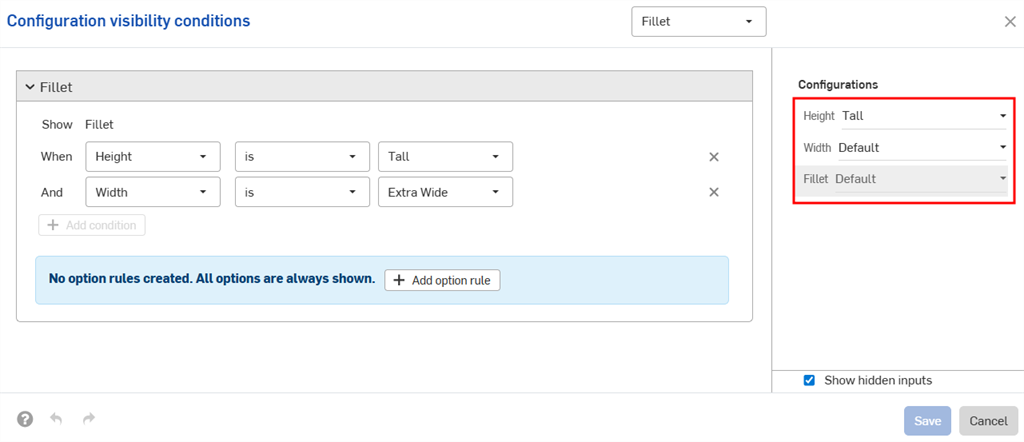
When the Default width is set for the Tall height, the Fillet configuration is hidden.
Configuration inputs can only control the visibility of inputs that appear below them in the Configurations panel. In the example, the Width input can be controlled by the Height input, but not by the Fillet input.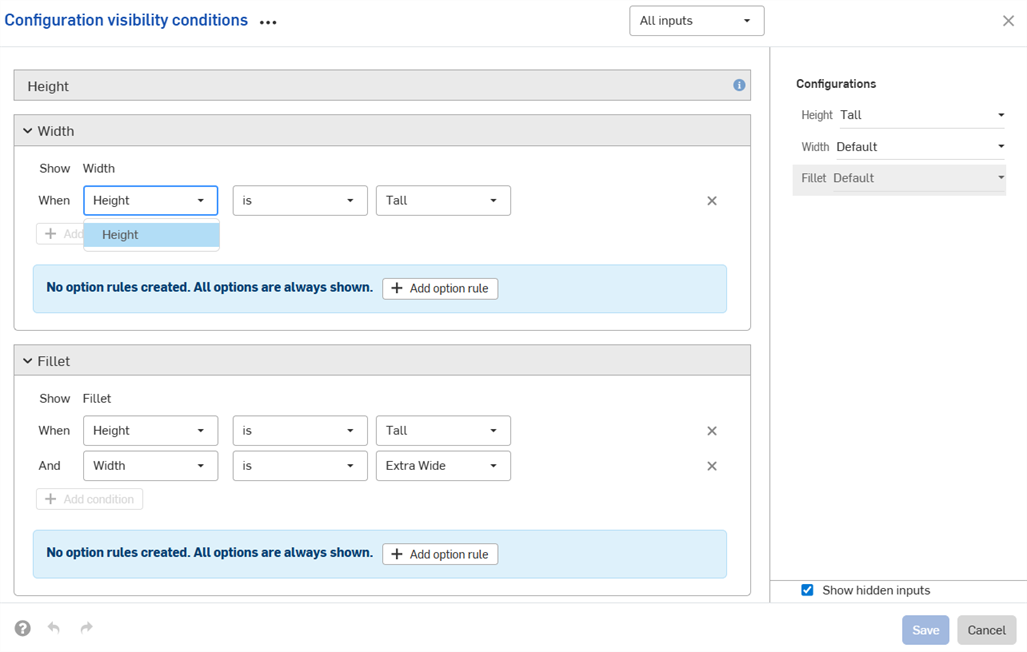
Visibility conditions are automatically repaired (removed) if the necessary inputs or options cannot be found.
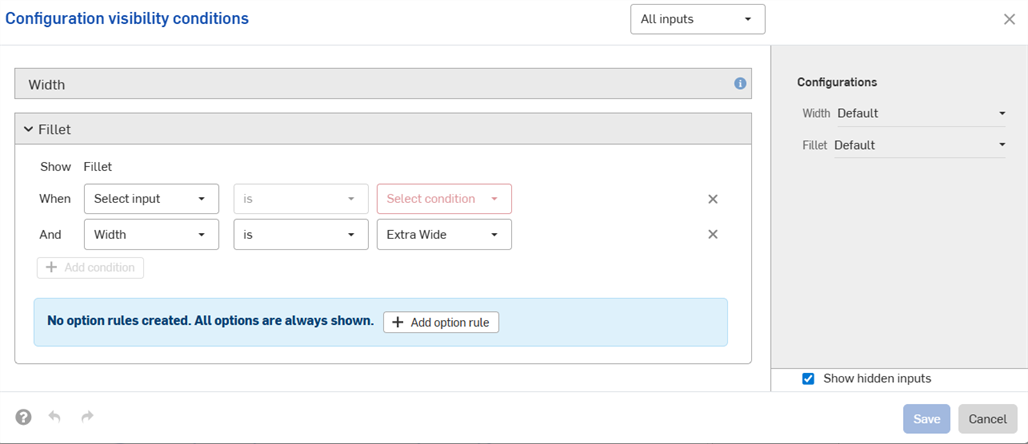
For example, if the visibility of the Width input depends on the Height input, and the Height input is deleted, the visibility conditions for Width are automatically removed. The same applies for individual options that are deleted or moved. In this example, the Height input has also been removed from the Fillet options.
You'll see a warning in your workspace, and the conditions are removed in the dialog:

-
The visibility conditions and option rules you set are available in all Insert dialogs (i.e., when inserting a configured part into an assembly). Changes made to visibility conditions are automatically reflected in all existing documents that reference the configured element.
-
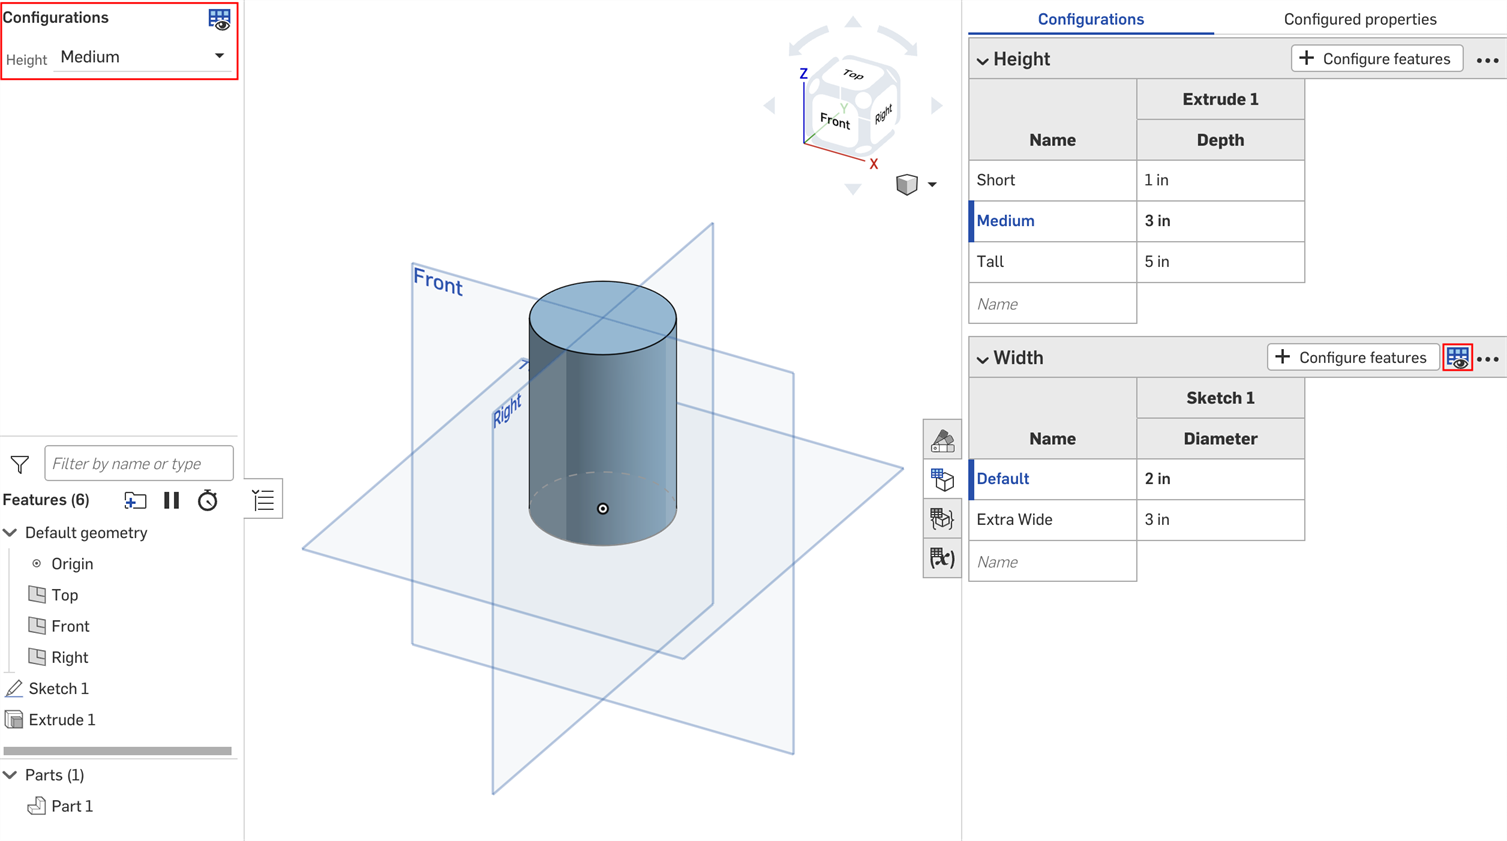
Hidden inputs always have their default value. In the first example on this page, Short and Medium height parts have the Default width, even though no width options are set.
-
If a configuration input has no visible options, it is hidden and assumes its default value.
-
-
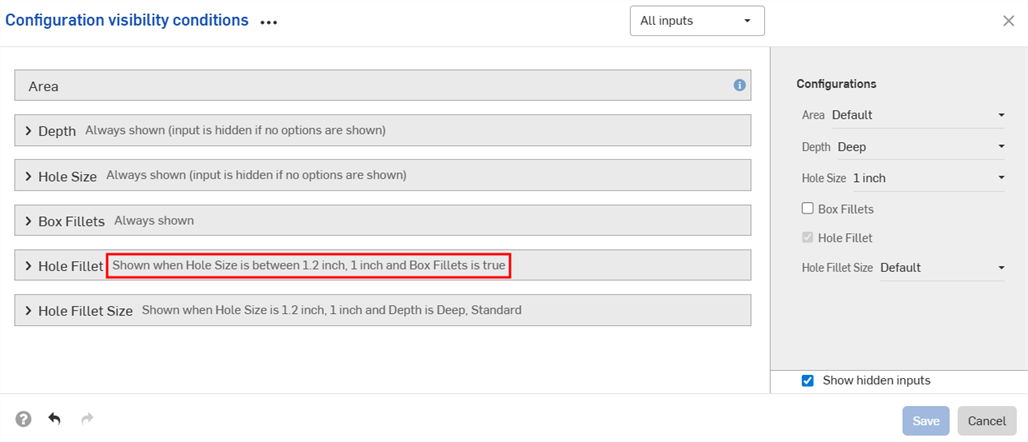
A summary of the visibility conditions is shown in the dialog when the input or option is collapsed.
-
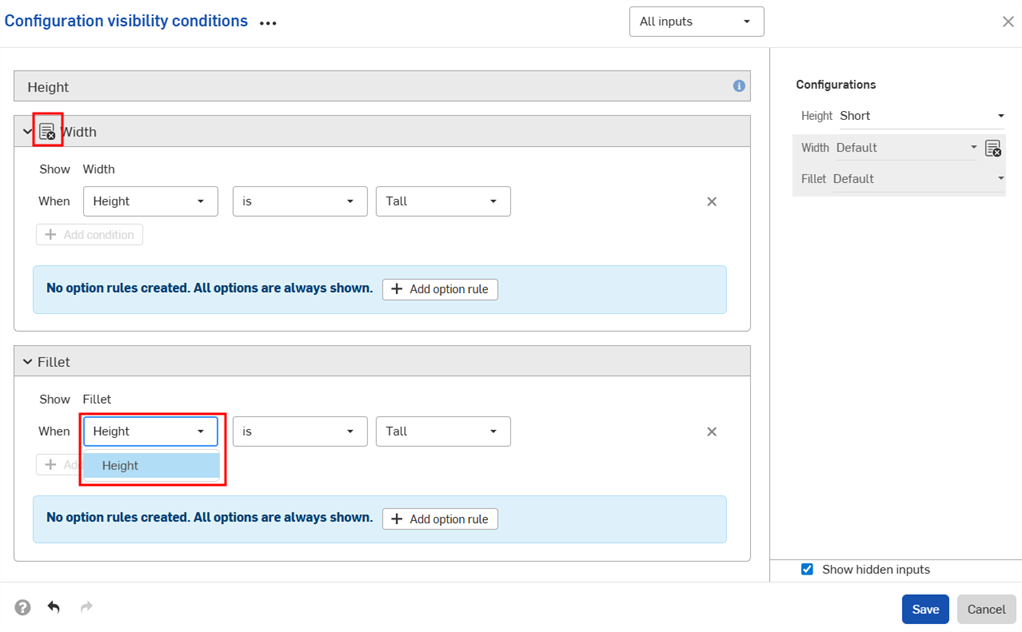
(Parts and Part Studios only): Configuration inputs that have been excluded from properties can only control the visibility of other inputs below them that have also been excluded from properties. In the example below, if Width is excluded from properties (indicated by the
 icon), it can only control the Fillet visibility if Fillet is also excluded from properties.
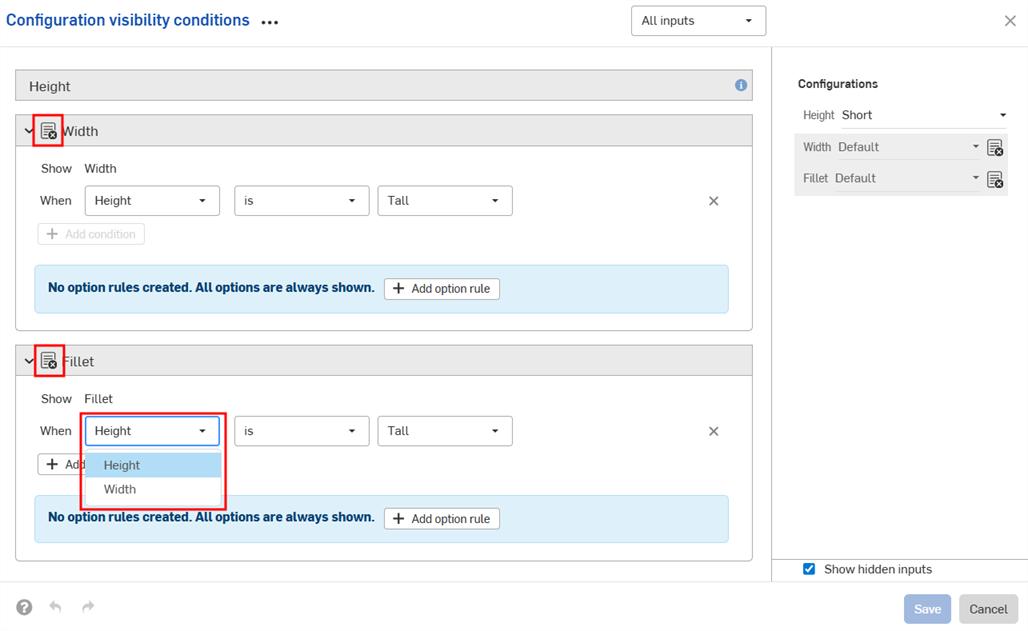
-
(Parts and Part Studios only): Configuration inputs that have been excluded from properties are treated as having their default values in release packages and revision references values. If visibility conditions prevent using the default value, the first visible value is used.
- Use the Inputs dropdown in the Configuration visibility conditions dialog to view other inputs. You can select All inputs to view all inputs available.
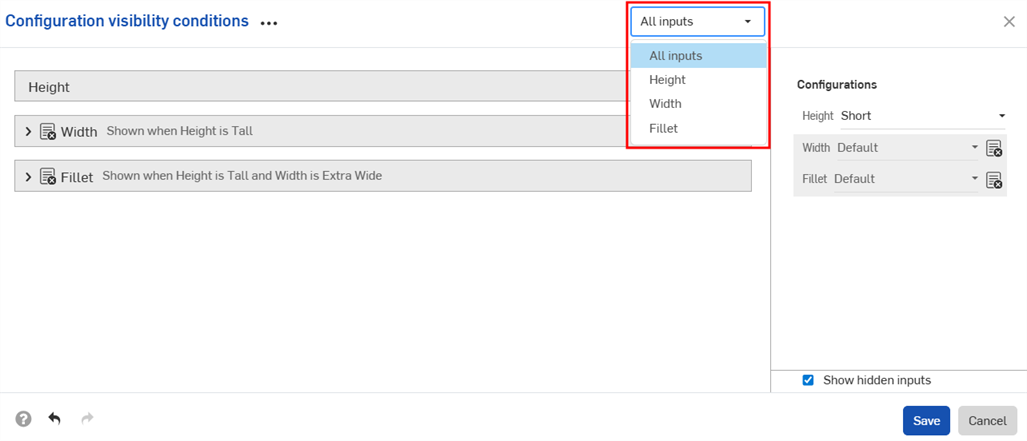
- When multiple inputs are displayed in the dialog, click the three-dot button to expand or collapse all inputs.
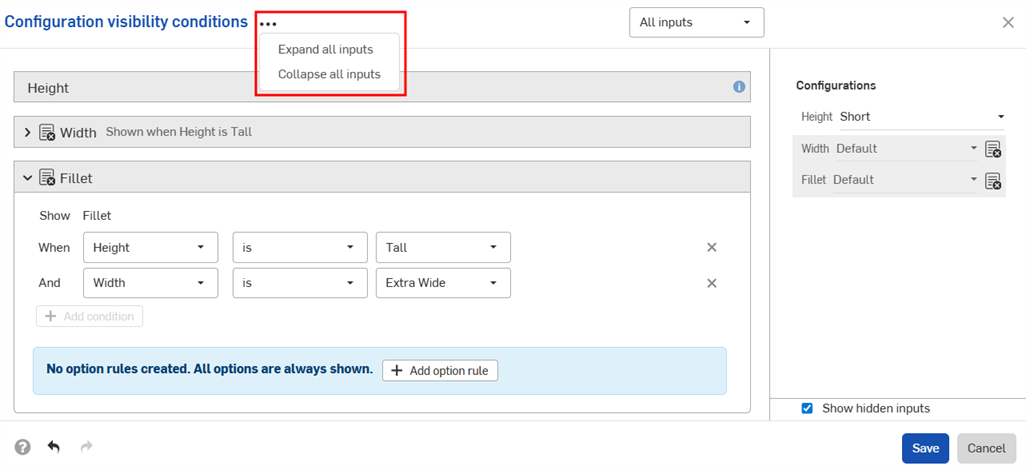
- You can use the preview section of the Configuration visibility conditions dialog as a playground to test your configurations.
- Deselect the Show hidden inputs checkbox to remove the grayed-out inputs from the dialog.
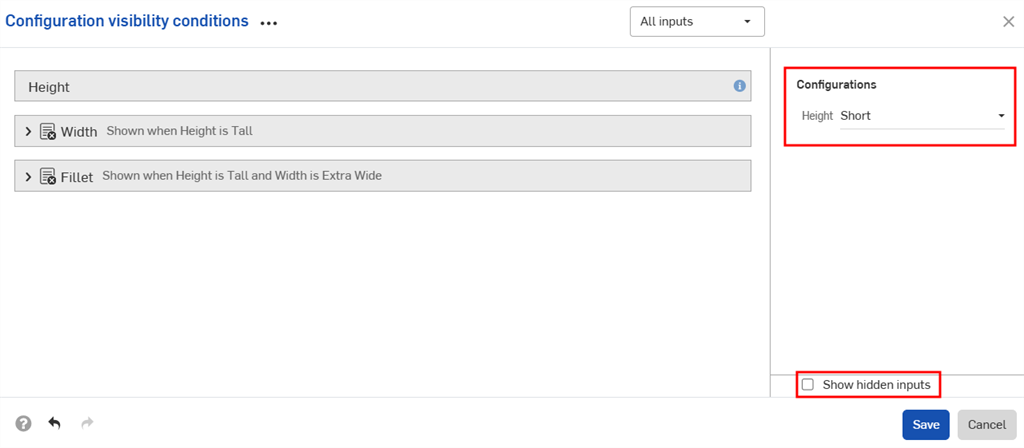
- Deselect the Show hidden inputs checkbox to remove the grayed-out inputs from the dialog.
-
When adding configured parts to assemblies, hidden inputs are grayed out in the Configurations panel.
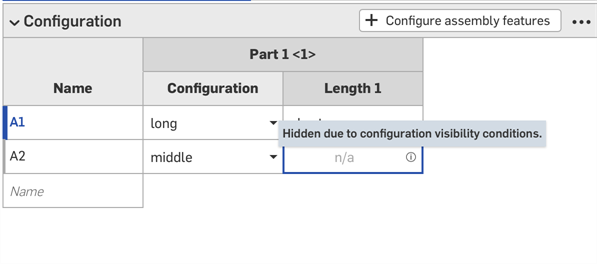
-
Click
 in the Configurations selector to open the Configuration visibility conditions dialog for all inputs. Click
  in the Configurations panel to open the dialog for that input.
The examples in this section show a configured Part Studio. Functionality is the same for configured Variable Studios.
You can copy and paste a configuration input into and out of Part Studios, assemblies, and Variable Studios. This makes it quick and easy to share configurations between designs.
-
Open the Configuration panel in the Part Studio, assembly, or Variable Studio that contains the input to copy.
-
Click the input's three-dot menu and select Copy input or Copy all inputs.
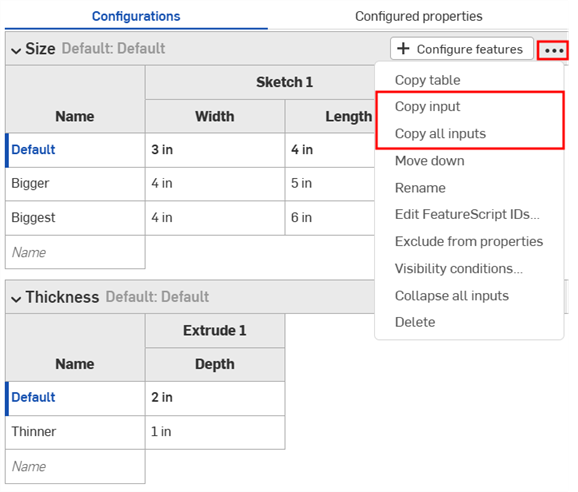
-
Open the Configuration panel in the tab to paste the input.
-
Click the arrow next to Configure Part Studio/Assembly/Variable Studio and select Paste inputs.
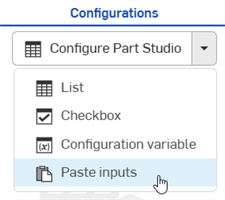
The inputs are inserted into the Configuration panel.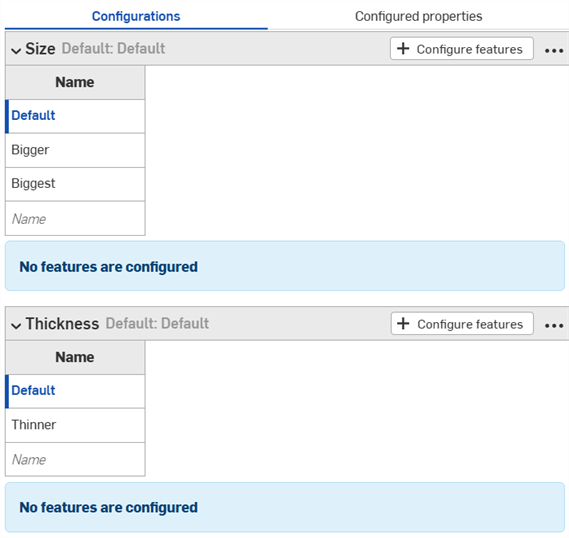
-
Select the parameters to configure from the new tab. Continue reading to learn how to now copy input values and parameters into the input tables.
Notes:
- You can copy and paste configuration inputs: between Part Studios, assemblies and Variable Studios; within the same document; and between different documents.
- All names, visibility conditions, FeatureScript IDs, and variable definitions are copied with the input.
- Copied inputs are available until the user logs out.
- References between the copied input and pasted input are NOT maintained; after pasting, changes to the original configuration input are NOT reflected in the pasted inputs.
- Pasted visibility conditions are automatically repaired (removed) if the target configuration does not have all the inputs needed to compute the visibility.
- Configuration inputs with the same internal FeatureScript IDs are not pasted. To fix this, you can delete the configuration input with the same internal FeatureScript ID and paste again.
You can copy and paste into and out of a configuration, to aid in entering or editing values.
To copy values and parameters:
-
Open the
 menu in the upper right corner of the Configuration panel.
- Select Copy table:
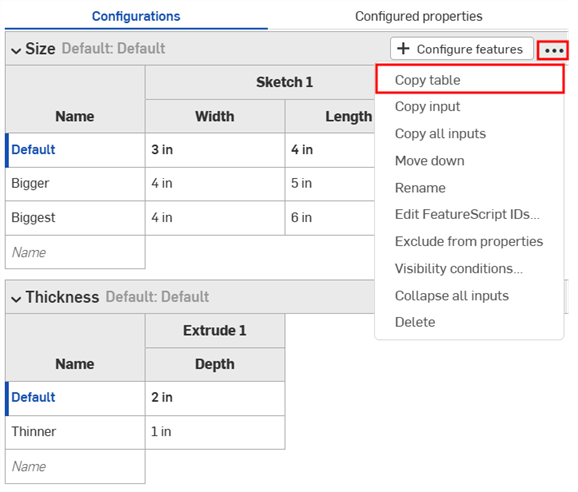
- Once you have copied the table, you can paste it into a spreadsheet:
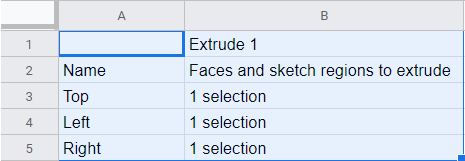
Note that the column names also come in with the table, as shown above. Now you can edit the table and copy/paste it back into Onshape:
- Select just the rows and columns with data (not the column names or headings), as shown in blue below:
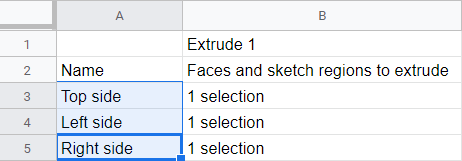
You can also pad your table with extra empty rows, if you wish. Just include the extra rows in the spreadsheet when selecting for the copy command.
- Issue a Copy command.
- In the Onshape Configuration table, click the top, left cell of the table.
- Issue a keyboard Paste command:
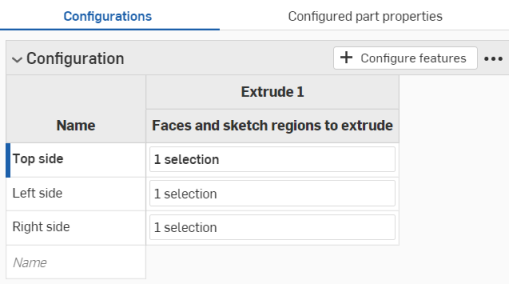
Onshape automatically replaces whatever data was in the rows and columns of the configuration input table with the data that was copied. Onshape also includes the default units for each input, automatically.
Note that if there are more rows copied from the spreadsheet than are in the Onshape configuration input table, those rows are included in the paste. Onshape creates the rows on the fly.
However, if there are more columns copied from the spreadsheet than are in the Onshape configuration input table, those columns are not included in the paste. Onshape does not yet create columns on the fly. You can, however, create additional columns (parameters) in the configuration table before pasting.
- Click an input name to rename it.
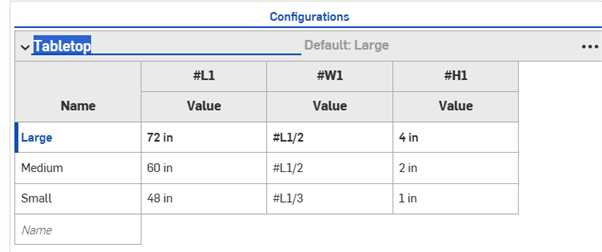
- To remove a value or description from a configuration, right-click it in the Variable Studio and click Unconfigure or Unconfigure from.
- To modify options in a configuration input, right-click the row.
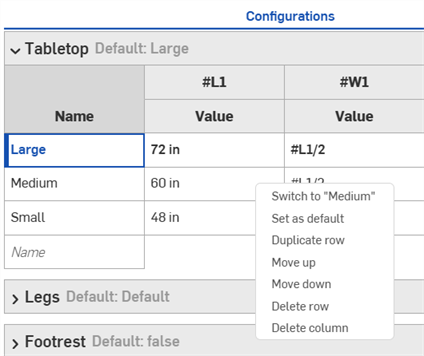
Select from one of the following options:
- Switch to - Set the configuration to the option specified in the selected row.
- Set as default - Set the selected row as the default for the input.
- Duplicate row - Copy the selected row and insert the copy into the table.
- Move up/Move down - Reorder the rows in the table.
- Delete row - Delete the row from the table.
- Delete column - Delete the column from the table. The first column cannot be deleted.
- To modify a configuration input table, click its three-dot menu on the right side of the Configuration panel.
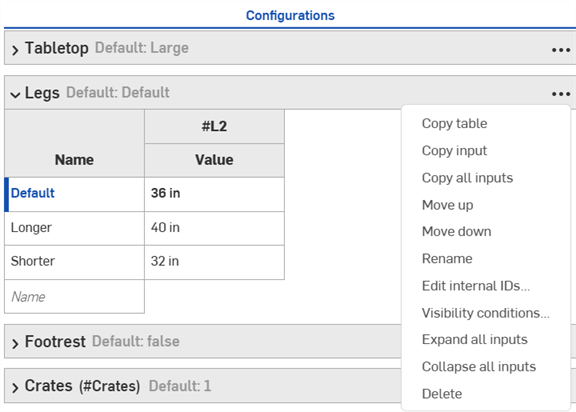
Select from one of the following options:
- Copy table/inputs/all inputs - Copy and paste input tables and values. See Copying configurations.
- Move up/move down - Reorder the tables in the Configuration panel.
- Rename - Rename a configuration input. You can also click an input name in the Configuration panel to rename it.
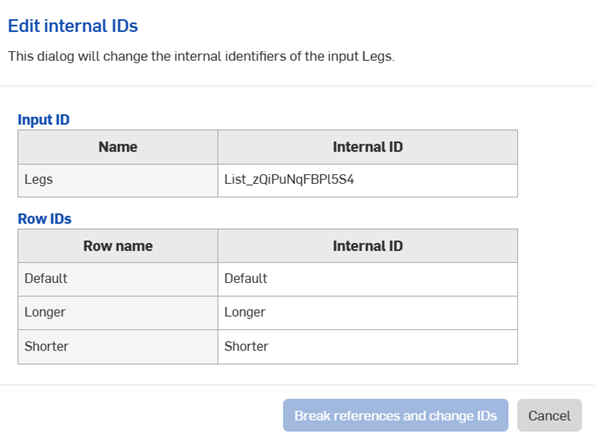
- Edit internal IDs - Open a dialog to change the internal FeatureScript identifiers of the configuration input. When finished, select Break reference and change IDs.
- Visibility conditions - See Setting visibility conditions.
- Expand/collapse all inputs - Expand or collapse all inputs in the Configuration panel.
- Delete - Delete the configuration input table.
iOS support for Variable Studio configurations is limited to viewing and using configurations that are created on the desktop (browser) platform only.
