Managing Your Onshape Free Subscription
![]()
![]()
![]()
The Account menu is located in the upper-right corner of the interface. The icon for the Account menu may look like this: ![]() , with your user name to the right. From this menu you can access:
, with your user name to the right. From this menu you can access:
- My account - Manage and maintain your Onshape account, set preferences, notifications settings, security, and more. See My account settings for detailed information.
- Company/Classroom/Enterprise settings - View the account settings for your company/classroom/enterprise. See Company/Classroom/Enterprise settings for more information.
- View support tickets - View any support tickets you have submitted. If you want to submit a support ticket, look in the Help menu (the icon to the right of your name in the upper-right corner of the interface). See Viewing support tickets for more information.
- App Store dev portal - Available for developers and Onshape partners that want to create applications that are published in the Onshape App Store.
- View in dark mode
 - Toggles the dark mode theme on. Dark mode is a low luminance color scheme mainly featuring light elements on dark backgrounds. Dark mode is a limited feature available in Part Studios, Render Studios, Assemblies, and the App Store. It is currently not available in Drawings, PCB Studio and Enterprise analytics, though the toolbars and menus surrounding the main graphics area are displayed in dark mode.
When toggled off, the color scheme returns to the default light mode featuring dark elements on light backgrounds.
View in dark mode is session-specific. The toggle resets to the original light mode theme after signing out. To have the dark mode theme persist after signing out, apply it via My account > Preferences > Theming.
- Sign out - Sign out of and close your Onshape session.
See Managing Your Onshape Plan > Signing in to an account.
To upgrade to a Standard subscription from a Free or Education subscription, click the Upgrade button on the Documents or My account page.
You are directed to a new tab with Onshape plans explained. Click the Select Standard button. Fill out the form and click the Confirm payment information button. Review and confirm your purchase.
A Professional Trial is available so that you can try out all the features of a Professional subscription, and then transition to a full Professional subscription once the trial is over. See Managing your Professional Trial for more information.
Onshape's Professional subscription allows you to create unlimited private documents. The Professional subscription is a company subscription (you are able to pay for one or multiple users).
- If you are new to Onshape and do not yet have an account, click the Sign up link on the Onshape home page and follow the instructions.
- If you already have an Onshape account, click the
Learn more
button on the Documents or My account page. The Explore Onshape's premium features dialog opens. Do one of the following:
- Click the Plans and pricing link at the bottom left of the dialog, then click the REQUEST TRIAL link under the Professional subscription column. Fill out the Request a Professional Trial form and click SUBMIT.
- Click the Chat now to learn more button at the bottom right of the dialog. A chat bot opens where you can discuss upgrading with a Sales representative.
When upgrading from a Free to a Professional subscription, any View only documents you previously saw on the Documents page are now editable documents. Onshape automatically makes all of your documents accessible to you.
To upgrade to a free EDU subscription from a Free subscription, first sign out of your free account:
-
On the Onshape sign in page, click Sign up.
-
On the Get started with Onshape page, enter the same contact information you used for your Free subscription.
-
Select Student for the What best describes you field.
-
Select your school level.
-
Check the agreement box and click Get Started.
-
Complete step 2.
-
Click Create Account.
You will be directed to a sign in page. Enter your credentials and sign in to your Onshape EDU subscription.
On iOS, users cannot create or delete accounts. Account creation or deletion must be done on Desktop or Android.
Users can delete their account, removing all personal data as well as document data from Onshape on their own, without the need to contact Onshape. If you have another type of Onshape account, you must first downgrade to Free before you can delete your account.
If you choose to remove your Onshape account, expect the following:
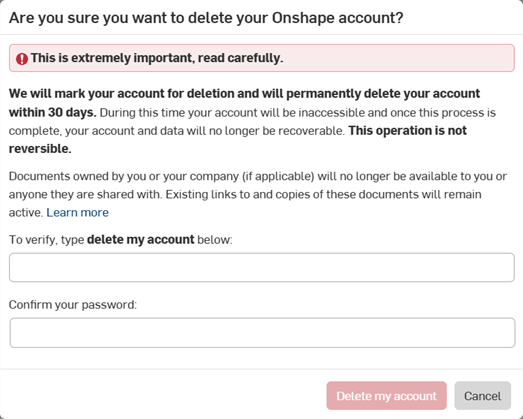
- Your account will be deleted within 30 days and during this time your account and the documents therein will be inaccessible.
- Once the request is completely processed, your account and all data will no longer be recoverable. Documents owned by you or your company (if applicable) will no longer be available to you or anyone those documents were shared with.
- Any existing links to (internal to a document, such as a linked part) and any copies of these documents will remain active.
To delete your Onshape account:
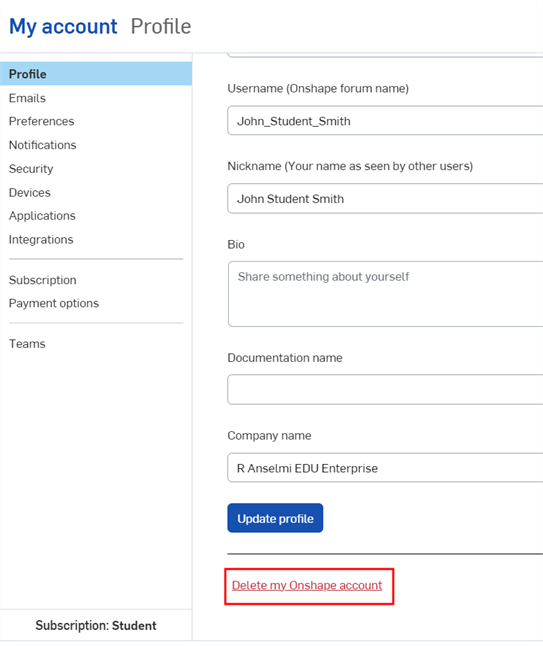
- Proceed to the My account > Profile tab.
-
At the bottom of the window, click the Delete my Onshape account link:

- Read the modal window carefully, it explains what actions will be taken on your behalf and what will happen to your documents:

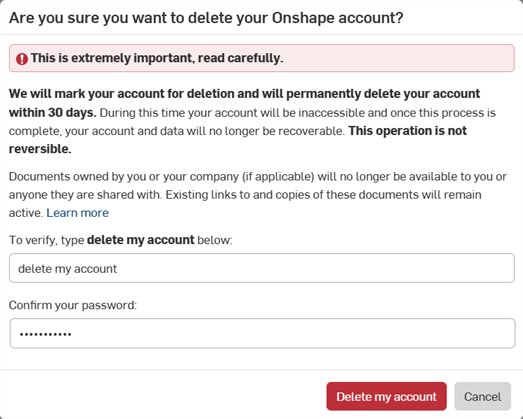
- When you understand the consequences of your actions, enter delete my account and then your password:

- Click the button.
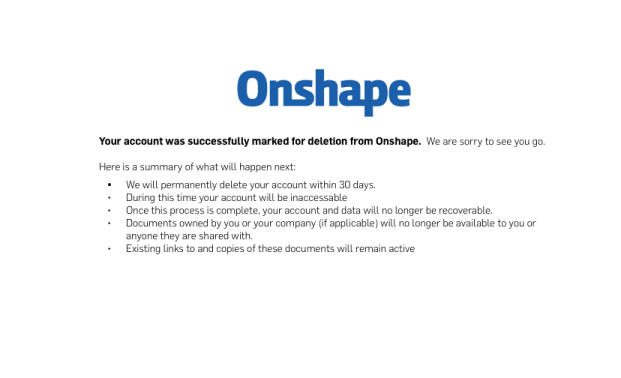
A summary of events is displayed. We recommend you take a screenshot of this information for future reference as it explains what actions are taken while we delete your account, and as well as what happens to your documents.

After four years of inactivity, your Onshape account will automatically be deleted. For more information on automatically deleted accounts, reach out to Onshape Support.