Delete Face
![]()
![]()
![]()
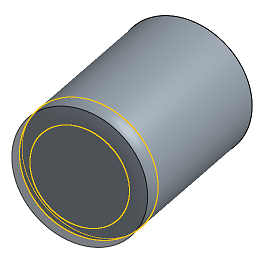
Remove geometry from a part. Select whether to heal the surrounding faces (by extending until they intersect), cap the void, or leave the void open. This Direct Editing tool is especially convenient if you don't have the parametric history of the part, as is often the case with an imported part.
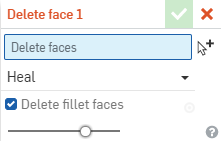
Delete face allows you to remove geometry from a part. Select whether to heal the surrounding faces by extending until they intersect, cap the void by placing a face over the remaining void, or leave the void open. This direct editing tool is especially convenient if you do not have the parametric history of the part, as is often the case with an imported part. To delete a face, select the Delete face command on the toolbar, then select the faces to delete. Select Heal, Cap, or Leave open. Keep the Delete fillet faces checked to delete adjacent filleted edges, and then click the green checkmark to accept the deletion.
- Click
 .
.
- On the model, select the part face or faces to delete.
- Select how to treat the remaining void:
- Heal - Extend the surrounding faces until they intersect.
- Cap - Place a face over the remaining void.
- Leave open - Do nothing, leaving the face removed and void visible; this creates a surface out of the existing solid.
Onshape remembers the selection for how to treat the void and opens the dialog with the last selected option in subsequent operations.
- Check Delete fillet faces to indicate whether or not to delete the adjacent filleted faces as well.
-
Click
 .
.
The
Create Selection
arrow
![]() (next to the Faces field) is useful when selecting related faces for Delete face.
(next to the Faces field) is useful when selecting related faces for Delete face.
This lists the collection of surface feature tools. This is not an exhaustive list. Additional Feature tools may be used when modeling surfaces. See Surfacing for additional information.
-
 Thicken - Add depth to a surface. Create a new part or modify an existing one by giving thickness to a surface and converting it to a solid, adding or removing material from an existing part or surface, or intersecting parts in its path.
 -
 Enclose - Create a part by selecting all boundaries surrounding an empty space to form a solid. Use any set of surfaces and solids (including planes and faces) that intersect each other or connect at a boundary to create a volume. Create a new part or modify an existing one by adding, removing, or intersecting parts.
 -
 Fillet - Round sharp interior and exterior edges and define as a standard constant radius, more stylized conic, or variable by selecting Edge fillet. Optionally apply a Full round fillet to create a seamless blend of one or more faces between two opposing sides.
 -
 Face blend - Round sharp connected or disconnected interior and exterior faces to create a seamless blend between the faces or detach the blend to create new faces, defining a radius or constant width. Further define the blend cross section (rolling ball or swept profile), symmetry, control, trim, constraints, and limits.
 -
 Delete face - Remove geometry from a part. Select whether to heal the surrounding faces (by extending until they intersect), cap the void, or leave the void open. This Direct Editing tool is especially convenient if you don't have the parametric history of the part, as is often the case with an imported part.
 -
 Move face - Translate, rotate, or offset one or more selected faces. This Direct Editing tool is especially convenient if you don't have the parametric history of the part, as is often the case with an imported part.
 -
 Replace face - Trim a face or extend a face to a new surface. This Direct Editing tool is especially convenient if you don't have the parametric history of the part, as is often the case with an imported part.
 -
 Offset surface - Create a new surface by offsetting an existing face, surface, or sketch region. Set offset distance to 0 to create a copy in place.
 -
 Boundary surface - Create or add a surface specified by its boundary profiles.
 -
 Fill - Create a surface (or a part from surfaces) by defining boundaries and refine the surface with boundary conditions (instead of requiring the use of reference surfaces).
 -
 Move boundary - Move boundary edges of a surface in order to extend or trim it.
 -
 Ruled surface - Create a new or additional ruled surface from an existing edge or multiple edges of a sketch region.
 -
 Mutual trim - Trim two adjacent surfaces by extending intersections to complete the trim.
 -
 Constrained surface - Create a surface from a selection of points or mesh data within a specified tolerance. Display deviations and optimize for performance or smoothness.
Remove geometry from a part. Select whether to heal the surrounding faces (by extending until they intersect), cap the void, or leave the void open. This Direct Editing tool is especially convenient if you don't have the parametric history of the part, as is often the case with an imported part.
Steps
- Tap the Delete face tool.

- Select faces to delete.
- Select how to treat the remaining void:
- Heal - Extend the surrounding faces until they intersect.
- Cap - Place a face over the remaining void.
- Leave open - Do nothing, leaving the face removed and the void visible.
- Optionally, toggle to delete fillet faces. This deletes adjacent filleted faces as well.
- Tap the checkmark.
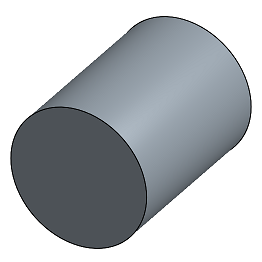
Before:
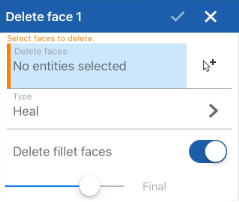
During:
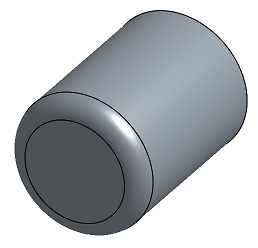
After: