Viewing, Selecting, and Shortcuts
The estimated time of completion is 6 minutes
Onshape has distinct methods for viewing models in the graphics area and has a helpful selection strategy and scheme throughout the user interface. Onshape also has keyboard and interface shortcuts you can use for maximum efficiency. This lesson introduces these strategies and schemes to help you use the interface with ease.
Open the document
You created the document named Primer in the previous lesson Creating Parts. Navigate to the Documents page (after signing in to your Onshape account):
- For enterprise users, click Documents at the top of the page.
- Click the Company name filter on the left.
- Click the title of the document named Primer.
- The document opens to the last active tab. (If Part Studio 1 is not selected, select it now.)
Tips
- To open a document, click the title when it's underlined.
- Click elsewhere in the row to select the document for another action.
Manipulating views
This Part Studio contains the sketch you created in Creating Parts.
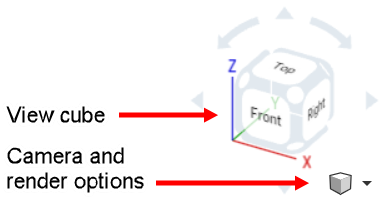
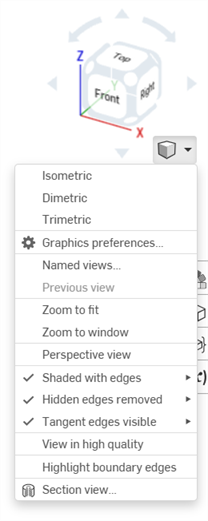
When setting your preferences in Setting Your Preferences you may have selected a familiar CAD system as a basis for mouse movements when viewing 3D parts and assemblies and 2D drawings. In addition to those methods, Onshape also provides a View cube and Camera and render options menu in the top right of the graphics area. The View cube and Camera and render options allow for easy, and automatic (respectively) rotation of your model space:

- Click the arrows to rotate the view in 45 degree increments.
- Click one of the white circles at the corners of the cube to return to a trimetric view.
- Click one of the sides of the cube to view the graphics area normal to that plane (top, bottom, front, back, right, left).
- The small cube (Camera and render options) below the large View cube contains a menu of additional viewing options. Click the small down arrow to open the menu:

When using Onshape on a mobile device, Onshape uses the mobile OS-specific gestures.
Selecting entities
Onshape uses color to indicate selection. For example, selected entities in the graphics area like edges, faces, and sketch entities are highlighted in yellow. Names in the Features and Parts lists are highlighted in blue.

The selected sketch is highlighted in yellow in the graphics area and the name of the sketch is highlighted in blue in the Features list; folders (when present) are highlighted in gray
Select entities simply by clicking. Onshape selection is additive and a small number appears at the cursor for up to 5 entities selected. When more than 5 entities are selected a small+sign appears next to the number 5.
To deselect, simply click on the entity a second time. To clear an entire selection of multiple entities, click in empty space, press the Space bar, or right-click and select Clear selection.
Tips
- Onshape selection is additive. Click to select, click again to deselect.
- Click in white space (or press the spacebar) to deselect multiple selections at once.
Undoing, Redoing and, Restoring
Every open dialog has two options for being closed or dismissed:
-
 - KEEP the actions taken and close the dialog.
 -
 - CANCEL all the actions taken and close the dialog.
Recovering from accidentally canceling
If you mistakenly cancel the dialog, you do not necessarily have to recreate your work.
If you click the ![]() of a Sketch dialog after making changes, Onshape displays this message:
of a Sketch dialog after making changes, Onshape displays this message:

To reverse the action of clicking the ![]() , click the Restore link in the message bubble (available for ten seconds). The sketch is restored to the changes made during the last edit session, before you clicked the
, click the Restore link in the message bubble (available for ten seconds). The sketch is restored to the changes made during the last edit session, before you clicked the ![]() .
.
If you began a new sketch and clicked the ![]() , clicking Restore restores the sketch as it was before you clicked the
, clicking Restore restores the sketch as it was before you clicked the ![]() .
.
If you take an action you don't mean to take, you can use the Undo ![]() icon (in the toolbar) at any time to undo the last action or series of actions, one by one. Use the Redo
icon (in the toolbar) at any time to undo the last action or series of actions, one by one. Use the Redo ![]() icon (also in the toolbar) to repeat the last series of actions, one by one.
icon (also in the toolbar) to repeat the last series of actions, one by one.
You can also right-click either icon to see the list of actions and select the action to undo/redo up to. 
This list contains only the actions each user has taken in their present session. If you need to undo an action taken by another user or one taken during a previous session, use the Versions and history panel, explained in Document Management.
Customized shortcut toolboxes
When you set your preferences in Setting Your Preferences, you had the chance to set up customized shortcut toolboxes for Sketches, Features, Assemblies, and Drawings. Access your personal shortcut toolbox by pressing the 'S' key.

The 'S' key opens the toolbox appropriate for the tab and toolbar active at the time. For example: when you are in a Part Studio with a sketch open, pressing S opens the Sketch shortcut toolbox. When no sketch is open, pressing S opens the Features shortcut toolbox.
If you didn't customize this toolbox, the toolbox opens with the Onshape defaults.
Selecting a tool from the toolbox closes the box. Clicking anywhere outside of the toolbox also closes the box.
You can also customize the tab toolbar at the top of the window in any Part Studio, Assembly or Feature Studio. Right-click anywhere in the toolbar and select Customize toolbar.
