 Projected Curve
![]()
![]()
![]()
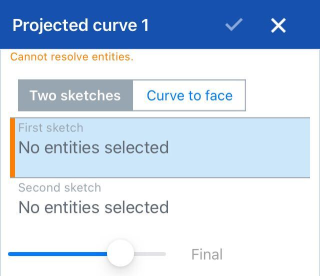
Create a curve from the projection of two sketches (Two sketches option) or from the projection of a curve on a face (Curve to face option). Note that the projections from one sketch must intersect the other (sketch or face) in one contiguous curve for this operation to succeed. The resulting Projected curve feature is listed in the Feature list and the curve itself is listed in the Curves list. For best results when selecting a curve, use the Curves list.
Create a curve from the projection of two sketches (Two sketches option) or from the projection of a curve on a face (Curve to face option). Note that the projections from one sketch must intersect the other (sketch or face) in one contiguous curve for this operation to succeed. The resulting Projected curve feature is listed in the Feature list and the curve itself is listed in the Curves list. For best results when selecting a curve, use the Curves list.
In the Feature toolbar:
![]()
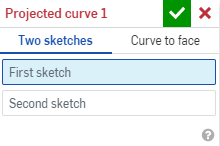
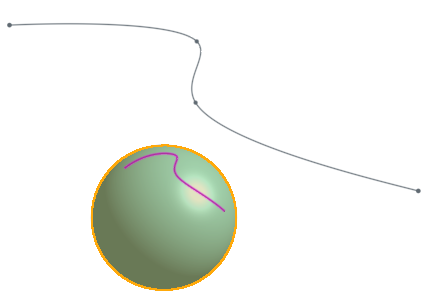
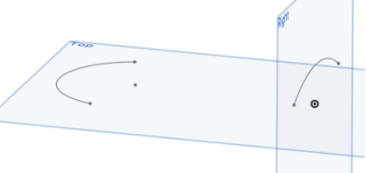
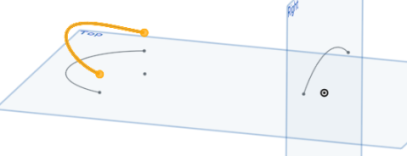
The Projected curve feature allows you to create a curve from the projection of two sketches (Two sketches option) or from the projection of a curve on a face (Curve to face option). Note that the projections from one sketch must intersect the other (sketch or face) in one contiguous curve for this operation to succeed. Click the Projected curve feature on the toolbar. Select the first sketch. Click on the Second sketch field in the dialog and select the second sketch. Click the green checkmark. The curve is listed in the Curves list.
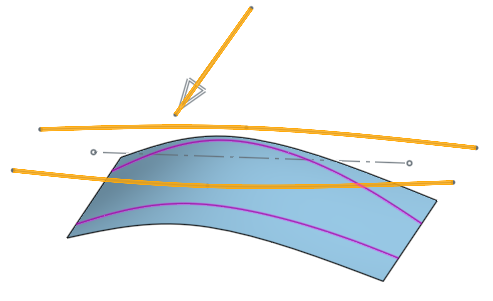
In the second example, click the Projected curve feature on the toolbar. Select Curve to face in the dialog. Select the edge. Select Normal to target. Click the Target field in the dialog and select the Target face. The curve is projected onto the target face normal to the target. Alternatively, select Direction. Click the Direction field in the dialog. Select the entity used for the direction. Then select the target. Click the green checkmark. The curve is listed in the Curves list.
With two non-parallel sketch curves in the graphic area:
- Click
 .
.
- Select the Two sketches option.
- With focus in the First sketch field, select the First sketch (on the model or in the Feature list).
- With focus in the Second sketch field, select the Second sketch (on the model or in the Feature list).
-
Click
 to accept.
You can not show/hide the feature associated with a Curve; use the show/hide functionality in the Curves list instead.
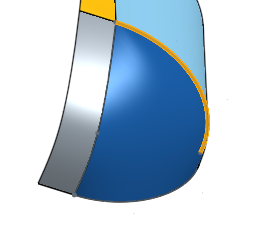
The first sketch is selected:
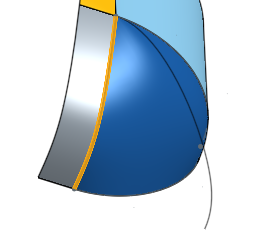
The second sketch is selected and the resulting curve appears:
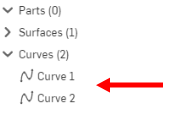
The curve is listed in the Parts list under Curves:
With a curve and a face in the graphic area:
- Click
.
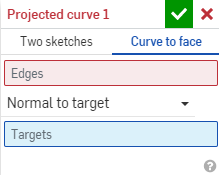
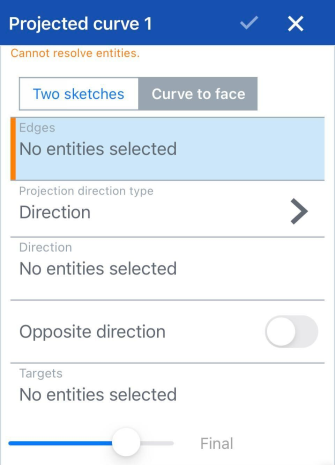
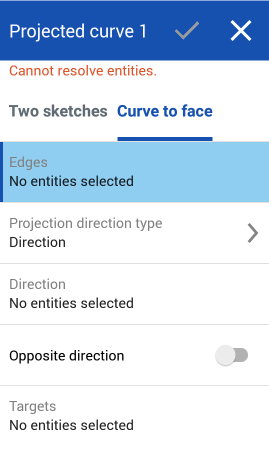
- Select the Curve to face option.
- With focus in the Edges field, select the edge/curve (you can select multiple) to project onto a face.
- Select the perspective of the projection:
- Normal to target
- Project the curve or curves onto the target face normal to the target.
- Direction
- Select a curve or edge illustrating the direction in which to project the curve or curves.
- Normal to target
- Project the curve or curves onto the target face normal to the target.
- With focus in the Targets field, select the face (or faces) onto which to project the selected curves.
-
Click
to accept.
You can not show/hide the feature associated with a Curve; use the show/hide functionality in the Parts list instead.
In addition to the surfacing tools, curves are used to create the basic building blocks of surfaces.
This lists the collection of curve feature tools. This is not an exhaustive list. Additional Feature tools may be used when manipulating curves.
- Sketch tools - Tools in the Sketch toolbar such as Line, Corner rectangle, Center point rectangle, Center point circle, 3 point circle, Tangent arc, 3 point arc, Spline, Point, and Construction used to create a sketch in a Part Studio.
-
 Helix - Create a helix using a conical or cylindrical face, single axis or z-axis of a mate connector, or circular edge.
 -
 3D fit spline - Create a 3D fit spline through a series of vertices. Creates a curve which is listed in the Parts list under Curves.
 -
 Projected curve - Create a curve from the projection of two sketches (Two sketches option) or from the projection of a curve on a face (Curve to face option).
 -
 Bridging curve - Create a Curve connecting any two points, vertices, or Mate connectors. The resulting Curve is listed in the Feature list and the Parts list.
 -
 Composite curve - Represent multiple edges as one Curve. Select multiple adjacent edges, sketch entities, and other curves. Selecting non-contiguous edges may result in multiple Curves created. Selections for each Curve must meet at their vertices. (Curves are listed in the Parts > Curves list.)
 -
 Intersection curve - Create a curve at the intersection of two or more surfaces or faces. The selections must intersect.
 -
 Trim curve - Trim or extend a curve by a distance or to a bounding entity.
 -
 Isocline - Create an isocline on a sloped face. An isocline runs on a face at positions where the face has a certain slope compared to its reference definition. The resulting isocline is listed in the Feature list and Parts list.
 -
 Offset curve - Create and extend and/or split a new curve by offsetting edges on surrounding faces.
 -
 Isoparametric curve - Create smooth curves that run along a face or surface in the U or V direction.
Create a curve from the projection of two sketches (Two sketches option) or from the projection of a curve on a face (Curve to face option). Note that the projections from one sketch must intersect the other (sketch or face) in one contiguous curve for this operation to succeed. The resulting Projected curve feature is listed in the Feature list and the curve itself is listed in the Curves list. For best results when selecting a curve, use the Curves list.
With two non-parallel sketch curves in the graphic area:
- Tap the Projected curve tool.

- Select the Two sketches option.
- Select the First sketch.
- Select the Second sketch.
- Tap the checkmark.
With a curve and a face in the graphic area:
- Click
.
- Select the Curve to face option.
- With focus in the Edges field, select the edge/curve (you can select multiple) to project onto a face.
- Select the perspective of the projection:
- Normal to target
- Project the curve or curves onto the target face normal to the target.
- Direction
- Select a curve or edge illustrating the direction in which to project the curve or curves.
- Normal to target
- Project the curve or curves onto the target face normal to the target.
- With focus in the Targets field, select the face (or faces) onto which to project the selected curves.
- Tap the checkmark to accept.
You can not show/hide the feature associated with a Curve; use the show/hide functionality in the Parts list instead.
Create a curve from the projection of two sketches (Two sketches option) or from the projection of a curve on a face (Curve to face option). Note that the projections from one sketch must intersect the other (sketch or face) in one contiguous curve for this operation to succeed. The resulting Projected curve feature is listed in the Feature list and the curve itself is listed in the Curves list. For best results when selecting a curve, use the Curves list.
With two non-parallel sketch curves in the graphic area:
- Tap the Projected curve tool.

- Select the First sketch.
- Select the Second sketch.
- Tap the checkmark.
You can not show/hide the feature associated with a Curve; use the show/hide functionality in the Parts list instead.
With a curve and a face in the graphic area:
- Click
.
- Select the Curve to face option.
- With focus in the Edges field, select the edge/curve (you can select multiple) to project onto a face.
- Select the perspective of the projection:
- Normal to target
- Project the curve or curves onto the target face normal to the target.
- Direction
- Select a curve or edge illustrating the direction in which to project the curve or curves.
- Normal to target
- Project the curve or curves onto the target face normal to the target.
- With focus in the Targets field, select the face (or faces) onto which to project the selected curves.
- Tap the checkmark to accept.
You can not show/hide the feature associated with a Curve; use the show/hide functionality in the Parts list instead.