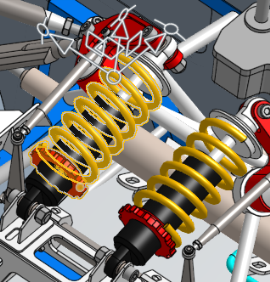
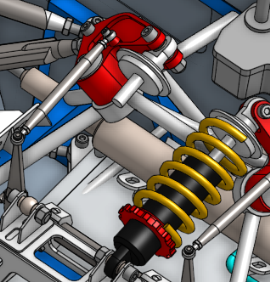
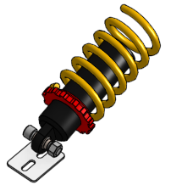
![]()
![]()
![]()
To aid in the process of assembling instances, Onshape provides some convenient tools in the context menu:
- Hide/Show
- Isolate
- Make transparent
Use these commands to access the instances and mates required for your tasks, instead of painstakingly finding and moving instances and subassemblies out of the way to access the relevant entities.
Shortcut: Hide - y / Show - Shift+y
Hide/Show selected Part Studio or Assembly entities. These can be sketches, parts/instances, surfaces, mates, folders, or groups. Hide/Show are a set of toggle commands available from the context menu of a Parts list in a Part Studio, the Instances list in an Assembly, or the graphics area when hovering over a model.
Hide/Show is used:
-
To better access entities that may be hidden by other entities (for example, parts hidden by other parts)
-
To show all entities of a specified type (for example, showing all mates in an assembly)
-
When modeling parts that are geometrically reliant on one another
-
When editing in-context.
Available commands are:
-
Hide/Show - Disables or enables the display of a model entity in the graphics area.
-
Hide/Show all - Hides or shows all entities of the same type in the current tab. For example, right-clicking on an instance in an assembly Instances list and selecting Hide all instances hides all instances in the assembly.
-
Hide/Show other - Hides or shows all entities of the same type other than what is currently selected in the current tab. For example, right-clicking on a mate in an assembly Mate features list, and selecting Hide other mates hides all mates in the assembly other than the one currently selected (or right-clicked on).
There are various methods to Hide and Show instances within an assembly.
Use the eye icon next to an instance in the list to Hide or Show individual instances.
Hide multiple instances at once by selecting them from the list or the graphics area. Right-click a selected instance for hide options.
Hide removes the visibility of the selected instances. Hide other instances keeps the selections visible and hides everything else. This is a quick way to focus on a portion of the assembly.
Right-click in the empty space of the graphics area for show options. Select Show all to make all instances, mate connectors, and mate features visible. Select Show all instances to make all hidden instances visible.
Show multiple instances at once by selecting instances from the list or the graphics area. Then, right-click and select Show.
Hover over instances in the graphics area, and use the Y key to Hide. Use Shift+Y to Show.
Switch to viewing an instance in its source Part Studio or subassembly using its context menu. Right-click a part and select the Switch to option with the Part Studio icon. The document changes the active tab to the Part Studio where the part was created. The selected part is highlighted, making it easy to identify which part the focus is on. Similarly, right-click a subassembly instance and select the Switch to option with the assembly icon. The document changes the active tab to the subassembly tab.
-
Use the shortcut key y to hide an entity under the cursor (entity shows highlighting on hover). Use Shift+y to show the entity.
-
Additional tools are available to isolate and make entities transparent. See Isolate and Make Transparent.
-
Box select also works for selecting entities in the graphics area.
-
You do not need to create a context in order to use the Hide/Show functionality.
Shortcut: Shift+i
Isolate keeps all selected Part Studio or Assembly entities opaque, while making other entities transparent. Options include visualizing the transparent internal geometry so it can be selected, measured, analyzed, and edited, and expanding the isolated selection based on connectivity or physical proximity.
Isolate is used:
-
To enhance entity visibility in large Part Studios and Assemblies.
-
To visualize and perform tasks on geometry (for example, points, edges, faces, mate connectors) that are occluded by other geometry.
-
As an alternative to the Hide/Show commands, where finding and hiding/showing entities to access relevant model geometry proves difficult or tedious.
The Isolate command is the reverse of the Make transparent command.
The Isolate and Make transparent commands are the reverse of each other.
Make transparent turns selected Part Studio or assembly elements transparent while keeping all other elements opaque, whereas Isolate keeps selected elements opaque and makes all other elements transparent.
Both commands enhance element visibility in large Part Studios and Assemblies and help visualize elements occluded by other geometry.
To make one or more elements opaque or transparent, make selections within the Part Studio's parts list, assembly’s Instances list, or graphics area, then right-click and select Isolate or Make transparent from the context menu. Alternatively, hover over an element and press Shift+i to Isolate or Shift+t to Make transparent. Hover the cursor over elements and use the same shortcut keys to add elements cumulatively.
Check Select transparent geometry to select, measure, analyze, and edit transparent geometry in the graphics area.
Use the Show or hide internal geometry slider to adjust the transparency.
In both Isolate and Make transparent, the slider controls the visibility of the transparency's outer edges and the transparency’s internal geometry. When the slider is fully left, the outer edges remain visible while the internal geometry is completely transparent. As the slider moves right, the internal geometry is made visible. As the slider is moved further right, the internal geometry and outer selection edges fade out, until they are both fully invisible.
Use the Component controls to Expand by distance or connectivity. When expanding by distance and moving the slider towards the right, Isolate makes each successive part opaque while Make transparent adjusts transparency based on proximity to the original selection. When expanding by connectivity, moving the slider towards the right makes each successive part transparent or opaque based on proximity to its mate connections from the original selection. Expanding by connectivity is only available in an Assembly.
Close the dialog or press Escape to exit.
The Select transparent geometry and transparency slider settings are maintained when exiting and re-entering the dialog, and between document sessions.
Isolate is available as a context menu command from the Parts list (in a Part Studio), Instances list (in an Assembly), or from the Part Studio or Assembly graphics area when right-clicking over a model selection.
From a Part Studio or Assembly:
-
Select the entities you wish to isolate from the Parts or Instances list, or the graphics area. These can be parts/instances, points, edges, faces, mate connectors, folders, or groups.
-
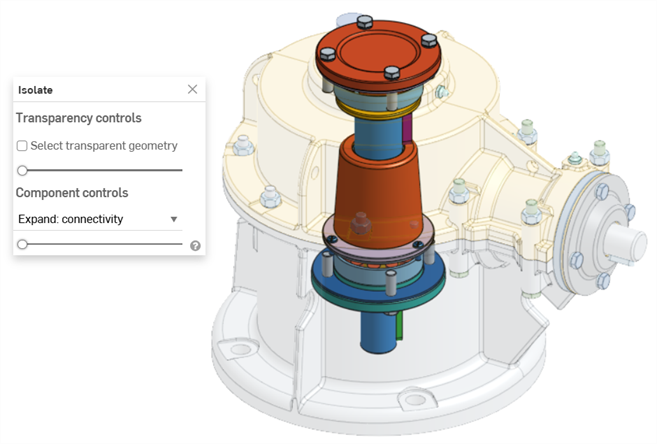
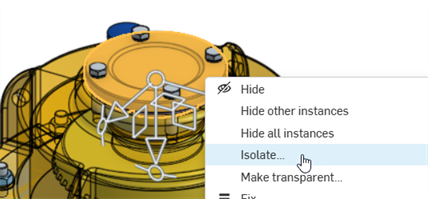
Right-click over the list or model selection and select Isolate from the context menu. The Isolate dialog opens:
-
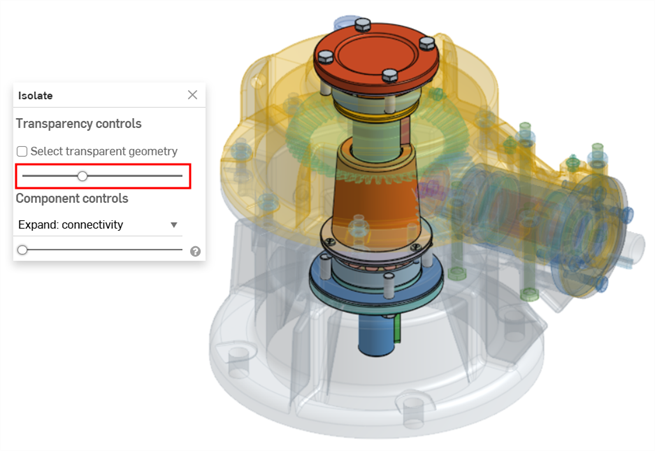
Set the Transparency slider (under the Transparency controls):
-
Set to the far left, only the outer edges of the transparent geometry is displayed. Internal geometry of the selection is not displayed (shown above).
-
Set to the far right, the transparent geometry is completely transparent.
-
Set anywhere between the two sides, the internal geometry of the transparent geometry is displayed (shown below). Moving the slider to the right increases transparency, making the transparent geometry less opaque. Moving the slider left decreases transparency, making the transparent geometry more opaque.
-
-
With Select transparent geometry checked, you can select, measure, analyze, and edit transparent geometry such as parts/instances, points, edges, faces, and mate connectors in the graphics area (shown below). When unchecked, only non-transparent geometry can be selected, measured, analyzed, and edited.
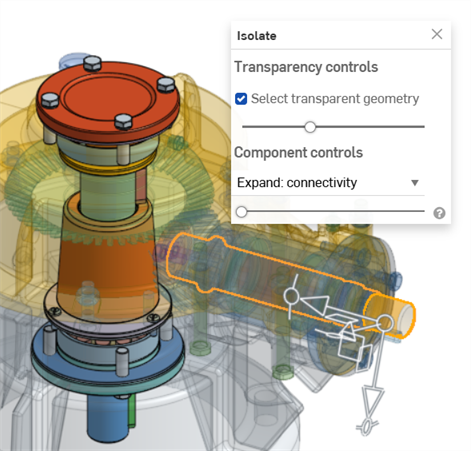
With Select transparent geometry checked, transparent parts/instances, folders, mate connectors, and groups can also be selected from the Parts or Instances list.
-
Use the Component controls to select either:
-
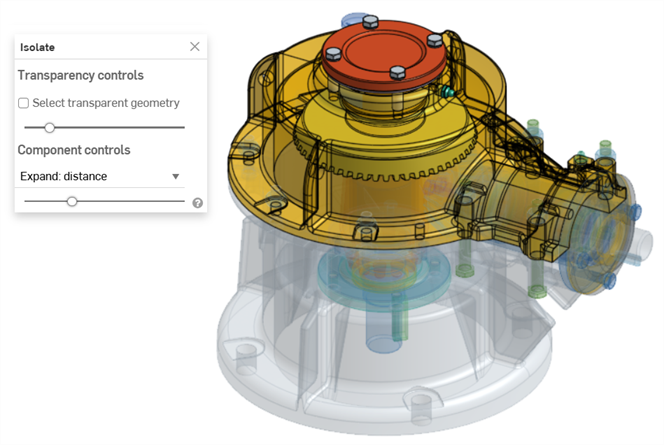
Expand: distance - Use the slider to isolate each successive part or instance based on its physical proximity to the selected part(s) or instance(s). Moving the slider right makes more parts/instances non-transparent (opaque).
-
Expand: connectivity (Assembly only) - Use the slider to isolate each successive instance based on its mate connectivity. Moving the slider right makes more instances non-transparent (opaque).
-
-
Click the x icon in the dialog to close it and return all the parts to their visible state. After exiting, any selections made while in the Isolate dialog are retained.
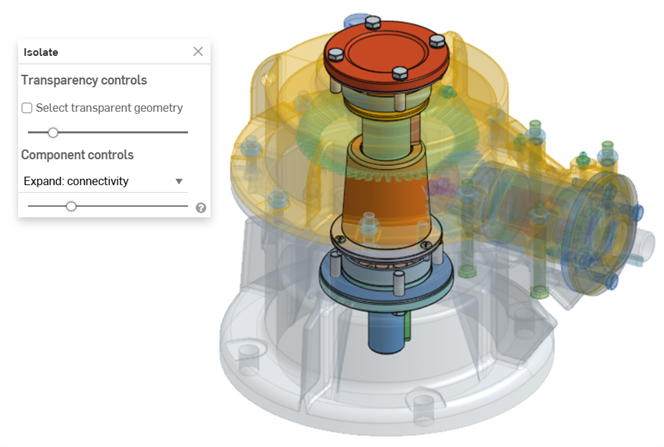
In the example below, the top cover instance of a gear and valve assembly is selected, and Isolate is selected from the context menu:
The Expand: distance slider is used to isolate instances successively based on their proximity to the selected cover instance:
The Expand: connectivity slider is used to isolate instances based on successive mate connections from the cover instance:
-
Use the shortcut key Shift+i to isolate parts or instances under the cursor. This command is cumulative; you can use it on part after part or instance after instance to isolate them all until you exit the Isolate dialog. You can also multi-select parts or instances and then select the Shift+i command.
-
The Select other (`) key (grave accent key, to the left of the “1” key) can also be used to select additional entities cumulatively.
-
To isolate an entire folder or group of parts or instances, right-click on the folder or group in the Parts or Instances list and select Isolate.
-
Isolate is also available when modeling in context and using Section view.
-
The Select transparent geometry and Transparency slider settings are remembered if you exit the dialog and re-enter.
-
If Select transparent geometry is checked, moving the Transparency slider fully left or right automatically disables it (unchecked). Subsequently, moving the slider will automatically enable it again (checked).
-
As an alternative to exiting the Isolate dialog via its x icon, either:
-
Right-click on the model in the graphics area or right-click on the Parts/Instances list and select Exit isolate from the context menu
-
Click the Esc (escape) key
-
-
On iOS platforms, only Expand: distance is available. Select the part, then use a two-finger tap to open the Context menu. Then select Isolate.
Shortcut: Shift+t
Make selected Part Studio or Assembly entities transparent. Other entities remain opaque. Options include visualizing the transparent internal geometry so it can be selected, measured, analyzed, and edited, and expanding the transparent selection based on connectivity or physical proximity.
Make transparent is used:
-
To enhance entity visibility in large Part Studios and Assemblies.
-
To visualize and perform tasks on geometry (for example, points, edges, faces, mate connectors) that are occluded by other geometry.
-
As an alternative to the Hide/Show commands, where finding and hiding/showing entities to access relevant model geometry proves difficult or tedious.
The Make transparent command is the reverse of the Isolate command.
The Isolate and Make transparent commands are the reverse of each other.
Make transparent turns selected Part Studio or assembly elements transparent while keeping all other elements opaque, whereas Isolate keeps selected elements opaque and makes all other elements transparent.
Both commands enhance element visibility in large Part Studios and Assemblies and help visualize elements occluded by other geometry.
To make one or more elements opaque or transparent, make selections within the Part Studio's parts list, assembly’s Instances list, or graphics area, then right-click and select Isolate or Make transparent from the context menu. Alternatively, hover over an element and press Shift+i to Isolate or Shift+t to Make transparent. Hover the cursor over elements and use the same shortcut keys to add elements cumulatively.
Check Select transparent geometry to select, measure, analyze, and edit transparent geometry in the graphics area.
Use the Show or hide internal geometry slider to adjust the transparency.
In both Isolate and Make transparent, the slider controls the visibility of the transparency's outer edges and the transparency’s internal geometry. When the slider is fully left, the outer edges remain visible while the internal geometry is completely transparent. As the slider moves right, the internal geometry is made visible. As the slider is moved further right, the internal geometry and outer selection edges fade out, until they are both fully invisible.
Use the Component controls to Expand by distance or connectivity. When expanding by distance and moving the slider towards the right, Isolate makes each successive part opaque while Make transparent adjusts transparency based on proximity to the original selection. When expanding by connectivity, moving the slider towards the right makes each successive part transparent or opaque based on proximity to its mate connections from the original selection. Expanding by connectivity is only available in an Assembly.
Close the dialog or press Escape to exit.
The Select transparent geometry and transparency slider settings are maintained when exiting and re-entering the dialog, and between document sessions.
Make transparent is available as a context menu command from the Parts list (in a Part Studio), Instances list (in an Assembly), or from the Part Studio or Assembly graphics area when right-clicking over a model selection.
From a Part Studio or Assembly:
-
Select the entities you wish to make transparent from the Parts or Instances list, or the graphics area. These can be parts/instances, points, edges, faces, mate connectors, folders, or groups.
-
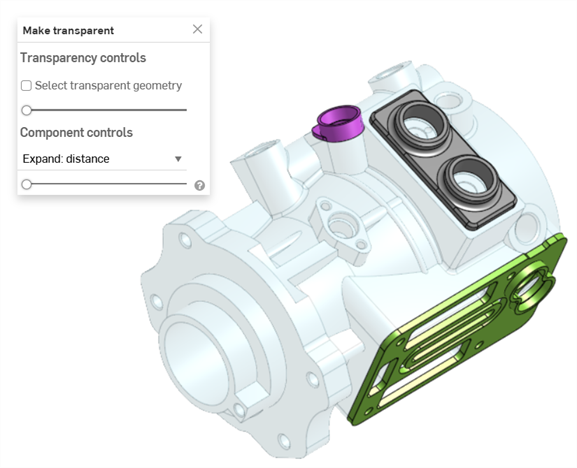
Right-click over the list or model selection and select Make transparent from the context menu. The Make transparent dialog opens:
-
Set the Transparency slider (under the Transparency controls):
-
Set to the far left, only the outer edges of the transparent geometry is displayed. Internal geometry of the selection is not displayed (shown above).
-
Set to the far right, the transparent geometry is completely transparent.
-
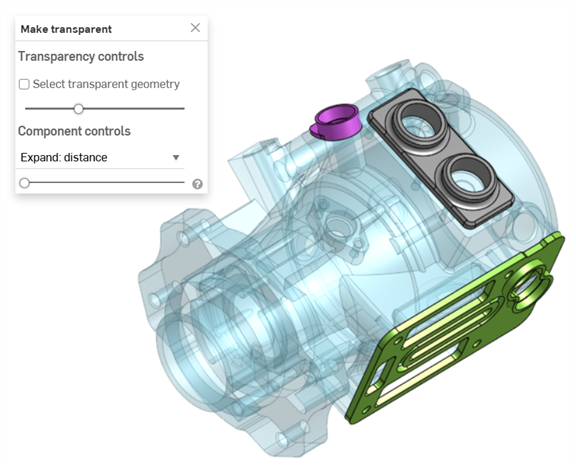
Set anywhere between the two sides, the internal geometry of the transparent geometry is displayed (shown below). Moving the slider to the right increases transparency, making the transparent geometry less opaque. Moving the slider left decreases transparency, making the transparent geometry more opaque.
-
-
With Select transparent geometry checked, you can select, measure, analyze, and edit transparent geometry such as parts/instances, points, edges, faces, and mate connectors in the graphics area (shown below). When unchecked, only non-transparent geometry can be selected, measured, analyzed, and edited.
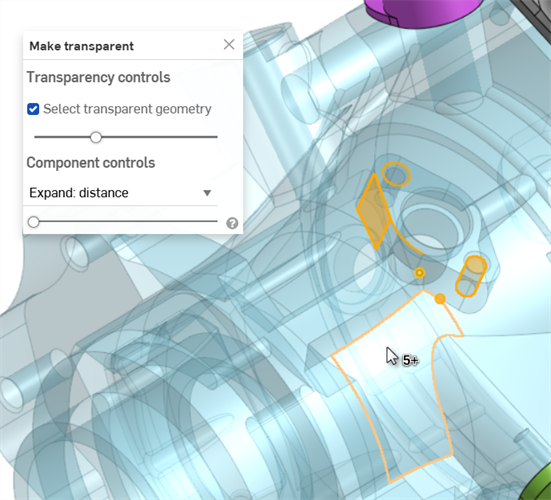
With Select transparent geometry checked, transparent parts/instances, folders, mate connectors, and groups can also be selected from the Parts or Instances list.
-
Use the Component controls to select either:
-
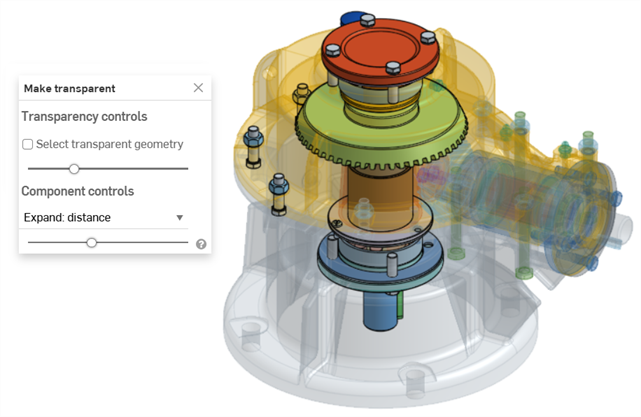
Expand: distance - Use the slider to make each successive part or instance transparent based on its physical proximity to the selected part(s) or instance(s). Moving the slider right makes more parts/instances transparent.
-
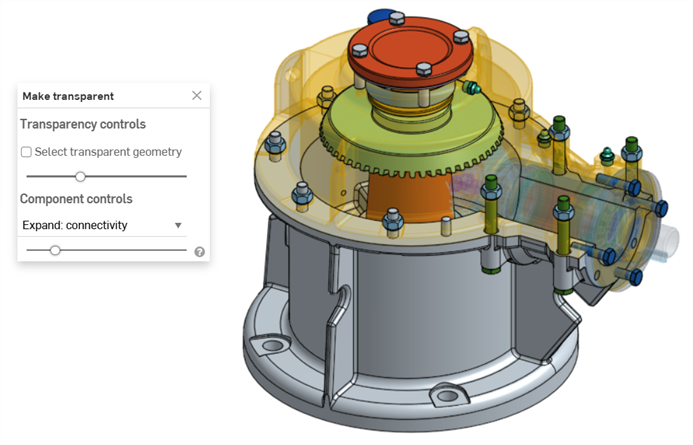
Expand: connectivity (Assembly tab only) - Use the slider to make each successive instance transparent based on its mate connectivity. Moving the slider right makes more instances transparent.
-
-
Click the x icon in the dialog to remove the transparency of all parts or instances. After exiting, any selections made while in the Make transparent dialog are retained.
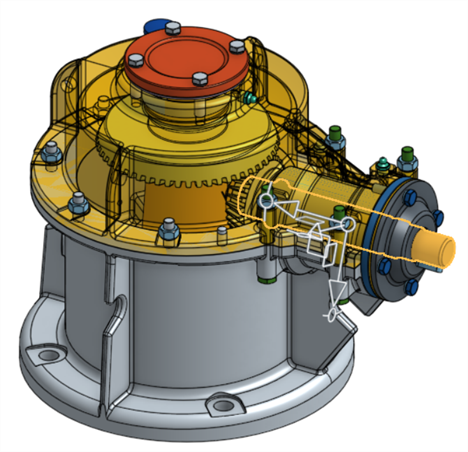
In the example below, the shaft instance of a gear and valve assembly is selected, and Make transparent is selected from the context menu:
The Expand: distance slider is used to make instances transparent based on their proximity to the selected shaft instance:
The Expand: connectivity slider is used to make instances transparent based on successive mate connections from the shaft instance:
-
Use the shortcut key Shift+t to make a part or instance under the cursor transparent. This command is cumulative; you can use it on part after part or instance after instance to keep them all transparent until you exit the Make transparent dialog. You can also multi-select parts or instances and then select the Shift+t command.
-
The Select other (`) key (grave accent key, to the left of the “1” key) can also be used to select additional entities cumulatively.
-
To make an entire folder of parts or instances transparent, right-click on the folder in the Parts or Instances list and select Make transparent.
- Make transparent is also available when modeling in context and using Section view.
- The Select transparent geometry and Transparency slider settings are remembered if you exit the dialog and re-enter.
-
If Select transparent geometry is checked, moving the Transparency slider fully left or right automatically disables it (unchecked). Subsequently, moving the slider automatically enables it again (checked).
-
As an alternative to exiting the Make transparent dialog via its x icon, either:
-
Right-click on the model in the graphics area or right-click on the Parts/Instances list and select Exit make transparent from the context menu
-
Click the Esc (escape) key
-
