![]()
Shortcut: n
Add single or multi-line text notes to any drawing, wherever you want, and use them to fill in the title blocks as well. You have the ability to define the size of the text box as well as format the text itself and optionally include a leader or many leaders. You also have the ability to rotate the orientation of the note and create additional leaders.
Note that hovering over a note automatically causes a blue highlight on the edges attached to the leaders:

-
Click
 .
.
- To create a
note with a leader:
- Hover over a view (or a view region or a face in a view) to activate a snap point. Click to anchor the leader, then click to set the note. A small text box appears at the end point of the leader. A note dialog accompanies it.
- Enter text. As you type, the note's bounding box adjusts to accompany the text.
- Apply formatting.
- Click the checkmark (
 )
to close the dialog.
- (Optional) To add more leaders, right-click the note and select Add leader. A leader automatically appears at the note grip point closest to the mouse location. Drag to a grip point in the drawing and click to place the leader. Repeat as necessary.
The leader includes a moveable node:
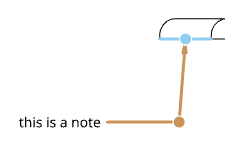
Click and drag the node to extend or shrink the horizontal segment of the leader line.
- To create a
note with no leader:
- Move the cursor to empty white space and click to place the text box.
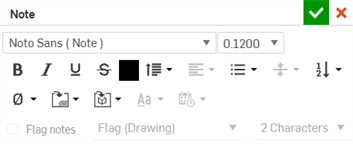
- Enter text. As you type, the note's bounding box adjusts to accompany the text.
- Apply formatting.
- Click the checkmark (
 )
to close the dialog.
- Move the cursor to empty white space and click to place the text box.
- To create a
note with a leader:
Only notes without leaders can be rotated.
There is no need to click directly on the point once it is visible. While moving the mouse to place the note, you'll notice thin, dashed lines as the cursor passes near other entities. These are inferencing lines that you are able to align the note to; simply click when you see the line appear to align the note to that line.
Only notes that are styled as bulleted lists and ordered lists (with numbers or letters) can be flagged:
-
Double-click on the note to open the Note panel.
-
Select a note that is formatted as an item in a bulleted or ordered list (number or letter).
-
Check the box next to Flag notes.
-
For each item in the list, make sure the Flag notes box is checked.
-
-
Optionally, select a type of flag.
-
Optionally, select a character size (flag size is set to 2 Characters by default).
-
Click the green check to accept and close the dialog.
To set default properties for note flags, see Properties.
- Ensure no tools are selected.
- Select the note, or hover over the note.
- Make your adjustments:
- (Notes without leaders only) To rotate, click the center drag point (as shown) and drag in a circular motion. Use the numeric box that appears to estimate the value of the angle:

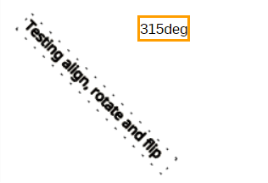
Rotating an aligned note detaches it from the edge it is aligned with.
To resize, click a square drag point on a side edge and drag to resize.
After creating a note, you can indicate to explode the note into polylines upon export. Use the context menu and select Explode:
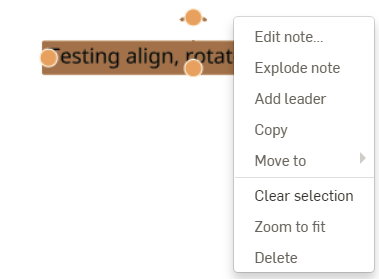
You can also Flip a note that is aligned to an edge (accessed through the context menu on the note). Flip rotates the note by 180 degrees and moves it to the other side of the edge. Flip is not available for notes that are not aligned.
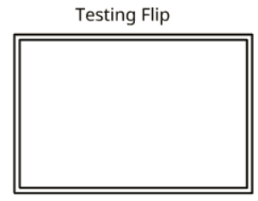
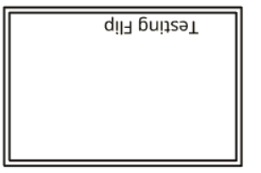
- (Notes without leaders only) To rotate, click the center drag point (as shown) and drag in a circular motion. Use the numeric box that appears to estimate the value of the angle:
You can enter unicode characters in notes. For example, use \U+00AE to create the registered trademark symbol ®.
You can also use shortcuts such as %%d for the degree symbol, %%c for the diameter symbol, and %%p for the plus/minus symbols.
You can add a leader to a note created without a leader:
- Right-click on the note.
- Select Add leader from the menu.
- Click on the grab point to which to attach the leader.
You can remove a leader from any note, regardless of whether the leader was created at the time the note was created or after the note was created:
- Right-click on the note.
- Select Remove leader from the menu:
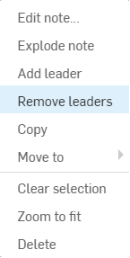
You can also group notes to drawing views. Click the note and the view, then right-click and select Group. Whenever the view is relocated, the position of the note will update accordingly.
- Click to select the leader and/or text.
- Press the Delete key.
You can remove a leader and/or text by right-clicking on the leader and/or text and clicking Delete:
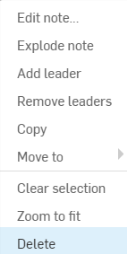
To reposition the leader and text at the same time:
- With no tool selected, click to select the text.
- Click anywhere in the text and drag.
- Upon release, the leader snaps to the text in its new location.
To reposition only the leader:
- With no tool selected, click to select a grab point on the leader.
- Drag the leader to its new position.
- Right click on the leader and click Add node:
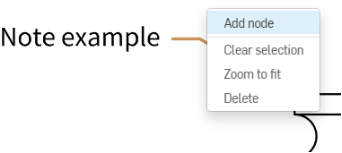
A node will appear on the leader. To add another node, right click on the leader and select Add node again.
- To remove a node from a leader, right click on the node and select Remove node.
- You can also add leaders to nodes by right clicking on the node and selecting Add leader. This will add a leader starting from that node and ending wherever you click next.
- With no tool selected, double-click the text.
- Make changes to the text and/or the Note formatting. Changes to text height become your new default.
-
Click
 .
.
Alignment of text is controlled by the drafting standard of the chosen template; the alignment buttons are disabled in this context.
Use the context menu (right-click) on the note to move it to the title block, border zones, border frame, or back to the drawing:
- Select the note.
- Right-click and select Move to.
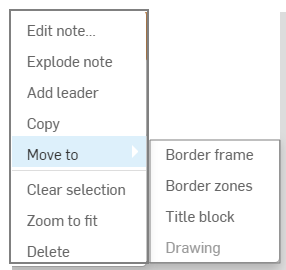
- Select title block, border zones, or border frame.
When the Format (on the Properties panel) is locked, you cannot edit Notes that are not on the Drawing layer. To edit when the Format is locked, move the Note back to the Drawing layer.
You can also drag a note off of an edge, thereby detaching it: use the middle bottom grip point. You can drag to reattach to another position on an edge.
Use the context menu (right-click) on the note:
- Select the note.
- Right-click and select Copy.
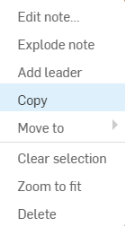
- Right-click again and select Paste.
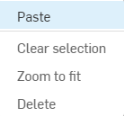
Copy and paste notes and notes with leaders from any drawing in any document (including a specific document workspace) to which you have permission and to any drawing in any document (including a specific document workspace) to which you have permission.
You can group notes to callouts or a single view. You can then move them as a group, if desired.
To group a note with callouts:
- Ensure the note, as well as all the callouts are created in the drawing.
- Select the note and all callouts you want to group.
- Right-click on one of the callouts or the note and select Group annotation from the context menu.
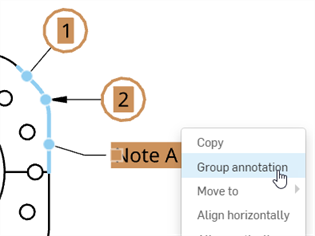
To remove a note or callout from the group, right-click the annotation and select Remove annotation from group.
If a note is connected to a view entity (edge, hole), it is grouped with the view. If the note is not connected, you can group it with the view:
-
Ensure the view and unconnected note is created in the drawing.
-
Select the note and the view you want to group.
-
Right-click on the note or the view and select Group from the context menu.
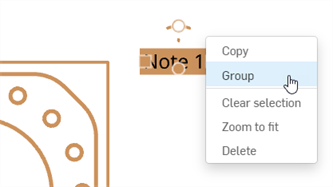
To remove a note or view from the group, right-click on either one and select Remove from group.
Tips
-
A note can be connected to one view only; however, you can group multiple notes to the same view.
-
If an unconnected note and view are grouped, moving the view moves the note with the view; however, moving the note does not move the view.
-
If multiple notes and callouts are selected, use Shift+drag to change the position of one selected entity only, in relation to the other grouped entities. When using Shift+drag, the grip point is ignored. Shift has no effect if the view is included in the selection. Moving the view moves the view and all entities connected to the view together.
You can double-click on a note to open the editor or triple-click to open with all text selected. In addition, in an open text box:
- Ctrl+a to select all text in the note
- Double-click to select a word (up to the next space)
- Triple-click to select a line (up to the next line break)
- Use copy/paste shortcut keys with the system clipboard to insert text from other pages or programs
Use the following controls to format your notes:
- Ruler - Set paragraph indents and tab stops for Notes. See more information below under Formatting ruler.
- Font - Specify a typeface using an SHX file or a True Type font file.
- Text height - Specify the text height for subsequent or selected text. Text height is measured from the baseline to the top of a regular uppercase glyph (cap line), also known as the Cap Height. This specification becomes your new default.
- Bold - Indicate subsequent or selected text is bold; works with True Type fonts only.
- Italic - Indicate subsequent or selected text is italic; works with True Type fonts only.
- Underline - Indicate subsequent or selected text is underlined; works with True Type fonts only.
- Strikethrough - Indicate subsequent or selected text is struckthrough (draws a line through the middle of the text).
- Color
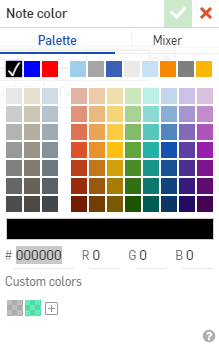
- Open the Note color palette where you can select a new color, enter a hash number, RGB values, or mix a new color:
- Line spacing
 - Change the spacing between lines of text. This applies to the entire Note. Select an option:
- 1.0, 1.5, 2.0, 2.5, 3.0 - Set line spacing to one of these factors.
- Add space before paragraph / Remove space before paragraph - Add or remove space before a paragraph; the line spacing is set as mentioned in this list, above.
- Add space after paragraph / Remove space after paragraph - Add or remove space after a paragraph; the line spacing is set as mentioned in this list, above.
- Horizontal alignment
 - Select a type of horizontal alignment of paragraphs: left-aligned text, right-aligned text, centered text, or justified text (aligned evenly along left and right margins).
Note that this option is disabled in Note with leader command; drafting standards dictate alignment of text in that context.
- List
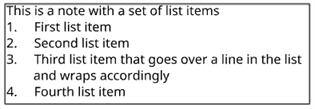
 - Select a type of list formatting to use, including: numbers, bullets, uppercase letters, or lowercase letters.
List designators (numbers, bullets, or letters) are not indented, but the text is. To indent the list designators, select all the list paragraphs and move the Ruler's first line indent
marker to the right. See Formatting ruler for more information.
- Vertical alignment
 - Indicate the type of paragraph justification in relation to the insertion point of the Note: Top, Middle, or Bottom.
Note that this options is disabled in Note with leader command; drafting standards dictate alignment of text in that context.
-
Note order
 - Click and select Bottom to top or Top to bottom to reorder the text in the note.
 - Fractions
- You can use 3 different codes to create fractions formatted in 3 ways:
- Fractions formatted with a diagonal slash between the numbers - <number>#<number><space>
- Fractions formatted with a horizontal slash between the numbers - <number>/<number><space>
- Fractions formatted with no slash between the numbers, just stacked on each other vertically - <number>^<number><space>
If the conversion to a fractional character is not desired, type any character other than <space> directly after the second number, then navigate back to it using the arrow keys or cursor, and delete it. (Otherwise, the special character code is not editable.)
- Symbols
- Select a symbol to insert at the current cursor location. Symbols can also be added from the Symbols dropdown list
 .
.
Symbol Name Shortcut ° Degree %%d ⌀ Diameter %%c ℄ Centerline ⌵ Countersink ↧ Depth ⌴ Counterbore □ Square ⌒ Arc length ± Plus/Minus %%p Ⓤ Unequally disposed profile Ⓘ Independency 
Continuous feature 
Spot face ▷ Translation - Insert drawing property
 - Insert the value of a Drawing property automatically, especially useful for filling in the title block, including:
- Drawing created by - The user name of the user who created the drawing
- Drawing created date - The date the drawing was initially created
- Drawing description - The description of the drawing as it exists in the Drawing tab’s Properties (right-click the tab and select Properties)
- Drawing last changed by - The user name of the user who last modified the drawing
- Drawing last changed date - The date of the most recent change to the drawing
- Drawing name - The name of the drawing, as displayed in the title box
- Drawing part number - The part number given to the drawing as it exists in the Drawing tab’s properties (right-click the tab and select Properties)
- Drawing revision - The current revision of the drawing as it exists in the Drawing tab’s properties (right-click the tab and select Properties)
- Drawing Title 1 - Title 1 of the drawing as it appears in the title box; defined in the Document properties
- Drawing Title 2 - Title 2 of the drawing as it appears in the title box
- Drawing Title 3 - Title 3 of the drawing as it appears in the title box
- Sheet number - The number of the currently displayed sheet
- Total sheets - The total number of sheets in the drawing
- Sheet scale - The scale of the views on the sheet. Change this value in Sheet properties.
- Sheet size - The sheet size; also linked to the size property in the Title block.
To view and edit Drawing properties, right-click the drawing tab and select Properties from the context menu.
- Insert sheet reference property
 - Insert a property referencing the entity from which you created the drawing. Default Onshape properties and active custom properties are listed. Active custom properties appear at the bottom of the list in alphabetical order. For more information on metadata and custom properties see
Properties.
- Name
- Description
- Part Number
- Revision
- State
- Vendor
- Project
- Product Line
- Title 1
- Title 2
- Title 3
- Material
- Mass
- Text format
 - Set the text format of an inserted drawing property to one of the following:
- All uppercase
- All lowercase
- Sentence case
- Title case
- Unmodified
- Date time format
 - Select a date and time format to use for an inserted drawing date property.
The UTC time zone is used for Date properties. This could potentially lead to a situation where a date is displayed as tomorrow, for example.
- Double-click the property. At this point, the cursor will be at the end of the property:

- Select the property. It is helpful to use a mouse (and not the Shift+arrow keys). When a property is highlighted you will notice a thin blue line below it:

- Click
and select the property to insert, for example, Drawing name:

- With the property still highlighted, the text formatting icon is active; click
 to select text formatting options for capitalization formatting.
If you want to remove the gray highlighting and/or placeholder dashes of a field in the title box, use the Drawings Properties pane, under Notes.
- If a date property was inserted, the Date format icon
 becomes active. Enter any of the following date formats:
Code Sample Description yyyy-M-d 2016-3-9 4 digit year, 1-2 digit month, 1-2 digit day yyyy-MM-dd 2016-03-09 4 digit year, 2 digit month, 2 digit day M.d.yyyy 3.9.2016 1-2 digit month, 1-2 digit day, 4 digit year M/d/yyyy 3/9/2016
1-2 digit month, 1-2 digit day, 4 digit year M/d/yy 3/9/16 1-2 digit month, 1-2 digit day, 2 digit year MM-yy 03-16 2 digit month, 2 digit year MM/dd/yyyy 03/09/2016 2 digit month, 2 digit day, 4 digit year MMM.d, yy Mar.9, 16
3 letter month, 1-2 digit day, 2 digit year MMMM yy March 16
Full month, 2 digit year MMMM d,yyyy March 9,2016 Full month, 1-2 digit day, 4 digit year d-MMM-yy 9-Mar-16 1-2 digit day, 3 letter month, 2 digit year d MMMM yy 9 March 16 1-2 digit day, full month, 2 digit year dd.MM.yyyy 09.03.2016 2 digit day, 2 digit month, 4 digit year dd/MM/yyyy 09/03/2016 2 digit day, 2 digit month, 4 digit year dddd,MMMM d,yyyy Monday, March 9,2016 Day of the week, full month, 1-2 digit day, 4 digit year
dd-mm-yyyy 03-09-2016 2 digit day, 2 digit month, 4 digit year d-MMM-yyyy 3-Sep-2016 1-2 digit day, 3 letter month, 4 digit year dd/mm/yy 03/09/16 2 digit day, 2 digit month, 2 digit year dd/mm/yyyy 03/09/2016 2 digit day, 2 digit month, 4 digit year dd.mm.yy 03.09.16
2 digit day, 2 digit month, 2 digit year dd.mm.yyyy 03.09.2016 2 digit day, 2 digit month, 4 digit year

Use the Note Formatting ruler to set paragraph indents and tab stops for Notes.
The ruler appears with the Note Formatting pop-up toolbar. It is located at the top of the Note bounding box.
By default, there are no paragraph indents or tab stops on the ruler when you start a new Note.
Paragraph indents and tab stops that you set before you start to enter text apply to the entire Note. When you type or edit, place the pointer in the paragraph to format or select multiple paragraphs to adjust indents and tab stops.
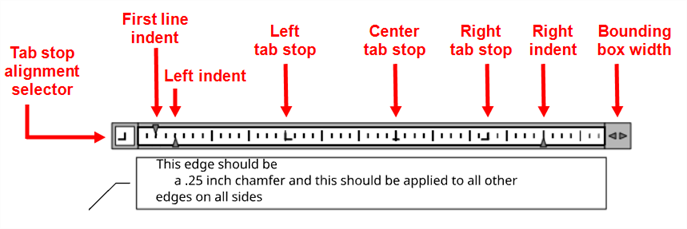
-
Tab stop alignment selector - By default, tab stops are predefined at drawing intervals (and are left aligned). To add custom tab stops, click the Tab stop alignment selector to toggle between tab stop alignments:
-
Left (
 ) - Aligns the left edge of the text to the tab stop.
 -
Center (
 ) - Aligns the text center to the tab stop.
 -
Right (
 ) - Aligns the right edge of the text to the tab stop.
 -
Decimal (
 ) - Aligns numbers around the decimal point. Independent of the number of digits, the decimal point is in the same position. You are able to align numbers around the same type: period, comma, or space.
Once an alignment is selected, click anywhere on the ruler to place a new tab stop at that position. When you place your cursor at the beginning of a paragraph and press the tab key, the paragraph position moves to the next tab stop along the ruler and is now aligned based on the tab alignment.
To relocate tab stops, drag existing tab stops left or right along the ruler.
To remove tab stops, drag a tab stop (up or down) off the ruler. When you release the mouse button, the tab stop disappears.
-
-
First line indent - Sets the left starting point for the first line of text in the Note paragraph.
-
Left indent - Sets the left starting point for all subsequent lines of text in the Note paragraph.
-
RIght indent - Sets the right stopping point for all lines of text in the Note paragraph. Entering text beyond this point wraps the text to the next line.
-
Bounding box width (
 ) - Sets the right edge of the bounding box. Click and drag left to make the Note text box smaller or drag right to make the Note text box larger.
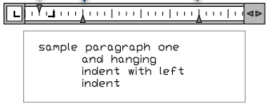
This example shows first line indent, left indent, and hanging indent:
Setting paragraph indents
- Place your cursor in the paragraph to format, or select multiple paragraphs.
- On the Formatting ruler, slide indent markers:
- Slide the First line indent marker to the position you want the first line of the paragraph to begin.
- Slide the Left indent marker from the left to the position you want the second and all following lines of a paragraph to begin (also referred to as a hanging indent).
- Slide the Right indent marker from the right to the position you want all lines of a paragraph to end.
The indent settings are maintained for subsequent paragraphs as you type.
To style a note:
-
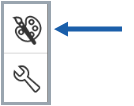
Click on the note you want to style, then click the Styles panel icon on the right side of the page:
-
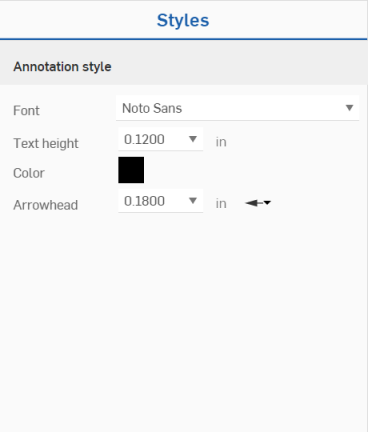
Edit the note Font, Text height, Color, and Arrowhead:
-
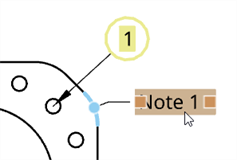
When selecting a note, the target (edge, hole) is highlighted blue:

-
If a note is grouped with other annotations or a view, and the note is selected, the grouped annotations are highlighted yellow (as the callout is in the following example):
Some fields in title blocks are filled in automatically, using document and drawings information. The rest you can fill using notes within the boundaries of the title block cells.
For best results:
- Create a text box the size of the cell. You can then experiment with text size, font, etc. and see if the text will fit without having to resize the text box.
- You cannot copy and paste text boxes; but you can copy and paste text from one text box to another.
- When copying and pasting text from one text box to another, the formatting is carried over.
- The labels in a title block are completely customizable as well. They are simply multi-line text, just another note.
- You can move the lines of the title blocks, or create your own.