 Styles
![]()
Drawing styles are a collection of visual settings you can apply to one or more dimensions and/or annotations, without having them affect all dimensions and/or annotations globally, as when they are edited in the Properties panel. Styles are located in a panel on the right side of the drawings area. Click the icon to open the panel, and click again to close the panel.
Drawing styles are a collection of visual settings you can apply to one or more dimensions and/or annotations, without having them affect all dimensions or annotations globally, as when they are edited in the Properties panel.
Select one or more dimensions or annotations in the drawing area, then click the Styles panel icon to open the Styles panel. Note that you can also open the Styles panel first, and then select the dimension or annotation in the drawing. Once in the Styles panel, update the Font, Text height, Color, Arrowhead, or any other applicable styles.
To remove any custom style options, select the dimension or annotation with custom styles applied, and then click the Revert to drawing properties icon at the bottom of the panel. Click the Styles panel icon to close the panel.
The illustration below shows the icon, located partway down the right side of the drawing window, outlined in red:
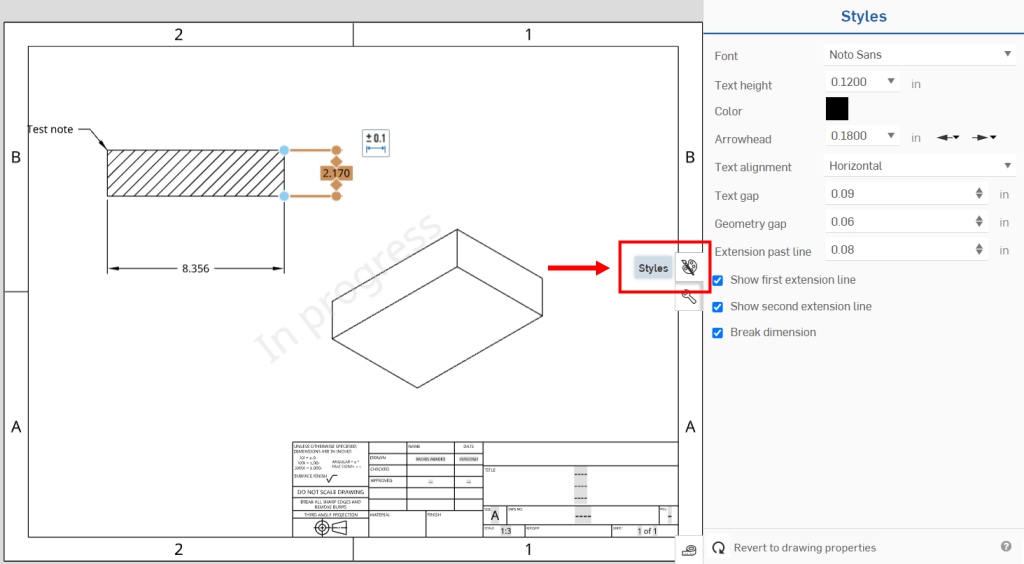
Dimension styles specify or customize the appearance of dimensions and ordinate dimensions.
-
Select a dimension (or multiple dimensions) in the drawing, and click the styles icon to open the Styles panel. Alternately, you can first click the styles icon to open the Styles panel, and then select the dimension to which you want custom styles applied.
-
Adjust the visual styles to alter the appearance of the selected dimension:
-
Font - Select the font family from a dropdown list of common fonts.
-
Text height - Adjust the size of the text.
-
Color - Click the color swatch to open the color palette to adjust the color of the text. Select a color, or specify the RGB values or hex value of the desired color.
-
Arrowhead - Adjust the thickness of the arrows and the arrowhead type. If a selected dimension has two arrow heads, a left facing arrow and a right facing arrow are shown in the panel, as seen in the image above.
-
Text justification - Change the justification of all the Note text in the drawing. Choose from Left, Center, Right, or Auto alignment.
-
Text alignment - Align the text with the dimension line or horizontally on the sheet.
-
Text gap - Adjust the space between the dimension line(s) and the dimension. Larger numbers produce a larger gap, while smaller numbers shorten the gap.
-
Geometry gap - Adjust the space between the dimension line and the geometry. Larger numbers produce a larger gap, while smaller numbers shorten the gap.
-
Extension past line - Extend the dimension line beyond the text alignment.
-
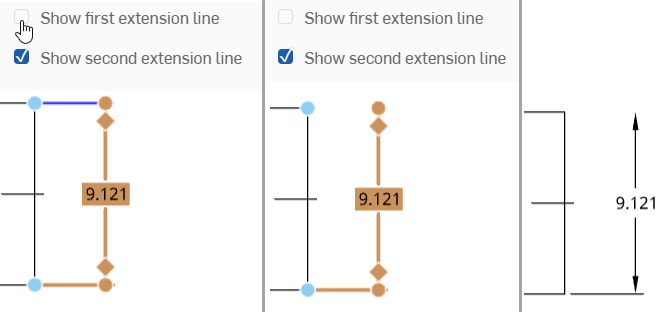
Show first extension line - When checked (default), the first extension line is displayed. When unchecked, the line is hidden.
-
Show second extension line - When checked (default), the second extension line is displayed. When unchecked, the line is hidden.
The following shows the first extension line hidden (unchecked) in all three images. When hovering your cursor over the checkbox, the line turns blue (first image). When the cursor moves off the checkbox, the line is hidden (second image). The third image shows the hidden first extension line when the dimension is not selected.
-
Break dimension - Checked by default, this creates a space between overlapping dimension lines. Uncheck this box to leave no space between overlapping dimension lines. The lines will run into each other.
-
Show dimension line - When checked, this option shows the dimension line inside the circle or arc.
Annotation styles specify or customize the appearance of geometric tolerances, surface finish symbols, notes, bend notes, callouts, hole callouts, datums, and weld symbols.
-
Select an annotation (or multiple annotations) in the drawing, and click the styles icon to open the Styles panel. Alternately, you can first click the styles icon to open the Styles panel, and then select the annotation to which you want custom styles applied.
-
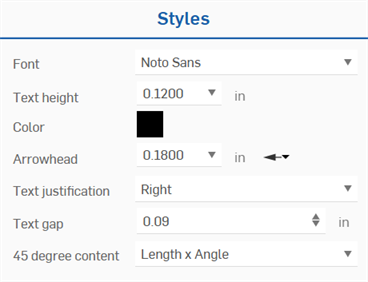
Adjust the visual styles to alter the appearance of the selected annotation:
-
Font - Select the font family from a dropdown list of common fonts.
-
Text height - Adjust the size of the text.
-
Color - Click the color swatch to open the color palette to adjust the color of the text. Select a color, or specify the RGB values or hex value of the desired color.
-
Arrowhead - Adjust the thickness of the arrow and the arrowhead type.
-
Text justification - Change the justification of all the Note text in the drawing. Choose from Left, Center, Right, or Auto alignment.
-
Text gap - Adjust the space between the annotation line(s) and the annotation. Larger numbers produce a larger gap, while smaller numbers shorten the gap.
-
X degree content - Selects the format for the length and angle content for a Chamfer dimension. Options are Angle x Length, Length x Angle, and Length x Length.
-
Datum size - Adjust the thickness of the datum and datum type.
Hatch styles specify or customize the appearance of a hatch.
-
Select a hatch (or multiple hatches) in the drawing, and click the styles icon to open the Styles panel. Alternately, you can first click the styles icon to open the Styles panel, and then select the hatch (or hatches) to which you want custom styles applied.
-
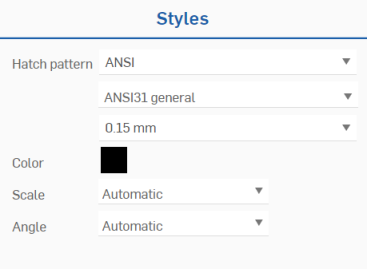
Adjust the visual styles to alter the appearance of the selected hatch:
-
Hatch pattern - Select the desired pattern type, style, and size for the hatch using the three dropdown lists.
-
Color - Click the color swatch to open the color palette to adjust the color of the hatch. Select a color, or specify the RGB values or hex value of the desired color.
-
Scale - Select the scale of the hatch.
-
Angle - Select the angle of the hatch.
Sketch geometry styles customize the appearance of lines, circles, rectangles, and splines that are drawn in sheets.
-
Select one or more sketches in the drawing, and click the styles icon to open the Styles panel. Alternately, you can first click the styles icon to open the Styles panel, and then select one or more sketches to which you want the custom styles applied.
-
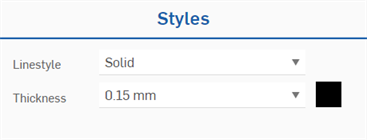
Adjust the visual styles to alter the appearance of the selected sketch geometry:
-
Linestyle - Selects the line style of the sketch geometry. Options are Solid, Phantom, Center, Dashed, and Dotted.
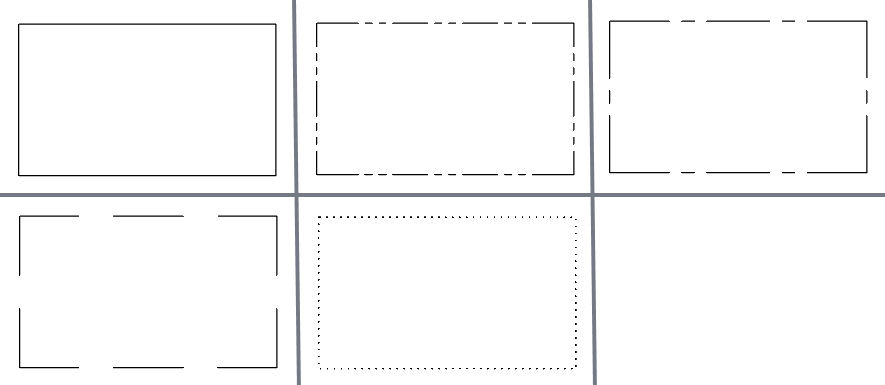
Linestyles: top (left to right): Solid, Phantom, Center; bottom (left to right): Dashed, Dotted
-
Pitch scale - If a Linestyle other than Solid is selected, you can adjust the Pitch scale of the line from 0.01 to 5.00. Lower pitches values create more breaks in the line (finer pitch), while higher pitches create less breaks in the line (coarser pitch).
-
-
Thickness - Adjusts the thickness of the sketch geometry lines.
-
To remove any custom style options, select the dimension and/or annotation with custom styles applied, and then click the Revert to drawing properties icon at the bottom of the Styles panel. The selected dimension and/or annotation revert back to the drawing's global properties.
The following table outlines available style options for Dimensions, Annotations, and sketch geometry:
| Dimension style | Chamfer | Maximum or minimum | 2 point linear | Point to line | Line to line | Line to line angular | 3 point angular | Radial | Diameter | Ordinate |
| Font | ✓ | ✓ | ✓ | ✓ | ✓ | ✓ | ✓ | ✓ | ✓ | ✓ |
| Text height | ✓ | ✓ | ✓ | ✓ | ✓ | ✓ | ✓ | ✓ | ✓ | ✓ |
| Color | ✓ | ✓ | ✓ | ✓ | ✓ | ✓ | ✓ | ✓ | ✓ | ✓ |
| Arrowhead | ✓ | ✓ | ✓ | ✓ | ✓ | ✓ | ✓ | ✓ | ✓ | |
| Text justification | ✓ | ✓ | ✓ | ✓ | ✓ | ✓ | ✓ | ✓ | ✓ | ✓ |
| Text alignment | ✓ | ✓ | ✓ | ✓ | ✓ | ✓ | ✓ | ✓ | ✓ | |
| Text gap | ✓ | ✓ | ✓ | ✓ | ✓ | ✓ | ✓ | ✓ | ✓ | ✓ |
| Geometry gap | ✓ | ✓ | ✓ | ✓ | ✓ | ✓ | ✓ | |||
| Extension past line | ✓ | ✓ | ✓ | ✓ | ✓ | ✓ | ✓ | |||
| Show first extension line | ✓ | ✓ | ✓ | ✓ | ✓ | ✓ | ✓ | |||
| Show second extension line | ✓ | ✓ | ✓ | ✓ | ✓ | ✓ | ✓ | |||
| Break dimension | ✓ | ✓ | ✓ | ✓ | ✓ | ✓ | ✓ | ✓ | ✓ | ✓ |
| Show dimension line | ✓ | ✓ | ||||||||
| Annotation style | Chamfer | Hole/thread callout | Datum | Geometric tolerance | Surface finish symbol | Weld symbol | Note | Callout | ||
| Font | ✓ | ✓ | ✓ | ✓ | ✓ | ✓ | ✓ | ✓ | ||
| Text height | ✓ | ✓ | ✓ | ✓ | ✓ | ✓ | ✓ | ✓ | ||
| Color | ✓ | ✓ | ✓ | ✓ | ✓ | ✓ | ✓ | ✓ | ||
| Arrowhead | ✓ | ✓ | ✓ | ✓ | ✓ | ✓ | ✓ | |||
| Text justification | ✓ | ✓ | ✓ | |||||||
| Text gap | ✓ | |||||||||
| X degree content | ✓ | |||||||||
| Datum size | ✓ | |||||||||
| Sketch geometry style | Line | Center point and 3 point circle | Corner and Center point rectangle | Spline | Tangent arc | |||||
| Linestyle | ✓ | ✓ | ✓ | ✓ | ✓ | |||||
| Thickness | ✓ | ✓ | ✓ | ✓ | ✓ | |||||
| Color | ✓ | ✓ | ✓ | ✓ | ✓ |
-
When selecting different dimension or annotation types simultaneously, you are only able to adjust the styles common to all. For example, if a note and dimension are selected, only the Font, Text height, Color, and Arrowhead are editable, as they are common to both.
-
If you select both an unsupported dimension/annotation and a supported dimension/annotation (a note, for example), the Styles panel is unavailable. Deselect the unsupported dimension/annotation to make the Styles panel options available.
-
Use the Format painter to apply the styles of one dimension or annotation to additional dimensions or annotations.