Managing Your Onshape Educator/EDU Enterprise Subscription


Educator subscriptions
Educator subscriptions are for current educators, mentors, or volunteers at educational institutions, and provide access to Classes and Assignments, and other advanced features such as Simulation. This plan is solely for classroom instruction, educational teams and organizations, and academic research. This plan is not for government, commercial, or other non-academic organizational use.
Educator subscriptions automatically renew after one year of use as long as the user still qualifies according to the criteria stated above. When the user no longer qualifies, the subscription is downgraded to a Free subscription.
EDU Enterprise subscriptions
Onshape Education Enterprise is designed for educators who are rolling out Onshape across their institution and need additional administrative, organizational, and analytics capabilities.
When you sign up for Onshape Education Enterprise, you receive a specific domain where the users in your institution can access Onshape. Your Onshape domain is specific to you and inaccessible by other, unrelated Onshape users. Only the users specified by your institution are allowed access to your enterprise.
When working within an Education Enterprise in Onshape, be aware that you are in a separate, managed environment that has a subtle difference from other types of Onshape subscriptions. All users belonging to a specific enterprise plan access Onshape through a single URL, specifically for their enterprise.
Every Onshape Education Enterprise user has access to their particular enterprise's account as well as an individual account. If you sign in using cad.onshape.com in lieu of your enterprise URL, you'll find yourself in your own account. Users can use this account to create Onshape documents that are separate from the enterprise and not seen or managed by the enterprise. These “individual” accounts are particularly useful for when students leave the institution and want to take their work with them in a portfolio.
Regardless of what platform you use, when you sign into Onshape you access this individual account first unless you use your specific enterprise URL. Use the User menu > Switch to <enterprise name> command to go to the sign in page of your enterprise account.
For plan and pricing information, see https://www.onshape.com/en/education/plans.
When users sign in, Documents is the default opening page. This can be changed under Account preferences (Enterprise startup page).
 Accessing the Account menu
The Account menu is located in the upper-right corner of the interface. The icon for the Account menu may look like this:  , with your user name to the right. From this menu you can access:
- My account - Manage and maintain your Onshape account, set preferences, notifications settings, security, and more. See My account settings for detailed information.
- Company/Classroom/Enterprise settings - View the account settings for your company/classroom/enterprise. See Company/Classroom/Enterprise settings for more information.
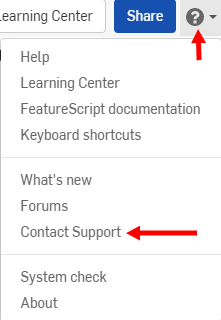
- View support tickets - View any support tickets you have submitted. If you want to submit a support ticket, look in the Help menu (the icon to the right of your name in the upper-right corner of the interface). See Viewing support tickets for more information.
- App Store dev portal - Available for developers and Onshape partners that want to create applications that are published in the Onshape App Store.
- View in dark mode
 - Toggles the dark mode theme on. Dark mode is a low luminance color scheme mainly featuring light elements on dark backgrounds. Dark mode is a limited feature available in Part Studios, Render Studios, Assemblies, and the App Store. It is currently not available in Drawings, PCB Studio and Enterprise analytics, though the toolbars and menus surrounding the main graphics area are displayed in dark mode.
When toggled off, the color scheme returns to the default light mode featuring dark elements on light backgrounds.
View in dark mode is session-specific. The toggle resets to the original light mode theme after signing out. To have the dark mode theme persist after signing out, apply it via My account > Preferences > Theming.
- Sign out - Sign out of and close your Onshape session.
Signing in
See Managing Your Onshape Plan > Signing in to an account.
Administering an Educator subscription
Transferring ownership of public documents
Once your account is upgraded to an Educator account, you then have the ability to make all personal documents available to all members of the classroom by right-clicking them and choosing “Transfer ownership…” and then choosing the classroom to which you want the documents transferred.
Check the ownership of any document by looking at the top right corner of the Share dialog (shown below, outlined in red). Click the x to the right of any permission setting to remove that permission.
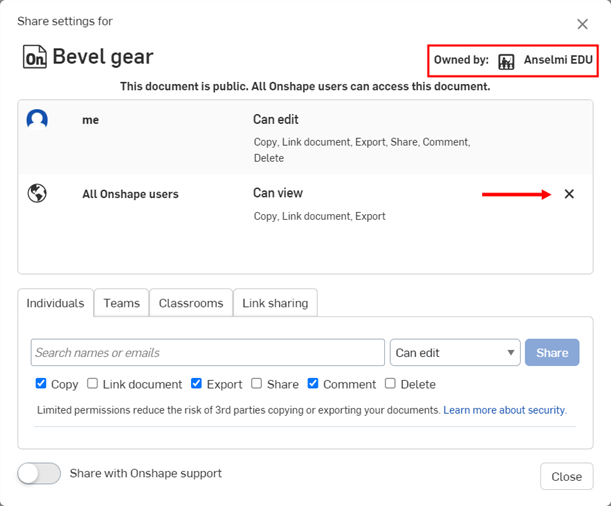
See Transfer Ownership for more information.
Upgrading to an EDU Enterprise subscription
If you have an existing Onshape account with existing Onshape documents, you are easily able to upgrade it to an EDU Enterprise subscription. To upgrade your existing account to an EDU Enterprise subscription, contact us.
Once your subscription has been upgraded, you receive a Customer Success contact with whom you will work closely. The following scenarios apply to Educator subscriptions, specifically with many users, folders, and documents.
All users are migrated to the new subscription
All existing subscription users receive an email with the EDU Enterprise URL. When signing in to Onshape using the EDU Enterprise URL, you automatically land in your EDU Enterprise environment. All members are still members and all admins are still admins.
What happens
All class members, owners, and admins in an Educator subscription are moved to the new EDU Enterprise subscription, and receive assignment of default user permissions. Educators and admins retain their status in the new EDU Enterprise domain.
During the upgrade, only documents owned by the classroom are moved to the Enterprise domain. These documents are now only accessible through the EDU Enterprise domain.
- Any documents owned by individual users (versus owned by the classroom) must be transferred to classroom ownership prior to the upgrade in order to be moved to the EDU Enterprise domain.
- Documents not transferred prior to the upgrade are still accessible via cad.onshape.com and may still be moved to the EDU Enterprise as described in Transfer any non-classroom-owned documents or folders, below.
- Folder structures and sharing permissions are all maintained during the upgrade.
- Folders owned by the class are migrated to the new account.
- Classroom-owned documents are migrated to the new account.
Signing in
When you sign in from the cad.onshape.com sign-in page, however, you are signing in to a personal account; You have access to any privately owned documents you had before upgrading.
To learn how to transfer privately-owned objects to your EDU Enterprise account, see Transfer any non-classroom-owned documents or folders, below.
You can switch from the personal account to the EDU Enterprise account through the User menu > Switch to command.
User account settings
User account settings remain identical in EDU Enterprise, including emails, preferences, security settings, and any custom features added to toolbars. It is the same user account, all the way down to sign-in credentials.
Classroom-owned documents are migrated to the new account
All classroom-owned documents are migrated to the new EDU Enterprise account. The internal shares of those documents remain intact.
Transfer any non-classroom-owned documents or folders
If you individually owned any data in your personal account, you can transfer that data (documents and folders, for example) to your EDU Enterprise account:
- Navigate to cad.onshape.com.
- Sign in with your EDU Enterprise account information.
- Locate the data you want to transfer.
- If there are multiple documents, place them in a folder.
- Right-click on the document or folder and select “Transfer to <EDU Enterprise name>”.
- Return to your EDU Enterprise and move the items to the correct locations.
Canceling an Educator subscription
To cancel the Educator subscription and move to the Free subscription:
- Expand the user menu under your Account user icon () and select My account:
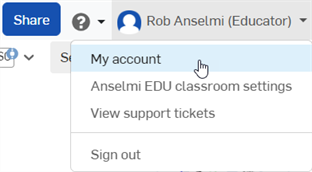
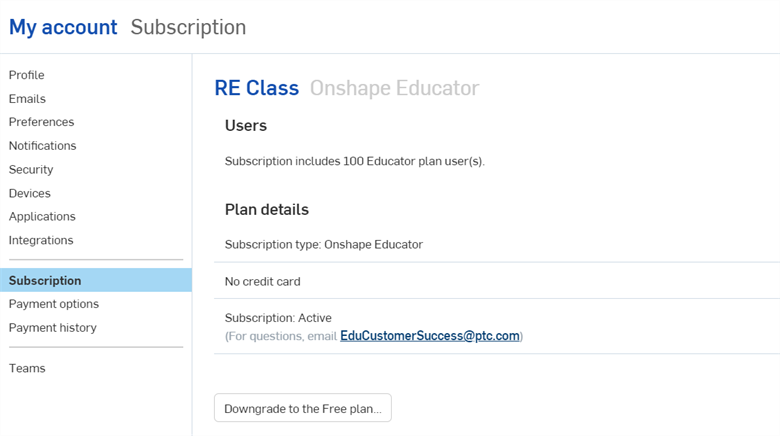
- Select the Subscription tab in the list on the left side of the page.
- If you have more than one subscription, click the subscription you want to cancel:
-
Click the Downgrade to the Free plan button.
-
The Are you sure you want to downgrade to the Free plan dialog opens. Ensure you read this dialog carefully, and if you agree, click the Downgrade to Free button. Otherwise, click the Close button to cancel the downgrade procedure.
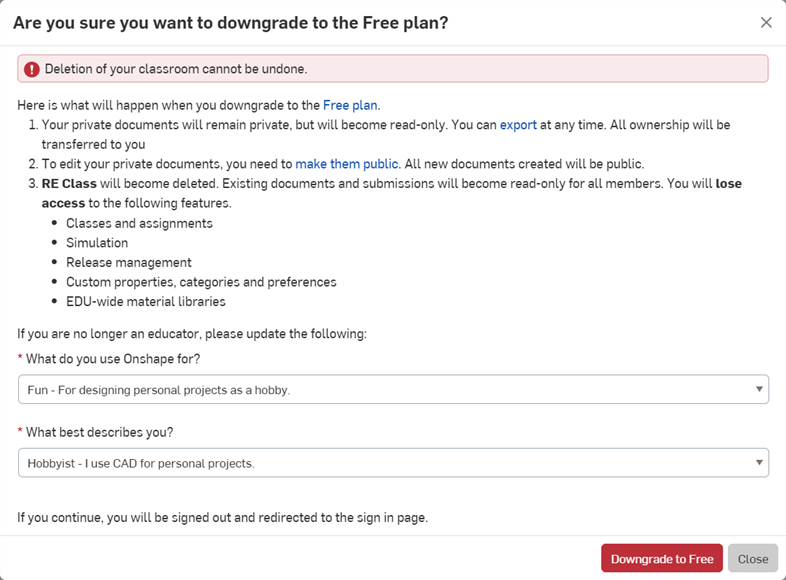
Once downgraded, you are taken back to the sign-in screen. After signing in, you are now on the Free plan.
Administering an EDU Enterprise subscription
The only people who can perform administrative duties for an EDU Enterprise account in Onshape are users designated as Admins in the account. The specifics of most of the tasks listed below are covered in the Enterprise help information, and links to that information are provided below.
Support options
The administrators of an enterprise have access to the Contact Support option in the Help menu and can submit a support ticket. Members (students) will see the Report a bug option in the Help menu.
Accessing your account
It is best to always use the enterprise-specific URL to access Onshape, for all users. When using the enterprise-specific URL, just sign in as you normally would and you land in the Onshape EDU enterprise account for your organization.
Use just cad.onshape.com, however, and you land in a private Onshape account for your user. At this point, to switch into your enterprise account, expand the account menu and select Switch to <enterprise name>. This requires that you sign in again, and then you land in your Onshape enterprise account.
Once in your enterprise account, you can use the Switch to Onshape account command in the User menu to switch back to cad.onshape.com
Uploading your logo
Only enterprise admins can upload a logo. To upload a logo:
-
Access the Enterprise settings for your account.
-
Select Details at the bottom of the list on the left.
-
At the top of the page that appears on the right, click Change under the icon of the building.
- Click the owner name to open the root folder, then select the folder into which you want to copy the document.
- Click Copy here.
Copying a document from one class to another also switches ownership of the copied document to the new class.
Adding users
For information on adding users (students or educators) to your EDU Enterprise account, See Adding users to the account.
For information on adding users (students or educators) to both your EDU Enterprise account and Teams/Classes, see Adding users to the Enterprise and Teams/Classes via CSV file import.
Authentication
For information on setting up 2-factor authentication for your enterprise, and for information on requiring users to sign in to Onshape using a pre-existing single sign on mechanism, see Two-factor Authentication for Authentication information and Configuring Integration with Identity Providers for SSO information.
Assigning permissions
One of the most important aspects of administering your Education Enterprise is to ensure that the proper level of permissions are provided to your users to ensure they can do what needs to be done on the platform. All members of the enterprise can view the following tabs in their account settings:
-
Project roles
-
Permission schemes
-
Custom properties
-
Categories
-
Items
-
Applications
-
Release management
-
Details
The areas that an enterprise member can edit vary depending on their permissions, as noted below.
Below is the complete list of Global permissions that are available and recommendations for how to configure them.
Company Administrator global permission
Grants the users assigned to this global permission full control and full permission over all of the enterprise’s resources. Users with this permission can edit the following tabs when accessing Enterprise settings:
-
All tabs
Additionally, enterprise administrators can see all documents within the enterprise regardless of whether they are shared with them or not.
Since this permission has full authority over the entire enterprise, it is appropriate only for head teachers and IT administrators at your institution. Being able to see all documents can be useful for teachers, but can also be overwhelming depending on how many users are in your organization.
Manage users and teams
Grants the users assigned to this global permission the ability to add and remove users from the enterprise account as well as view and modify teams. Users with this permission can edit the following tabs when accessing Enterprise settings:
-
Users
-
Teams
Users assigned to the Educators team can Manage users and teams. Enterprise admins can edit this permission.
This permission is very useful for teachers and teacher assistants as it allows them to manage adding and removing their own students, as well as putting them into teams. This permission includes the ability to remove users from the enterprise, so it is often not appropriate for students.
Manage role-based access control
Grants the users assigned to this global permission the ability to view and modify Project roles and Permission schemes.
Users with this permission can edit the following tabs when accessing Enterprise settings:
-
Project roles
-
Permission schemes
Only enterprise admins can edit this permission.
Most typical educational applications of Onshape do not require sophisticated roles to be set up or managed. Unless an advanced engineering use-case exists within the institution (such as research) then the recommendation is to have no users have this permission.
Permanently delete
Grants the users assigned to this global permission the ability to permanently delete any resources that have been placed in Trash (through the Documents page > Trash) and also to permanently delete a workspace from within the Version and history panel (of documents they have created).
Users assigned to the Educators team can Permanently delete resources. Enterprise admins can edit this permission.
This permission is up to the discretion of the institution. Since there is no limit of the number of documents within your enterprise, there is no strict need to be able to permanently delete. However being able to delete documents can allow users to stay more organized.
Analytics administrator
Grants the users assigned to this global permission the ability to fully control reports and analytics, via the Analytics tab in the enterprise account. The default users assigned to this global permission is the Educators team. Enterprise admins can edit this permission.
The Analytics tab is most useful for educators who would like data on how students are working. As the Analytics tab contains data about all users, it is often not appropriate for students to have access.
Create Projects
Grants the users assigned to this global permission the ability to create projects; the All Enterprise Users team is automatically assigned to this Global permission. Add and remove users and teams as desired in projects via the Documents page. The default users assigned to this global permission is the All enterprise users team. Enterprise admins can edit this permission.
Most typical educational applications of Onshape do not use the nuanced permission schemes provided by projects. Unless an advanced engineering use-case exists within the institution (such as research) then the recommendation is to have no users have this permission.
Create documents and folders in the Enterprise
Grants the users assigned to this global permission the ability to create documents and folders in the Enterprise name filter. The default users assigned to this global permission is the All enterprise users team. Enterprise admins can edit this permission.
Create Releases
Grants the users assigned to this global permission the ability to create Release candidates. The default users assigned to this global permission is the All enterprise users team. Enterprise admins can edit this permission.
Most typical educational applications of Onshape do not use release management workflows. Unless an advanced engineering use-case exists within the institution (such as research) then the recommendation is to have no users have this permission or any other release-specific permissions.
Approve Releases
Grants the users assigned to this global permission the ability to approve Release candidates. The default users assigned to this global permission is the All Enterprise team. Enterprise admins can edit this permission.
Most typical educational applications of Onshape do not use release management workflows. Unless an advanced engineering use-case exists within the institution (such as research) then the recommendation is to have no users have this permission or any other release-specific permissions.
Allow access to the App Store
Grants the users assigned to this global permission the ability to sign in to the App store and subscribe to applications. The default users assigned to this global permission is the All enterprise users team. Enterprise admins can edit this permission.
Since the app store contains applications that users can pay for, some institutions may choose to prevent students from accessing this. Users will not be able to charge the institution for apps. Since there are free and useful apps in the app store, we recommend that instructors have access so that they can explore it.
Allow access to Public documents
Grants the users assigned to this global permission the ability to access public documents. The default users assigned to this global permission is the All enterprise users team. Enterprise admins can edit this permission.
Share for anonymous access
Grants the users assigned to this global permission the ability to share documents by an anonymous link to people outside of the enterprise and outside of Onshape. These links provide read-only access to the document shared. When a user is associated with this global permission, they have an additional option in the Share dialog. The default users assigned to this global permission is the All enterprise users team. Enterprise admins can edit this permission.
For more information, see Share Documents.
This can be a great way for students to share their work with others (such as parents or potential employers), but is sometimes regulated by state or federal privacy regulations. It is useful for all enterprise users unless regulated.
Creating teams
Teams are an important part of administering Onshape across your institution. A team is a list of users which can be used for two primary purposes:
-
Applying global permissions - Teams can be applied to global permissions so that every member of the team receives the global permission. This is useful for giving all instructors access to adding users, and allowing students to add apps, for example.
-
Sharing documents with large groups of users - When sharing a document or folder, teams can be selected to quickly distribute access to a list of people at the same time. This is useful for providing an assignment to all students at the same time, and allowing students to share with the grading TA’s, for example.
When set up with your Onshape education enterprise account, two teams are automatically created:
-
All enterprise users - A team with all users in your enterprise, managed automatically.
-
Educators - A team with all educators in your enterprise. This team is very useful for giving educators access to global permissions such as managing teams and accessing analytics. This lets you create needed global permissions so all Educators can use them.
Educator accounts must be added to this team to be granted the ability to create Classes and Assignments.
For more information on how teams work, see Understanding Teams.
Bulk adding students to teams
Users can be assigned to teams in bulk by using a CSV file. This is done in the same way that bulk uploading user is performed, but can be done even if all users are already on the platform. To bulk add users to teams:
-
Before beginning, ensure that all of the teams that you wish to add students to have already been created.
-
Click your name in the upper right corner of the window to open the User menu.
-
Select Enterprise settings.
-
Click Users in the left tab pane.
-
In the top right corner of the page, click Import from CSV file button.
-
Click Choose File to select the previously-created .csv file listing all users you want to add to the team.
-
Click Import. You receive a report on the status of all of the users who were assigned to a team, along with any errors that may have occurred.
Transfer documents out of Enterprise
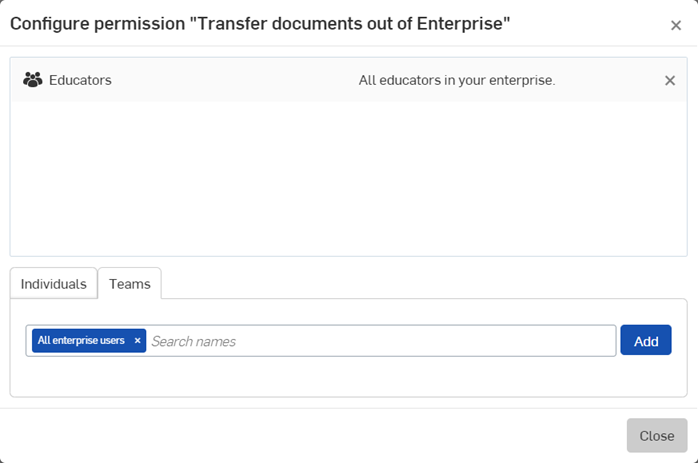
Users can transfer the ownership of their documents outside Enterprise. This permission is only granted by administrators, and is given to users and/or teams. All educators are granted permission by default. Clicking this option opens the Configure permission dialog. Select the Individuals and/or Teams tab, enter the parties to which you want permission granted, and click Add. Then click Close.
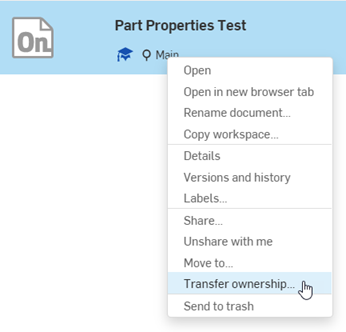
Once permission is granted, the user right-clicks on a document from the Documents page and selects Transfer ownership from the context menu (shown in the first image below). The Transfer ownership dialog opens where an Individual, Company, or Enterprise is selected (shown in the second image below).:
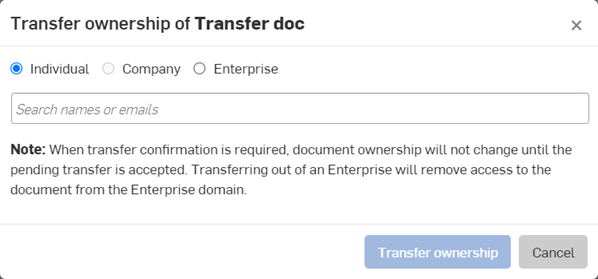
Click Transfer ownership, and an email notification is sent to the selected individual, company, or enterprise. As stated in the dialog, when transfer confirmation is required, document ownership will not change until the pending transfer is accepted. Transferring out of an Enterprise will remove access to the document from the Enterprise domain.
For additional resources on teaching with Onshape, follow the self-paced courses for educators here: Self-paced Courses for Educators (Onshape account required) (opens in a new tab). You can also find curriculum resources to use while teaching Onshape here: Curriculum Resources for Educators (Onshape account required) (opens in a new tab).