![]()
![]()
![]()
可用于:Part Studio、装配体
创建零件、Part Studio 或装配体的变体。例如,您可以配置拉伸特征的深度、圆角的抑制、自定义特征的 FeatureScript、零件编号、颜色、材料等。
在装配体中,您只能配置嵌合(不能配置嵌合连接器)、实例和阵列。无论是否存在任何 Part Studio 配置,您都可以配置装配体。
配置只能在浏览器上创建,但可以在 iOS 和 Android 上查看。
请参见以下页面了解有关使用配置的更多详细信息:
配置只能在浏览器(在 Part Studio 或装配体中)中创建。通过创建整个 Part Studio 或特定零件的变体来创建零件族。您可以配置任何特征或参数值,甚至是零件属性、自定义零件属性、面和零件外观,以及草图文本。例如,您可以配置拉伸特征的深度、圆角特征的应用、为圆角选择的面、自定义特征的 FeatureScript 以及零件编号、颜色和材料。
您在一个 Part Studio 中配置的所有特征和参数都属于一个配置。每个 Part Studio 可以有一个配置;但是,您可以在一个配置中创建多个配置输入。
当您将零件插入装配体或工程图时,您在 Part Studio 中定义的配置输入将变成“插入”对话框中的选项。
在此示例中,创建了两种配置:新的钣金厚度配置和替代法兰配置。将模型置于工作区后,单击“配置”图标以打开“配置”面板。单击“配置 Part Studio”按钮。输入 “Sheet thickness”(钣金厚度)作为配置名称。单击选项卡以创建新行,然后输入 “Alternate flange”(替代法兰)作为第二个配置名称。每行都是不同的配置。
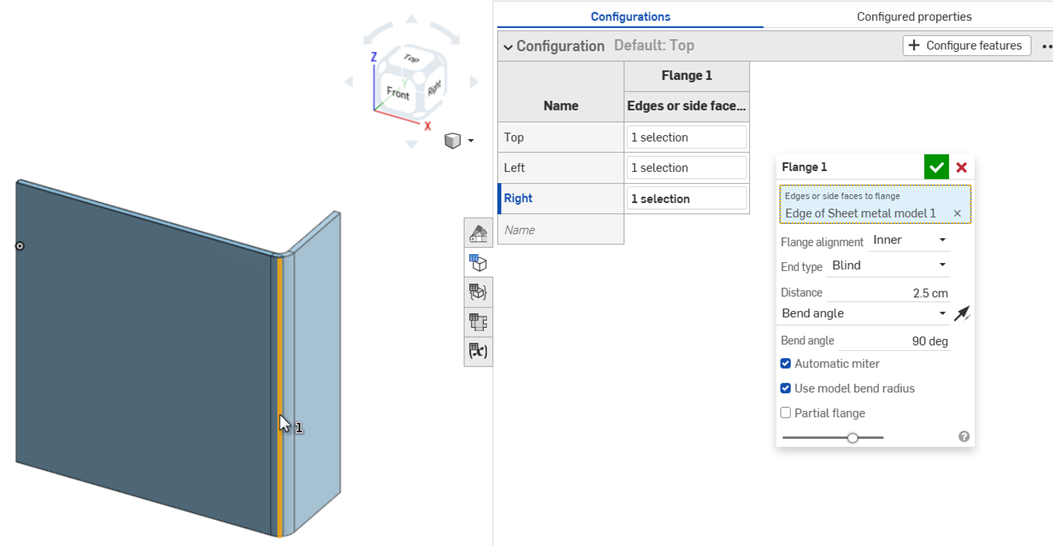
选择“钣金厚度”这一行后,单击“配置特征”按钮。在“特征”列表中双击包含该参数的特征。选择参数以用黄色虚线勾勒出轮廓,在本例中为“钣金厚度”参数。在表中会为该参数创建一个新列。双击表格单元格,然后提供一个新值。接下来,选择“替代法兰”配置行,使用“法兰”特征执行相同操作,并在表中提供“距离”和“折弯角度”的替代值。
若要使用模型测试输入,请单击“特征”列表的“配置”区域中的下拉箭头,然后选择新配置以查看结果。模型使用新的输入参数进行更新。
- 单击屏幕右侧的配置面板图标 (
 )。
)。 -
配置面板打开。单击“配置 Part Studio”或“配置装配体”以添加输入:
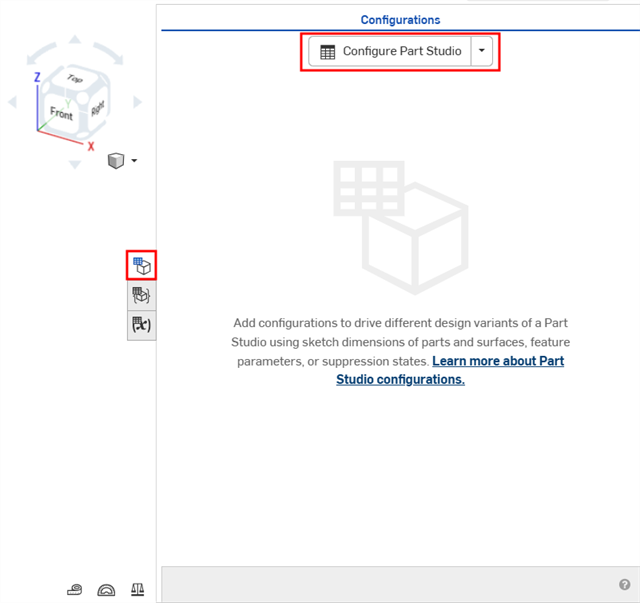
在 Part Studio 中创建配置
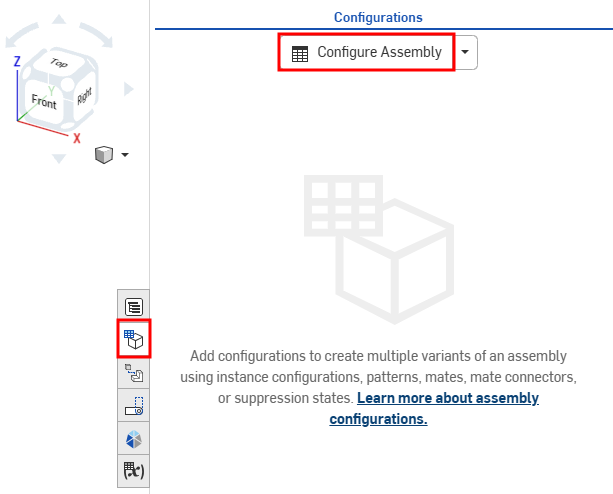
在装配体中创建配置
默认情况下,“配置”左边的插入符号是展开的,当您完成面板的某个部分后,点击插入符号即可折叠该部分。
- 单击第一行将其激活,然后在第一列中输入输入值名称。按 页签以移至下一行。该行左侧的蓝条表示当前在 Onshape 窗口中选择的配置。
此示例有 3 种可能的配置:“短”、“中”和“高”。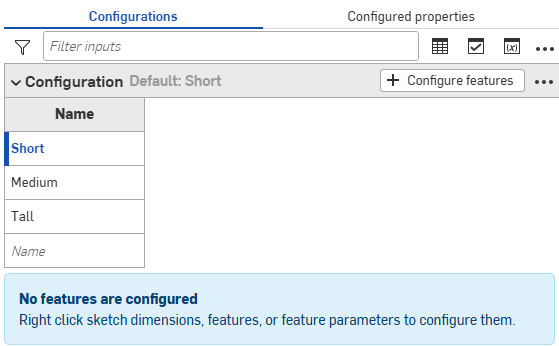
- 要为选定的输入值配置特征,请单击“+ 配置特征”(或“+ 配置装配体特征”)。
- 单击要配置的特征或实例并选择参数。该参数将以黄色虚线框标出,并为该参数创建了一个新列。
例如,单击特征列表中的“拉伸”特征,然后在“拉伸”对话框中选择“深度”参数。该参数在对话框中以黄色亮显,表格中会出现一个新列。
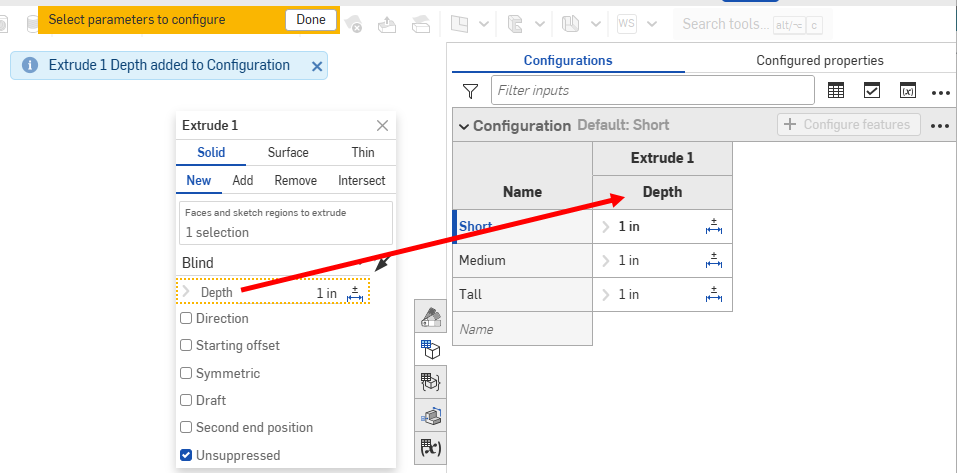
列名称默认为特征名称(作为顶级标题)加上参数名称(作为下级标题),在这种情况下,挤出 1 是特征名称,深度 是字段名称。
将光标悬停在特征对话框中的输入框上,查看可以配置的参数。将光标悬停在可供配置的参数上面时,这些参数以黄色亮显。
您可以直接在“配置表”中为许多草图和特征尺寸配置“公差选项”(
 )。每个选项值都可以有自己的“公差选项”设置。
 - 要配置参数,请执行以下操作:
- 要编辑某个值,请双击该值并输入新值。
在此示例中,我们将为 3 个输入值设置深度: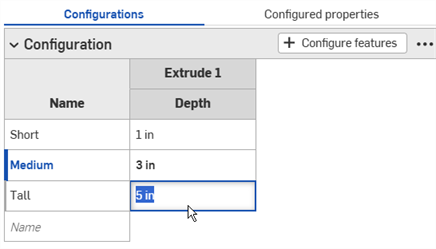
- 要编辑对话框中的选择,请双击表中配置的参数以打开特征对话框。
特征对话框中的参数以蓝色亮显。移除任何不需要的选择,然后在模型或草图上做出新的选择。单击特征对话框中的绿色复选标记将其关闭。
- 要编辑某个值,请双击该值并输入新值。
- 完成配置定义后,请单击黄色横幅中的“完成”按钮
- 要向输入中添加另一个参数(列),请重复步骤 4-7。
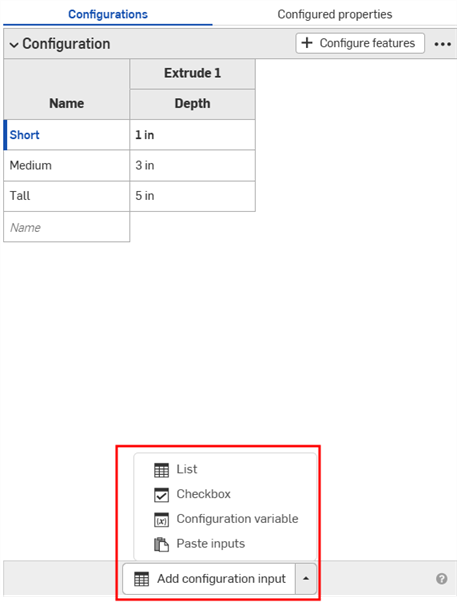
- 要添加其他列表输入,请单击配置面板底部的“添加配置输入”按钮,然后选择“列表”。
- 要使用模型测试输入,请在左侧面板的“配置”下,使用向下箭头从菜单中进行选择:
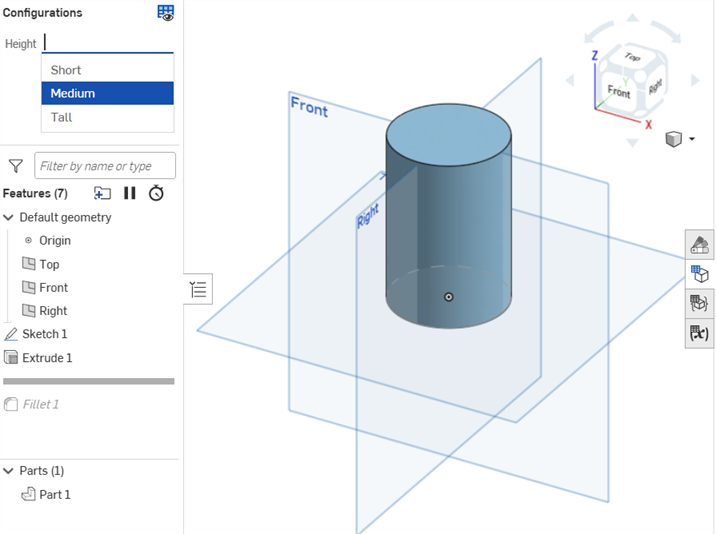
模型应该相应地更新。如果未更新,请检查设计意图的模型和配置定义以进行精确选择。
创建一个复选框以开启或关闭选项(例如圆角或倒角),并抑制或取消抑制特征。这会在插入时的“插入”对话框中显示一个复选框。
-
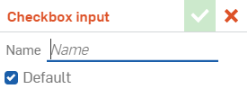
单击配置面板底部的“添加配置输入”按钮,然后选择“复选框”:
- “复选框输入”对话框打开。为输入项输入一个名称。
-
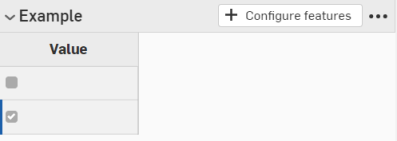
配置输入项包含一列,其中有一个未勾选的复选框行和一个已勾选的复选框行。单击“+ 配置特征”(或“+ 配置装配体特征”)。
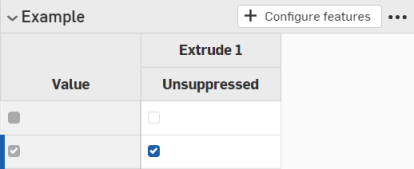
- 在特征列表中,单击以打开包含参数的特征并选择该参数。该参数随后以黄色虚线表示,并为表格中的该参数创建一个新列。(在其他输入中配置的参数用黄色虚线表示,不可用于配置。)
在此示例中,选中“取消抑制”作为配置参数。
- 单击 X 可关闭特征对话框。
- 取消选中第一列中的复选框以表示复选框应插入已取消抑制的特征:
-
单击配置面板底部的“添加配置输入”按钮,然后选择“配置变量”:
- 在“变量输入”对话框中输入变量输入的名称。这成为系统中的实际变量,以 #variableName 的形式被参考。
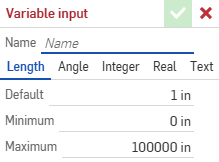
- 选择变量类型:长度、角度、整数、实数、文本。文本可以是可以在自定义 FeatureScript 中使用的任何类型的文本。
- 为您所选的变量类型,输入值。
- 单击复选标记以保存您的定义。
- 将变量应用于特征:
- 双击特征列表中的某个特征将其打开。
- 右键单击输入,然后单击“设置为 #variableName”。您也可以直接在任何表达式中键入变量名称(以 # 开头)。
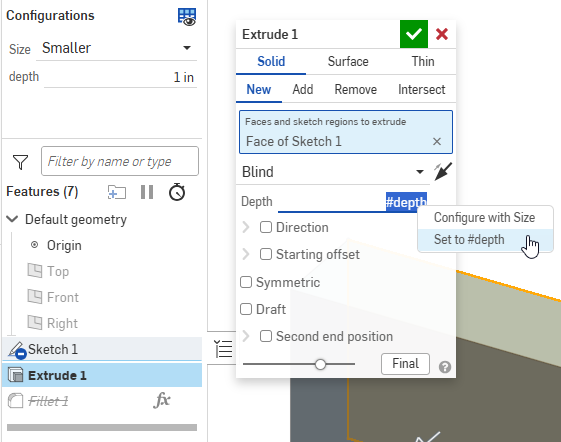
- 关闭特征对话框。变量输入的使用情况在“配置”面板中列出。
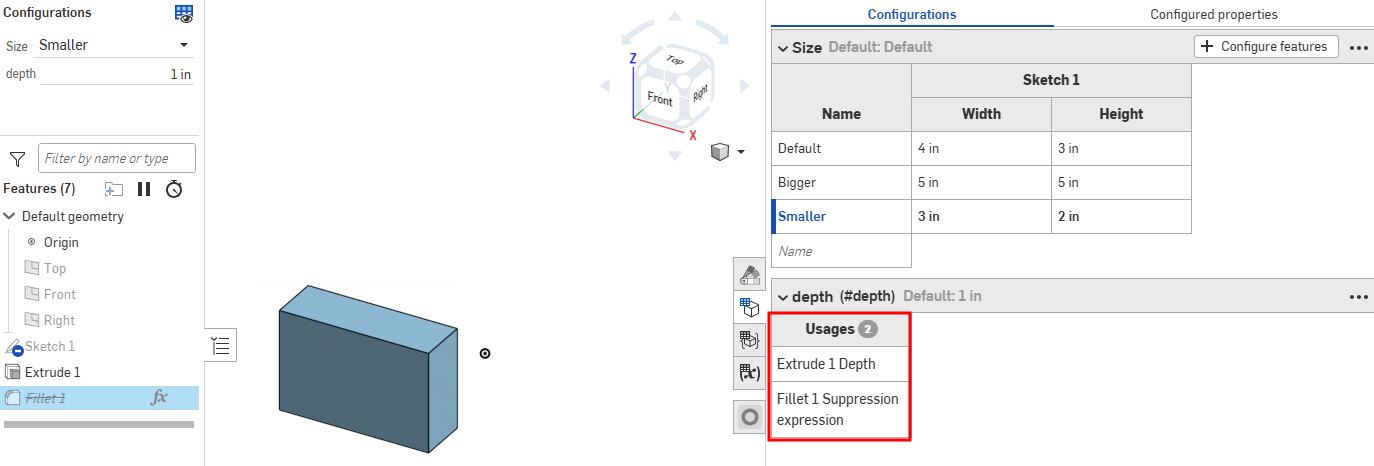
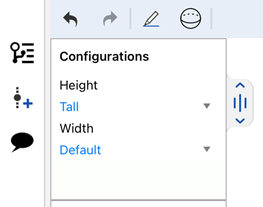
- 通过在页面左侧特征列表上方的配置列表中选中该值来测试该值:
您可以使用直接在 Part Studio 或装配体中创建的配置输入来预览其设计。但是,创建配置输入的主要用途是选择特定的配置以插入到其他装配体、工程图、发布版本等之中。
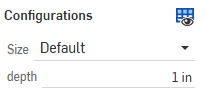
使用屏幕左上角的配置区域选择配置输入,以查看它们如何影响整体设计。设计会更新以匹配所选输入,因此您可以预览最终设计。可能的配置输入的每种排列都是一个配置。

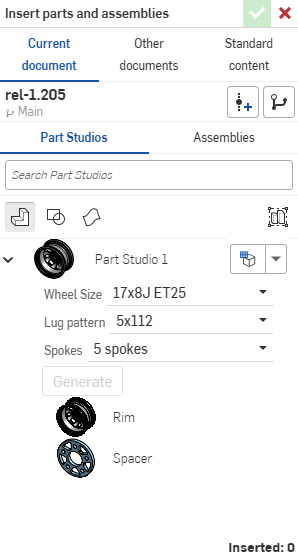
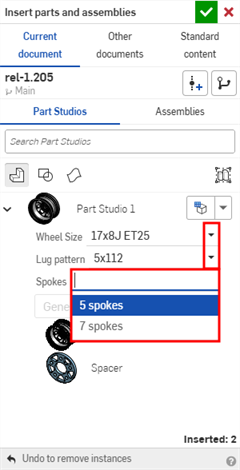
您可以通过“插入 Part Studio 和装配体”对话框将已配置的零件、Part Studio,或装配体插入到装配体、发布版本和工程图中
-
直接在“插入”对话框中选择所需的输入:
-
单击“设为上次查看的配置”图标 (
 ),选择在“Part Studio”或“装配体”选项卡中预览最后一个处于活动状态的配置,或单击箭头并选择“重置为默认值”以将所有输入设置为其默认值。
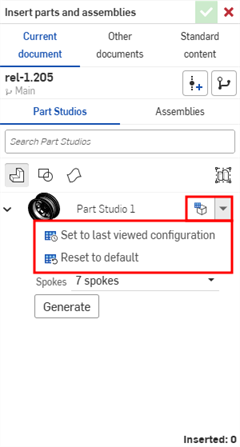
-
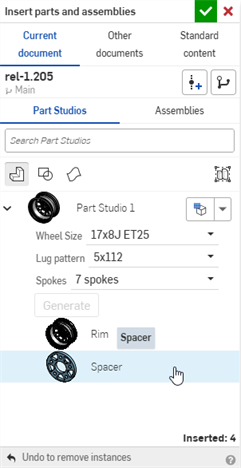
如您对配置感到满意,单击“生成”。
-
单击要插入的配置。
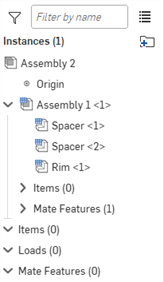
在装配体中,配置的零件和装配体由实例列表中的 ![]() 图标指示:
图标指示:
将已配置的零件或装配体插入到装配体中后,您可以更改配置:
- 右键单击实例列表中的零件或装配体,然后选择“更改配置”。
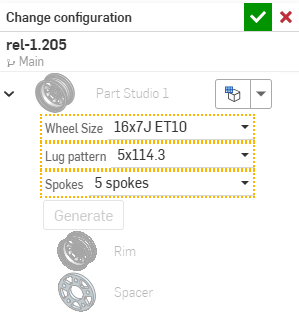
- 选择新的配置值。
- 当您对选择的内容满意时,请单击
 。(使用
。(使用  可取消操作。)
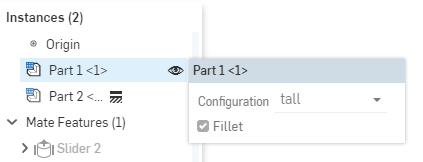
要查看装配体中当前有哪些配置处于活动状态,请将鼠标悬停在实例列表中的某个零件上,出现包含配置信息的工具提示:
iOS 和 Android 对配置的支持仅限于以下内容:
-
查看右侧的“配置”面板 (
)。 -
在左侧面板(功能列表上方)中的“配置”之间进行选择:
在 iOS 上选择“配置”
-
(仅限 iOS)如果配置中存在“可见性条件”,则应用这些条件。
您无法在 iOS 或 Android 平台上创建或编辑配置或可见性条件。这只能在桌面(浏览器)平台上完成。
有关其他学习中心资源,请参阅:自定进度课程 > 配置。您还可以在此处阅读学习路径课程:零件配置简介(需要 Onshape 帐户),以及此处的技术简报文章:参数变量与配置变量(需要 Onshape 帐户)。