拘束の操作
![]()
![]()
![]()
拘束は、スケッチの作成中、または編集用に開いているときに使用でき、表示することができます。
(たとえば、あるスケッチのエンティティを別のスケッチで使用する場合) 2 つのスケッチのエンティティ間に適用された拘束は、青色の背景で区別されます。拘束は手動で適用でき、スケッチとしてジオメトリが作成された場合に作成される拘束もあります。カーソルを置くと、参照される拘束の背景が濃い青になります。
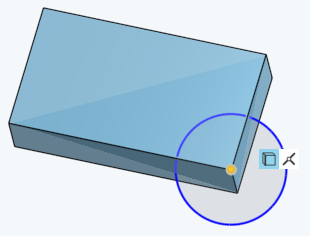
上図の使用拘束 (青い背景) は、長方形のスケッチの頂点を、円のスケッチ内の円の中心点で拘束します。
拘束スケッチツールを使用すると、スケッチの作成中や編集用に開いているときに、拘束を表示したり変更したりできます。たとえば、あるスケッチのエンティティを別のスケッチで使用する場合など、2 つのスケッチのエンティティ間に適用された拘束は、青色の背景で区別されます。拘束は手動で適用でき、スケッチとしてジオメトリが作成された場合に作成される拘束もあります。カーソルを合わせると、参照先の拘束の背景は濃い青色になります。
一致、同心円、平行、接線、水平、垂直、直立、等号、中点、法線、貫通、対称、固定、曲率などの複数の拘束を使用できます。拘束は、推測を使用して自動的にスケッチに追加することも、ツールバーを使用して手動で追加することもできます。
この例では、垂直の作図線と円の間に中点制約が追加されています。円の中点と作図線を選択します。スケッチツールバーの [中点拘束] をクリックします。このプロセスはさまざまな制約に対してエミュレートできます。または、最初にスケッチツールバーから [中点拘束] ツールを選択し、次に構築線と円を選択することもできます。
図面の拘束を適用するには、次のいずれかを行います。
-
メニューから拘束を選択し (または対応するショートカットキーを使用)、スケッチで拘束を適用するエンティティを選択します。
-
スケッチエンティティを選択し、ツールバーの拘束メニューで拘束をクリックします。
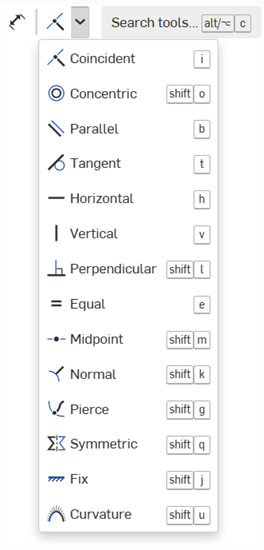
ツールバーの拘束メニューでは、次の拘束を使用できます。
-
一致 - 2 つ以上のスケッチエンティティがスケッチ内の同じ場所を共有するようにします。
-
同心円 - 任意の点を円弧または円の中心と一致させ、円弧と円が中心点を共有するようにします。
-
平行 - 2 本以上の線を平行にします。
-
接線 - 2 つのスケッチエンティティ間、またはスケッチエンティティと平面間を正接関係にします。
-
水平 - 1 本または複数の線または点のセットを水平になるように拘束します。
-
垂直 - 1 本または複数の線または点のセットを垂直になるように拘束します。
-
直角 - 2 本の線を直角にします。
-
等しい - 複数の線の長さを等しくするか、複数の円弧を同じ半径にします。
-
中点 - スケッチ点を線または円弧の中点に拘束します。
-
法線 - 曲線と直線、または曲線と平面を直角にします。
-
貫通 - スケッチエンティティをアクティブスケッチ平面以外の別のエンティティと一致させます。
-
対称 - 同じタイプの 2 つのエンティティを、線、平面、または直線エッジに対して対称にします。
-
固定 - スケッチエンティティをスケッチ平面に固定し、移動しないようにします。
-
曲率- スケッチスプライン (または円錐) と周囲のジオメトリの間に曲率連続トランジションを作成します。
スケッチを開いた状態で、線や円弧などのスケッチエンティティの上にカーソルを置くと、そのエンティティの拘束が表示されます。エンティティの上でカーソルを動かすと、強調表示されたエンティティのみ拘束が表示されます。すべての拘束を表示したままにするには、[Shift] キーを押しながらマウスを動かします。
エンティティは、ホバー時にオレンジ色で強調表示されます。ただし、参照拘束は例外で、ホバー時には青色の背景および濃い青色の背景で表示されます。拘束を選択し、座標エンティティも強調表示されるように、関連するエンティティは黄色で強調表示されます。
![]()
これらの拘束は、ツールバーの [拘束] セクションでは使用できませんが、以下に説明するように、特定のアクションの間に自動的に作成されます。
-
 四半円点 - 楕円とその楕円の長軸または短軸のいずれかに一致する点を拘束します。推測によって、任意のアイテムをドラッグするか、楕円上の点の 1 つに任意のアイテムを配置することによって行うことができます。
 -
 使用 - あるスケッチのスケッチエンティティを別のスケッチのエンティティに拘束します。使用ツールを選択してから、別のスケッチまたはフィーチャーのエンティティ (スケッチエンティティ、面、またはエッジ) を選択します。
 -
 交差 - 貫通拘束
  を使用して、開いた曲線の終点 ([交点] ツールを使用した結果) を、交差面のエッジ上に配置するように拘束します。閉じた曲線の場合、スケッチエンティティは交差拘束で拘束されます。
スケッチエンティティの色は、次のような拘束状態を示します。
- 青は拘束状態を意味します。
- 黒は完全に拘束された状態を意味します。
- 赤は拘束の問題 (過剰拘束) を意味します。
拘束アイコンの色は、制約された状態を示します。
- グレー地に黒ははっきりしていることを意味します。
- 赤地に白は問題を示します。
- 選択すると、完全に拘束されていないスケッチ点 (青と赤) が、重なり合っている完全に拘束されたスケッチ点 (黒) よりも優先されます。
寸法や拘束を追加すると、スケッチがさらに拘束されます。エンティティをドラッグすることで、どのような拘束や寸法を追加すればよいかわかりやすくなります。
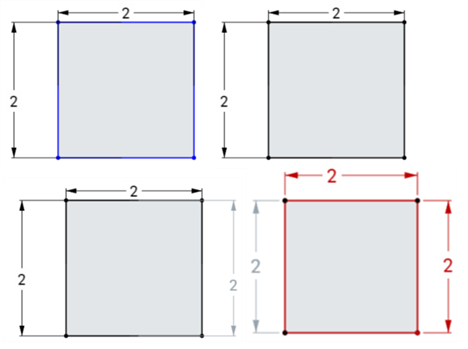
スケッチ拘束と寸法を表示して絞り込み、それらを分析してスケッチ拘束のエラーを修正できます。
拘束マネージャーへのアクセス
スケッチダイアログから:
-
[スケッチ診断ツールを表示] アイコン (
 ) をクリックします。
 -
[拘束マネージャー] をクリックします。
![スケッチ診断ツールの [拘束マネージャー] をクリック](Resources/Images/sketch-tools/constraint-manager-00.png)
拘束マネージャーダイアログが開きます。
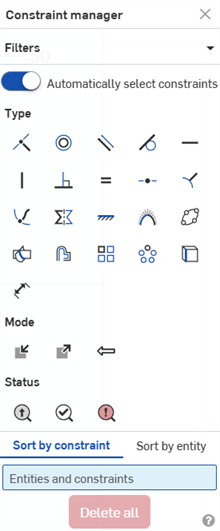
拘束マネージャーの使用
拘束マネージャーダイアログでは、次の操作を行えます。
-
フィルター - すべてのダイアログセクション (タイプ、モード、ステータス) を一括して折りたたんだり展開したりします。
-
拘束を自動的に選択 - オンにすると (既定)、拘束マネージャーダイアログで任意の拘束を選択し、それに対応するスケッチ内の拘束の周囲に黄色の境界ボックスが表示されます。オフにすると、拘束の周囲に境界ボックスは表示されません (選択解除)。
このオプションは、スケッチ内の特定のパーツの拘束のみを選択したい場合に便利です。たとえば、このオプションをオフに切り替え、スケッチの一部に配置したい拘束タイプを選択します (下の例では一致拘束)。次に、スケッチの一部 (下の例では長方形) の周りに選択ボックスを作成します。そのセクションの拘束のみ、周囲に境界ボックスが表示され、エンティティと拘束リストで使用できます (下記参照)。
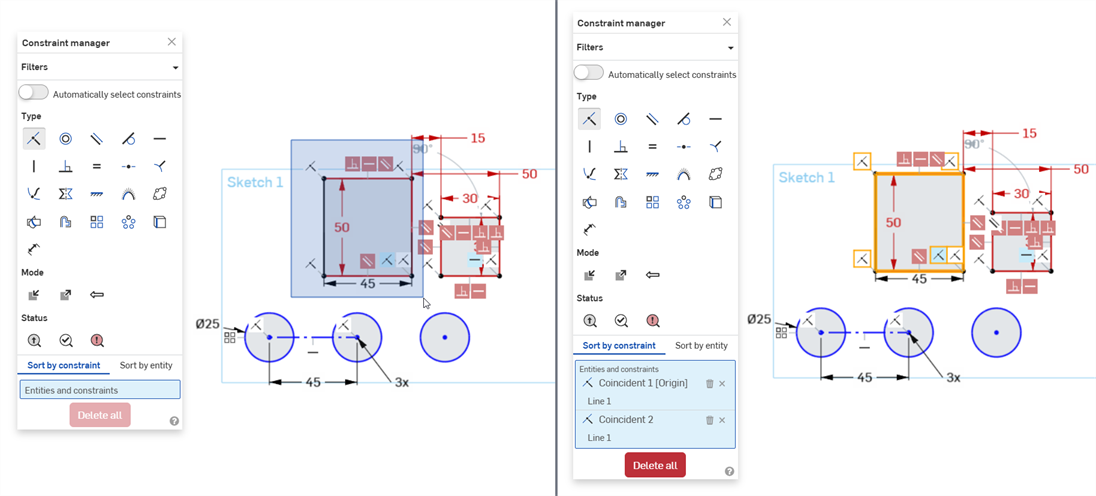
[拘束を自動的に選択] をオフにしてから、スケッチ内の長方形をボックスで選択します (左)。選択すると、フィルターは選択したスケッチエンティティにのみ適用されます。この例では、以前に選択した長方形にのみ一致拘束が表示されます (右)。
-
タイプ - 使用可能な拘束のリストから選択します。たとえば、[一致] を選択すると、スケッチ内のすべての一致拘束の周囲に黄色の境界ボックスが配置されます ([拘束を自動的に選択] がオンの場合)。
-
モード - 次の 3 つのモードから選択します。
-
内部 - 現在のスケッチから拘束を選択します。
-
外部 - 外部ソースから拘束を選択します。
-
インコンテキスト - インコンテキストで参照されている拘束を選択します。
-
-
ステータス - 次の 3 つのステータスから選択します。
-
駆動 - 駆動拘束。これを選択すると、駆動拘束が黄色で強調表示されます。拘束が十分でない場合は、濃い青色で強調表示されます。
-
解決済み - 解決済みの拘束。これを選択すると、解決済みの拘束が黄色で強調表示されます。拘束が十分でない場合は、濃い青色で強調表示されます。
-
エラー - エラーがある拘束。選択すると、エラーのある拘束が濃い赤色で強調表示されます。
-
-
拘束ごとに並び替え - 下のエンティティと拘束リストで最初に拘束順に並び替え、次にエンティティ順に並び替えます。
-
エンティティごとに並び替え - 下のエンティティと拘束リストで最初にエンティティ順に並べ替え、次に拘束順に並べ替えます。
-
エンティティと拘束リスト - ダイアログでのフィルターの選択に応じて、選択したすべての拘束を表示します。リスト内の拘束またはエンティティにカーソルを合わせると、スケッチで強調表示されます。このリストから、次の操作を実行できます。
-
拘束を削除 (
 ) - スケッチから拘束を削除します。
 -
選択を削除 (
 ) - エンティティと制約リストから制約を削除します。
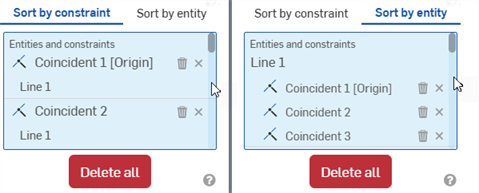
拘束順の並べ替え (左)、エンティティ順の並べ替え (右)
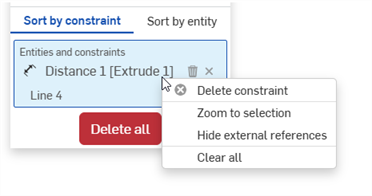
エンティティと拘束リスト内で拘束またはエンティティを右クリックすると、次のコマンドにアクセスできます。
-
制約/エンティティを削除 - 選択 (拘束またはエンティティ) を削除します
-
選択を拡大 - 選択 (拘束またはエンティティ) を拡大します
-
外部参照を非表示にする - 外部参照のすべての拘束を非表示にします
-
すべてクリア - エンティティと拘束リストからすべての拘束をクリアします
-
-
-
すべて削除 - 選択したすべての拘束をスケッチから削除します。
拘束マネージャーをオフにする
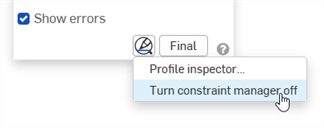
拘束マネージャーをオフにするには、次のいずれかを行います。
-
拘束マネージャーダイアログの右上隅にある X をクリックします。
-
スケッチ診断ツールを表示アイコン (
 ) をクリックし、[拘束マネージャをオフにする] を選択します。
ヒント
-
タイプ、モード、ステータスをダイアログからいくつでも選択して、選択した内容で拘束を絞り込むことができます。これらのフィルターはどのような組み合わせでも使用できます。
-
スケッチダイアログで [拘束を表示] と [エラーを表示] がオフになっている場合、エンティティと拘束リストの拘束にカーソルを合わせると、スケッチ内のその拘束 (および関連エンティティ) のみが表示されます。
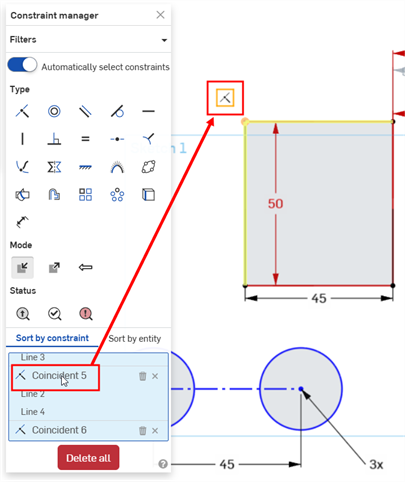
-
エンティティと拘束リストでエンティティを選択すると、そのエンティティが薄い黄色で強調表示されます。
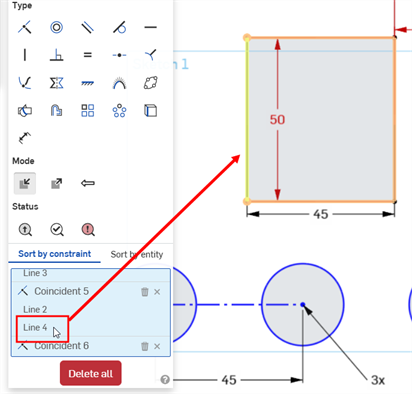
-
拘束マネージャーは、シートメタルのフラットパターンビューのスケチでも動作します。
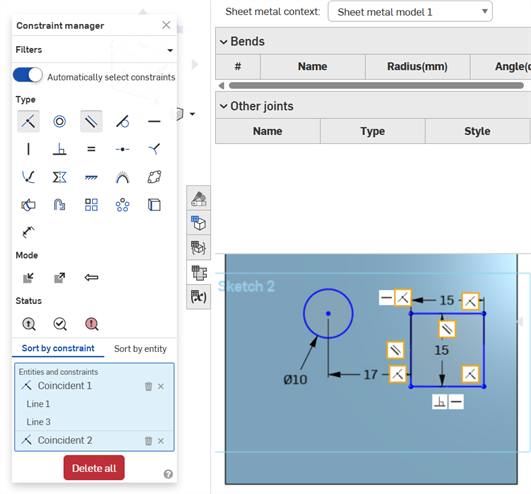
拘束アイコンを操作することができます。
- アイコンまたはアイコンのグループをクリックし、別の場所にドラッグします。
- 1 つの拘束アイコンの上にカーソルを合わせると、強調表示されているエンティティが表示されます。これは、拘束が適用されていることを示します。
- 拘束を削除する: 拘束アイコンを 1 つクリックして Delete キーを押すか、コンテキストメニューから [削除] を選択します。
- [スケッチ] ダイアログで、[拘束を表示] をオンにして、スケッチに定義されているすべての拘束を表示します。
- 矛盾する拘束は、赤い背景に白い記号として表示されます。
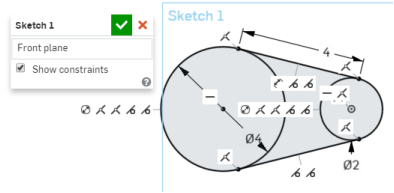
スケッチでは、曲線が推測をスナップすると、マウスカーソルの横に拘束インジケータが表示されます。
拘束を追加、適用、編集することで、Onshape でのパーツの定義が容易になります。拘束は、スケッチの作成中、または編集用に開いたときに、スケッチダイアログに一覧表示されます。
スケッチ内のエンティティ間、または 2 つ以上のスケッチのエンティティ間に拘束を適用できます (たとえば、別のスケッチ内の 1 つのスケッチからエンティティを 使用 する場合)。拘束は手動で適用でき、スケッチとしてジオメトリが作成された場合に作成される拘束もあります。自動的に作成される拘束の詳細は、自動推測を参照してください。
スケッチダイアログで、リスト内の拘束をタップして、関連するスケッチジオメトリを強調表示します。たとえば、2 本の線が互いに水平に拘束されている場合に、水平拘束をタップすると、両方の線が強調表示されます。
拘束を追加、適用、編集して、Onshape でパーツを定義しやすくします。拘束は、スケッチの作成中、または編集用に開いている場合にのみ使用でき、表示することができます。
モバイルデバイスでの特定の拘束の使用の詳細は、特定の拘束のトピックを参照してください。