 Text
Text
![]()
![]()
![]()
Add up to 250 characters of text to a sketch (you are able to copy and paste into the text dialog). Treat sketch text as most other sketch entities: extrude, dimension, and apply constraints.
To sketch text, select the text sketch tool from the sketch toolbar, and then click and drag from the top left to the bottom right to create the text box. You'll notice that the text dialog opens. Enter your text into the text field, and then you can also select the type of font that you want to use.
You can also select whether the text is going to be bold or italic, and you can also select whether you want to flip the horizontal, or flip the vertical. The preview for the text will show up in the gray area of the dialog.
When you're ready, click the green check mark and your text is applied. If you'd like to move your text to a new location, select one of the corner handles, and move it to where you'd like it to be located.
-
Click
 .
.
- Click and drag to establish the position and size of the text box. (The lower left corner and the height define the text position and size of the first line of text.)
Note that a horizontal constraint is applied to the lower edge of the box by default.
In the dialog that appears:
- Enter the text as you wish it to appear. (You are able to see a preview of your text in the preview box at the top of the dialog.)
- Select a font from the drop-down menu.
Be sure to select a font that supports your language.
- Optionally, select styling: Bold, Italic.
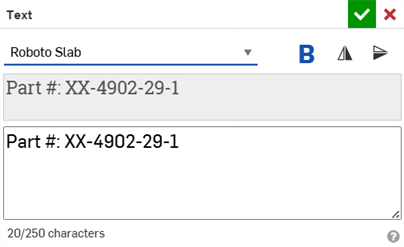
- Optionally, select one of the icons to flip the text:
- Flip the text about the horizontal center of the text frame
- Flip the text about the vertical center of the text frame
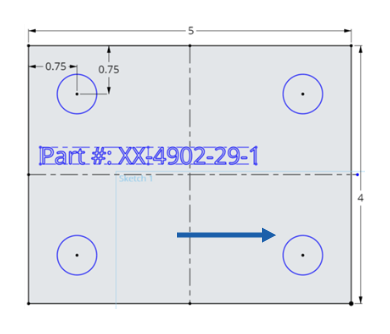
For example, when the above text is flipped about the vertical center of the text frame, the result is this:

The text field in a Text dialog can be converted into an expression. Once converted, you can use Length, Angle, Number, and string variables as part of the Sketch text. See Using variables in text expressions for more information.
Click
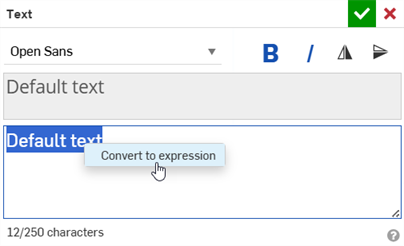
![]() to open the Text dialog. Right-click on the Default text and select Convert to expression:
to open the Text dialog. Right-click on the Default text and select Convert to expression:
The Default text is converted to an expression, with a text expression entry line:
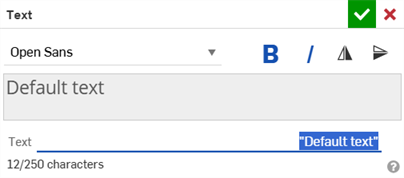
If you wish to convert an expression back to text, right-click on the Text field and select Convert to text (shown below left). The expression is converted back to text (shown below right).

Once a text field in a Text dialog is converted into an expression, you can use Length, Angle, Number, and string variables as part of the Sketch text. See Text expressions for more information.
To use a string variable in the text expression:
-
Create the string variable prior to the sketch using the Variable feature or Variable table. See Variable and Variable table for more information.
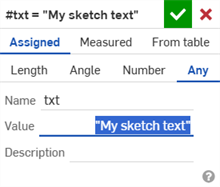
- Select the string variable or enter it on the Text expression entry line (#txt in the example below):
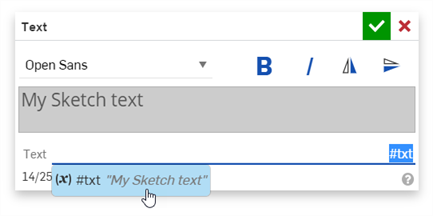

String variable used in the sketch text
Typically, when using a length value, you should divide by the units of choice, round the resulting number, and concatenate with a string:
-
Create the Length variable prior to the sketch using the Variable feature or Variable table. See Variable and Variable table for more information.
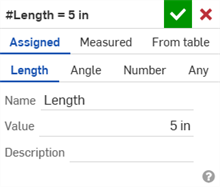
- On the Text expression entry line, enter roundToPrecision(#Length/in, 3) ~ "in":
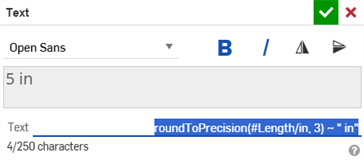
roundToPrecision() - Rounds the value.
If you do not precision round the value, floating-point errors can occur. For example, if the Length variable is 5 inches, and you enter #Length/in ~ " in" in the text expression, the result is 4.999999999999999 in.
#Length - Length variable
/in - Divides the variable by the specified measurement value (inches)
3 - Formats the rounded value to 3 decimal places
~ Concatenates the resultant value with the string
" in" - String value that adds a space and the units label after the value
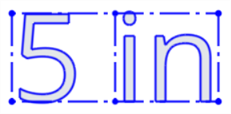
Length variable used in the sketch text
Typically, when using an angle value, you should divide by the units of choice and concatenate with a string:
-
Create the Angle variable prior to the sketch using the Variable feature or Variable table. See Variable and Variable table for more information.
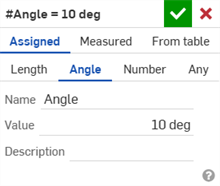
- On the Text expression entry line, enter #Angle/deg ~ " degree":
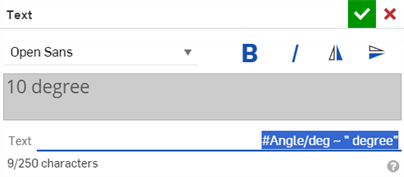
#Angle - Angle variable
/deg - Divides the variable by the specified measurement value (degrees)
~ Concatenates the resultant value with the string
" degree" - String value

Angle variable used in the sketch text
When using an numerical value, you can use it on its own or concatenate with a string:
-
Create the Number variable prior to the sketch using the Variable feature or Variable table. See Variable and Variable table for more information.
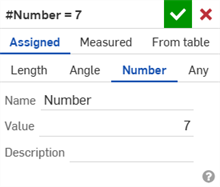
- On the Text expression entry line, enter #Number ~ " items":
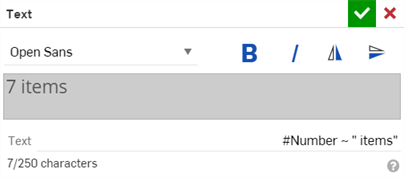
#Number - Number variable
~ Concatenates the number with the string
" items" - String value

Number variable used in the sketch text
- To edit existing sketch text, select Edit text from the context menu.
- There is a limit of 250 characters per text box.
- When entering more than one line of text, the first line of text appears in the box and the subsequent lines appear 'outside' of the box. This is because the box represents the line length and height (text baseline to text ascender).

-
You are able to dimension the text box.
- Dragging the box without fixing or constraining it moves the box; note that the box may not be visible during the move.
- To rotate the box, remove the horizontal constraint on the lower edge, apply a Fix constraint to one corner, then drag an opposite corner.
- To resize the box, dragging a corner (make sure one other corner is fixed). If the box has been dimensioned, you are not able to resize it by dragging.
- Note that when you drag the text box, you see only the text box until the box is stationary again, then you see the text.
- You cannot pattern or mirror text in a sketch. However, you can create the text in the sketch, accept the sketch, and then use the Linear pattern, Circular pattern or Mirror features to pattern the entire sketch as a Feature pattern. See Linear feature pattern, Circular feature pattern, or Mirror: feature for more information.
Add up to 250 characters of text to a sketch (you are able to copy and paste into the text dialog). Treat sketch text as most other sketch entities: extrude, dimension, and apply constraints.
Steps
-
With a Sketch open, tap
 .
.
- Tap to set starting point (corner) of the text box.
- Tap to set the end point (opposite corner) of the text box.
A horizontal constraint is applied to the lower edge of the box by default.
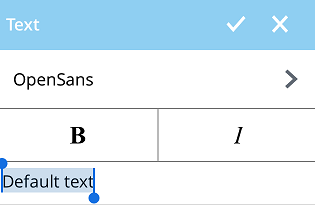
The Text dialog opens.
- Type to enter text. You are able to enter up to 250 characters.
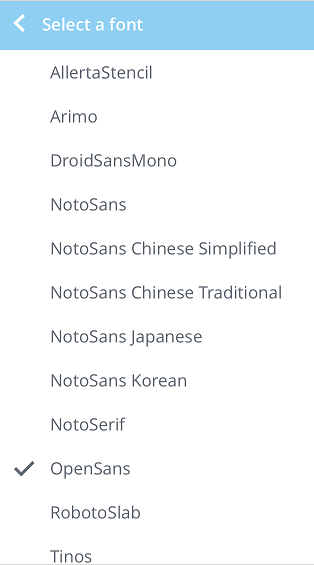
- Tap in the font field to view a list of fonts to chose from.
- Tap B or I to toggle bold or italic text, respectively.
- Tap checkmark.
Tips
- To edit existing sketch text, tap on an entity of the text (a part of a character or a text box line), then select Edit Text from the context menu.
Two-finger tap to bring up the context menu. See Context Menus for more info.
- There is a limit of 250 characters per text box.
- When you hit return to enter more than one line of text, the first line of text appears in the box and subsequent lines appear 'outside' of the box. This is because the box represents the line length and height (text baseline to text ascender).
- You are able to dimension the text box.
- Dragging the box without fixing or constraining a point moves the box; note that the box may not be visible during the move.
- To rotate the box, remove the horizontal constraint on the lower edge, apply a Fix constraint to one corner, then drag an opposite corner.
- To resize the box, drag a corner (make sure the other corner is fixed). If the box has been dimensioned, you are not able to resize it by dragging.
- Note that when you drag the text box, you see only the text box until you lift your finger, then you see the text.
- You cannot pattern or mirror text in a sketch. However, you can create the text in the sketch and then use the Part Linear pattern, Circular pattern or Mirror features to pattern the entire sketch as a Feature pattern. See Linear feature pattern, Circular feature pattern, or Mirror: feature for more information.
Add up to 250 characters of text to a sketch (you are able to copy and paste into the text dialog). Treat sketch text as most other sketch entities: extrude, dimension, and apply constraints.
Steps
-
With a Sketch open, tap
 .
.
- Tap to set starting point (corner) of the text box.
- Tap to set the end point (opposite corner) of the text box.
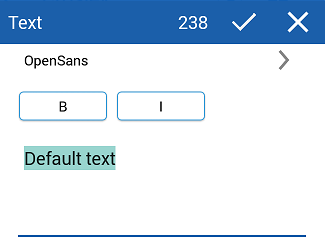
- Type to enter text. You are able to enter up to 250 characters.
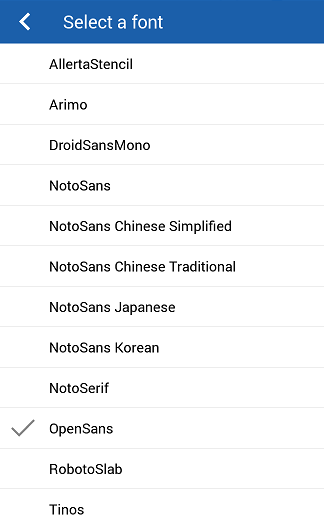
- Tap in the font field to view a list of fonts to chose from.
- Tap B or I to toggle bold or italic text, respectively.
- Tap checkmark.
A horizontal constraint is applied to the lower edge of the box by default.
The Text dialog opens.
Tips
- To edit existing sketch text, tap on an entity of the text (a part of a character or a text box line), then select Edit Text from the context menu.
Two-finger tap to bring up the context menu. See Context Menus for more info.
- There is a limit of 250 characters per text box.
- When you hit return to enter more than one line of text, the first line of text appears in the box and subsequent lines appear 'outside' of the box. This is because the box represents the line length and height (text baseline to text ascender).
- You are able to dimension the text box.
- Dragging the box without fixing or constraining a point moves the box; note that the box may not be visible during the move.
- To rotate the box, remove the horizontal constraint on the lower edge, apply a Fix constraint to one corner, then drag an opposite corner.
- To resize the box, drag a corner (make sure the other corner is fixed). If the box has been dimensioned, you are not able to resize it by dragging.
- Note that when you drag the text box, you see only the text box until you lift your finger, then you see the text.
- You cannot pattern or mirror text in a sketch. However, you can create the text in the sketch and then use the Linear pattern, Circular pattern, or Mirror features to pattern the entire sketch as a Feature pattern. See Linear feature pattern, Circular feature pattern, or Mirror: feature for more information.