![]()
Only available for
These instructions present the basic workflow of releasing any object, demonstrated with a single part.
Creating a release can be done only on the browser, but the rest of the steps (reviewing, approving, rejecting, etc) can be done on any Onshape platform.
There are four ways you can start the release process which is to open the Create Release candidate dialog for a selected entity, illustrated here with a single part:
- In a Part Studio, from the Parts list:
Right-click the part you want to release and select Release:
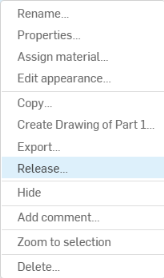
This method pre-populates the Create Release candidate dialog with the selected part.
- For any tab (Part Studio, Assembly, Drawing, Variable Studio, or imported file):
Right-click on the tab and select Release:
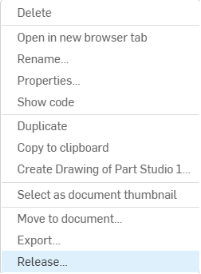
This method pre-populates the Create Release candidate dialog with the contents of the tab. In the case of a Drawing, it pulls in the part or assembly the drawing is of as well.
- From any Properties dialog:
Right-click on a part, Part Studio, Assembly, Drawing, Variable Studio, or File tab and select Properties. In the top-left corner of the dialog, click
 . This method pre-populates the Create Release candidate dialog with the part selected or the contents of the tab selected.
- From the open Versions and history panel:
Click
 . This method pre-populates the Create Release candidate dialog with objects from the currently active tab.
Upon starting the release process with the methods explained above:
- The Create Release candidate dialog opens:
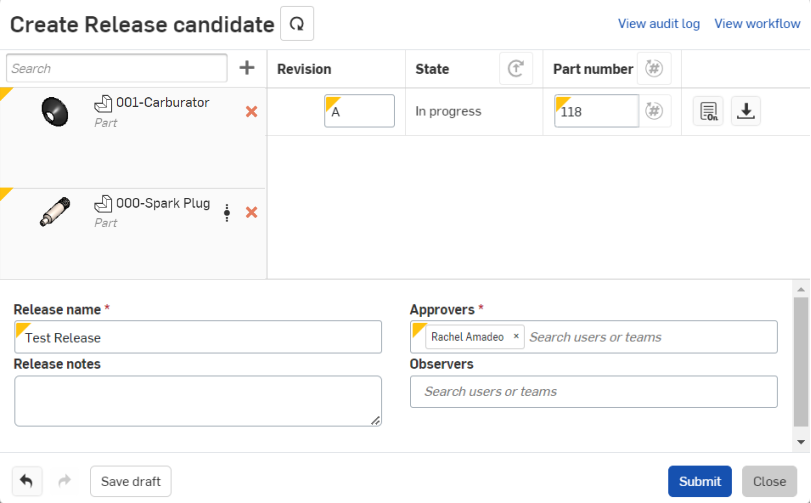
- The part you selected in the Parts list is already listed in this dialog. If you selected an Assembly, all of the parts in the Assembly are listed. Use the plus sign
 to
add more objects. You can select items from Part Studios, Assemblies, Files, Drawings, or Variable Studios, as shown below:
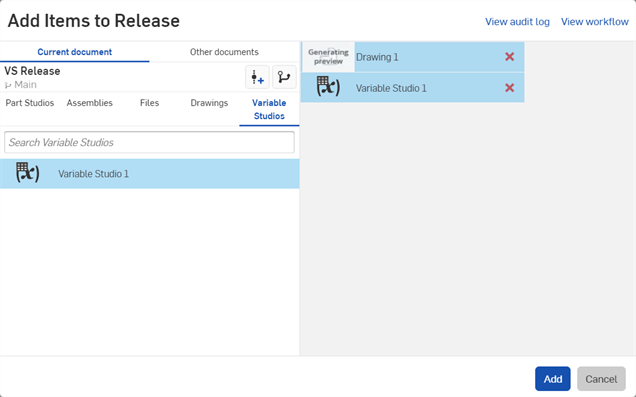
You can check any object's design before submitting by clicking the object's name in the list. The appropriate tab will open in another browser tab.
You can remove any objects not necessary to the Release by clicking the red x next to the object's name.
- Optionally, click Include associated drawings
 at the top of the dialog. Drawings associated with items in the release are also added to the release.
 - Warnings are shown for any outdated associated drawings. You can update them or include the outdated drawings in the release.
- Drawings that reference a version from a different workspace than the one the release is created in are not included as associated drawings. To include one of these drawings, create it in the same workspace as the release, or create a version in the drawing itself.
- The Revision is automatically supplied, based on the choices made during set up (alphabetic, numeric or custom) and any prior releases of this object.
The Revision is incremented automatically for new releases. Note that revisions are applied only to objects in the release process, which are never objects in a workspace. As soon as a release candidate is created, a version is captured and all the objects in the release candidate are objects in that version. The objects in the workspace do not have Revision labels unless specifically manually assigned in the Part properties.
Upon the initial revision after Release management is turned on, Onshape attempts to maintain the revision values for Parts, Assemblies, and Drawings. This is useful when importing objects from outside sources such as SOLIDWORKS, where revisions have already been applied to objects. For example, if a Part is imported with a revision value of 3, the first release package maintains the Part's revision at 3. If the associated revision is not the same as the Release management scheme, a warning message is produced, and the object's revision value is adjusted to match the Release management revision scheme. For example, Part 3 in the image below was assigned a numerical revision value of 6, and the Release management scheme is set to alphabetical. In the first release, the new revision value for Part 3 is set to A, with an accompanying warning message.

You can change the Revision, but it does not permit you to go backward in order. For example, if the previous revision is B, then Onshape will suggest C. You may enter any letter after C in the alphabet as well, but you may not change to A.
- The object's current State is also automatically supplied:
- In progress reflects objects being released for the first time.
- Pending reflects objects whose release is pending approval.
- Released reflects previously-released, linked objects.
- Supply a unique part number for the part:
- Onshape tracks part numbers across Releases and prevents the re-release of a lower revision of an existing part number.
-
If you have Sequential part number generation turned on in Numbering schemes settings click the
 icon to generate a part number. Clicking
 at the top of the dialog generates part numbers for all of the objects in the Release candidate.
-
If you have Drawing can reuse part number from an assembly or part in the release turned on in Numbering schemes settings, and you click
 to Generate part numbers for all objects in the Release candidate, Onshape will generate a new part number for all Drawings which don't have a Part number assigned to both the Drawing and the object inserted in the drawing. If either the Drawing or object inserted in the drawing has an associated number, but the other does not, the associated part number is assigned to both. This only happens if a Drawing has only one object inserted. If multiple objects are inserted into the drawing, a new part number is generated. You can still generate individual part numbers by clicking the
 icon to the right of each item in the parts list.
Click the Edit properties icon
 next to each object in the top half of the dialog to open the view displaying the properties in order to enter and record property information for the object. This allows you to begin
editing properties of released objects.
Click the Export icon next to the Properties icon to export that release or entities in that release.
- Based on how the administrator set up the rules, some fields may be mandatory and some may not be. Supply information, if required or desired, in each of the following fields:
- Release Name - This is required by Onshape and will be displayed as the version name in the Versions and history panel (where you can later view the release information).
- Release Notes
- This may or may not be required by your company administrator and is a good place for specific information or instructions regarding the Release.
- Approvers
- Enter the email addresses of users or the names of teams of users who must approve this Release candidate before the objects are released. (This may or may not be required by the company administrator; if this field remains empty then the objects are immediately released upon clicking Release.) If an email address or team is present, then a Release candidate is created, approvers are notified and the objects are not released until an
approver indicates approval.
When listing a team in the Approvers field, only one member of the team is required for approval, even if Require approval from all approvers is selected (in the release management work flow set up).
- Approvers
- Enter the email addresses of users or the names of teams of users who must approve this Release candidate before the objects are released. (This may or may not be required by the company administrator; if this field remains empty then the objects are immediately released upon clicking Release.) If an email address or team is present, then a Release candidate is created, approvers are notified and the objects are not released until an
approver indicates approval.
- Observers - Enter the email addresses of users or the names of teams of users to whom you want to give View only rights to the Release candidate (or Release). You may enter observers even if you do not require an approval. Observers receive notifications.
- Click one of the following based on the desired outcome:
- Save draft to save the Release candidate you are currently working on as a draft and close the dialog. For more information, see Release drafts.
- Submit
(visible when approvers are listed) to create a version, and set the version icon, Release candidate, and its objects as
Pending.
A notification is sent to each approver and observer listed. A blue message bubble also appears at the top of the graphics area stating the release has been submitted (or other action) and contains a link to the Action items page where you can monitor and act on the release process.

The message stating you can view the status on the Action items page
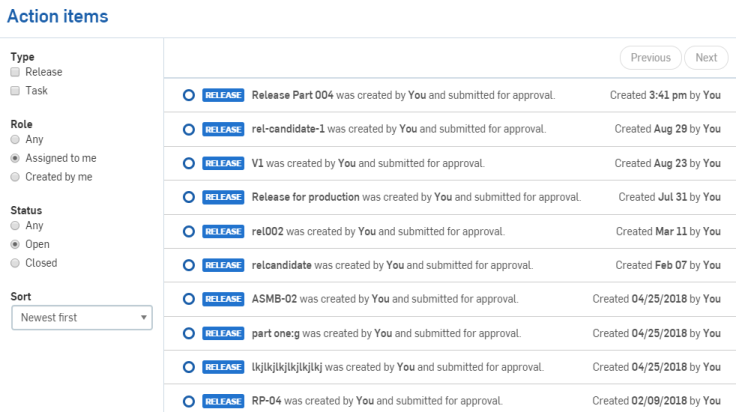
The Action items page
To move from Pending to Released and complete the release workflow, the Release candidate must be approved.
- Close to close the dialog without recording any changes or taking any actions.
You can resize this dialog and its sections by clicking and dragging an edge or corner.
New or modified fields are marked with a yellow triangle in the upper left corner of the field. While in this dialog, you can use the Undo and Redo buttons or your operating system hot keys to undo or redo changes.
- The user who creates the Release candidate should not be the only required approver; best practice is to require an additional or different person in the Approver field.
- Pay attention to good design practices (especially the limited or temporary use of suppression and the rollback option) to keep parts from being generated improperly.
- Make sure drawings are updated before being included in a release. If an updated drawing is available, you will be notified at the time you create the release candidate that the "Drawing has a pending update."
- Be careful with Assemblies to make sure there are no errors before including them in a release candidate.
- If items in a release candidate require attention, you are notified and can filter them in the Release candidate dialog. See Filtering items requiring attention.
To release an Assembly:
- Right-click on the Assembly tab and select
Release
to open the Create Release candidate dialog.
The Create Release candidate dialog is populated with everything listed in the Assembly's Bill of Materials, including all parts, subassemblies, and standard content referenced by the Assembly.
- Released parts linked from other documents, in the Assembly, are reflected in the Create Release candidate dialog and no new revisions of the parts are created when the Assembly is released:
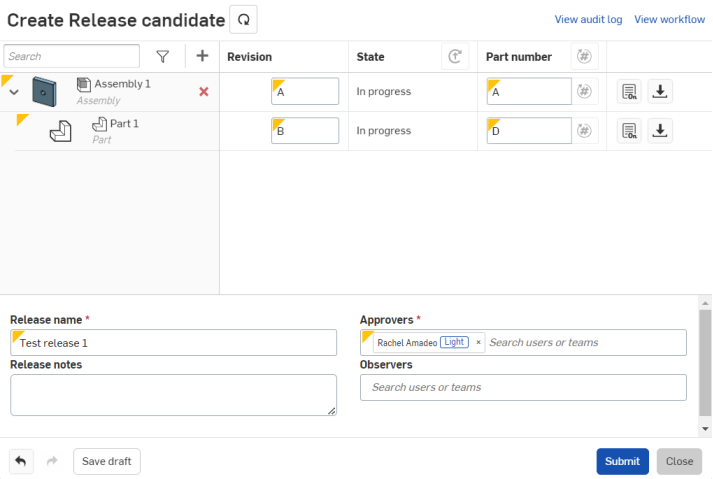
If you reference a part in a workspace, the Revision label of that part will bump up when releasing the Assembly. If you reference a part that is already released, then the Revision will not be bumped when releasing the Assembly.
Keep in mind that Revisions only bump up when the candidate is actually released / approved.
-
If you are using Onshape's sequential part number generator, click
 at the top of the dialog to generate part numbers for all of the objects in the Release candidate.
- Fill in the remaining necessary fields, as described in Typical Release Workflow, above, to complete the workflow steps.
If there are two pending release candidates that contain the same part with the same pending revision value, the first approved one wins and takes the new revision value. Release candidates are never automatically discarded for you, nor are you required to take action on the pending one. The pending release indicates that the part's pending revision has already been taken and the only action is to either discard or reject.
Any
standard content
parts in the Assembly are included but will not have a revision.
To release a Drawing:
- Right-click on the Drawing tab and select
Release
to open the Create Release candidate dialog:
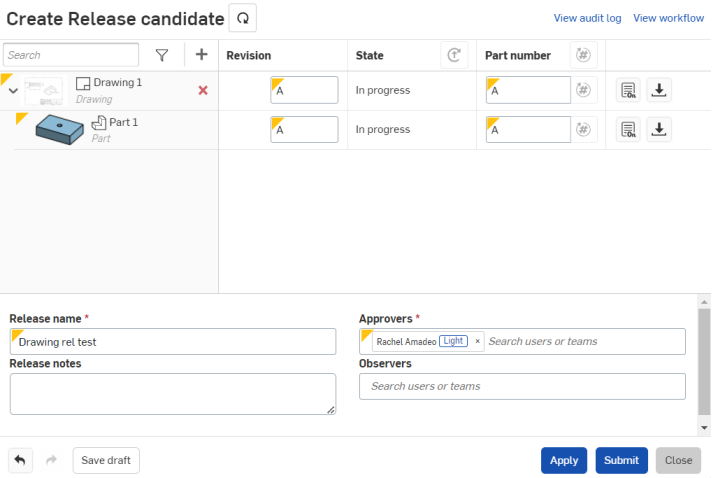
The Create Release candidate dialog automatically populates with all of the parts or assemblies referenced by the Drawing.
Released parts linked from other documents in the Drawing are reflected in the dialog as Released, and no new revisions of the parts are created when the Drawing is released.
- Proceed filling out the dialog as described above in the Typical Release Workflow instructions to complete the workflow steps.
When you are releasing drawings of an assembly and the drawings of its parts, the release dialog includes a listing of all the parts involved in all the drawings. This results in a release candidate dialog with parts repeated. These parts are not being released multiple times, they are simply listed for reference. For example, Part 1 in the example below is in both the drawing of the assembly and its own drawing, so it is listed twice:
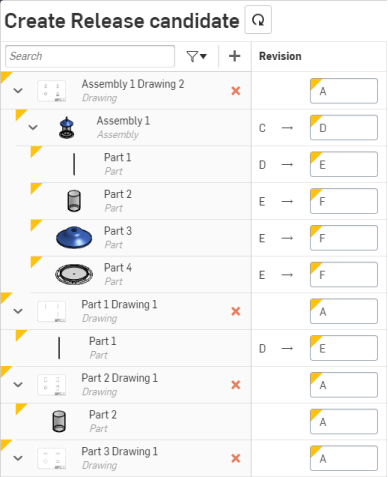
If the drawing has a pending update, you are notified at the time of creating the release candidate. This is for informational purposes only, you are not required to update the drawing before creating the release candidate.
When the Release management setting for Part number uniqueness is set to 'Drawing can reuse part number from an assembly or part in the release' then generating missing part numbers gives the drawing the same part number as the part or assembly.
The Create Release candidate dialog allows you to search and filter the objects list, and you can search for parts, Assemblies, Drawings and other objects by name:
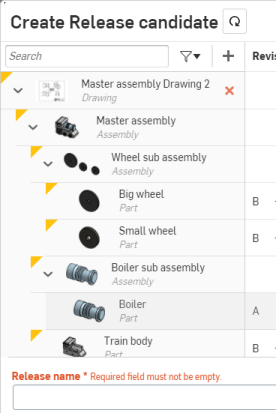
Filter the list by object type:
-
Click the Filter icon
 to expand the filter list.
-
Click a type icon (
 ) to toggle it on and filter the list for objects of that type.
- Click multiple icons to filter for several types at once.
- To clear the filter, click the type icons again to deselect, or click the Clear button to remove all filters.
-
Click the Filter icon
 again to collapse the filter list.
The Create Release candidate dialog has a mechanism to view and modify the Properties for any given object:
- While in the Create Release candidate dialog, click the Edit properties icon
 on the right side of the dialog to open the Properties view for that object:
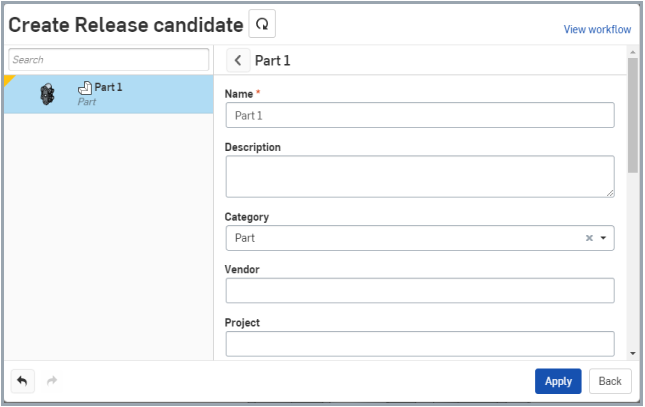
Once in the Properties view, you are also able to select other objects in the list to view and modify their properties.
- Click Apply to save changes to all objects without leaving the Properties view.
- Click Go back or the Back arrow icon (to the left of the Part name) to return to the main Create Release candidate dialog view. This saves metadata changes while you continue to work in the dialog.
- Click Apply or Submit/Release to save all changes, including those made in the Properties view.
By default, configured parts properties (meta data) of released objects cannot be edited, that is, when the Only administrators can edit the properties of released objects checkbox is checked. When this checkbox is unchecked:
-
Admins can edit properties on released objects
-
Anyone can edit properties on released objects (depending on company policy) except release management-critical properties
If your Release candidate contains items that require attention (such as missing part numbers or 2 parts accidentally assigned the same part number) the top right corner of the Create Release candidate dialog displays the number of errors with a button that allows you to filter the items in the dialog to show only those items that require attention:
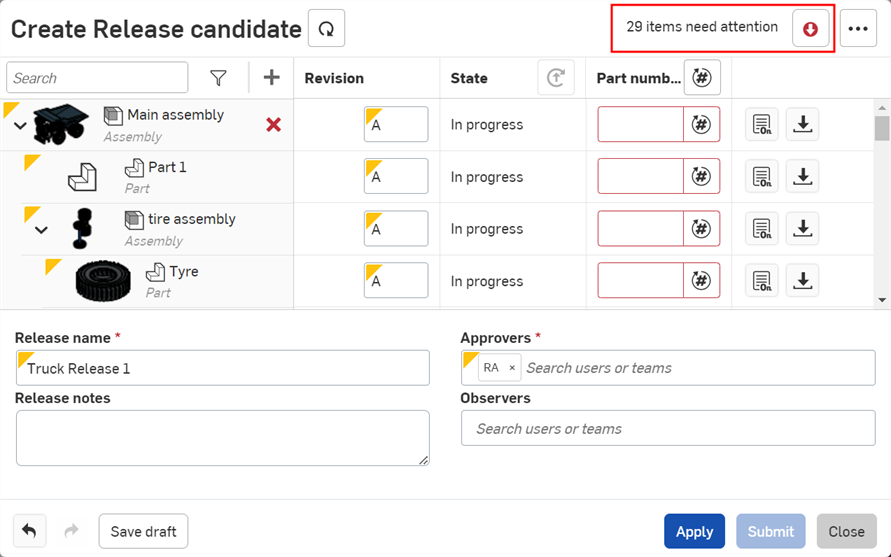
This button is a toggle. Click the button once to show only Release candidate items that require attention. Click again to show all Release candidate items.
As items are corrected, the number counts down. When all items are corrected, the text and button are removed.
While creating a release candidate, you can make sure you have the latest iteration of the objects in your release candidate by using the Refresh button to the left of the dialog title.

When creating a release candidate, you can visually check the objects included in the candidate to make sure they are correct. If something is outdated, you can click the link that is the object name (in the list of objects), to open a new tab with the appropriate Part Studio, Assembly, or Drawing. Make any changes necessary. Once you are satisfied with the object in its tab, return to the tab with the Release candidate dialog open, and click the Refresh button.
Onshape applies the changes made to the objects in the Release candidate dialog and refreshes the interface to reflect those changes.
For example:
Click on Part 1 in the list of objects to open a new tab with that part's Part Studio open so you can inspect the object. In this example, the expected fillet features are missing, so they are added to the part.
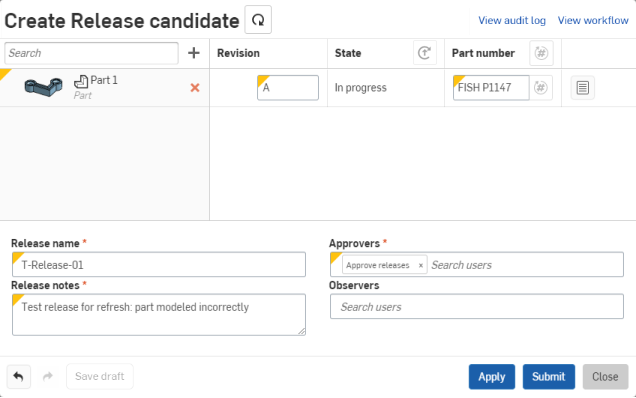
Example image of a Create Release candidate dialog missing fillet features.
Return to the tab containing the Release candidate dialog, notice the thumbnail of the part still has no fillets. Click the Refresh icon to update the part to include the new changes.
The part is reloaded and contains the fillet features created in the other tab. Even if the changes made are not visible in the Release candidate dialog, once you click the Refresh button, they are included. When you click Apply or Submit, a version is created and all currently updated features are included in that version. If another user is simultaneously making changes, the changes made for the Release candidate take precedence and are recorded in the version that is created. Other changes are recorded in the Version and history.
The Refresh button is available only when creating a Release candidate, and when the Release candidate dialog is open, and only for the creator of the release candidate.
You do not have to refresh the dialog for every change.
Similarly, you can use the Refresh button to update a release candidate after fixing errors. For example:
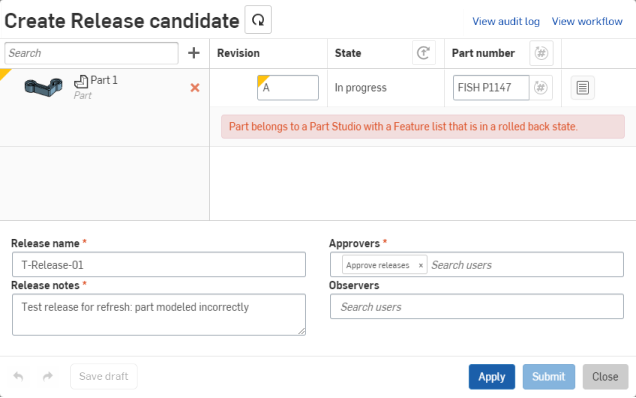
A part belonging to a Part Studio with a Feature list that is in a rolled-back state cannot proceed through the release candidate creation process
Click the name of the Part to open a new tab with the Part Studio in it and correct the rollback bar. Return to the tab containing the Release candidate dialog box and click Refresh to update the part in the candidate:
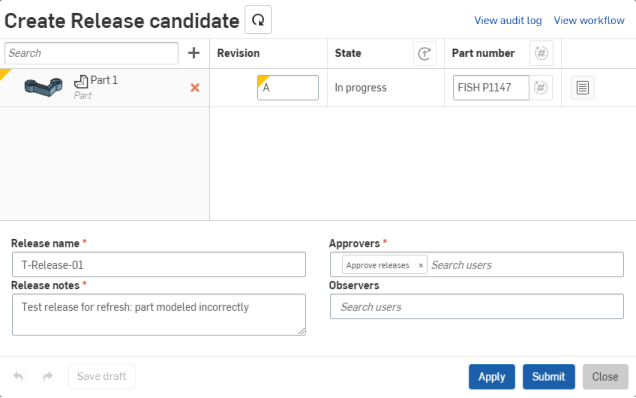
The problem is resolved and this release candidate can be submitted for review and approval
When releasing an Assembly or Drawing that was previously released, Onshape checks each of its references for whether the items in a release have changes in their geometry and/or metadata since the last release. One of three things occurs:
-
If the geometry has changed, the typical Release candidate process is followed.
-
If the geometry has not changed, but the metadata has changed, Onshape displays a Revert button next to the State (in the State column), and a message is provided explaining that the metadata has changed.
-
If neither the geometry nor the metadata has changed since the latest revision, the following message appears: "Item has not changed since its latest revision."

Clicking the button on an item will change its reference to the last revision and refresh the release package accordingly. Because this is a reference update, it will only work if the item is referenced from the same workspace as the release package. Clicking the button on the State header changes the reference for all unchanged items to their last revision.
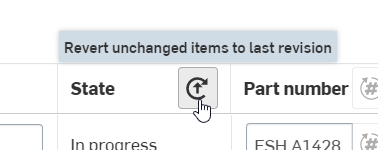
Once the release package is submitted, if the unchanged item was a workspace reference originally, it is changed back to the workspace again. If it was a version reference originally, it is kept at the revision.
In this context, a geometry change in an Assembly is defined as any added, removed, or changed instances, and any BOM change. Repositioning items are treated as unchanged geometry.
Reverting part instances inside rigid Part Studios is not supported.
Onshape allows you to save release candidates as drafts while in the Create Release candidate dialog inside a document. Access your saved drafts in the Release drafts panel inside a document to edit, submit, or delete.
To save a release candidate as a draft, while in the Release candidate dialog, select the Save draft button in the bottom left (shown below outlined in red):
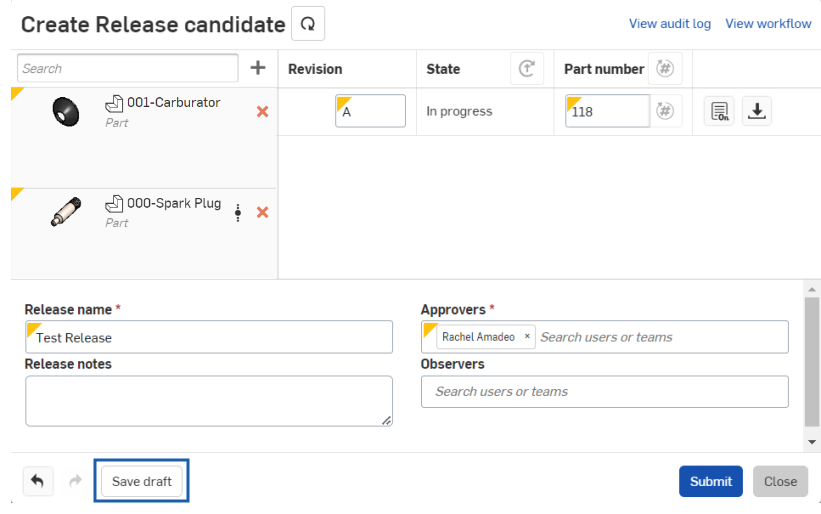
This automatically saves the release candidate as a draft, closes the dialog, and adds the new draft to the Release drafts panel.
To access the Release drafts panel, click the Release drafts icon ![]() on the left side of the graphics area:
on the left side of the graphics area:
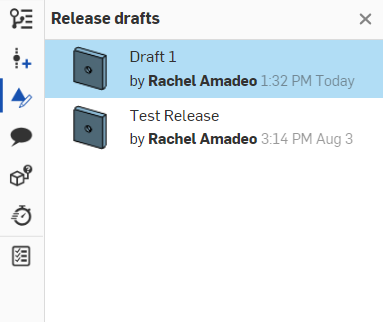
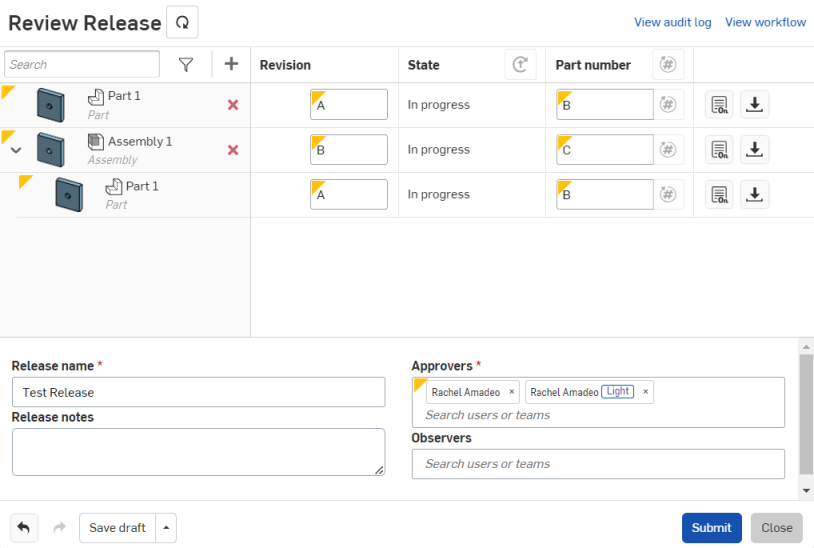
From here, double-click on a draft to open the Review Release dialog and continue editing the release candidate:
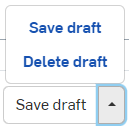
To save the release as a draft again or delete the draft, click the arrow next to the Save draft option in the bottom left and choose your preferred option:
Or, click the Submit button to submit your Release and close the dialog.
Click the Close button to close the dialog without saving or submitting any changes.
Part Studios, Assemblies, and Drawings in one document can all reference objects in versions of other documents, thereby creating linked objects. Linked objects are automatically included in a Release candidate, but how all objects are handled during the release process is affected by whether or not they are linked.
- If an object is in the current workspace (an unlinked object), when the Release candidate is created the Release state is initially In Progress since workspaces are always editable by definition. Releasing objects from the current workspace creates a version in the current document, and marks the object and version as Released (or Pending approval if approval is required).
- If an object is linked from an unreleased version in another document, when the Release candidate is created the Release state is initially In Progress. Releasing linked objects from unreleased versions operates no differently from releasing objects in the current workspace, except that the version in the linked document will also be marked as Released and the Release attached to the version will be the one from the current document.
- If a linked object is linked to a release that is Pending approval, it will have a Pending state. Since the linked object is Pending rather than Released, you will be able to modify its metadata and Revision. Releasing the linked object changes its state to Released and an additional Release will be attached to the linked version, overriding the previous Pending Release candidate.
- If a linked object is linked to a Released version, then that object will have a Released state. Including a Released object in a new Release does not change the object’s State or Revision. State and Revision are included for your reference.
You may occasionally have an object (or even an entire document) that you don't want to mark with a revision. These objects may need to be included in a Release for reference purposes but there is no need to track their revisions. Onshape provides a way to mark the object as not revision-managed (not receiving a revision during any release process):
- Access the Properties dialog for the object (Assembly, Document, Drawing, Variable Studio, or File) through any of:
- The Workspace menu > Properties command
- The Versions and history panel context menu > Properties command
-
Click the Edit properties icon
 . To mark the object as not revision-managed, click the
Not revision-managed
checkbox towards the bottom of the Properties dialog.
Objects that can be marked as not revision managed include: Part Studios (including all parts within the Part Studio), Assemblies, Drawings, Variable Studios, Files, and individual parts.