![]()
Only available for
Access and manage third-party applications for use with your Onshape Professional, Educator, or Enterprise subscription.
This page is where you set company/classroom/enterprise-wide Applications. For information on setting your user account Applications, see My account - Applications.
To navigate to your Applications settings in Onshape, click on your Account user icon (![]() ) in the top right corner of your Onshape window. This opens a dropdown menu. Click Company/Classroom/Enterprise settings.
) in the top right corner of your Onshape window. This opens a dropdown menu. Click Company/Classroom/Enterprise settings.
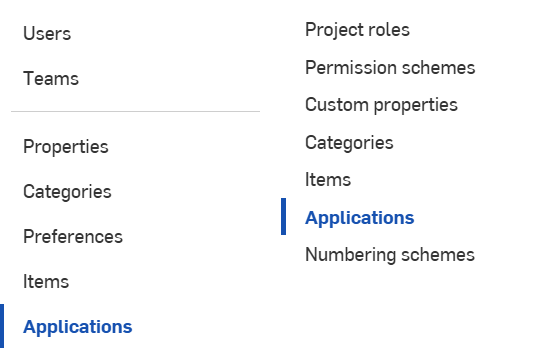
Click Applications in the list on the left side of the page:

Company settings > Applications (shown left); Enterprise settings > Applications (shown right)
To access the Onshape App Store, navigate to http://appstore.onshape.com and sign in with your Onshape account credentials.
Once signed in to the App store, you can browse the available apps and make purchases. As the owner of a company or enterprise, you have the ability to purchase multiple seats for other users in your company or enterprise and assign users to those seats.
Onshape third-party apps are of the following types:
- Integrated Cloud Application - Accessible from within an Onshape document
- Connected Desktop Application - Downloaded from the third-party website and installed on your physical machine
- Connected Cloud Application - Accessible from a cloud-based service
After purchasing an app, you may have to grant it access to your Onshape documents.
-
While in a document, click the
 and select Add application. (Select the desired application.)
- Review the permissions you are about to authorize, then click Authorize application (or Deny if you no longer wish to use the app).
- To view the permissions an application has on a document, or to give the application access to another document:
- Click Share to open the Share dialog and settings for that document.
- On the Application tab, select the application from the drop down and click Allow.
- To revoke an application's access, click the x next to the application name at the top of the dialog.
Purchased apps that are authorized to access your Onshape data are listed in three places in your Onshape documents:
- Applications tab in the user profile (My account page) - Shows all apps you have authorized to access your Onshape data.
- Subscriptions tab in the user profile - Shows all apps for which you have a subscription.
-
On the Add application command from the
 menu at the bottom of your Onshape window.
An owner of a company or enterprise is able to purchase multiple seats for an application, to make available to users of their organization. An owner is able to add and remove users at any time for any given application.
To add seats while purchasing an application:
- Click the app button to purchase or subscribe, as you normally would, in the App store.
- On the confirmation page is a field to enter the number of users you are paying for (include yourself, if appropriate).
- Click the purchase button.
- Enter your Onshape password.
- A confirmation dialog appears, providing more information about your purchase.
- Click Close to dismiss the dialog.
Once you purchase multiple seats for an app, you can manage the users who are allowed to use that app. You have the ability to change users who can use the app and change the number of seats.
- On the Applications tab of the Enterprise settings page, select the app you wish to manage.
- On the page that appears, increase the number of seats you wish to pay for: enter a value in the field and click Update.
A confirmation dialog appears and your changes take effect immediately.
- In the Add users or teams field, enter the email addresses of the users (or the names of the teams) who should have access to the application, and click Add. Note that these users or teams must already be members of the enterprise.
-
More seats are automatically added to the application purchase if the number of seats subscribed to a free application is exceeded.
-
Light users in teams will not count against the number of seats for the application.
- To remove a user's or team's access to the application, click the X next to their name in the list.
Adding teams to application purchases prevents adding team members to the team if there are not enough seats available.
Through the My account area and Applications tab, users have the ability to take action on the apps used with their Onshape account.
- Revoke - Remove an app's access to Onshape data. This does not remove the app from Onshape. If you use this app again, you will be prompted to allow access to your Onshape data.
- Authorize Application
- Authorize the purchased app to access your Onshape data. You see this option in an Onshape document: Click the
 icon > Add Application > application-name. A new tab opens and becomes active in your Onshape document.
- Control application access to my documents individually through the Share dialog?
- Some applications prompt you to allow the app access to all your Onshape documents. If you would like to have control on a per document basis, turn this option on.
If you have granted access prior to turning this switch on, that access is still granted. If you turn this switch off, all access previously granted is still granted. When this switch is on, you must use the Share dialog to allow a specific application access to a specific document.
See App Store for more information about available applications. See App Store FAQs for a list of frequently-asked questions.