![]()
![]()
![]()
Available in: Part Studio, Assembly, Variable Studio
Manage configurations for your Part Studio, assembly, or Variable Studio by renaming, filter, copy/pasting, and more.
Configuration inputs in a Part Studio that is derived from an Assembly mirror are view only and are referenced from the source Part Studio. These configuration inputs must be edited from their source Part Studio tab.
To rename a configuration input or input parameter (column), hover over the current name to display the I-cursor. Click to select the current text, type the new text, then press Enter.

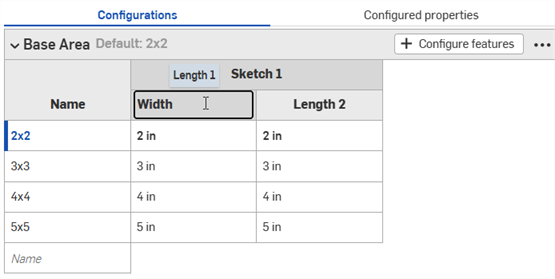
Configuration input parameters (columns) can be renamed for sketch features only.
Configuration inputs can also be renamed via the context menu.
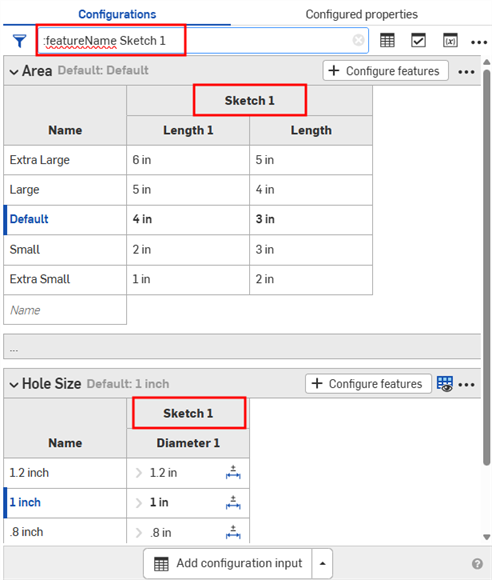
Use the Filter options to find inputs in the Configurations panel.
-
Click the Filter icon (
 ) and select a search option.
- If no search option is selected, :name is used by default.
- Use quotation marks to match an exact string (i.e., :part "Part 1")
- Filters can be combined (i.e. :name Depth :part "Part 1" ).
- The example image shows the filters available in a Part Studio configuration. Assemblies and Variable Studios have different filters available.
-
Type your search term into the Filter inputs field after the search option. Inputs that do not match the filter are hidden in the Configuration panel.
-
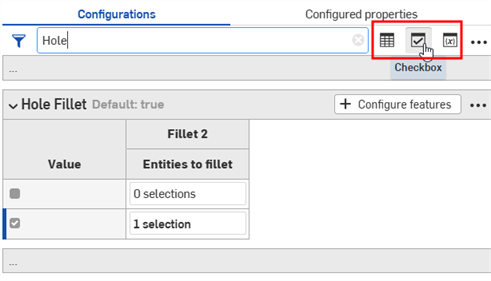
Use the icons to the right of the Filter field to further refine what is shown in the Configuration panel. You can select multiple options at one time.
-
 - Show List input tables that match the filter
 -
 - Show Checkbox input tables that match the filter
 -
 - Show Configuration variable input tables that match the filter.
-
You can copy and paste a configuration input into and out of Part Studios, assemblies, and Variable Studios. This makes it quick and easy to share configurations between designs.
-
Open the Configuration panel in the Part Studio, assembly, or Variable Studio that contains the input to copy.
-
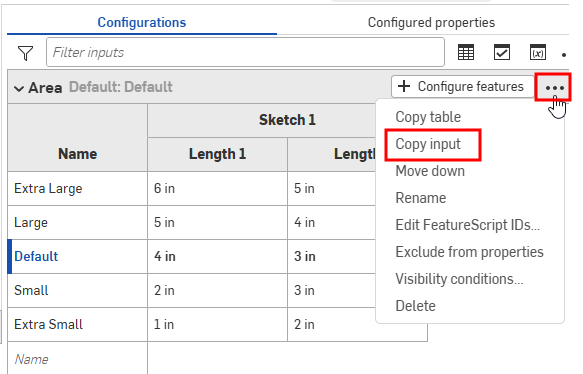
Click the input's three-dot menu and select Copy input. (You can also click the Configuration panel's three-dot menu and select Copy all inputs.)
-
Open the Configuration panel in the tab to paste the input.
-
Click the arrow next to Configure Part Studio/Assembly/Variable Studio and select Paste inputs.
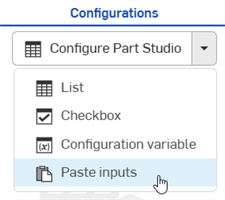
The inputs are inserted into the Configuration panel.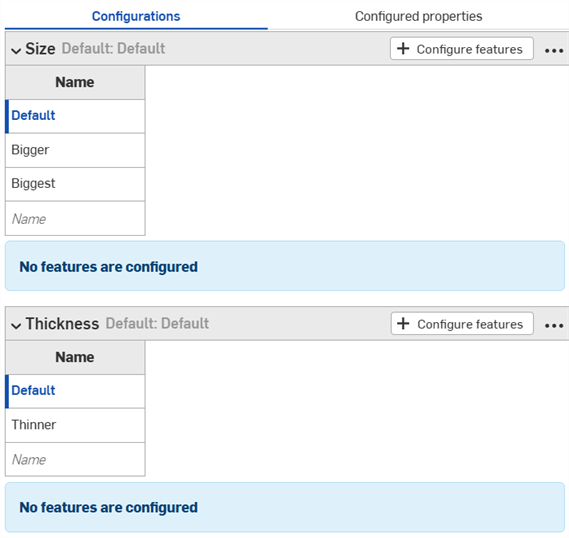
-
Select the parameters to configure from the new tab. Continue reading to learn how to now copy input values and parameters into the input tables.
Notes:
- You can copy and paste configuration inputs: between Part Studios, assemblies and Variable Studios; within the same document; and between different documents.
- All names, visibility conditions, FeatureScript IDs, and variable definitions are copied with the input.
- Copied inputs are available until the user logs out.
- References between the copied input and pasted input are NOT maintained; after pasting, changes to the original configuration input are NOT reflected in the pasted inputs.
- Pasted visibility conditions are automatically repaired (removed) if the target configuration does not have all the inputs needed to compute the visibility.
- Configuration inputs with the same internal FeatureScript IDs are not pasted. To fix this, you can delete the configuration input with the same internal FeatureScript ID and paste again.
You can copy and paste into and out of a configuration, to aid in entering or editing values.
To copy values and parameters:
-
Open the
 menu in the upper right corner of the Configuration panel.
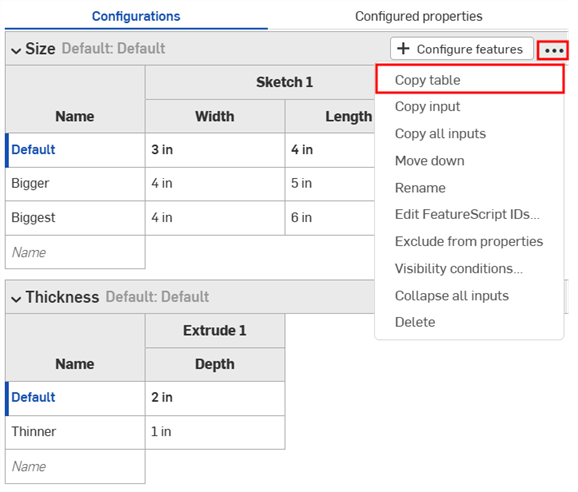
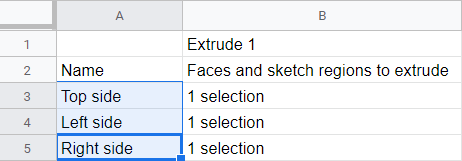
- Select Copy table:
- Once you have copied the table, you can paste it into a spreadsheet:
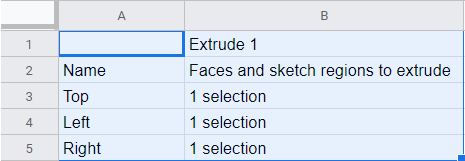
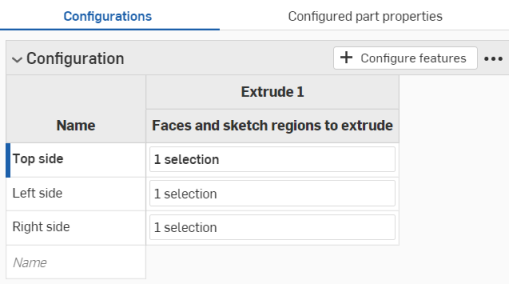
Note that the column names also come in with the table, as shown above. Now you can edit the table and copy/paste it back into Onshape:
- Select just the rows and columns with data (not the column names or headings), as shown in blue below:
You can also pad your table with extra empty rows, if you wish. Just include the extra rows in the spreadsheet when selecting for the copy command.
- Issue a Copy command.
- In the Onshape Configuration table, click the top, left cell of the table.
- Issue a keyboard Paste command:
Onshape automatically replaces whatever data was in the rows and columns of the configuration input table with the data that was copied. Onshape also includes the default units for each input, automatically.
Note that if there are more rows copied from the spreadsheet than are in the Onshape configuration input table, those rows are included in the paste. Onshape creates the rows on the fly.
However, if there are more columns copied from the spreadsheet than are in the Onshape configuration input table, those columns are not included in the paste. Onshape does not yet create columns on the fly. You can, however, create additional columns (parameters) in the configuration table before pasting.
Images are from a configured Part Studio. Context menu options may differ in an assembly or Variable Studio.
Configuration panel context menu
To make adjustments to all input tables, click three-dot button
![]() in the filter area.
in the filter area.

-
Copy all inputs - Copy all the inputs and values (rows) in the Configuration panel. You can then paste it into another Part Studio or Assembly's Configuration panel, and add parameters using the Copy table command. See the Copying and pasting inputs section on this page.
-
Collapse/Expand all inputs - Collapse or expand all the configuration inputs in the Configuration panel.
Input table context menu
To make adjustments to a configuration input, click three-dot button
![]() . The options on the context menu will vary depending on if you're configuring a Part Studio, Assembly, or Variable Studio:
. The options on the context menu will vary depending on if you're configuring a Part Studio, Assembly, or Variable Studio:
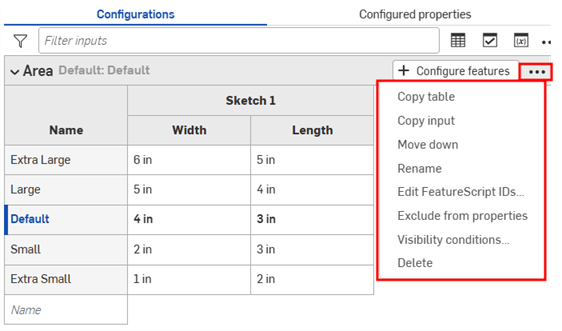
- Copy table - Copy the entire configuration input. You can then paste it into a spreadsheet for record-keeping or editing. You can likewise paste from a spreadsheet back into a configuration input. See the Copying and pasting input values and parameters section on this page.
- Copy input - Copy the input and values (rows). You can then paste it into another Part Studio or Assembly's Configuration panel, and add parameters using the Copy table command. See the Copying and pasting inputs section on this page.
- Move up/down - Reorder the input in the Configuration panel. You can also click and drag the inputs to reorder them.
- Rename - Rename the configuration input. You can also rename the input as described in the Renaming configurations section above.
- Edit FeatureScript IDs - (Parts and Part Studios only) This dialog will change the internal FeatureScript identifiers of the configuration input. Click inside the dialog boxes to change IDs. When finished, select Break reference and change IDs in the lower right corner.
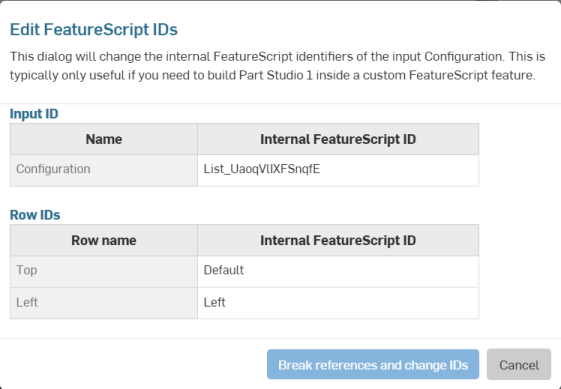
This dialog is typically only useful if you need to build a Part Studio inside a custom FeatureScript feature.
- Exclude from properties - (Parts and Part Studios only). See Configurations: Excluding configurations from affecting properties.
- Visibility conditions - See Visibility Conditions for details.
- Delete - Select this action to immediately delete the configuration input; no warning is given.
Row context menu
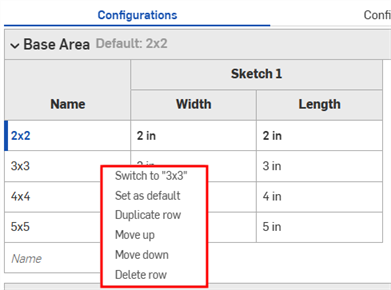
Row context menu
Column context menu
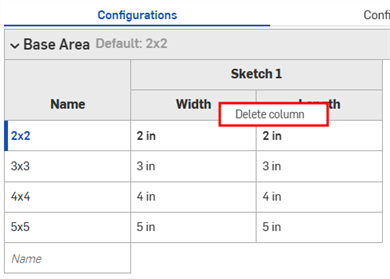
Column context menu
- Switch to - When right-clicking a row that is not the currently selected input, the menu item is prefaced with Switch to a different input.
- Set as default - If a row is not currently the default input value, set it as the new default. The current default is displayed next to the input name.
- Duplicate row - Create a duplicate row; this is especially convenient when preparing to paste a new input into this one. See the Copying and pasting tables into and out of Configuration Inputs section on this page.
- Move up/down - Move the selected row up or down one row. You can also click and drag to reorder the rows.
- Rename - Rename the input.
- Delete column/row - Delete the selected column or row.
You can click and drag individual column edges in the table to resize them; in the case of stacked column labels, click and drag the bottom label, indicated in the illustration above by the blue arrow.
Tolerance options can be used in conjunction with configurations.
-
Click the Tolerance options icon (
 ) to make the configuration's option value tolerant:
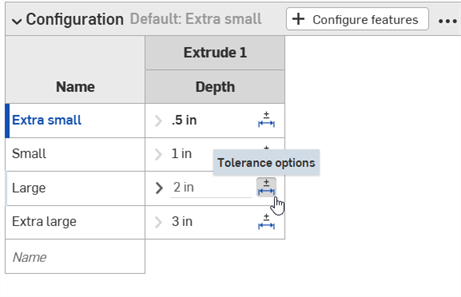
-
Click the dropdown arrow icon (
 ) to the left of the parameter in order to set the tolerance Precision and Type.
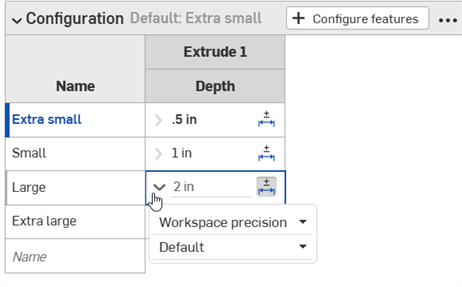
See Tolerance options for more information.
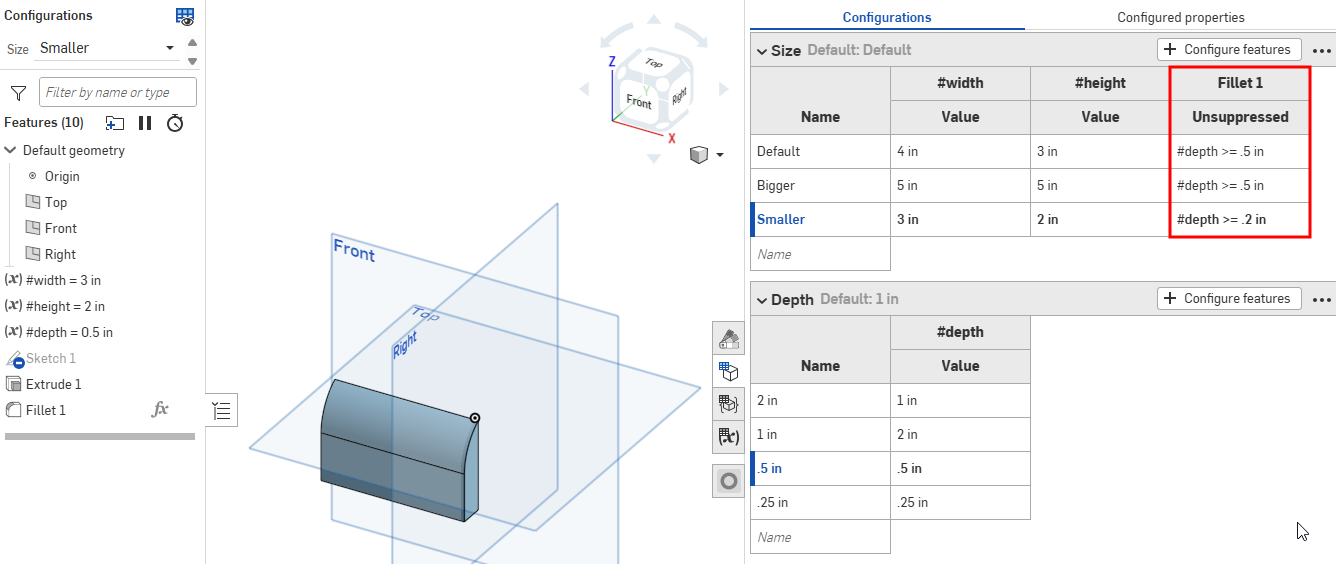
Part Studios only.
To configure a dynamic suppression expression, click Configure features in the desired input, then right-click the corresponding feature in the Feature list and select Configure suppression (or Configure suppression with...) from the context menu to add the feature to the Configuration panel. You can then edit the expression directly in the Configuration panel.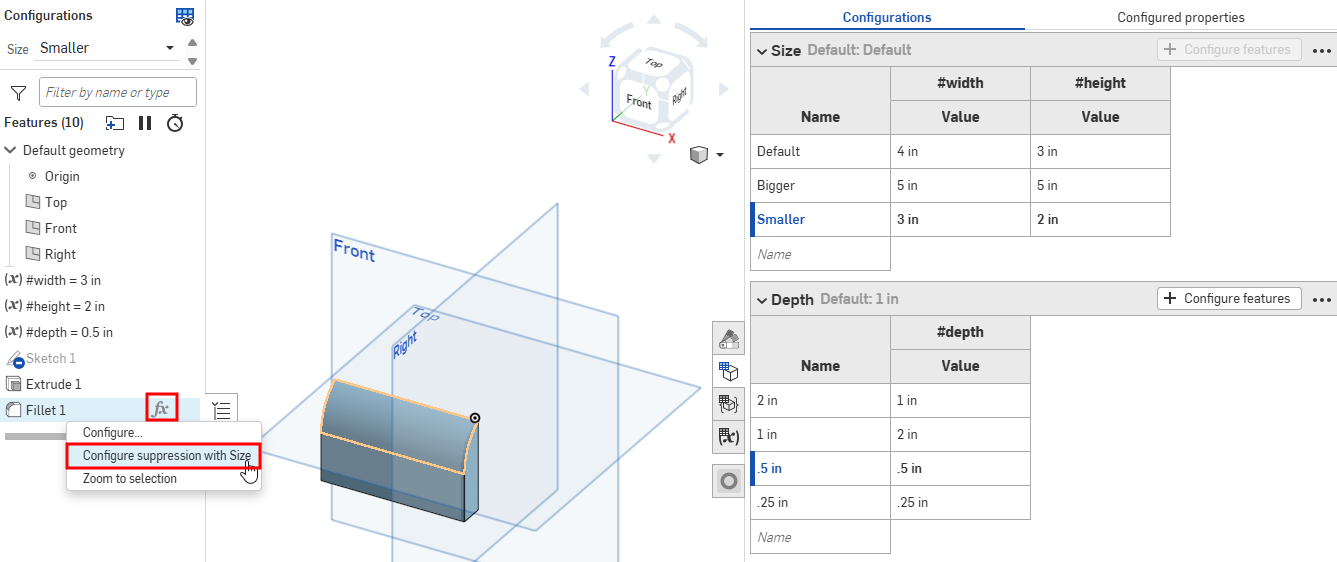
See also: Converting a checkbox to an expression.
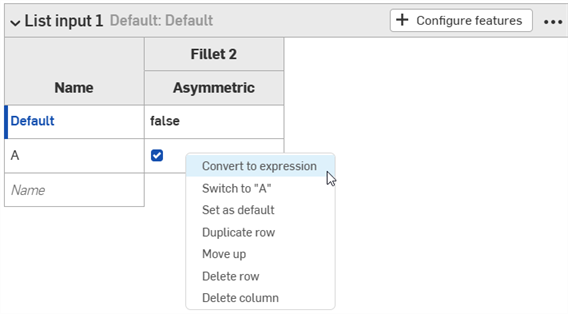
Checkbox and text configuration inputs can be converted to expressions.
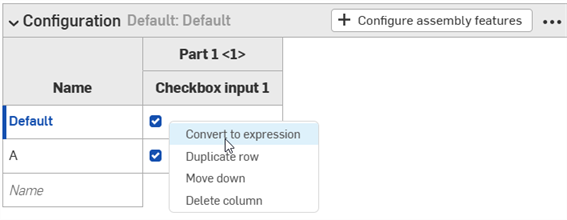
To convert a checkbox into an expression in a Part Studio, right-click the checkbox in the Configuration panel, and then click Convert to expression. You can then edit the expression directly in the Configuration panel. To convert back to a checkbox, right-click the expression and click Convert to checkbox.
Converting a configuration to an expression in a Part Studio Configuration panel.
In assemblies, you can convert a configuration to an expression in the Change configuration dialog, the Instance dialog, and in the assembly's Configuration panel.
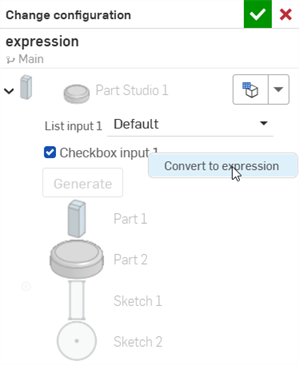
Converting a configuration to an expression in the assembly instance's Change configuration dialog and Configuration panel.
Suppression configurations and List input configurations cannot be converted to expressions in assemblies.
If a configured dynamic suppression is removed from the feature, the expression automatically converts to a checkbox in the Configuration panel.
See also: Dynamic suppression expressions (Part Studios only).