![]()
![]()
![]()
Available in: Part Studio, Assembly, Variable Studio
The Configuration visibility conditions dialog enables you to add logic to your configurations, so you can control when certain inputs and options are available.
Images on this page are from a configured Part Studio. Functionality is the same for a configured Assembly or Variable Studio.
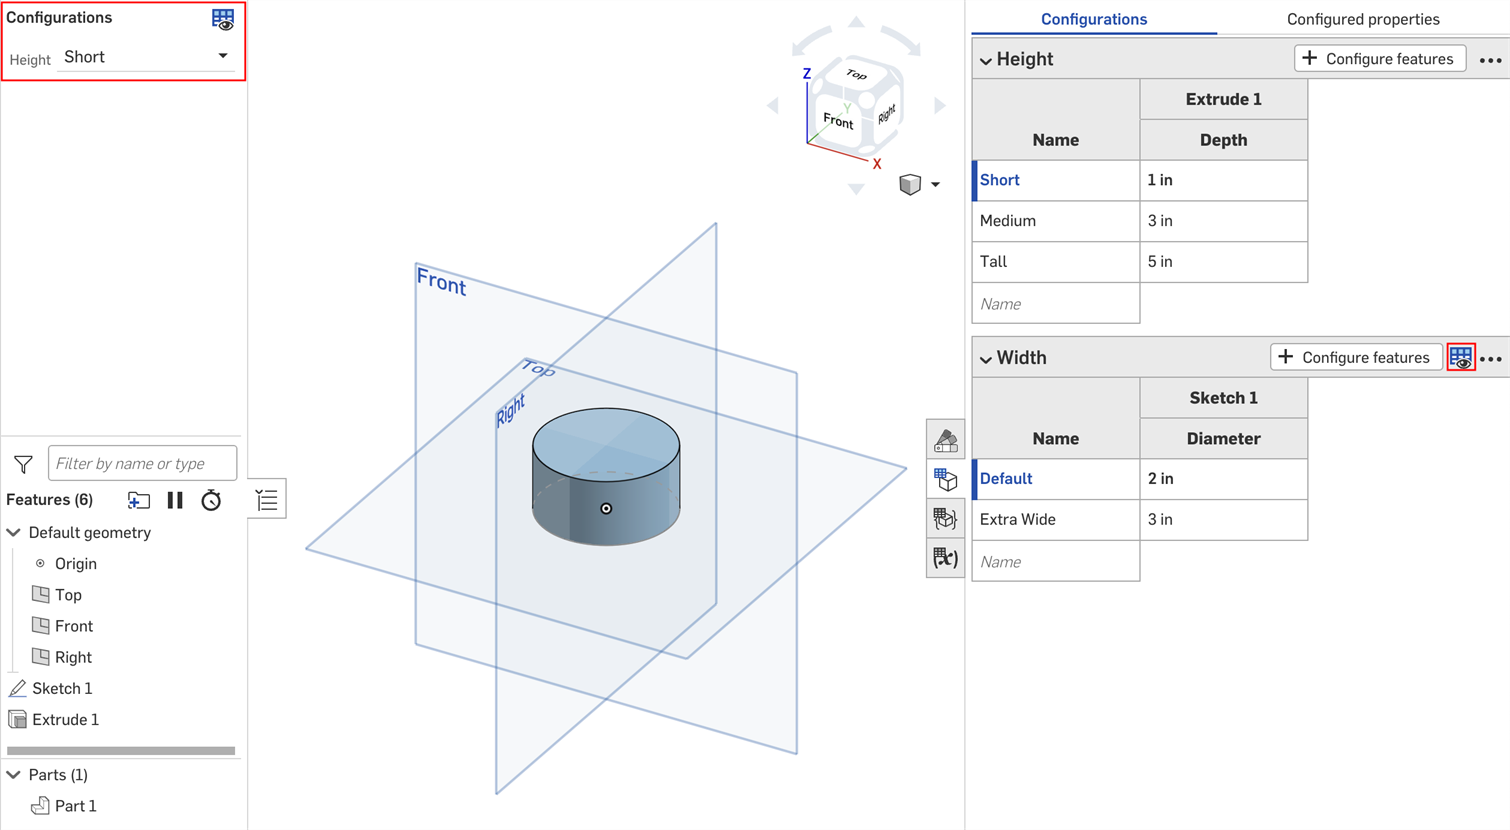
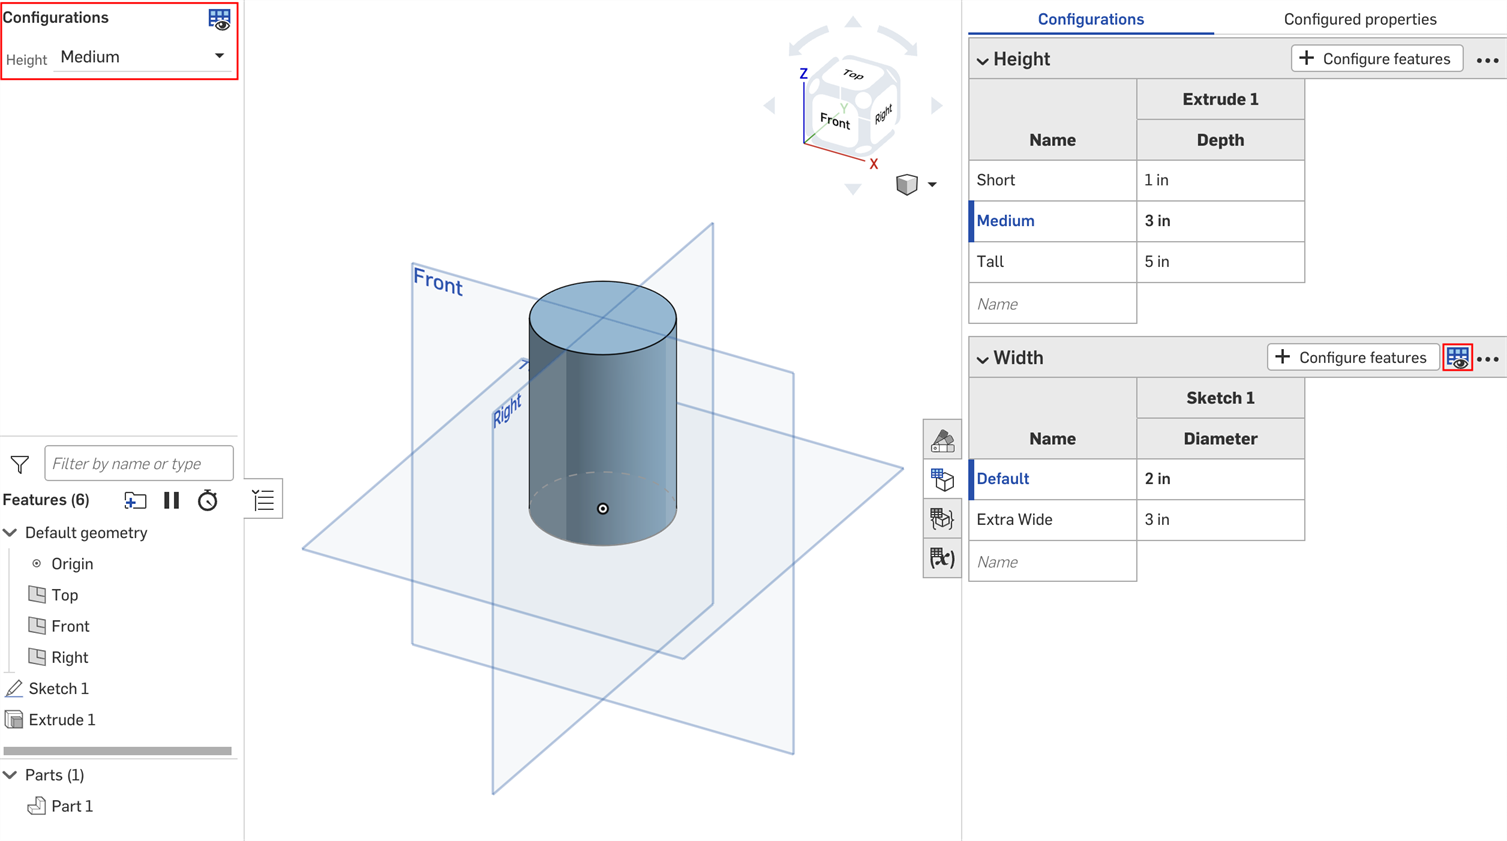
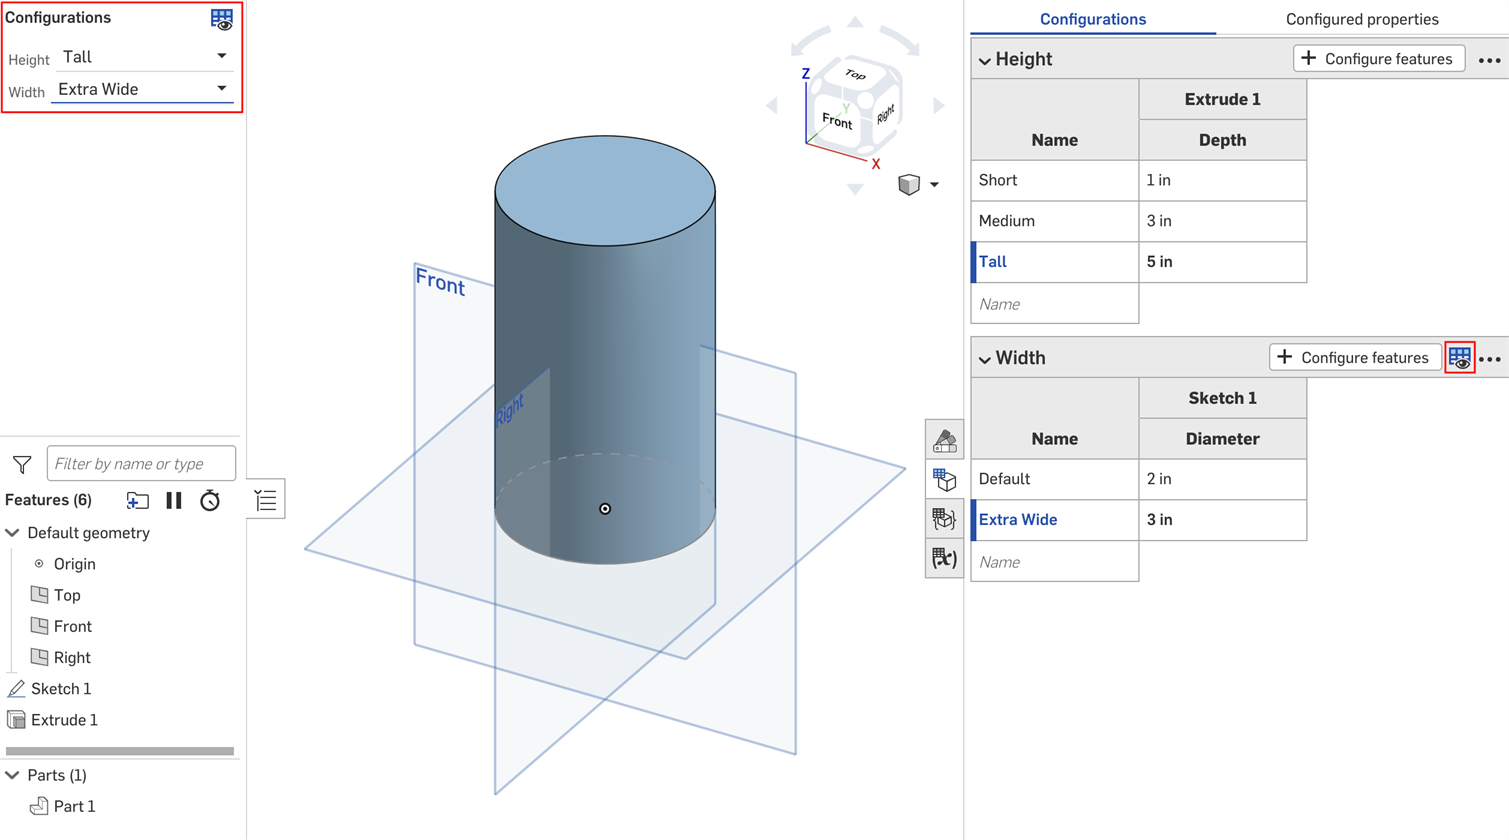
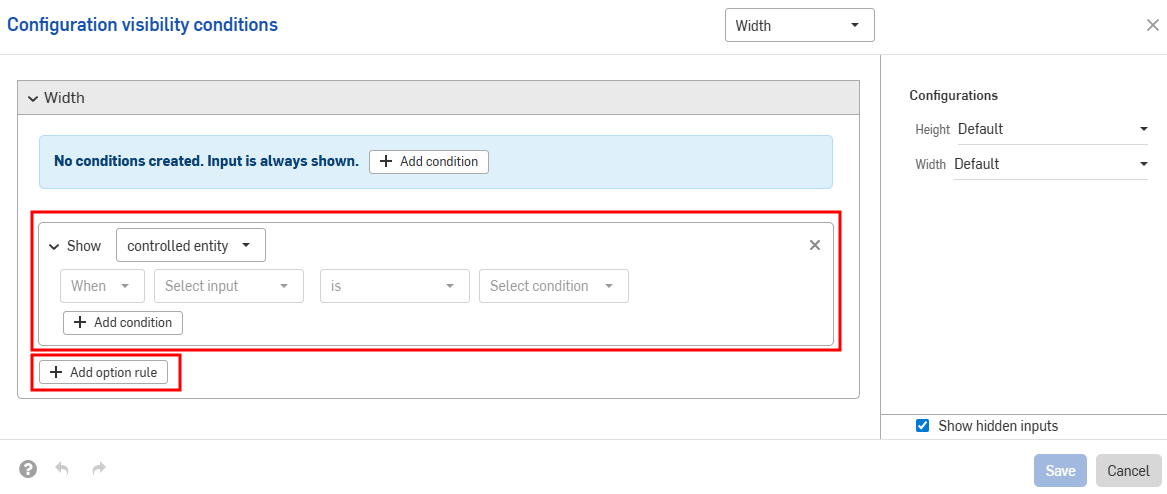
Consider a part with two inputs: Height and Width.
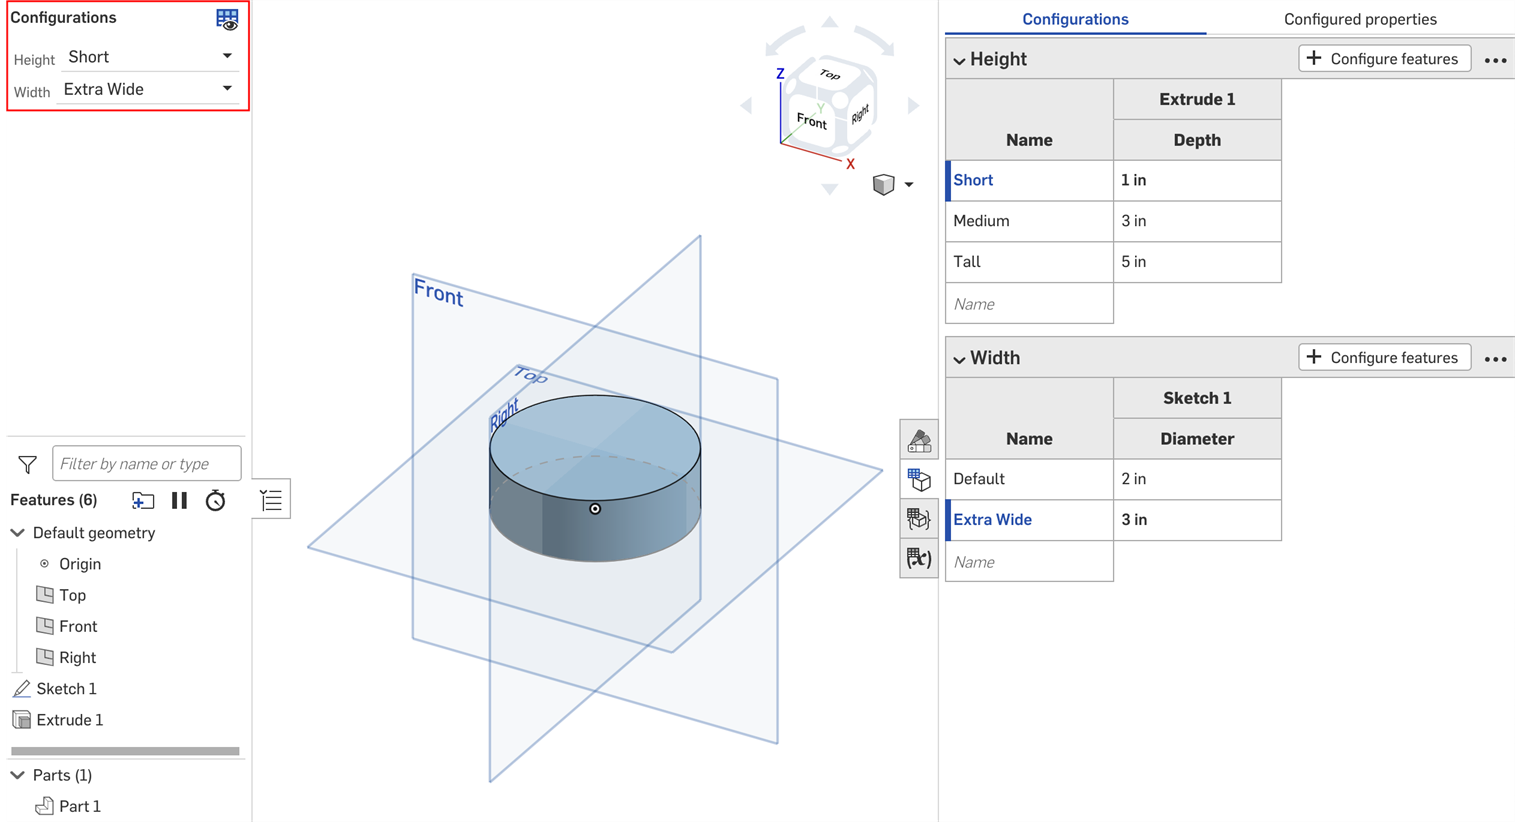
By default, a part of any height can have any width. But let's say the Extra Wide width is only available for the Tall height. In that case, we can set the conditions under which the Width input is visible.
- In the Configuration panel, click the input's three-dot button, and select Visibility conditions from the menu.
The Configuration visibility conditions dialog opens. The right panel shows a preview of the currently selected configurations. You can change the selected options directly in this panel to preview your settings.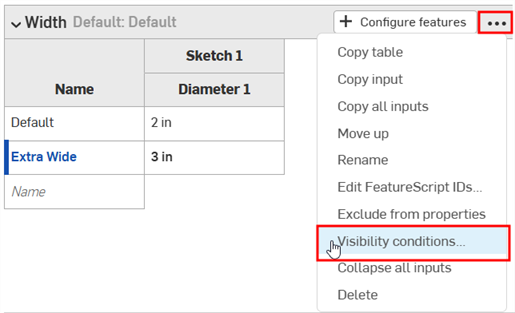
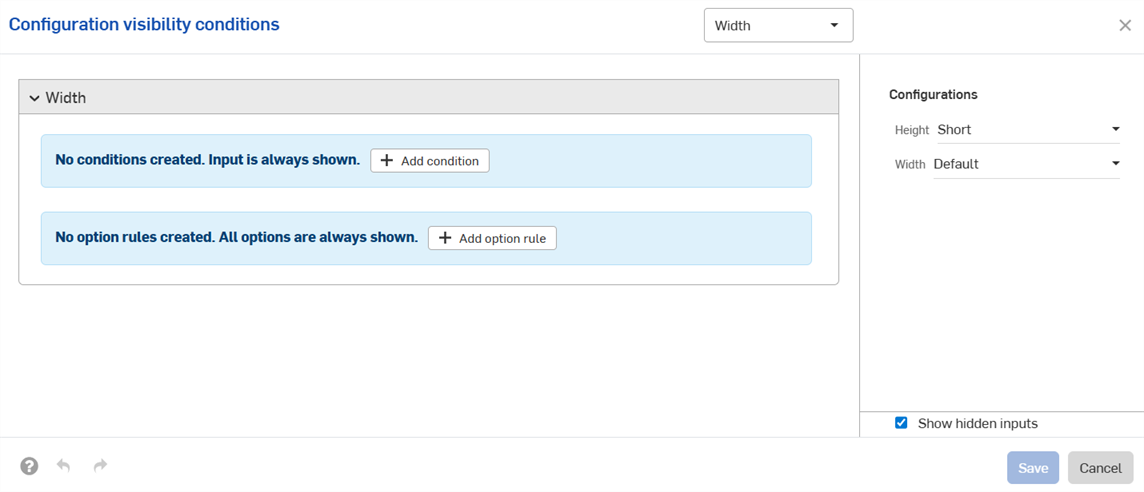
- Click Add condition.
- Click the first dropdown, and select the input that should control the visibility of this input. In this example, we'll select the Height input.
- In the second dropdown, choose either is to select specific options, or is between to select a range of options:
- Is: Click the third dropdown that appears and select the allowed option(s) for the input.
- Is between: Click the third dropdown and select the first allowed option in the range. Click the fourth dropdown and select the final allowed option in the range.
In this example, the Width input is only available for the Tall height. The preview on the right updates to reflect your selections. You can see that the Width input is no longer available for the Default height in the image below.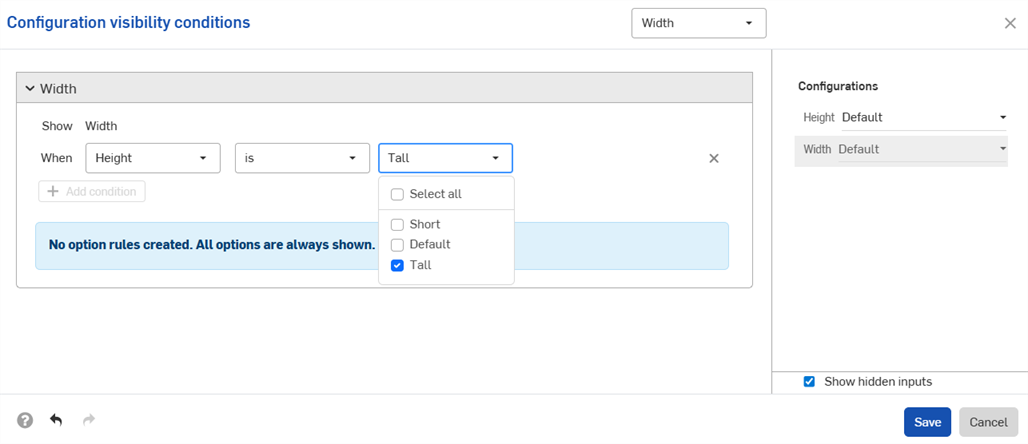
- Click Save. Now, the Width input is only visible when the Tall height is selected, and the Width input table displays the Visibility conditions icon
 .
.

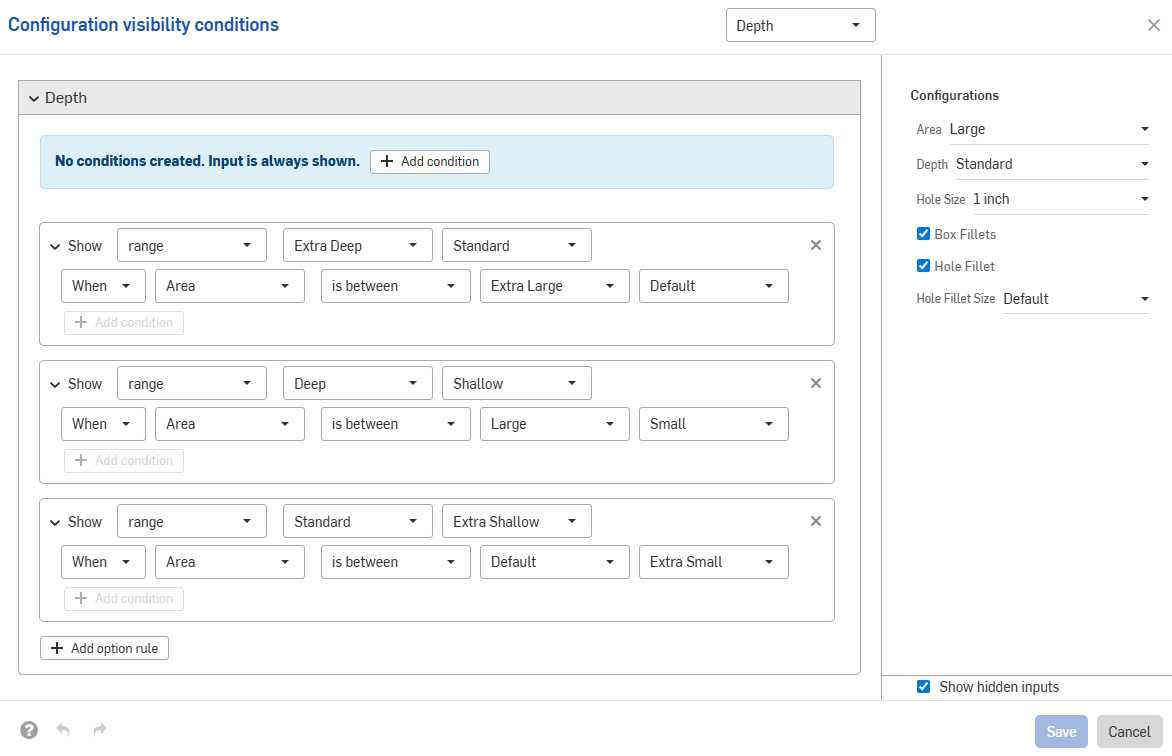
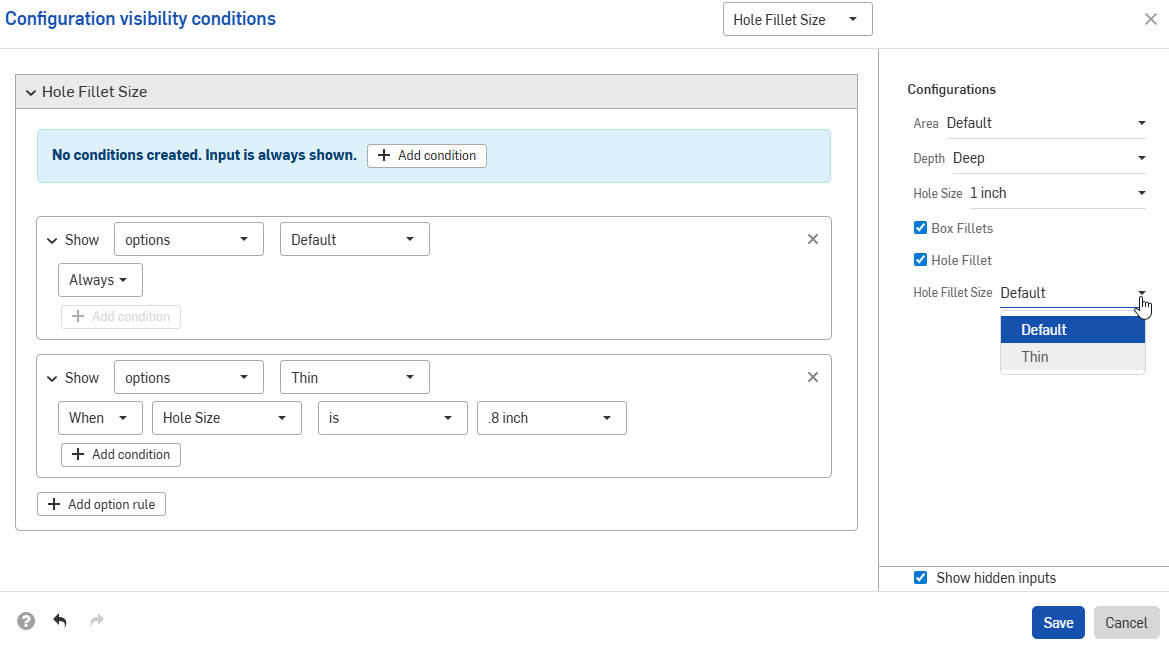
You can use the option rule settings in the Configuration visibility conditions dialog to specify the conditions under which certain options should appear.
Option rule logic can be set for list inputs only.
- In the Configuration visibility conditions dialog, expand an input and click Add option rule. A new section appears in the dialog:
- In the Show line, choose the options that are being controlled.
- Options: Click the dropdown that appears and select the option(s) to set conditions for.
- Range: Click the first dropdown and select the first option in the range. Click the second dropdown and select the final option in the range. Ranges are inclusive of the specific options, and overlapping ranges are allowed.
- In the When line, click the When dropdown and select Always (to always show the option) or When (to set option conditions). If you choose When, you must also:
- Select the input from the second dropdown.
- Choose either is to select specific options, or is between to select a range of options.
- Is: Click the dropdown that appears and select the allowed value(s) for the option.
- Is between: Click the first dropdown and select the first allowed option in the range. Click the second dropdown and select the final allowed option in the range.
-
Continue to add logic within the configuration by clicking Add condition and repeating this set of steps.
Conditions within an option rule are combined together as AND statements; all conditions must be met for the controlled options to be visible.
- Add conditions for other options by clicking Add option rule again.
- Click Save.
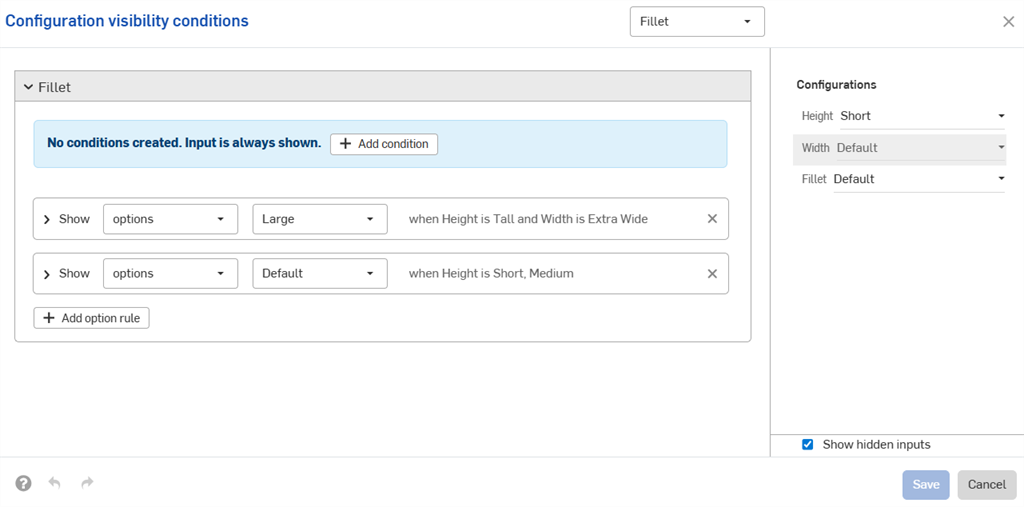
In the example below, the "Thin" option is only allowed when the Hole Size is .8 inches. The Default option is always allowed:
The next example uses overlapping ranges to specify visibility conditions:
The example below uses a combination of option and range controls to set the required logic.

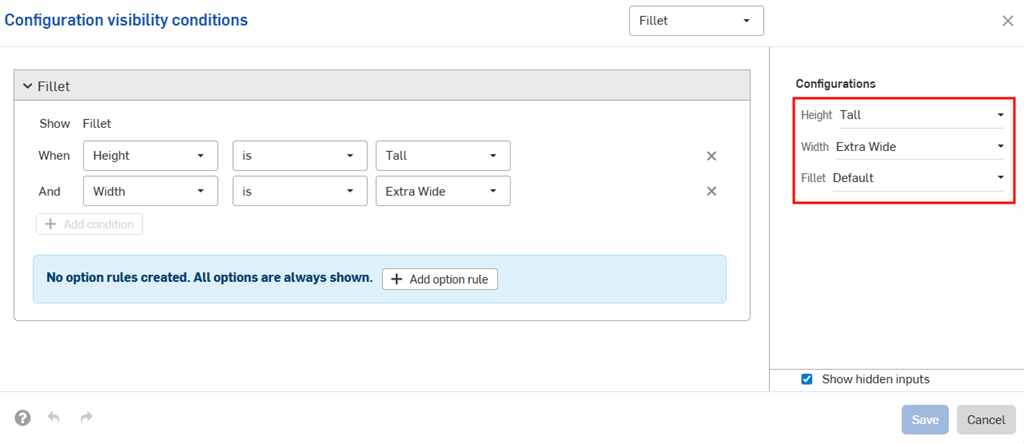
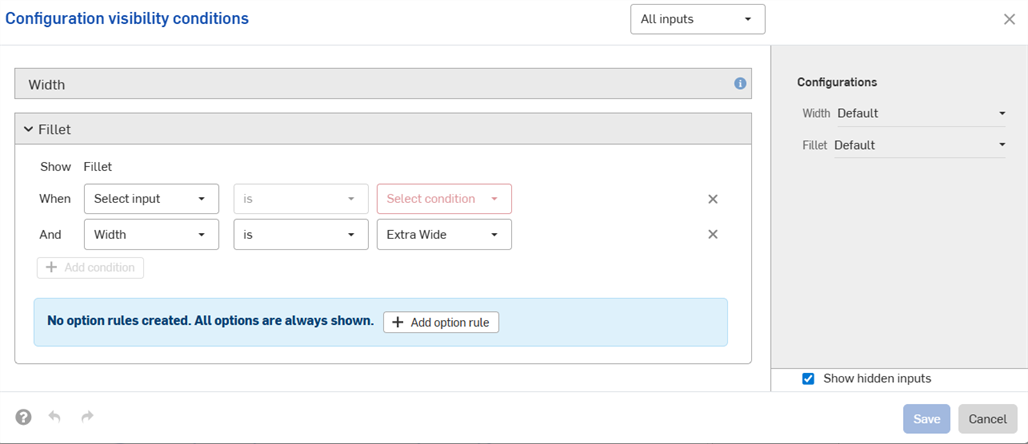
Input conditions are additive; if we add a third configuration to the above example and set the conditions shown in the image below, the Large Fillet option will only be available for parts that have both the Tall height and Extra Wide width inputs.
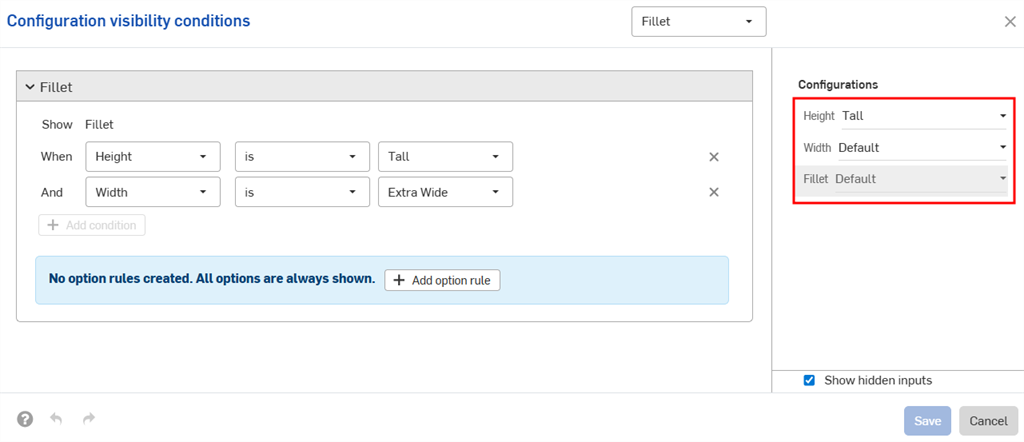
When the Default width is set for the Tall height, the Fillet configuration is hidden.
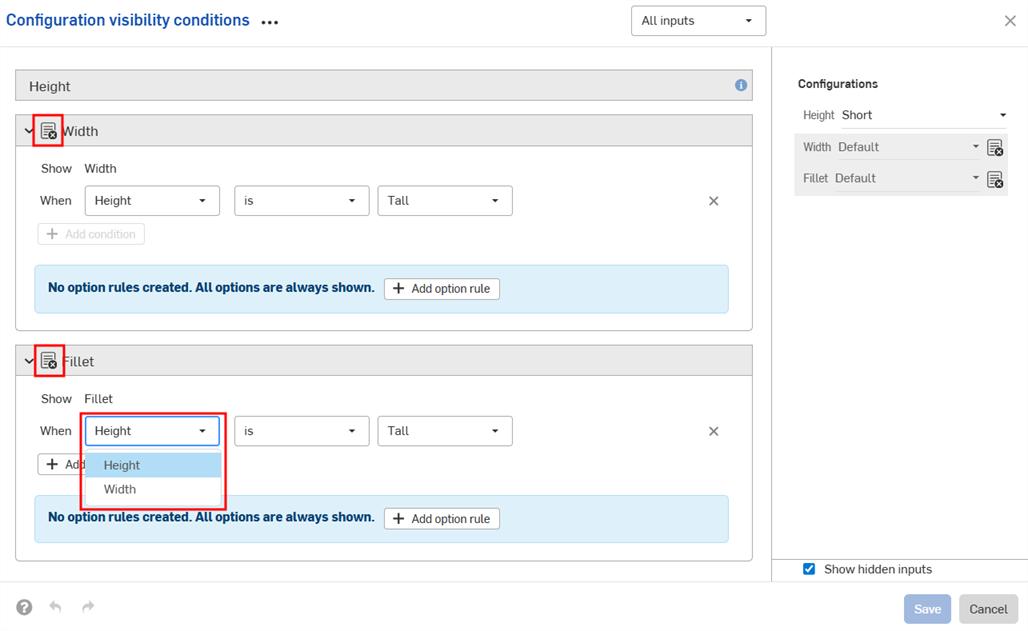
Configuration inputs can only control the visibility of inputs that appear below them in the Configurations panel. In the example, the Width input can be controlled by the Height input, but not by the Fillet input.
Visibility conditions are automatically repaired (removed) if the necessary inputs or options cannot be found.
For example, if the visibility of the Width input depends on the Height input, and the Height input is deleted, the visibility conditions for Width are automatically removed. The same applies for individual options that are deleted or moved. In this example, the Height input has also been removed from the Fillet options.
You'll see a warning in your workspace, and the conditions are removed in the dialog:

-
The visibility conditions and option rules you set are available in all Insert dialogs (i.e., when inserting a configured part into an assembly). Changes made to visibility conditions are automatically reflected in all existing documents that reference the configured element.
-
Hidden inputs always have their default value. In the first example on this page, Short and Medium height parts have the Default width, even though no width options are set.
-
If a configuration input has no visible options, it is hidden and assumes its default value.
-
-
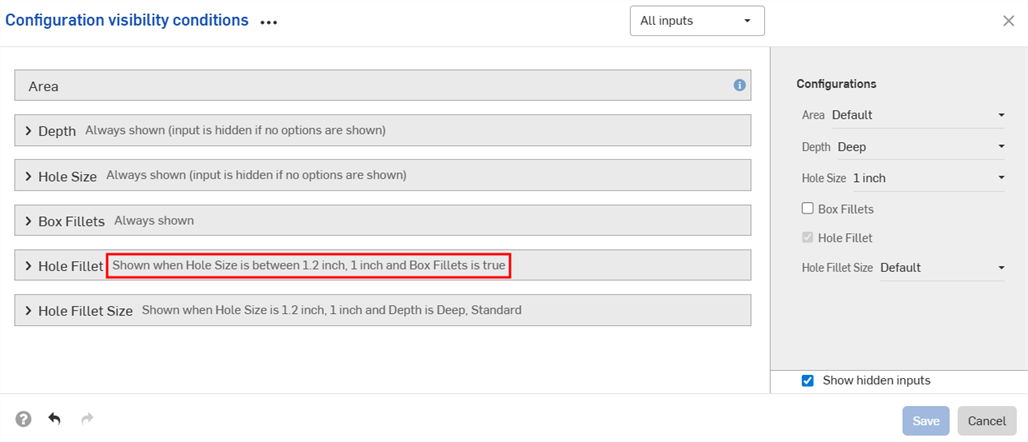
A summary of the visibility conditions is shown in the dialog when the input or option is collapsed.
-
(Parts and Part Studios only): Configuration inputs that have been excluded from properties can only control the visibility of other inputs below them that have also been excluded from properties. In the example below, if Width is excluded from properties (indicated by the
 icon), it can only control the Fillet visibility if Fillet is also excluded from properties.
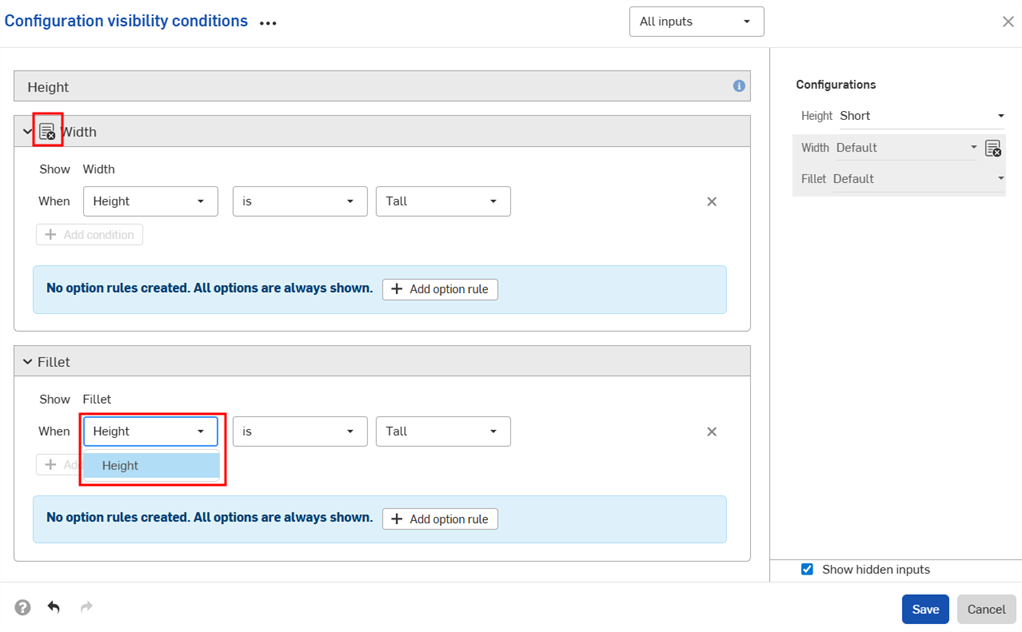
-
(Parts and Part Studios only): Configuration inputs that have been excluded from properties are treated as having their default values in release packages and revision references values. If visibility conditions prevent using the default value, the first visible value is used.
- Use the Inputs dropdown in the Configuration visibility conditions dialog to view other inputs. You can select All inputs to view all inputs available.
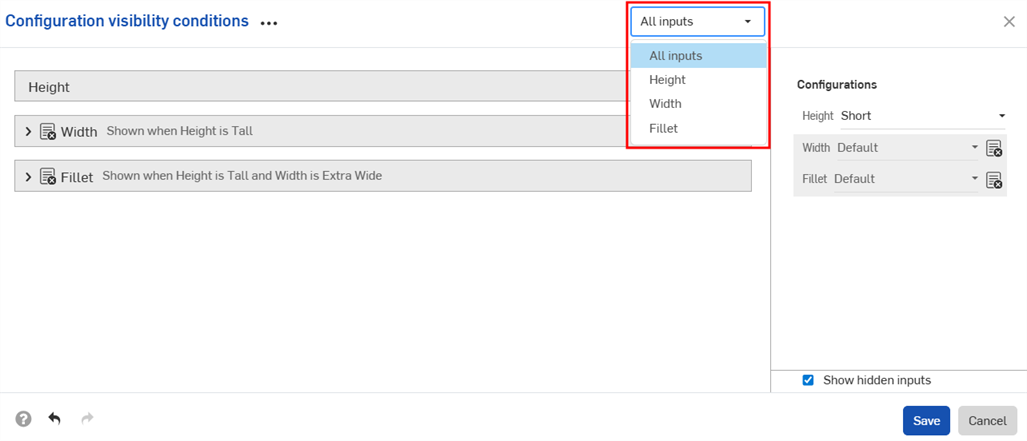
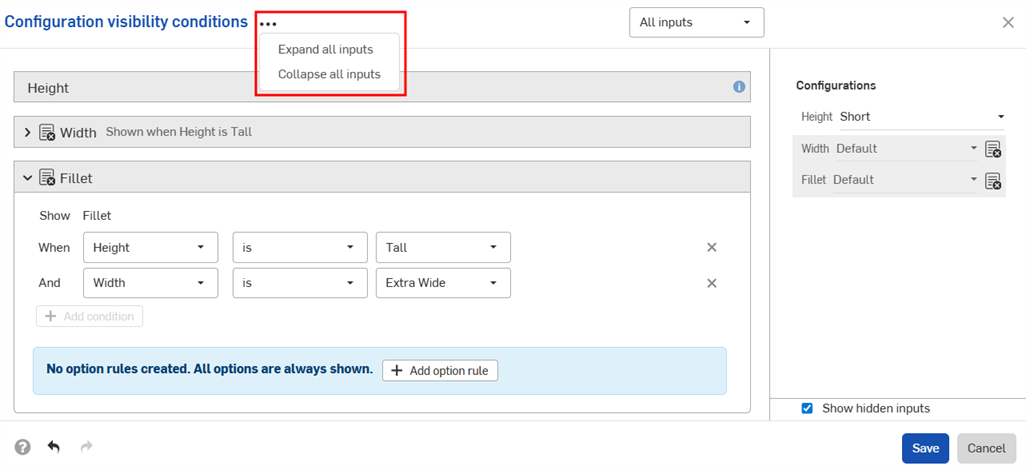
- When multiple inputs are displayed in the dialog, click the three-dot button to expand or collapse all inputs.
- You can use the preview section of the Configuration visibility conditions dialog as a playground to test your configurations.
- Deselect the Show hidden inputs checkbox to remove the grayed-out inputs from the dialog.
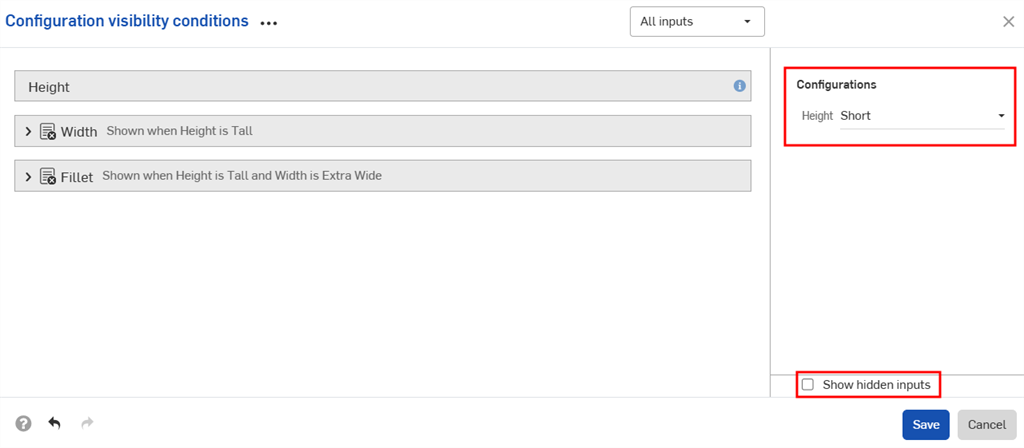
- Deselect the Show hidden inputs checkbox to remove the grayed-out inputs from the dialog.
-
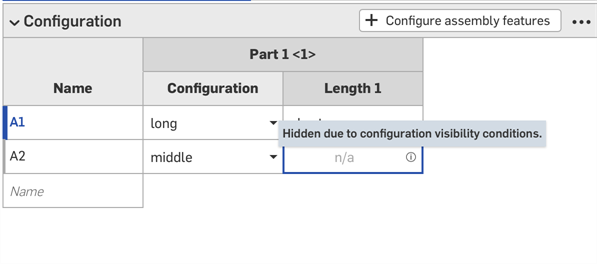
When adding configured parts to assemblies, hidden inputs are grayed out in the Configurations panel.
-
Click
in the Configurations selector to open the Configuration visibility conditions dialog for all inputs. Click in the Configurations panel to open the dialog for that input.