Custom Standard Content Libraries

Available in: Assembly
Create your own standard content library for users to insert in their assemblies. Administrators can create standard content libraries that can be shared among the company, classroom, or enterprise.
 Setting the custom standard content library
To create your own standard content library:
-
From the Documents page, create a new folder,
-
(Admins only) Administrators can share this library with other users in a company, classroom, or enterprise, by enabling Link sharing for the folder for the company.
-
Add the document (or documents) that contains the parts for the library to this folder.
Documents added to the library must be marked as "Not revision managed".
-
Use the Tag feature to apply the Standard Content tag to the part in each Part Studio for the library.
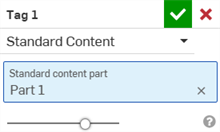
Each Part Studio in the library must contain at least one part tagged as Standard Content. The tagged part must be a solid part or a composite part. We recommend placing each standard content part in its own Part Studio.
-
Create a version in each document in the folder.
-
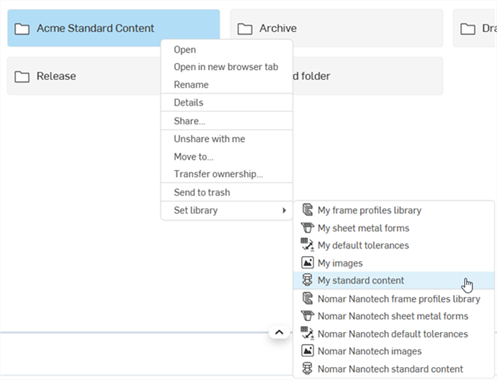
Return to the Documents page, right-click the folder, and select Set library > My standard content.
-
To set the standard content library for whole company, classroom, or enterprise, select Set library > CompanyName standard content.
-
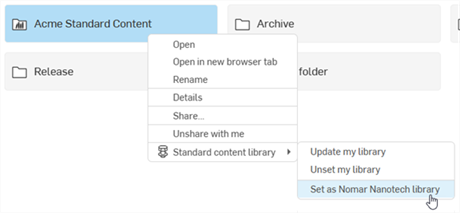
To set the same standard content library for a different account, select Standard content library > Set as ... library from the shortcut menu.
-
Using a custom standard content library
To insert a part from a custom standard content library into an assembly:
-
In an assembly, click Insert parts and assemblies (
 ) and click the Standard content tab.
-
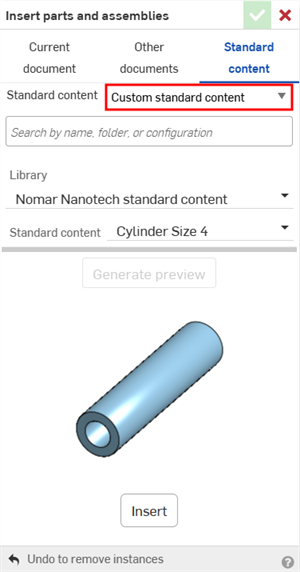
Click the Standard content dropdown and select Custom standard content.
-
Click the Library dropdown and select the library to insert from (for example, My standard content or CompanyName standard content).
-
Use the dropdowns below the Library field to navigate to the part. The dropdowns follow the library's folder and document structure. Alternatively, use the search bar at the top of the dialog to search the library for the part by name.
-
If the part is configurable, set its configuration options, then click Generate preview to update the preview image.
-
Click Insert. The part appears at your mouse location. Drag it to the preferred location and click to snap it to a Mate connector (implicit or explicit).
-
Click the checkmark (
 ) on the dialog to create the instance in the assembly and list it in the Instances list.
To insert from a company library, you must have access to the library folder and its documents. If you do not have access, the message Creation of linked document reference failed is displayed when you select a part. Contact your administrator to request access.
Editing a custom standard content instance
To change the configuration of a custom standard content instance in an assembly:
-
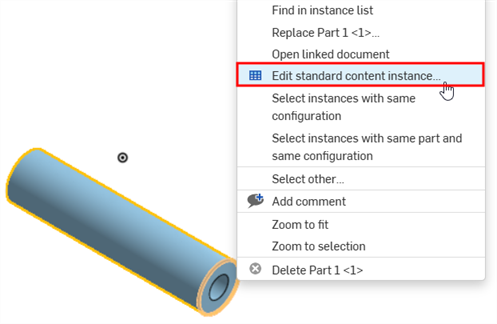
Right-click the part in the graphics area or the instance in the Instances list, and select Edit standard content instance from the context menu.
To edit several instances at once, first right-click an instance and select Select instances with same configuration or Select instances with same part and same configuration, then right-click again and select Edit standard content instance.
-
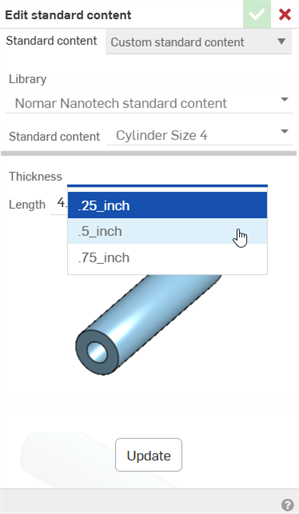
In the Edit standard content dialog, change the configuration options as needed. The library and part selections cannot be changed. To use a different part, replace the instance.
-
Optionally, click Generate preview to update the preview image.
-
Click Update.
-
Click the checkmark (
) to close the dialog.
An instance keeps the library version it was inserted from, and its configuration options come from that version. Instances inserted from different versions of a library document cannot be edited together.
Custom standard content in the Bill of Materials
Custom standard content instances are listed in the assembly's Bill of Materials (BOM) as follows:
-
Instances from the same element library are combined into a single BOM row if they have the same part number, even if they originate from different library versions.
-
Instances without a part number are listed like any other part. They are combined into one row only if they reference the same part, version, and configuration.
-
Instances in a subassembly whose BOM behavior is set to Show components only are combined with matching rows at the parent level.
-
If any instance in a combined row is excluded from the BOM, the whole row is excluded. A combined row is suppressed if all of its instances are suppressed, and partially suppressed if some of them are.
Unlike Onshape standard content, custom standard content properties can be edited from the BOM table or the Properties dialog, the same way as other parts from another document. You must have write access to the library document, and changes are saved to the library document. When release management is enabled, properties such as Part number and Revision are read-only. Edits to a combined row apply to the instance whose properties the row shows.
Managing the custom standard content library
Manage your standard content library from its folder's context menu:
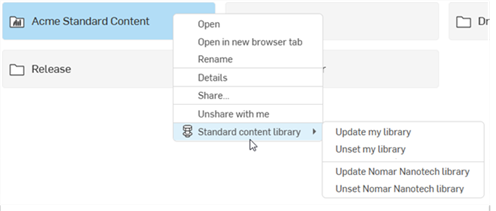
From this menu, you can:
-
Update library - Update the library with any changes made to parts tagged as Standard Content. The updated library is available to everyone with whom the library is shared, the next time they insert standard content from it.
Updating the library does not update standard content instances already inserted in assemblies. Each instance continues to reference the library version it was inserted from. Editing the configuration of an existing instance also keeps its original library version. Custom standard content instances are not listed in the Reference manager and are not marked as out of date.
-
Unset library - Remove the folder as the standard content library, allowing you to set a different folder for the library.