![]()
僅為 提供
這些指示說明發行任何物件的基本流程,此處是以一個單一零件為範例。
僅能在瀏覽器版本上建立發行版本,但可以在任何的 Onshape 作業平台上執行其餘的步驟 (檢閱、核准、拒絕等等)。
有四種方式可以開始發行的流程,也就是為所選的圖元開啟「建立發行候選」對話方塊,在此處以單一零件來說明:
- 在 Part Studio 中,從「零件」清單上:在您要發行的零件上按右鍵,然後選擇 [發行]:
![在按右鍵功能表中強調顯示了 [發行]](Resources/Images/Release_highlighted.png)
這個方法會將分頁的內容先填入「建立發行候選」對話方塊中。
- 從任何的分頁 (Part Studio、組合件、工程圖、Variable Studio、 或匯入的檔案):在分頁上按右鍵然後選擇 [發行]:
![在按右鍵分頁功能表中強調顯示了 [發行]](Resources/Images/Release_highlighted2.png)
這個方法會將分頁的內容先填入「建立發行候選」對話方塊中。如果是工程圖,則會同時會填入工程圖的零件或組合件。
- 從任何屬性對話方塊中:在零件、Part Studio、組合件、工程圖、Variable Studio 或檔案分頁上按右鍵,然後選擇 [屬性]。在對話方塊的左上角,按一下
 。這個方法會將所選零件或所選分頁的內容先填入「建立發行候選」對話方塊中。
 - 從開啟的「版本與歷程」面板中:按一下
 。這個方法會將目前使用中分頁的物件預先填入「建立發行候選」對話方塊中。
使用上方解釋的方法開始發行的過程時:
- 「建立發行候選」對話方塊開啟:
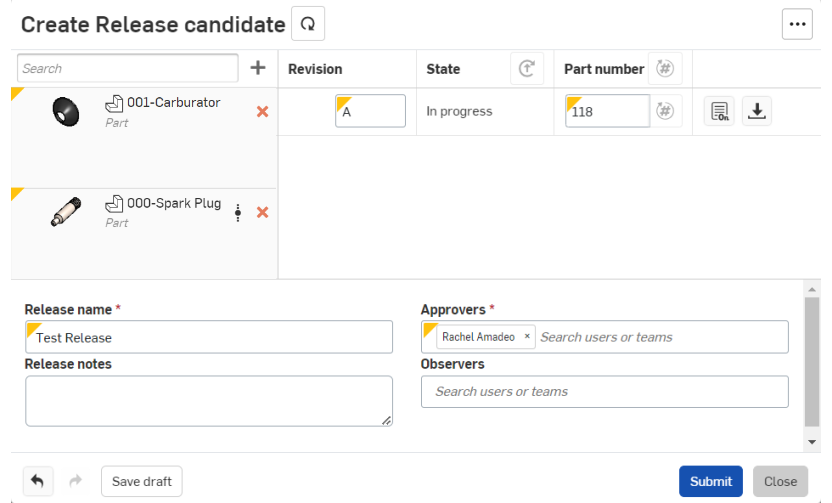
- 您在「零件」清單中選擇的零件已列在這個對話方塊中。如果您選擇一個組合件,則會列出組合件中的所有零件。使用加號
 來 加入更多物件。您可以從 Part Studios、組合件、檔案、工程圖、或 Variable Studios 中選擇項目,如下所示:
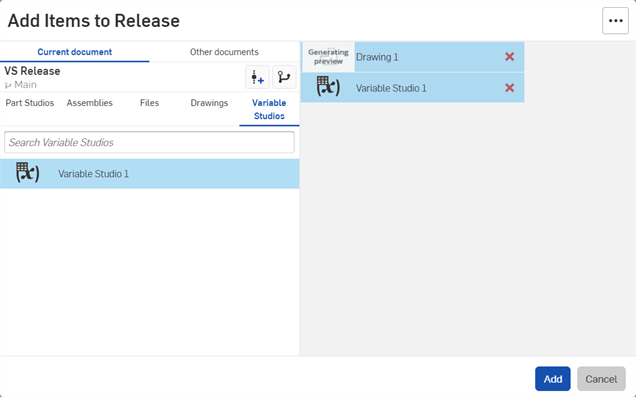
在送交物件之前,您可以按一下清單中的物件名稱來查看物件的設計。會在另一個瀏覽器分頁中開啟適當的分頁。
您可以按一下物件名稱旁的紅色 x 來移除發行中不需要的物件。
- 選擇性地按一下對話方塊上方的包括相關的工程圖
 。在發行中與項目相關的工程圖也會加入至發行中。
- 會為過時的相關工程圖顯示警告。您可以更新它們或將過時的工程圖包括在發行中。
- 如果工程圖參考版本的工作區是與發行所建立處的工作區不同,則不會以相關的工程圖來包括工程圖。若要包括這些工程圖之一,請在與發行相同的工作區中建立工程圖,或在工程圖本身建立一個版本。
- 取決於設定過程所做的選擇 (字母、數字或自訂) 與這個目標先前的發行,系統會自動提供修訂版。
會為新的發行自動遞增修訂版。請注意,修訂版僅套用至發行過程中的物件,絕不會是工作區中的物件。在建立發行候選之後,馬上會被擷取為一個版本,在發行候選中的所有物件都是該版本中的物件。在工作區中的物件並沒有修訂版標籤,除非您在零件屬性中特別手動指派。
在開啟發行管理之後隨即的初始修訂版管理中,Onshape 會嘗試維持零件、組合件與工程圖中的修訂版值。這在從像是 SOLIDWORKS 等外部來源匯入物件時是相當有用的,因為已在外部來源中將修訂版套用至物件上。 例如,如果匯入的物件有修訂版 3 的值,則第一個發行套件會將零件的修訂版維持為 3。如果相關的修訂版與發行管理方案不同,則會出現警告的訊息,並調整物件的修訂版值來與發行管理修訂方案相符。例如,下圖圖片中的 Part 3 被指定了 6 的修訂版數值,但發行管理方案是設定為字母式的,這時在第一個發行中會將 Part 3 的新修訂版值設定為 A,並同時顯示警告的訊息。

您可以變更「修訂」但不允許您回到順序中的上一步。例如,如果先前的修訂版是 B,那麼 Onshape 會建議使用 C。您可以輸入字母順序 C 之後的任何字母,但不能改為 A。
- 會自動提供物件的目前「狀態」:
- 進行中代表物件第一次被發行。
- 待決中反映物件的發行正在等待批准。
- 已發行反映之前發行、連結的物件。
- 為零件提供一個獨特的零件編號:
- Onshape 會追蹤各個發行間的零件編號,以避免再次發行現有零件編號的較低修訂版。
- 如果您在「編號方案」設定中開啟了「產生連續的零件編號」,按一下
 圖示來產生零件編號。按一下對話方塊上方的
  來為發行候選中的所有物件產生零件編號。
 - 如果您在「編號方案」設定中開啟了「工程圖可以重新使用發行中來自組合件或零件的零件編號」,然後按一下
 來為發行候選中的所有物件產生零件編號,Onshape 會為未分配有零件編號的工程圖以及插入工程圖的物件的所有工程圖產生新的零件編號。如果工程圖或工程圖中的插入物件其一有相關的編號,但另一個沒有,則會將相關的零件編號分配給兩者。這只會在工程圖中只有一個物件插入時發生。如果有多個物件插入到工程圖中,則會產生新的零件編號。您仍可以按一下「零件」清單中每個項目右邊的
  圖示來產生個別的零件編號。
按一下對話方塊上半部每個物件旁的「編輯屬性」圖示
 來開啟顯示屬性的視圖以為物件輸入跟記錄屬性資訊。這可讓您開始 編輯已發行物件的屬性。
按一下「屬性」圖示旁的「匯出」圖示 來匯出該發行或該發行中的圖元。
 - 取決於管理員如何設定規則,某些欄位可能會是必填的,而有些則不是。如果需要,請於下方各欄位中提供資訊:
- 發行名稱 - Onshape 要求必需要有發行名稱,此名稱在「版本與歷程」飛出視窗中 (您可以稍後於此處檢視發行資訊) 會顯示為版本名稱。
- 發行版本附註 - 您公司的管理員可能會要求也可能不要求這一點,但此處是提供關於發行的特定資訊與說明的好地方。
- 核准者 - 輸入在物件發行之前必須核准這個發行的使用者或使用者團隊的名稱 (公司管理員可能會或是不會對此要求;如果這個欄位留為空白的,則在按下「發行」時會立即發行物件)。如果有電子郵件或團隊出現時,則會建立「發行候選」,接著通知核准者,直到核准者表示批准時,物件才會發行。
當在「核准者」欄位中列出的是團隊時,只需要團隊中的一個成員核可即可 (即使在發行管理工作流程設定中選取了需要來自所有核准者的批准)。
- 核准者 - 輸入在物件發行之前必須核准這個發行的使用者或使用者團隊的名稱 (公司管理員可能會或是不會對此要求;如果這個欄位留為空白的,則在按下「發行」時會立即發行物件)。如果有電子郵件或團隊出現時,則會建立「發行候選」,接著通知核准者,直到核准者表示批准時,物件才會發行。
- 觀察人員 - 輸入您要給予對「發行候選」(或發行) 有「唯檢視」權限的使用者電子郵件或使用者團隊名稱。即使您不需要獲得核准,也可以輸入觀察人員。觀察人員會收到通知。
- Click one of the following based on the desired outcome:
- Save draft to save the Release candidate you are currently working on as a draft and close the dialog. For more information, see Release drafts.
- Submit (visible when approvers are listed) to create a version, and set the version icon, Release candidate, and its objects as Pending.
A notification is sent to each approver and observer listed. A blue message bubble also appears at the top of the graphics area stating the release has been submitted (or other action) and contains a link to the Action items page where you can monitor and act on the release process.

訊息說明您可以在「行動項目」頁面中檢視狀態
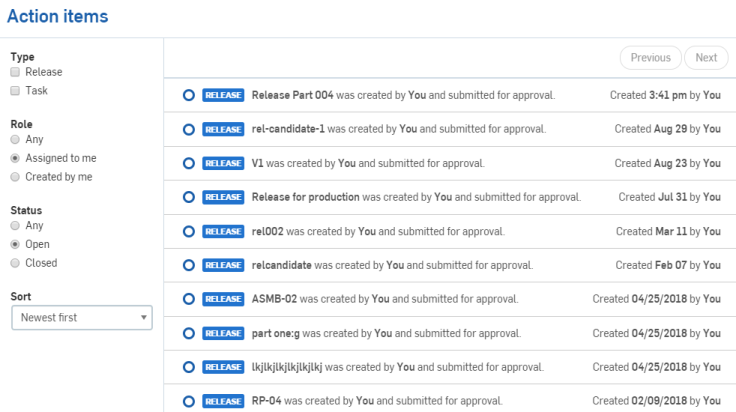
The Action items page
To move from Pending to Released and complete the release workflow, the Release candidate must be approved.
- Close to close the dialog without recording any changes or taking any actions.
您可以按一下並拖曳邊線或角落來調整這個對話方塊與各個區域的大小。
新的或經修改的欄位會在欄位的左上角標有黃色的三角形。您可以在這個對話方塊中使用 [復原] 與 [取消復原] 的按鈕,或是操作系統的快速鍵來復原或取消復原變更。
- 建立「發行候選」的使用者不應是唯一的核准者;最佳實踐是在「核准者」欄位中加入額外或不同的使用者。
- 請特別注意在設計中採用良好的操作習慣 (特別是抑制功能的有限度或暫時使用,以及回溯的選項) 以避免無法適當地產生零件。
- 在將工程圖包括在發行之前,請先確定已更新工程圖。如果有可用的已更新工程圖,會在您建立發行候選時通知您,表示「工程圖有待決的更新」。
- 請小心處理組合件以確定在將其包括在「發行候選」中時沒有錯誤。
- 如果在「發行候選」中的項目需要注意,您會收到通知並可在「發行候選」對話方塊中篩選這些項目。請參考篩選需要注意的項目。
發行組合件:
- 在組合件分頁上按右鍵,然後選擇發行以開啟「建立發行候選」對話方塊。
會將列在組合件材料表中的所有項目 (包括全部的零件、次組合件以及組合件參考的標準內容) 都先填入「建立發行候選」對話方塊中。
- 在組合件中與其他文件連結的發行物件會反映在「建立發行候選」對話方塊中,當發行組合件時,不會建立零件的新修訂:
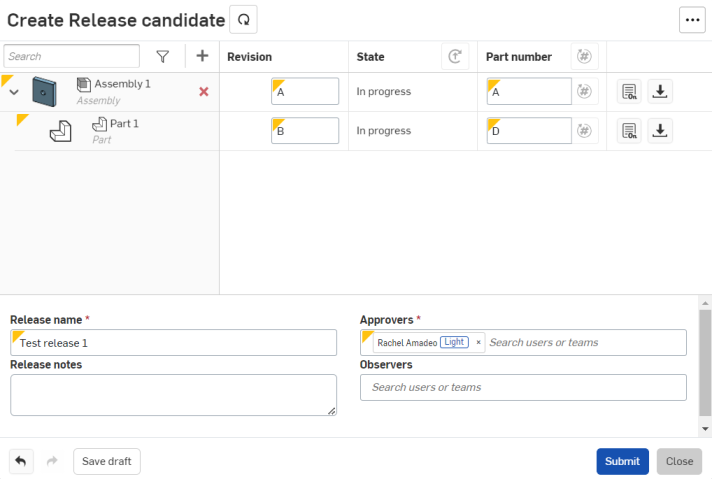
如果您在工作區中參考了一個零件,當發行組合件時,該零件的「修訂」標籤會向上移動。如果您參考的是已發行的零件,則當發行組合件時,「修訂」不會向上移動。
請注意,僅當候選版本實際上發行 / 核准時,修訂編號才會增加。
- 如果您使用了 Onshape 的連續零件編號產生器,按一下對話方塊最上方的
 來產生「發行候選」中所有物件的零件編號。
 - 如上方典型的發行工作流程中所述填寫其餘必填欄位來完成工作流程的步驟。
如果兩個待決的發行候選中包含有相同零件 (有相同的待決修訂值),則第一個經核准的零件贏得新修訂版的值。系統絕不會為您自動捨棄發行候選,您也不需要為待決的候選版本採取行動。待決的發行會指出零件的待決修訂版已被使用,唯一可採取的行動是捨棄或拒絕。
會包括組合件中的所有標準內容零件,但不會有修訂版。
發行工程圖:
- 在「工程圖」分頁上按右鍵,然後選擇發行來開啟「建立發行候選」對話方塊:
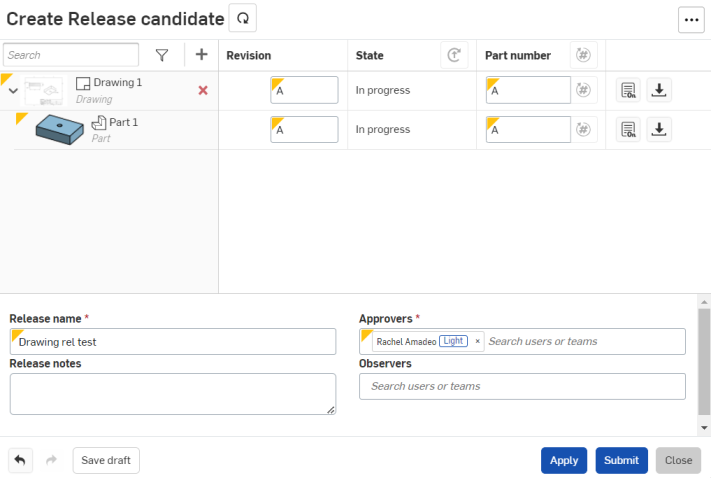
「建立發行候選」對話方塊會自動填入工程圖所參考的所有零件或組合件。
在工程圖中與其他文件連結的已發行物件會以已發行反映在對話方塊中,且在發行工程圖時不會建立零件的新修訂。
- 如典型的發行工作流程中的說明所述繼續填寫對話方塊來完成工作流程的步驟。
當您發行組合件的工程圖與其零件的工程圖時,發行對話方塊會包括所有與工程圖有關的零件。這樣會在發行候選對話方塊中產生重複的零件。系統不會多次發行這些零件,而僅是列出零件做為參考。例如,在下方範例中的 Part 1 同時出現在組合件工程圖與自身的工程圖中,因次被列出兩次:
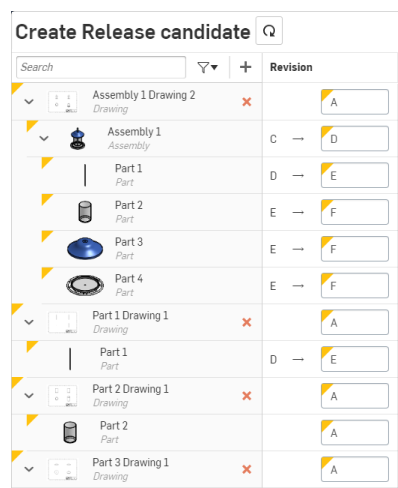
如果工程圖有待決的更新,會在您建立發行候選時通知您。這些資訊僅供參考,您並不需要在建立發行候選之前更新工程圖。
在發行管理設定中將零件編號獨特性設定為「工程圖可以重新使用發行中來自組合件或零件的零件編號」的情況下,那麼產生遺失零件編號會給工程圖與零件或組合件相同的零件編號。
「建立發行候選」對話方塊可讓您搜尋與篩選物件清單,您可以根據名稱來搜尋零件、組合件、工程圖與其他物件:
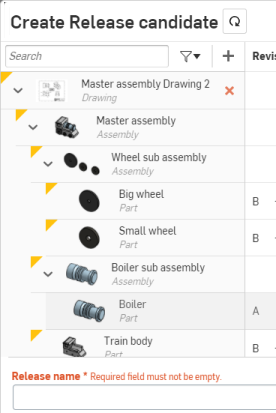
根據物件類型篩選清單:
- 按一下「篩選器」圖示
 來展開篩選器清單。
 - 按一下類型圖示 (
 ) 來切換開啟,以篩選該類型的物件清單。
 - 點按多個圖示可一次篩選好幾個類型。
- 若要清除篩選器,再按一下類型圖示來取消選取,或按一下 [清除] 的按鈕來移除所有的篩選器。
- 再按一下「篩選器」圖示
 來摺疊篩選器清單。
「建立發行候選」對話方塊有檢視與修改任何給定物件「屬性」的機制:
- 當在「建立發行候選」對話方塊中時,按一下對話方塊右側的「編輯屬性」圖示
 來開啟該物件的「屬性」視圖:
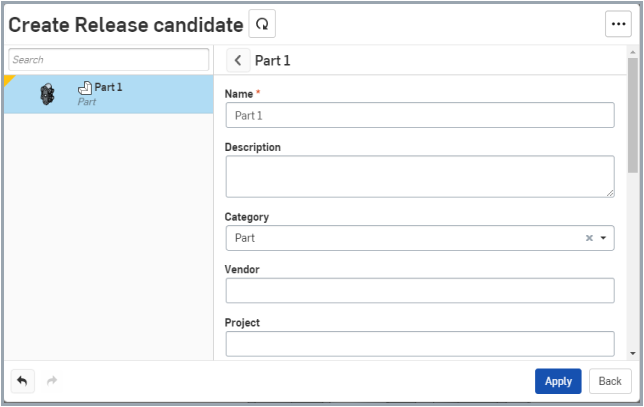
在「屬性」對話方塊中,您也可以選擇清單中的其他物件來檢視與修改其屬性。
- 按一下套用來儲存對所有物件的變更而不離開「屬性」對話方塊。
- 按一下回到上一步或「上一步」箭頭圖示 (零件「名稱」的左側) 來回到「建立發行候選」主對話方塊中。這樣可以在您繼續在對話方塊中工作時儲存中繼資料的變更。
- 按一下 [套用] 或 [送出/發行] 來儲存所有變更,包括在「屬性」對話方塊中做出的變更。
根據預設,當核取了只有管理員可以編輯發行物件的屬性核取方塊時,無法編輯已發行物件的已組態零件屬性 (中繼資料)。如果沒有核取這個核取方塊,則:
-
管理員可以編輯已發行物件的屬性
-
除了關鍵的發行管理屬性,任何人都可以編輯已發行物件的屬性 (取決於公司的政策)
如果您的「發行候選」中包含了需要注意的項目 (像是遺失零件編號或是不小心 2 個零件分配了相同的零件編號),「建立發行候選」對話方塊右上角會顯示錯誤的數量並有按鈕可讓您在對話方塊中篩選項目來僅顯示那些需要注意的項目:
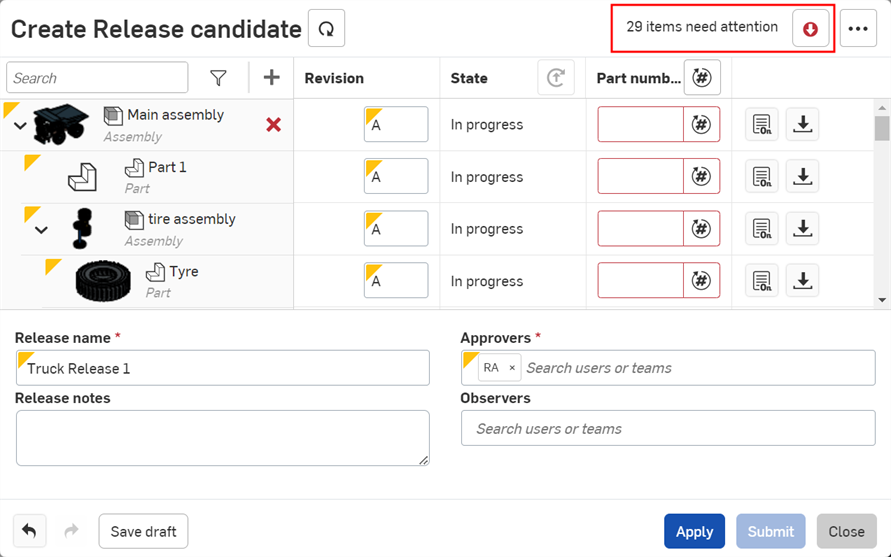
這個按鈕式可切換的。點按按鈕一次可僅顯示需要注意的「發行候選」項目。再次點按會顯示所有的「發行候選」項目。
當更正項目時,數字會減少。在所有項目都正確之後,文字與按鈕會被移除。
在建立發行候選時,您可以確定在發行候選中有物件的最新迭代項目。請使用對話標題左側的 [重新整理] 按鈕。

在建立發行候選時,您可以目視檢查包括在候選中的物件以確保一切正確無誤。如果有過時的項目,您可以點按物件名稱的連結 (在物件清單中) 來開啟新的分頁,其中會有適當的 Part Studio、組合件或工程圖。做出任何所需的變更。在對該分頁中的物件感到滿意時,請回到有「建立發行候選」對話方塊的分頁中,然後按一下 [重新整理] 的按鈕。
Onshape 會套用對「建立發行候選」對話方塊中物件的變更,重新整理介面以反映這些變更。
例如:
按一下物件清單中的 Part 1 來開啟一個新分頁,該零件的 Part Studio 會於其中開啟,讓您能夠檢查物件。在這個範例中,預期的圓角特徵遺失,所以要加回到零件中。
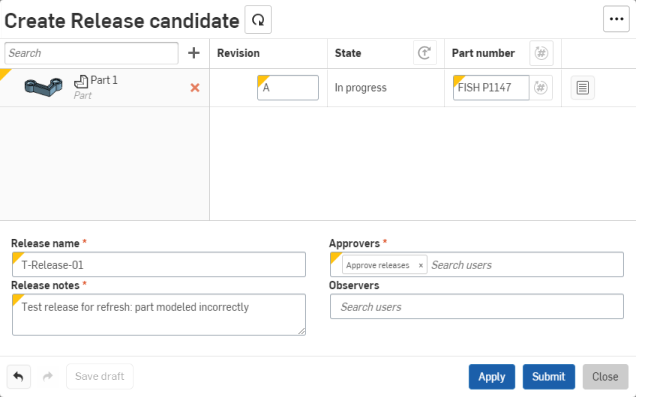
「建立發行候選」對話方塊中遺失圓角特徵的範例。
回到包含「發行候選」對話方塊的分頁中,注意到零件的縮圖仍沒有圓角。按一下「重新整理」圖示來更新零件以包括新的變更。
系統會重新載入零件,並包含在另一個分頁中建立的圓角特。即使在「建立發行候選」對話方塊中並未顯示做出的變更,在您點按 [重新整理] 按鈕之後即會包括這些變更。當您按一下 [套用] 或 [送出] 時,系統會建立一個版本,目前更新的所有特徵會包含在該版本中。如果另一個使用者同時進行變更,為發行候選所做的變更會有優先權,並被記錄在所建立的版本中。其他的變更會記錄在「版本與歷程」中。
僅在建立發行候選與「發行候選」對話方塊開啟時提供 [重新整理] 的按鈕,且僅為發行候選的建立者提供。
您不需要為每個變更重新整理對話方塊。
同樣地,您可以在更正錯誤之後,使用 [重新整理] 按鈕來更新發行候選。例如:
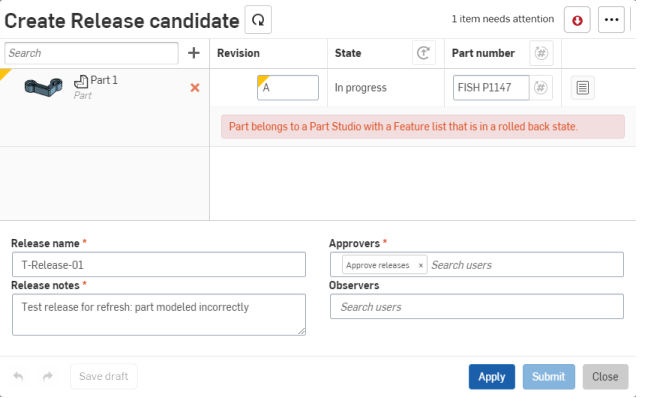
屬於 Part Studio 的一個零件,其特徵清單處於回溯的狀態,因此無法繼續建立發行候選的過程
點按零件名稱來開啟新的分頁,分頁內會有 Part Studio,請於其中修正回溯控制棒。回到包含「建立發行候選」對話方塊的分頁中,然後點按 [重新整理] 以更新候選版本中的零件:
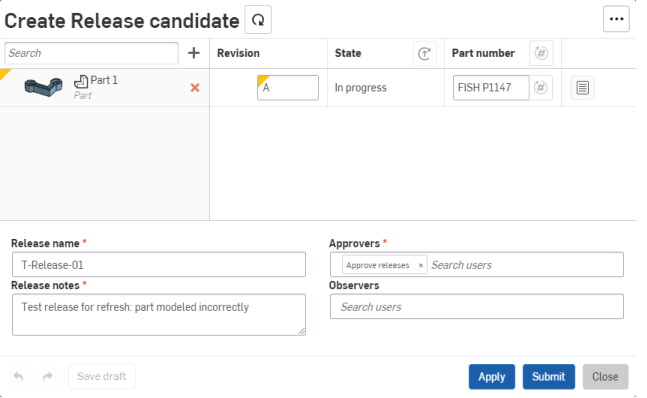
問題已解決,可以送交這個發行候選以供檢閱與核准
當發行先前已發行的組合件或工程圖時,Onshape 會檢查各個參考來確定發行中的項目自最後發行之後有無幾何和/或中繼資料的變更。有三種清況可能發生:
-
如果幾何有所變更,則會繼續典型的發行候選流程。
-
如果幾何沒有變更但中繼資料改變,Onshape 會在「狀態」(在「狀態」欄位) 旁顯示一個「還原」按鈕,並提供訊息說明中繼資料有所變更。
-
如果自最新修訂版之後沒有幾何也沒有中繼資料的變更,會出現下列的訊息:「項目自其最新修訂版後並無任何變更」。

點按項目旁的按鈕會將項目的參考變為最新的修訂版並相應地重新整理發行套件。由於這是一個參考的更新,只會在項目參考與發行套件來自相同工作區時有用。點按「狀態」標頭旁的按鈕來將所有未變更項目的參考變更為最新的修訂版。
在送交發行套件之後,如果未變更項目原本是工作區參考,則會再變回工作區中。如果原本是版本參考,則會保持在修訂版中。
在這種情況中,幾何變更的定義是在組合件中的任何新增、移除或變更實例,以及 BOM 的變更。重新放置項目並不視為幾何的變更。
不支援在剛性 Part Studio 內還原零件實例。
Onshape 可讓您在文件內的「發行候選」對話方塊中將發行候選儲存為草稿。可在文件內的「發行草稿」面板中存取您儲存的草稿以進行編輯、提交或刪除。
若要將一個發行候選儲存為草稿,請選擇在「發行候選」對話方塊左下角的 [儲存草稿] (下圖中以紅色輪廓線框出):
![「建立發行候選」對話方塊中以藍色輪廓線框出 [儲存草稿] 按鈕的螢幕擷取畫面](Resources/Images/release/savedraftbutton-relcandidatedialog.png)
這樣會自動將發行候選儲存為草稿,接著關閉對話方塊,然後將新的草稿加入至「發行草稿」面板中。
若要存取「發行草稿」面板,按一下圖形區域左邊的「發行草稿」圖示 ![]() :
:
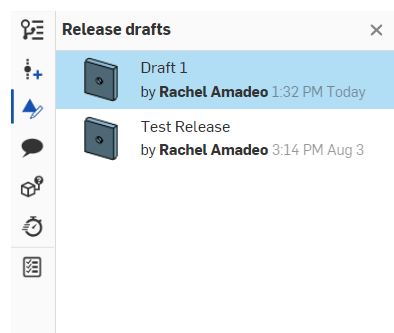
在其中連按兩下一個草稿來開啟「檢閱發行」對話方塊,然後繼續編輯發行候選:
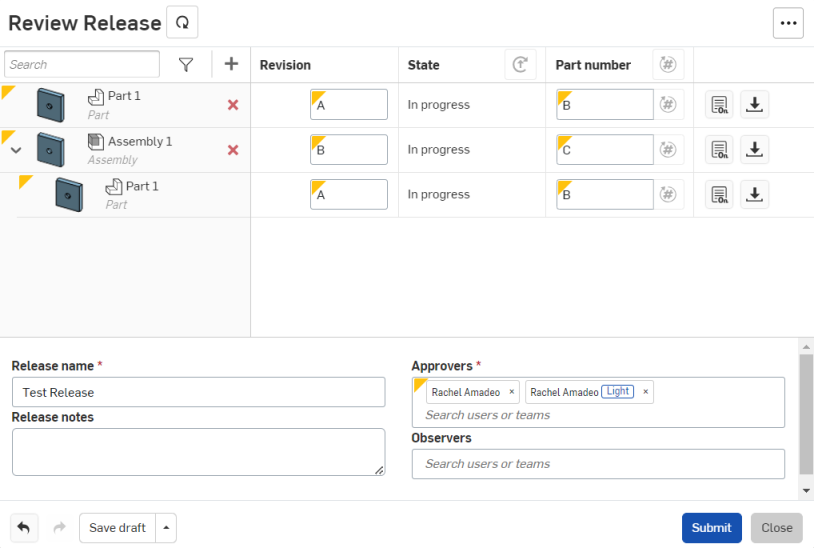
若要再次將發行儲存為草稿或刪除草稿,按一下下方 [儲存草稿] 選項旁的箭頭,然後選擇所需的選項:
![在「檢閱發行」對話方塊中 [儲存草稿] 與 [刪除草稿] 選項的螢幕擷取畫面](Resources/Images/release/save-delete-draft.png)
或是按一下 [提交] 按鈕來送交您的發行並關閉對話方塊。
按一下 [關閉] 按鈕來關閉對話方塊而不儲存或送出任何變更。
在一個文件中的 Part Studios、組合件與工程圖都可以參考其他文件版本中的物件,藉此產生連結的物件。系統會自動將連結的物件包括在「發行候選」中,但在發行的過程中要如何處理所有的物件是取決於物件是否是連結的。
- 如果物件是在目前的工作區中 (未連結的物件),則當建立「發行候選」時,發行的狀態一開始會是進行中。這是因為根據定義,工作區永遠是可編輯的。從目前工作區中發行物件會在目前的文件中建立一個「版本」,並將物件與版本標示為已發行 (如果需要核准,則會是待決中)。
- 如果物件是與另一文件中未經發行的版本連結,則當建立「發行候選」時,發行的狀態一開始會是進行中。發行與未經發行版本連結的物件與發行目前工作區中的物件並無不同,除了在連結文件中的版本也會被標示為「已發行」,且與發行關聯的版本會是來自目前文件的版本。
- 如果連結的物件是與等候核准中的發行相連結的,則會有待決中的狀態。因為連結的物件是「待決中」而非「已發行」的,所以您可以修改物件的中繼資料與修訂版。發行連結的物件會將其狀態變為已發行,且會有另一個發行與連結的版本相關連,取代之前待決中的「發行候選」。
- 如果連結的物件是與已發行的版本相連結,則該物件會有「已發行」的狀態。將已發行物件包括在新的發行中並不會改變物件的狀態或修訂版。系統會包括該狀態或修訂版供您參考。
有時候您可能會有不想標示為修訂版的物件 (或甚至整個文件)。您可能需要將這些物件包括在發行中來做為參考之用,但並不需要追蹤物件的修訂版。Onshape 提供方法可將物件標示為非修訂版管理 (在發行的過程中物件不會收到修訂)。
- Access the Properties dialog for the object (Assembly, Document, Drawing, Variable Studio, or File) through any of:
- 工作區功能表 > 屬性指令
- The Versions and history panel context menu > Properties command
- 按一下「編輯屬性」圖示
 。若要將物件標示為非修訂版管理的,按一下「屬性」對話方塊底部的非修訂版管理的核取方塊。
可以標示為非經修訂版管理的物件包括:Part Studios (包括 Part Studio 中的所有零件)、組合件、工程圖、Variable Studios、檔案與個別的零件。