![]()
快速鍵:n
將單行或多行的文字註解加入至工程圖中您想要的任何位置,並使用來填入標題區塊中。您可以定義文字方塊的大小以及文字本身的格式,並選擇是否要包括一或多條導線。您也可以旋轉註解的方位並建立額外的導線。
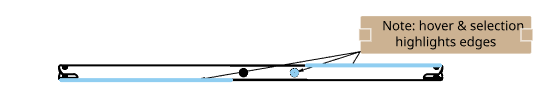
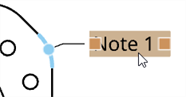
請注意,將滑鼠移動至註解上暫留時,系統會自動將與導線連結的邊線以藍色強調顯示:
- 按一下
 。
。 - 建立帶導線註解:
- 移動游標至視圖 (或一個視圖區域或視圖中的一個面) 上暫留來啟用一個抓取點。按一下來定錨導線,然後再按一下來設定註解。一個小的文字方塊會出現在導線的尾端,「註解」對話方塊也隨之出現。
- 輸入文字。當您輸入時,註解的界限方塊會隨之調整以配合文字大小。
- 套用格式。
- 按一下核取記號 (
 ) 來關閉對話方塊。
 - (選用) 若要加入更多的導線,請在註解上按右鍵並選擇 [加入導線]。導線會自動出現在最靠近滑鼠位置的註解抓點上。拖曳導線至工程圖中的抓點上,然後按一下來放置導線,可根據需要重複這些步驟。
導線包括一個可移動的節點:
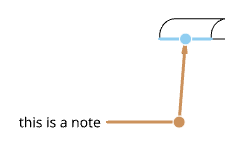
按一下並拖曳節點來延伸或縮短導線的水平線段。
- 若要建立不帶導線的註解:
- 將游標移動到空白處然後按一下來放置文字方塊。
- 輸入文字。當您輸入時,註解的界限方塊會隨之調整以配合文字大小。
- 套用格式。
- 按一下核取記號 () 來關閉對話方塊。
- 將游標移動到空白處然後按一下來放置文字方塊。
- 建立帶導線註解:
只能旋轉不帶導線的註解。
一旦點出現之後,則不需要在點上直接點按。在移動滑鼠來放置註解的操作中,您會在游標經過靠近其他圖元時,看到細虛線的出現。這些是您可以用來對齊註解的推斷線;當您看到推斷線出現時只要按一下即可將註解與該線對齊。
僅能在項目符號清單和排序清單 (使用數字或字母) 樣式的註解上建立標幟:
-
在註解上連按兩下來開啟「註解」面板。
-
選擇以項目符號或排序清單 (數字或字母) 為格式的註解。
-
核取「旗標註解」旁的方塊。
-
請確定為清單中的每個項目核取了「旗標註解」方塊。
-
-
選擇地選取一個旗標類型。
-
選擇性地選取字元大小 (根據預設,旗標是設定為 2 個字元)。
-
按一下綠色核取記號來接受並關閉對話方塊。
若要設定註解旗標的屬性,請參考屬性。
- 請確定沒有選擇任何工具。
- 選擇註解,或將游標移動到註解上暫留。
- 做出調整:
- (僅限沒有導線的註解y) 若要旋轉,按一下中心拖曳點 (如圖所示) 然後以環狀的動作拖曳。使用出現的數值方塊來估計角度的值:
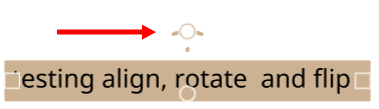
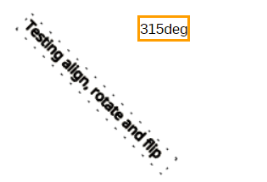
旋轉已對齊的註解會斷開其與所對齊邊線的附著。
若要調整大小,請按一下側邊上的正方形拖曳點並拖曳以調整大小。
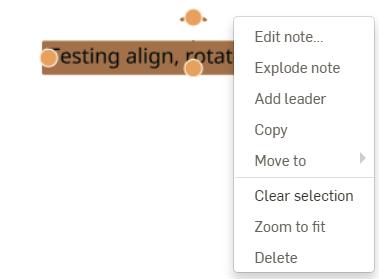
After creating a note, you can indicate to explode the note into polylines upon export. Use the context menu and select Explode:
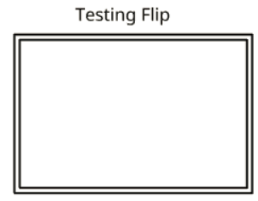
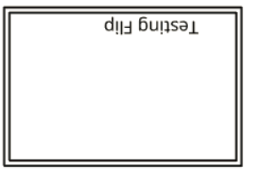
您也可以反轉已與邊線對正的註解 (透過註解的環境選單存取使用)。反轉會將註解旋轉 180 度,並將其移動至邊線的另一邊。無法在並未對齊的註解上使用反轉。
- (僅限沒有導線的註解y) 若要旋轉,按一下中心拖曳點 (如圖所示) 然後以環狀的動作拖曳。使用出現的數值方塊來估計角度的值:
您可以在註解中輸入 unicode 字元。例如,使用 \U+00AE 來建立註冊商標符號 ®。
您可以將導線加入至已建立的無導線註解中:
- 在註解上按右鍵。
- 從功能表中選擇 [加入導線]。
- 在抓點上按一下來附加導線。
您可以從任何註解中移除導線,不論導線是與註解同時產生,或是在建立註解之後才加入的導線:
- 在註解上按右鍵。
- 從功能表中選擇 [移除導線]:
![在按右鍵功能表中強調顯示了 [移除導線]](Resources/Images/Remove_leaders_highlighted.png)
您也可以將註解與工程視圖群組在一起。按一下註解與視圖,然後按右鍵並選擇 [群組]。當視圖被重新定位時,註解的位置也會隨之更新。
- 按一下來選擇導線和/或文字。
- 您也可以在導線和/或文字上按右鍵,然後點按 [刪除] 來移除導線和/或文字:
您也可以在導線和/或文字上按右鍵,然後點按 [刪除] 來移除導線和/或文字:
![在按右鍵功能表中強調顯示了 [刪除]](Resources/Images/Delete_highlighted.png)
同時調整導線與文字的位置:
- 在沒有選擇工具的情況下,按一下來選擇文字。
- 在文字任意處上按一下並拖曳。
- 放開游標時,導線會在新的位置抓取到文字上。
僅重新調整導線的位置:
- 在沒有選擇工具的情況下,按一下來選擇導線上的抓點。
- 將導線拖曳到新的位置。
- 在導線上按右鍵,然後按一下 [新增節點]:
![在環境選單中強調顯示 [新增節點] 的螢幕擷取畫面](Resources/Images/drawings-tools/add-node-contextmenu-note.png)
若要從導線中移除節點,請在節點上按右鍵,然後選擇 [移除節點]。
- 您也可以在節點上按右鍵,然後選擇 [加入導線] 來在節點上加入導線。這樣會在節點處開始一條導線,直至您下個點按處結束。
- 修改文字
- 在沒有選擇工具的情況下,連按兩下文字。
- 對文字和/或註解格式做出變更。對文字高度的變更會成為您新的預設。
- 按一下 。
文字的對齊是由所選範本的製圖標準所控制;在此情況下,對齊的按鈕是被停用。
在註解上使用環境選單 (按滑鼠右鍵) 來將註解移動到標題區塊、邊框區域、邊框框架,或移回工程圖中:
- 選擇註解。
- 按右鍵並選擇移動至。
![在按右鍵功能表中強調顯示了 [移動至]](Resources/Images/Move_to.png)
- 選擇標題區塊、邊框區域或邊框框架。
當格式 (在屬性面板中) 是鎖定時,您無法編輯不在工程圖圖層中的註解。若當格式是鎖定時要編輯註解,請將註解移回工程圖圖層中。
您也可以將註解拖離邊線,藉此斷開附著,請使用底部中間的抓點。您可以拖曳註解來將其附加回邊線上的不同位置。
在註解上使用環境選單 (按滑鼠右鍵):
- 選擇註解。
- 按右鍵並選擇複製。
![在按右鍵功能表中強調顯示了 [複製]](Resources/Images/Copy_highlighte.png)
- 再次按右鍵並選擇貼上。
![在按右鍵功能表中強調顯示了 [貼上]](Resources/Images/Paste_highlighted.png)
從您有權限的任何文件的任何工程圖 (包括特定的文件工作區) 中複製註解與帶導線註解,將其貼至您有權限的任何文件的任何工程圖 (包括特定的文件工作區) 中。
您可以將註解與標註或單一視圖群組在一起。如果需要,可以單一群組來移動這些項目。
ˋ將一個註解與標註群組在一起:
- 請確定註解以及標註都是在工程圖中建立的。
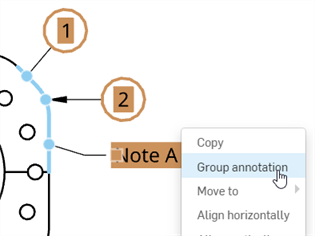
- 選擇您要群組在一起的註解與所有的標註。
- 在標註之一或註解上按右鍵,然後從環境選單中選擇群組註記。
若要從群組中移除一個註解或標註,在註記上按右鍵,然後選擇 [從群組中移除註記]。
如果註解是與一個視圖圖元 (邊線、鑽孔) 連接,則註解是與視圖群組在一起的。如果註解不是連接的,您可以將其與視圖群組在一起:
-
請確定視圖與未連接的註解都是在工程圖中產生的。
-
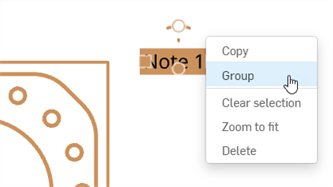
選擇您要群組在一起的註解與視圖。
-
在註解或視圖上按右鍵,然後從環境選單中選擇群組。
若要從群組中移除註解或視圖,請在其上按右鍵,然後選擇 [從群組中移除]。
提示
-
一個註解僅能與一個視圖連接;不過,您可以將多個註解與同一視圖群組在一起。
-
如果一個未連接註解與視圖是群組在一起的,移動視圖會移動與視圖一起的註解;不過,移動註解不會移動視圖。
-
如果選取了多個註解與標註,使用 Shift+拖曳來僅變更一個所選圖元的位置 (相對於其他群組中的圖元)。在使用 Shift+拖曳時,系統會忽略抓點。如果在選取項目中包括了視圖,則 Shift 不會有任何的作用。移動視圖會同時移動視圖與跟視圖連接在一起的所有圖元。
您可以在註解上連按兩下來開啟編輯器,或按三下來開啟並同時選取所有文字。此外,在開啟的文字方塊中:
- Ctrl+a 來選擇註解中的所有文字
- 連按兩下來選擇一個字 (直到下一個空格)
- 連按三下來選擇一行 (直到下一個分行符號)
- 使用複製/貼上快速鍵以及系統提供的剪貼簿以插入來自另一個頁面或程式的文字
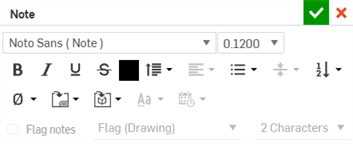
使用下列的控制項來格式化您的註解:
- 尺規 - 設定註解的段落縮排與定位停駐點。詳細資訊請參考下方的格式化尺規。
- 字型 - 使用 SHX 檔案或 True Type 字型檔案來指定字樣。
- 文字高度 - 指定之後或所選文字的文字高度。文字高度的測量是從基準線到一般大寫字符的頂端 (大寫字母線),也稱為大寫字母高度。這個規格會成為您的新預設。
- 粗體 - 表示之後或所選文字是粗體的;僅適用於 True Type 的字型。
- 斜體 - 表示之後或所選文字是斜體的;僅適用於 True Type 的字型。
- 底線 - 表示之後或所選文字是加底線的;僅適用於 True Type 的字型。
- 刪除線 - 表示之後或所選文字是有刪除線的 (貫穿文字中間的一條直線)。
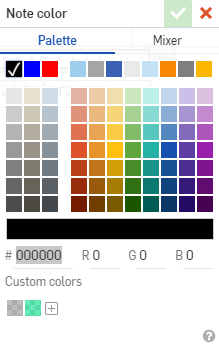
- 色彩 - 開啟註解色彩調色盤,您可於其中選擇新的色彩,輸入雜湊數字、RGB 值或混調一個新的色彩:
- 行距
 - 變更文字行之間的間距。這會套用至整個註解中。請選擇一個選項:
- 1.0, 1.5, 2.0, 2.5, 3.0 - 將行距設定為這些係數之一。
- 新增段落前空格 / 移除段落前空格 - 新增或移除段落前空格;行距是在上方所述中設定的。
- 新增段落後空格 / 移除段落後空格 - 新增或移除段落後空格;行距是在上方所述中設定的。
- 水平對齊
 - 選擇段落的水平對齊類型:靠左對齊文字、靠右對齊文字、置中文字、或左右對齊文字 (將文字平均分配對齊在左右邊界之間)。
請注意,此選項在帶導線註解指令中是停用的;在該情況中製圖標準會決定文字的對齊。
- 清單
 - 選擇要使用的清單格式類型,包括:數字、項目符號、大寫字母或小寫字母。清單指示符 (數字、項目符號或字母) 不會縮排,但文字會縮排。若要將清單指示符縮排,請選擇所有的清單段落,然後將尺規的首行縮排標記移動到右邊。詳細資訊請參考格式化尺規。
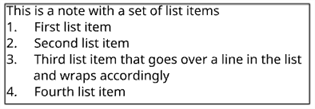
- 垂直對齊
 - 指出相對於註解插入點段落調整的類型:上方、中間、或下方。
請注意,此選項在帶導線註解指令中是停用的;在該情況中製圖標準會決定文字的對齊。
-
註解順序
 - 按一下並選擇由下至上或由上至下來重新排序註解中的文字。
 - 分數 - 您可以使用 3 個不同的代碼來以 3 種方式建立分數的格式:
- 有斜線在數字之間的分數格式 - <數字>#<數字><空格>
- 有水平斜線在數字之間的分數格式 - <數字>/<數字><空格>
- 數字之間沒有斜線的分數格式,僅垂直互相堆疊 - <數字>^<數字><空格>
如果不想要轉換為分數字元,請在第二個數字之後直接輸入除了 <空格> 之外的字元,然後使用方向鍵或游標來向後移動回去再刪除它 (否則,無法編輯特殊字元代碼)。
- 符號 - 選擇一個符號來插入至現有的游標位置。也可以從「符號」下拉清單中來加入符號
 。
。符號 名稱 快速鍵 ° 度 %%d ⌀ 直徑 %%c ℄ 中心線 ⌵ 沉頭孔 ↧ 深度 ⌴ 埋頭孔 □ 正方形 ⌒ 弧長 ± 加/減 %%p Ⓤ 非均勻分布輪廓 Ⓘ 獨立 
連續特徵 
魚眼坑 ▷ 平移 - 插入工程圖屬性
 - 自動插入工程圖屬性的值,對填入標題區塊是特別有用的,包括:
- 工程圖建立者 - 建立工程圖的使用者的使用者名稱
- 工程圖建立日期 - 工程圖一開始建立的日期
- 工程圖說明 - 存在於工程圖分頁屬性 (在分頁上按右鍵然候選擇屬性) 中的工程圖說明描述
- 工程圖最後更改者 - 最後修改工程圖的使用者的使用者名稱
- 工程圖最後更改日期 - 最後變更工程圖的日期
- 工程圖名稱 - 顯示在標題方塊中的工程圖名稱
- 工程圖零件編號 - 存在於工程圖分頁屬性 (在分頁上按右鍵然候選擇屬性) 中給工程圖的零件編號
- 工程圖修訂版 - 存在於工程圖分頁屬性 (在分頁上按右鍵然候選擇屬性) 中的工程圖目前修訂版
- 工程圖標題 1 - 出現在標題方塊中的工程圖標題第一行;這是在工程圖屬性中定義的
- 工程圖標題 2 - 出現在標題方塊中的工程圖標題第二行
- 工程圖標題 3 - 出現在標題方塊中的工程圖標題第三行
- 圖頁數 - 目前顯示圖頁的數量
- 全部圖頁 - 工程圖中的圖頁總數
- 圖頁比例 - 圖頁上視圖的比例。可以在圖頁屬性中變更這個值。
- 圖頁大小 - 圖頁大小;同時與標題區塊中的大小屬性相連結。
若要檢視與編輯工程圖屬性,請在工程圖分頁上按右鍵並從環境選單中選擇 [屬性]。
- Insert sheet reference property
 - Insert a property referencing the entity from which you created the drawing. Default Onshape properties and active custom properties are listed. Active custom properties appear at the bottom of the list in alphabetical order. For more information on metadata and custom properties see Properties.
 - Name
- 說明
- 零件編號
- 修訂
- 狀態
- 廠商
- Project
- 產品線
- 標題 1
- 標題 2
- 標題 3
- 材料
- 質量
- 文字格式
 - 將所插入工程圖屬性的文字格式設定為下列之一:
- 全部大寫
- 全部小寫
- 句首大寫
- 標題大寫
- 未修改過
- 日期時間格式
 - 選擇所插入工程圖日期屬性要使用的日期與時間格式。
日期屬性使用的是 UTC 時區。這可能會導致在某些情況案例中將日期顯示為明天的日期。
- 連按兩下屬性。在這個時候,游標會位在屬性的尾端:
- 選擇屬性。使用滑鼠是相當有用的 (而不是 Shift+方向鍵)。當屬性被強調顯示時,您會注意到屬性下方有一條細的藍線:
- 按一下
 並選擇要插入的屬性。例如,工程圖名稱:
- 在屬性仍被強調顯示的情況下,文字格式的圖示會是啟用的;按一下
 來爲大寫格式選擇文字格式的選項。
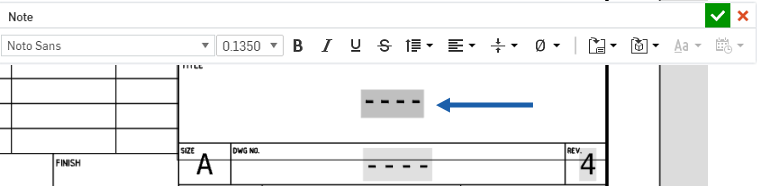
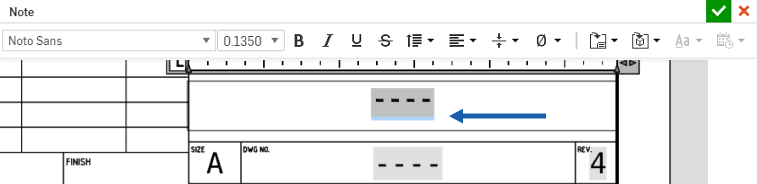
 如果您要移除標題方塊中的灰色強調顯示和/或欄位的預留位置虛線,請使用註解下方的工程圖屬性來執行。
- 如果插入了日期屬性,「日期格式」圖示
 會變為啟用。 輸入任何下列的日期格式:
代碼 範例 說明 yyyy-M-d 2016-3-9 4 位數年份,1-2 位數月份,1-2 位數日期 yyyy-MM-dd 2016-03-09 4 位數年份,2 位數月份,2 位數日期 M.d.yyyy 3.9.2016 1-2 位數月份,1-2 位數日期,4 位數年份 M/d/yyyy 3/9/2016
1-2 位數月份,1-2 位數日期,4 位數年份 M/d/yy 3/9/16 1-2 位數月份,1-2 位數日期,2 位數年份 MM-yy 03-16 2 位數月份,2 位數年份 MM/dd/yyyy 03/09/2016 2 位數月份,2 位數日期,4 位數年份 MMM.d, yy Mar.9, 16
3 個英文字母的月份,1-2 位數日期,2 位數年份 MMMM yy March 16
完整的英文月份,2 位數年份 MMMM d,yyyy March 9,2016 完整的英文月份,1-2 位數日期,4 位數年份 d-MMM-yy 9-Mar-16 1-2 位數日期,3 個英文字母的月份,2 位數年份 d MMMM yy 9 March 16 1-2 位數日期,完整的英文月份,2 位數年份 dd.MM.yyyy 09.03.2016 2 位數日期,2 位數月份,4 位數年份 dd/MM/yyyy 09/03/2016 2 位數日期,2 位數月份,4 位數年份 dddd,MMMM d,yyyy Monday, March 9,2016 英文的星期幾,完整的英文月份,1-2 位數日期,4 位數年份
dd-mm-yyyy 03-09-2016 2 位數日期,2 位數月份,4 位數年份 d-MMM-yyyy 3-Sep-2016 1-2 位數日期,3 個英文字母的月份,4 位數年份 dd/mm/yy 03/09/16 2 位數日期,2 位數月份,2 位數年份 dd/mm/yyyy 03/09/2016 2 位數日期,2 位數月份,4 位數年份 dd.mm.yy 03.09.16
2 位數日期,2 位數月份,2 位數年份 dd.mm.yyyy 03.09.2016 2 位數日期,2 位數月份,4 位數年份

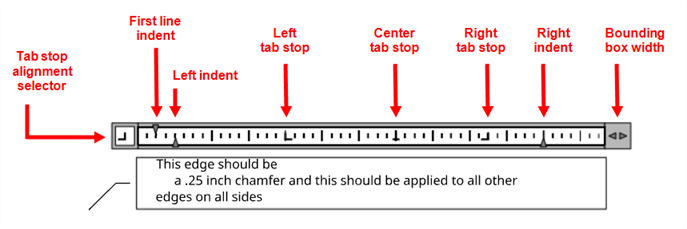
使用註解格式尺規來設定註解的段落縮排與定位停駐點。
尺規與註解格式快顯工具列出現,會位在註解界限方塊的上方。
根據預設,當您開啟一個新的註解時,在尺規上不會有段落縮排與定位停駐點。
在開始輸入文字之前所設定的段落縮排與定位停駐點會套用至整個註解中。當您輸入或編輯時,將游標放置在段落中來設定格式或選擇多個段落來調整縮排與定位停駐點。
-
定位停駐點對齊選擇器 - 根據預設,定位停駐點是依照工程圖間隔預先定義的 (且是靠左對齊的)。若要加入自訂的定位停駐點,按一下定位停駐點對齊選擇器來在定位停駐點的對齊間切換:
-
左 (
 ) - 將文字的左邊與定位停駐點對齊。
 -
中心 (
 ) - 將文字的中心與定位停駐點對齊。
 -
右 (
 ) - 將文字的右邊與定位停駐點對齊。
 -
小數 (
 ) - 對齊數字的小數點位置。獨立的位數,小數點是在相同的位置。您可以對齊同樣類型的小數點:英文句點、逗號或是空格。
在選擇了對齊之後,在尺規的任意處按一下來在該位置放置新的定位停駐點。當您將游標放置在段落的開頭,然後按下 Tab 鍵,段落的位置會沿著尺規移動到下一個定位停駐點,現在並會根據定位點對齊的方式來對齊。
若要改變定位停駐點的位置,請沿著尺規向左或向右拖曳現有的定位停駐點。
若要移除定位停駐點,請將定位停駐點 (向上或向下) 拖出尺規中。當您放開滑鼠按鍵時,定位停駐點即消失。
-
-
首行縮排 - 設定在「註解」段落中第一行文字左邊的起點。
-
左縮排 - 設定在「註解」段落中所有接續文字行的左邊起點。
-
右縮排 - 設定在「註解」段落中所有文字行右邊的停止點。輸入超過此點的文字將會換行到下一行中。
-
邊界方塊寬度 (
 ) - 設定邊界方塊的右邊。按一下並向左拖曳來使得「註解」文字方塊變得較小,或向右拖曳來使得「註解」文字方塊變得更大。
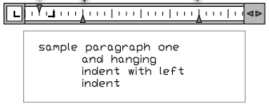
這個範例顯示首行縮排、左側縮排與首行凸排:
設定段落縮排
- 將您的游標放置在段落中來設定格式,或選擇多個段落。
- 在格式化尺規中,滑動縮排標記:
- 將首行縮排標記滑動至您要段落第一行開始的位置。
- 將左側縮排標記從左滑動至您要段落中第二行與隨後各行開始的位置 (同時稱做首行凸排)。
- 將右側縮排標記從右側滑動至您要段落所有行結束的位置。
當您輸入時,會為接下來的段落使用縮排的設定。
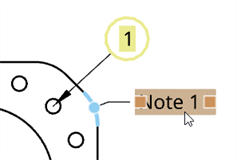
-
當選擇一個註解時,會以藍色強調顯示目標 (邊線、鑽孔):
-
如果註解是與其他註記或一個視圖群組在一起,在選取註解時,會以黃色強調顯示群組的註記 (如下方範例中的標註):
會使用文件與工程圖資訊自動填入標題區塊中的某些欄位。其餘的欄位可在標題區塊格子的邊界內使用註解來填入。
要獲得最佳的結果:
- 建立格子大小的文字方塊。您可以試用不同的文字大小、字型等等,看文字是否放得進去而無需調整文字方塊的大小。
- 您無法複製與貼上文字方塊,但您可以將來自一個文字方塊中的文字複製與貼到另一方塊中。
- 當從一個文字方塊中將文字複製與貼至另一個文字方塊時,會保留原有的格式。
- 在標題區塊中的標籤也是可完全自訂的。這些標籤僅是多行的文字,就只是一個註解而已。
- 您可以移動標題區塊行,或是建立您自己的標題區塊。