![]()
建立與編輯帶導線的標註 (球標)。標註是與文件、BOM 表格 (如果有的話) 與切割清單表格 (如果有的話) 的零件中繼資料相關聯的。當有 BOM 或切割清單表格存在時,標註預設會使用表格中的「項目編號」 。
如果表格的順序變更,請使用「更新工程圖」特徵 ![]() 來更新標註。
來更新標註。
建立標註:
- 按一下
 。
。 - 若要放置帶導線標註,將游標移動至視圖 (或視圖中的面) 上暫留以啟動抓取點。按一下來固定導線,然後再按一下來設定球標。導線包括一個可沿水平線段移動的節點 (當「邊框形狀」= 無):
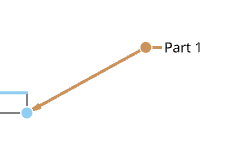
按一下並拖曳節點來延伸或縮短導線的水平線段。
- 若要在工程圖的空白處放置一個不帶導線的標註,只要在空白處按一下即可設定標註。
您也可以將標註放置在中心符號線、手動放置的中心符號線、線性尺寸與角度尺寸上。
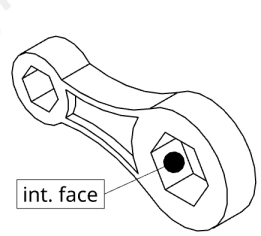
如下圖所示,放置在面上的標註會以實心圓而非箭號來指示。
- 若要放置帶導線標註,將游標移動至視圖 (或視圖中的面) 上暫留以啟動抓取點。按一下來固定導線,然後再按一下來設定球標。導線包括一個可沿水平線段移動的節點 (當「邊框形狀」= 無):
- 在於工程圖中放置標註之前先在對話方塊中指定詳細規格。

按一下
 來儲存您指定的設定並關閉對話方塊。
在移動滑鼠來放置標註的操作中,您會在游標經過靠近其他圖元時,看到細虛線的出現。這些是您可以用來對齊尺寸的推斷線;當您看到虛線與尺寸對齊時只要按一下即可。
- Use the options to dictate the style and content of the callout:
 Part property - Select from the metadata for the part to create associative links to that data:
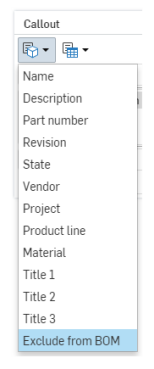
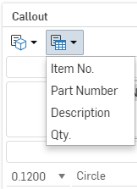
 Table property - Select from the fields included in your table to create associative links to that table:
 Flag note property - Add a flag to an item in a note styled as a list. See Note for more information.
  Cut list table property - Select from the fields included in your Cut list table to create associative links to that table:
- 輸入標註資料上方、下方、左邊與右邊的文字。
- 從下拉功能表中選擇符號來插入至標註中。
- 選擇標註文字的高度、邊框形狀與邊框大小。
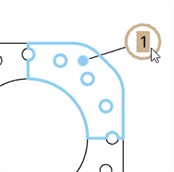
When selecting a Callout, the target (face, edge, hole) is highlighted blue:
在標註上按右鍵來開啟環境選單:
- 編輯 - 開啟「標註」對話方塊來編輯標註的指定規格。
- 複製 - 複製標註。
- 加入導線 - 將一條導線 (或另一條導線) 加入至標註中。
- 移除導線 - 從標註中移除所有導線。
- 群組註記 / 從群組中移除註記 - 選擇多個標註,然後按右鍵並選取 [群組註記] 來建立可一起移動的註記群組。您可以將標註與尺寸、熔接、表面加工及基準符號群組在一起。在群組中選擇一或多的標註,然後選取 [從群組中移除註記] 來將這些項目從群組中移除,項目即可單獨地移動。
- 複製/貼上 - 複製並貼上經複製的標註;標註會整體移動,直到您將一個標註附著至工程圖中的一個零件上 (藉由導線)。
- 移動至 - 將標註移動至工程圖的不同圖層中:邊框框架、邊框區域或標題區塊。一旦在另一個區域之後,您可以選擇是否要鎖住圖層 (透過「工程圖屬性」、「格式分頁」) 以固定圖元在該圖層的位置。在將一個標註移動到不同的圖層中時,系統會將該圖層的格式 (例如,色彩、線條粗細與字型) 套用到標註上。
- 清除選取項目 - 從選取項目佇列中移除任何強調顯示的項目。
- 縮放至適當比例 - 適當地縮放以將整個工程圖配合視野大小。
- 刪除 - 刪除所選的項目。
若要將標註互相對齊,請先選取多個標註,然後按右鍵以存取環境選單,再選擇:
- 水平對齊
- 垂直對齊
請注意,不會就地鎖住標註。您仍可以分別拖曳置放標註,或是一次選取多個標註,然後再次選擇對齊的指令。
- 按一下來選取標註或導線。Onshape 的選取項目是累加的,所以您可以選擇多個項目然後再執行一個指令 (按右鍵使用清除選取項目來從佇列中移除所有的選取項目)。
- 您也可以在導線和/或文字上按右鍵,然後點按 [刪除] 來移除導線和/或文字:
刪除有附加標註的尺寸同時會刪除標註。
您可以將標註與視圖、其他標註、尺寸、熔接、表面加工或基準符號群組在一起。如果需要,可以單一群組來移動這些項目。
將現有標註群組在一起:
- 按一下來選取標註。
- 將標註拖曳至現有的標註、尺寸、熔接、表面加工或基準符號上,在項目被強調顯示之後,放開拖曳。
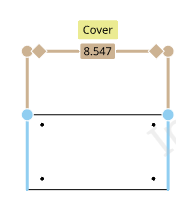
將一個標註與一個尺寸組成群組
於建立的過程中群組標註:
- 在「標註」對話方塊開啟之後,於其中進行所需的變更。
- 當在工程圖區域中放置標註時,按一下您要與標註組成群組的標註或尺寸、熔接、表面加工或基準符號。
將標註與視圖群組在一起:
如果一個標註是與視圖圖元 (邊線、鑽孔) 連接在一起的,系統會將標註與視圖群組在一起。如果標註沒有與圖元連接,您可以將其與視圖群組在一起。僅能將一個標註與一個視圖連接;不過,您可以將多個標註與同一個視圖群組在一起。
-
請確定視圖與未連接的標註是在工程圖中建立的。
-
選擇您要群組在一起的標註與視圖。
-
在標註或視圖上按右鍵,然後從環境選單中選擇群組。
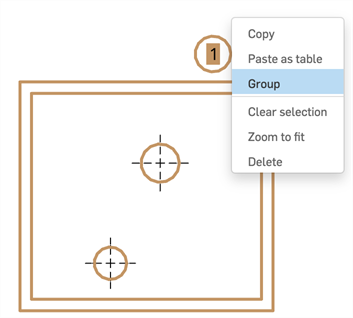
若要從群組中移除標註或視圖,請在其上按右鍵,然後選擇從群組中移除。
移動標註群組:
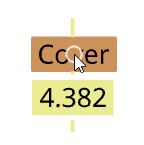
按一下並拖曳第二個項目到新的位置。另一種方式是點按標註以選取,然後在抓點 (下方游標處所示) 外任意處按一下來將項目一起移動到新位置。
-
移動一個視圖會同時移動視圖與跟該視圖群組在一起的所有標註。
-
移動已群組的標註並不會移動已群組的視圖。
-
如果選取了多個註解與標註,使用 Shift+拖曳 來僅變更一個所選圖元的位置 (相對於其他群組中的圖元)。在使用 Shift+拖曳時,系統會忽略抓點。如果在選取項目中包括了視圖,則 Shift 不會有任何的作用。
When you are using BOMs with your drawings ( Insert BOM) the Balloon tool adjusts to create automatic identifiers in the balloon, according to the data in the BOM you have inserted into the drawing.
在 BOM 已插入至工程圖中的情況下:
- 按一下
 。
。 - 按一下導線的起點。
- 按一下導線的結束點。
- 對話方塊開啟以供輸入進一步的詳細資訊:
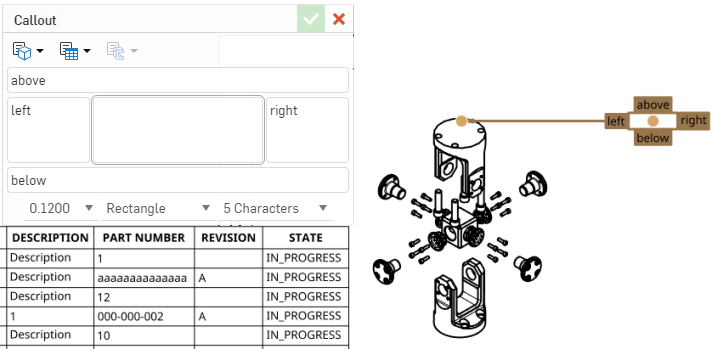
- 使用最上方的圖示下拉式功能表來指定要從表格中的那些屬性抓出球標標識符:
 - 從所有零件屬性的清單中選擇
  - 從 BOM 表格中所有欄位的清單中選擇 (如果有的話)
 - 從切割清單表格中所有欄位的清單中選擇 (如果有的話)
- 提供球標標識符上方、下方、左邊與右邊的其他詳細資料 (選用)。
- 選擇文字的點大小、球標的形狀與您所需要球標的字元寬度。
- 按一下
 來儲存您指定的設定。
- 在導線上按右鍵,然後按一下 [新增節點]:
![在工程圖的環境選單中強調顯示 [新增節點] 的螢幕擷取畫面](Resources/Images/drawings-tools/add-node-callout-ex.png)
若要從導線中移除節點,請在節點上按右鍵,然後選擇 [移除節點]。
- 您也可以在節點上按右鍵,然後選擇 [加入導線] 來在節點上加入導線。這樣會在節點處開始一條導線,直至您下個點按處結束。
- 修改文字
-
當選取一個標註時,系統會以藍色強調顯示目標 (面、邊線、鑽孔):

-
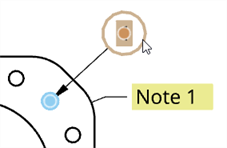
如果標註是與其他註記群組在一起,在選取標註時,會以黃色強調顯示群組的註記 (如下方範例中的 note):
僅供有相關 BOM 表格的組合件使用。
為有相關 BOM 表格的組合件整齊地堆疊標註:
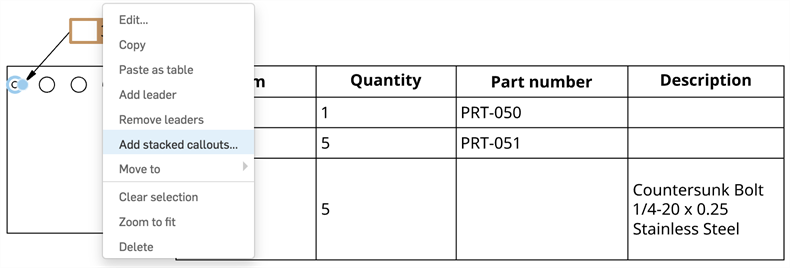
- 在一現有的標註上按右鍵,然後選擇加入堆疊標註。
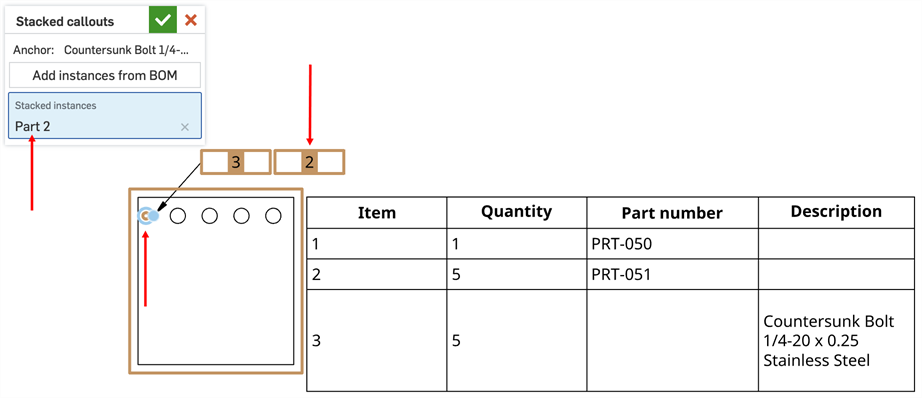
- 在選擇了堆疊標註對話方塊中堆疊實例欄位的情況下,按一下工程圖中的一個實例。系統會將實例加入對話方塊的清單中,新的標註會堆疊出現在原始的標註旁。
- 從 BOM 表格而非工程圖中選擇實例:
- 按一下加入來自 BOM 的實例。會有一個黃色橫幅出現。
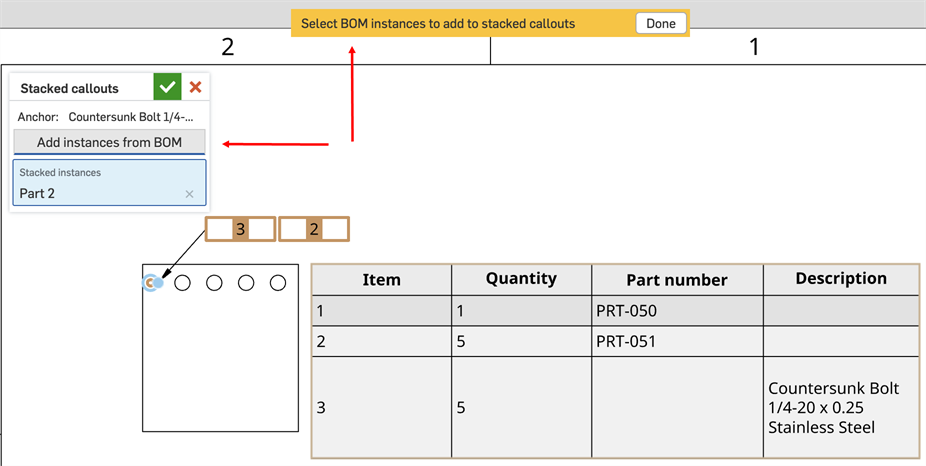
- 在黃色橫幅出現時,按一下 BOM 表格第一欄的實例來加入。新的實例會出現在對話方塊清單中,新的標註以堆疊的方式呈現。
![工程圖中有「堆疊標註」對話方塊與選擇 BOM 實例的橫幅。箭頭指向橫幅中 [完成] 的按鈕、新的標註、在 BOM 表格中點按的項目、與在對話方塊清單中的實例。](Resources/Images/drawings/callout-stack-bom-instances-added-01.png)
- 按一下黃色橫幅中的完成。
- 按一下加入來自 BOM 的實例。會有一個黃色橫幅出現。
- 按一下綠色的核取記號來關閉對話方塊。

如同其他的群組標註,可以藉由拖曳來將堆疊標註群組在一起。
