Configuring Arena and Onshape
![]()
Only available for
The target Arena Workspace for use with Onshape must be configured by Arena Support before a connection can be established with Onshape. Once that is done, you must configure your Onshape account to sign in and connect to your Arena account. This topic explains the steps for Administrators to take to ensure a proper connection can be made by establishing the correct configurations.
Required information
| Required item | Source | Note |
| Arena workspace ID | Your Arena workspace | The workspace to be configured to your Onshape Enterprise. This is not the same as the user-visible name, but the internal ID used by Arena. This ID is displayed in the URL when configuring the Workspace in Arena. For help locating this ID contact Arena Support. |
| Arena workspace name | Automatically populated upon successful connection | Once all other data is verified, this field is populated upon successful connection between Onshape and Arena. |
| Integration user ID | Arena Support | The Integration user ID must be a valid automation or integration Arena ID that is not being used by anyone to log in to the Arena UI. |
| API web token | Arena Support generates and distributes this upon request, for each customer's Onshape Arena connection | The web token associated with the Integration user ID referenced above, for your Arena Workspace. The web token is a unique key that establishes a secure connection between an Onshape Enterprise and an Arena Workspace. The web token could be used to gain access to your system, and as such should be treated with the same caution that you treat a password. |
| Arena API URL | https://api.arenasolutions.com/v1/ https://api.europe.arenaplm.com/v1/ |
Use the first URL if the URL to your Arena Workspace starts with https://app.bom.com |
Users and permissions
The API web token could be used to gain access to your system, and as such should be treated with the same caution that you treat a password.
The required users and their permissions in each product are:
-
Onshape:
-
Enterprise Administrator - The Administrator account configuring the connection must use the same email and have a full Arena user license with Arena workspace read and write permissions. Logging into the target Arena workspace at least once is required, prior to configuration.
-
Onshape User - The user syncing parts to Arena must have an Arena Account with a full Arena user license, using the same email as in Onshape, and must log in to the target Arena workspace at least once before syncing parts to Arena.
-
-
Arena Administrator - The Administrator configuring the Arena settings.
-
Integration user - The Integration user with permission to view and edit in the Arena workspace. This user must have a full license and have the For integration use setting in Arena. This user is set up by Arena support.
Overall setup process
-
Work with Arena Support to configure the Arena Workspace and obtain a web token for the Integration user. See Arena Workspace configuration process.
-
Work with your Arena Solutions Architect to configure Categories, Part Numbering, and Revision schemes in Arena.
-
Configure Onshape enterprise (Onshape Administrator). See Onshape configuration process.
-
Map Onshape categories to Arena categories. See Map Onshape categories.
-
Map Onshape Material and Mass properties. See Map Onshape Material and Mass.
-
Configure part numbering in both Arena and Onshape. See Configure part numbering.
-
In Onshape, provide permissions to users and/or teams so they can sync to Arena. See Grant Sync to Arena permission.
-
If you are syncing Onshape Release management to Arena's change management system:
-
Configure Onshape for Release management. See Onshape configuration for syncing Release management.
-
Configure Arena for Release management. See Arena configuration for syncing Release management.
-
-
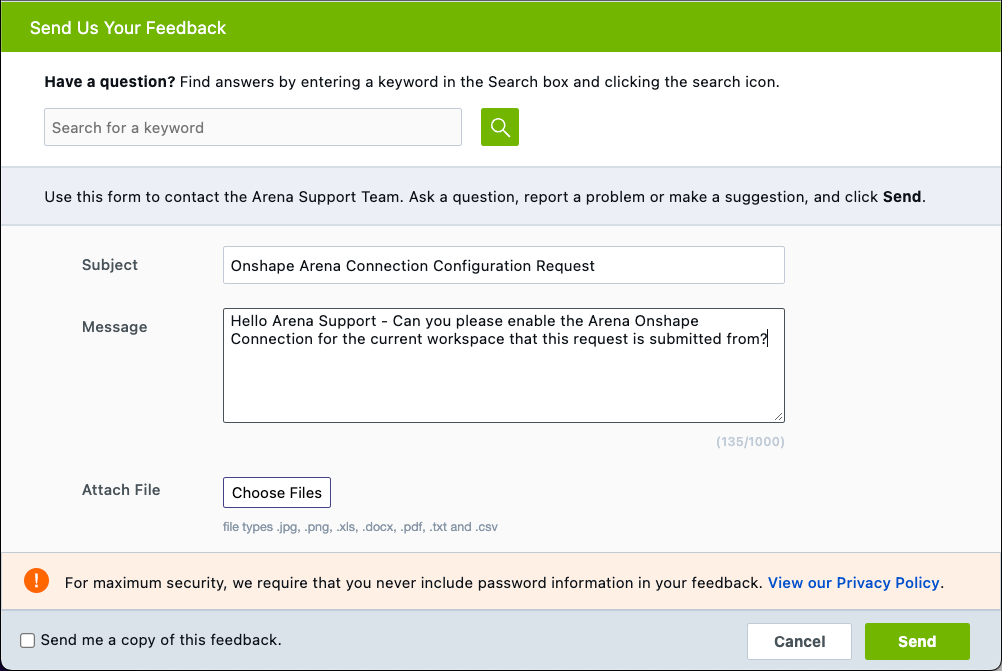
Log in to the target Arena workspace for use with the Onshape connection.
-
Navigate to Help, then select Send Us Feedback.
-
-
In the Subject field enter Onshape Arena Connection Configuration Request.
-
In the Message field enter something similar to: Hello Arena Support - Can you please enable the Arena Onshape Connection for the current Workspace, from which this request is submitted?
-
The target Arena Workspace for the connection is the active Workspace from which the request is submitted.
-
The Onshape Arena Connection is a 1 to 1 connection. That is, an Onshape enterprise can be connected to only one Arena Workspace.
-
If there is a need to switch the target Arena Workspace for the connection, for example, from an Arena Sandbox Workspace to an Arena Production Workspace, the connection must first be reset in Onshape by contacting Onshape Support. Then a new request must be submitted to Arena Support from the Production Workspace.
-
-
The submitted request creates an Arena Support case.
-
Arena Support configures the Workspace on the back end accordingly.
-
Arena Support uses the secure Arena File Drop feature, or an encrypted email, to communicate the web token string required for the connection configuration in Onshape.
-
Arena Support communicates to the Arena Administrator and the user who submitted the request, that the Workspace ID [id] and Workspace Name [name] have been configured on the back end for use with the Onshape integration and the configuration web token is accessible in the relevant Workspace's File Drop tab, or sent via a separate encrypted email.
-
Continue with Configuring Onshape below for the connection link.
Users and permissions
The required users and their permissions in each product are:
-
Onshape - Enterprise Administrator
-
Arena - Arena Administrator
The Onshape and Arena Administrator accounts configuring the connection must use the same email and have a full Arena user license with Arena workspace read and write permissions. Logging into the target Arena workspace at least once is required, prior to configuration.
The Onshape Administrator and Arena Administrator do not have to be the same person.
Configuration process
This process is performed by the Onshape Enterprise Administrator:
-
In Onshape, navigate to Enterprise settings > Arena.
-
In the page that appears to the right of the menu, enter the following information:
-
Check the Enable Onshape Arena connection checkbox.
-
Enter the Arena Workspace ID.
-
Skip the Arena Workspace name: This read only field is populated upon successful connection once the Save changes button is clicked.
-
Enter the API web token acquired from Arena Support.
-
Enter the Arena API URL (as supplied by the steps outlined in the Arena Workspace configuration process).
At this point Onshape contacts Arena with the supplied credentials and activates a log in to Arena. Upon successful connection, the Arena Workspace Name field is filled.
If you experience any issues connecting to the Arena workspace, please contact Onshape or Arena Support.
Once the connection has been successfully saved and established, it cannot be changed or edited without contacting Onshape Support.
If there is a need to switch the target Arena Workspace for the connection, for example from an Arena Sandbox Workspace to an Arena Production Workspace, we recommend you contact support to request an Onshape enterprise sandbox that you can connect to an Arena sandbox for testing. This ensures any testing remains completely outside production. See Arena Workspace configuration process for more information.
-
-
Enter the General sync settings. Refer to the Arena page for more information on each option.
Pay special attention to the Sync Onshape release management with Arena changes setting. If checked, an Onshape Release candidate and associated parts, Assemblies, and drawings are synced with an open and unlocked Arena Change. The Arena Change then drives the approval process, and once approved in Arena, a notification is sent to Onshape, and the Onshape Release candidate is approved.
When checked, the Onshape Arena release workflow is made active in the Release management settings.
Uncheck this option to Sync Parts, Assemblies, and BOMs only, or check to additionally Sync Release Management.
If you are syncing with Release management, also consult the following sections: Arena configuration for syncing with Release management and Onshape configuration for syncing with Release management.
To connect Arena part numbers, you must first map Onshape categories to Arena categories. This task is performed in Onshape and explained in this topic.
Introduction
Mapping Onshape categories and custom properties to Arena categories and custom attributes allows Onshape users to enter custom property values in Onshape that are added to Items in Arena created through syncing from Onshape.
This mapping is particularly useful when the Arena definition for an Item includes required attributes. For example, if an Arena category definition, named Light, includes a required attribute of Light Color, then failing to provide a value for the Light Color attribute in Onshape results in failure to create the Light Item in Arena.
Mapping the Light category to Onshape and mapping the Light Color attribute to an Onshape property enables an Onshape user to provide a value for Light Color and consequently, Items of this type can be created in Onshape.
Categories and Attributes are first defined in Arena and then only the ones that are applicable to the Onshape environment should be mapped to Onshape. Not all categories need to be mapped and not all attributes in a category need to be mapped.
Wherever an Attribute is mapped, it is implicitly declared that Onshape is the master system for this attribute value. Using the above example, if an Onshape part with Category Light is synced to Arena, and has the value for Light Color set to Red, then this color is Red in Arena after the sync. If an Arena user changes this attribute value to Blue, the next time the part is synced from Onshape, Blue is overwritten with the value set in Onshape (Red).
Required information
| Required item | Source |
| Arena category and attribute names | Your Arena workspace |
| Onshape category and property names | Onshape workspace |
Users and permissions
The required users and their permissions in each product are:
-
Onshape - Enterprise user with administrator permissions
-
Arena - Arena Administrator (someone with a workspace policy allowing editing of categories and attributes in the workspace settings)
Onshape mapping process
This process is performed by the Onshape enterprise Administrator:
-
In Onshape, navigate to Enterprise settings > Arena.
-
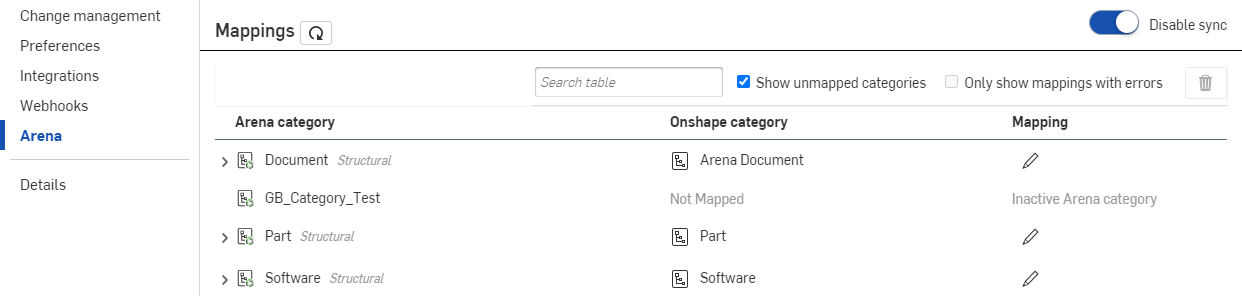
Navigate to Mappings:
-
The Arena category column lists all the categories defined in Arena. This list is read from Arena as the page loads, as long as the Sync is enabled toggle is enabled (blue).
-
The Onshape category column indicates the name of the category as defined in Onshape. If the Arena category is not mapped to an Onshape category, Not Mapped appears in this column instead of the category name.
-
The Mapping column displays either an informative message or an Edit icon (
 ) to allow the Administrator to create or edit the mapping.
-
Editing a mapping
To edit a mapping:
-
From the Arena page, Click the Edit icon (
) in the Mapping column, that corresponds to the category you wish to map.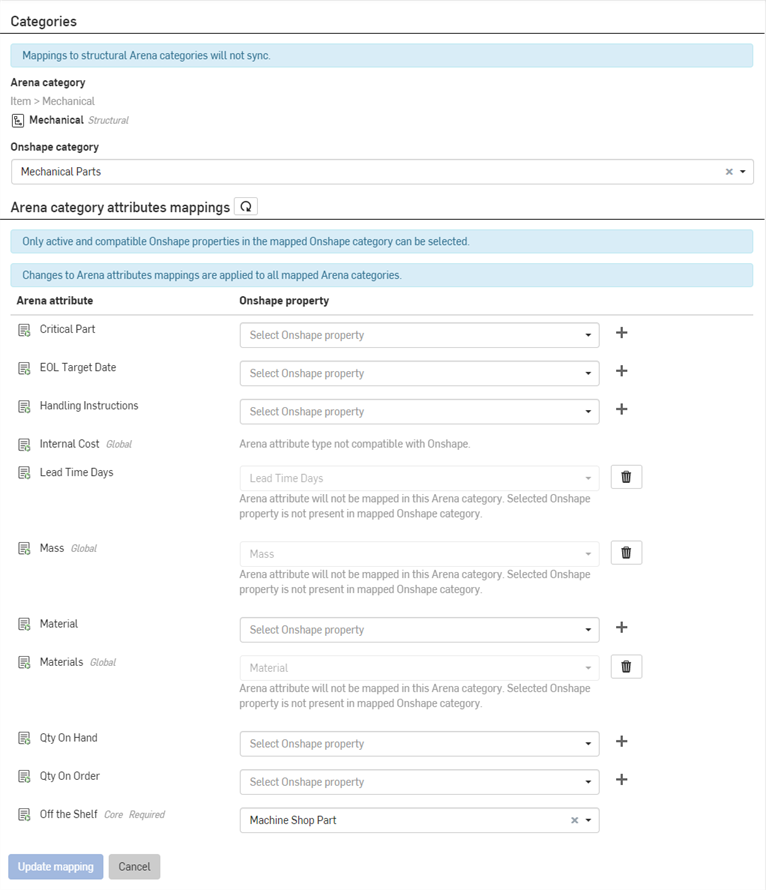
-
Use the Onshape category dropdown to map the target Arena category to an existing Onshape Category.
This field is pre-populated if an Onshape Category with the same name as the Arena category already exists in Onshape.
If an Onshape category does not exist, click the Create Onshape category icon (
 ) to create a new Onshape category to automatically map to this Arena category, then click the Create button:
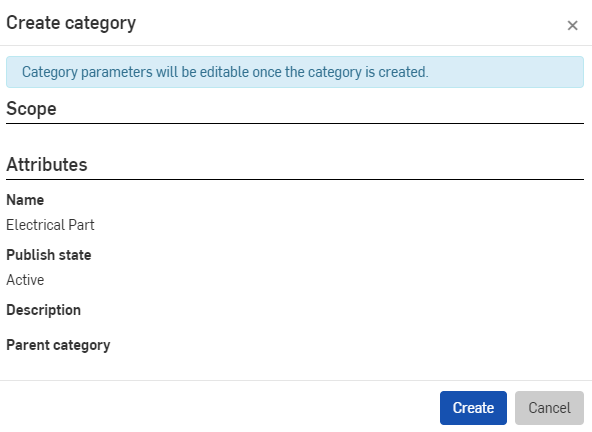
Once a Category has been mapped, the Administrator can map Onshape properties to Arena Attributes.
Attribute mapping follows a similar pattern to Category mapping: if an existing Onshape property with the same name and type as the Arena Attribute is found, the Onshape property field is pre-populated. Clicking the attribute drop-down opens the Create dialog, allowing the Administrator to quickly create an Onshape property using the Arena attribute as a template.
Tips
-
Not all attributes in a category need to be mapped.
-
In Arena there are parent categories designated as Structural, and used to group similar categories that inherit properties from the parent. These parent categories must be mapped in Onshape before the child categories can be mapped. Since Onshape does not have a Structural category designation, you need to remove the scope from the Onshape categories mapped to the Arena structural categories so that they are not user selectable. This makes the Onshape category behave like a structural category in Arena. See Creating a category for more information.
-
The Onshape Arena connection does not assign a scope to an Onshape category created while mapping to an Arena structural category.
-
When a category in Arena is renamed, a new category ID is created. In Onshape, this category ID is not updated. and because Onshape looks for the previous category ID, the mapping is broken. This is indicated in the Arena settings > Mappings by displaying an Invalid mapping error in the Mapping column (see image below). The Administrator should delete this mapping (which frees up the Onshape category) and then re-map the Onshape category to the new Arena category:
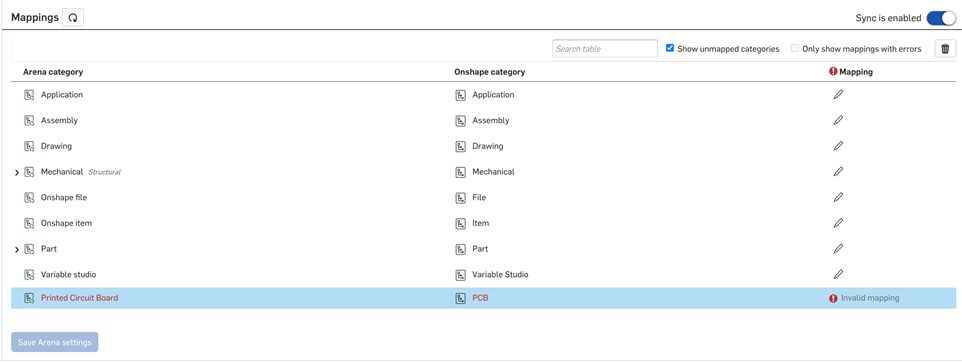
All categories marked with Invalid mapping are found at the bottom of the Mappings table.
The Onshape Material and Onshape Mass properties are special cases that are properties of the Onshape category Onshape Part and these can also be mapped to Arena attributes. This topic explains how to make sure these are mapped appropriately.
Users and permissions
The required users and their permissions in each product are:
-
Onshape - Enterprise user with administrator permissions
-
Arena - Arena Administrator
Materials and Mass mapping process
In Onshape:
-
Navigate to Enterprise settings > Categories tab.
-
Locate and click on the appropriate category, in this example Mechanical Parts. The following page appears:

-
Under Parent categories, make sure that the parent category of Onshape Part is selected (this ensures that the Mechanical Parts category inherits the properties of the Onshape Part parent category.
Onshape Categories can have more than one Parent so, in this case, the category Mechanical Parts could have parents of Part and Onshape Part. You can also, make Onshape Part a parent of Part.
-
Click Save changes.
In Arena:
-
Create two Arena single line text attributes Materials and Mass.
-
Assign the Materials and Mass text attributes to the Arena category Part > Mechanical.
In Onshape:
-
Navigate to the Enterprise settings > Arena page.
-
Under Mappings, In the Arena category column, select Mechanical Parts.
-
Confirm that the corresponding Onshape category column contains Mechanical Parts.
-
Click the Edit icon (
) to check that the Arena attributes are mapped:-
The Mass (global) Arena Attribute maps to the Onshape Mass property.
-
The Materials (global) Arena Attribute maps to the Onshape Material property.
-
If you have made changes, click Update mapping.
-
During sync, the Onshape Material Name is populated into the Arena Materials attribute and the calculated mass of the part (based on the material density and part volume) is populated into the Arena Mass attribute. Note that Mass is a text attribute in Arena that includes the mass and the unit of measure in the text value.
Mass units are synced in the units set in the Onshape user's User preferences.
The Onshape Arena Connection supports Category-based Item numbering, which must be configured in Arena prior to enabling Arena Part Number Generation.
Required information
| Required item | Source |
| Onshape Category Mechanical (example category) | Onshape |
| Category-based Item numbering | Configured in Arena |
Users and permissions
The required users and their permissions in each product are:
-
Onshape - Enterprise user with administrator permissions
-
Arena - Arena Administrator
Configuring part numbers process
This process requires set up in both Arena and Onshape.
In Arena:
-
Define an Arena Number Format.
-
Associate the Number Format to one or more Arena categories.
When any of those categories are mapped to an Onshape category, and the Onshape user assigns one of those categories to an Onshape Part, Assembly, Drawing or File, then auto generated Part Numbers sync from Arena.
In Onshape:
-
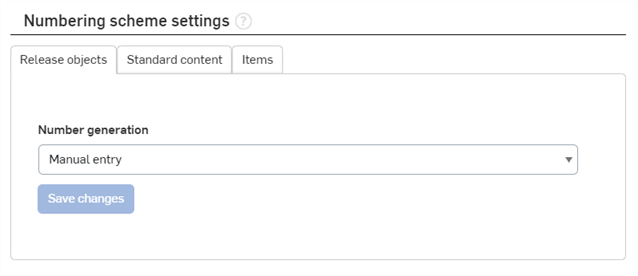
Go to Enterprise settings > Numbering schemes:
-
Set up a Numbering scheme for each of the 3 object types.
- Click Save changes to ensure all changes you've made are saved.
Save changes only saves the changes for the current tab being edited (Release objects, Standard content, or Items). Each tab's changes are independent.
When Onshape pulls a part number from Arena it is reserved in Arena; however, the Arena Item with that number is not created until the Onshape part is synced.
Limitations
-
Although Arena allows up to 200 characters in an Item Number, an Onshape Part Number can contain only up to 128 characters, so make sure that the Arena Number format generates part numbers fewer than 128 characters in length.
-
Arena Part Number Formats that are used by Onshape-mapped categories cannot include a free text field in the number format.
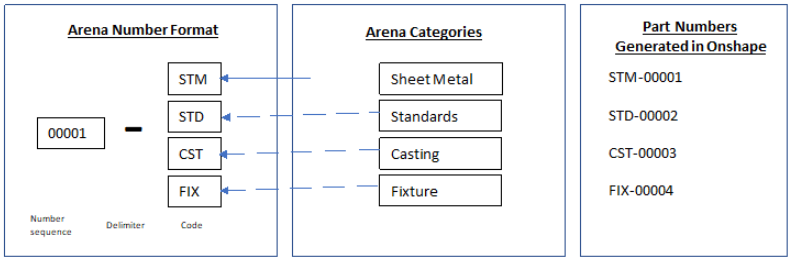
Common numbers across categories, above
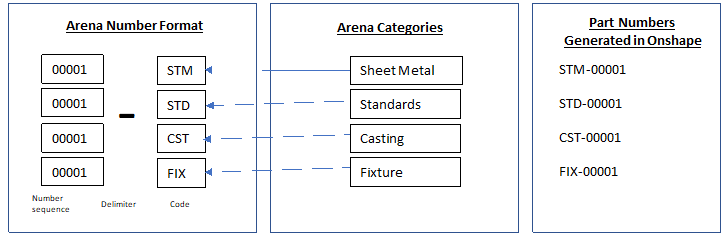
Unique numbers in categories, above
The following configurations are required to enable synchronizing releases between an Onshape Release candidate and an Arena Change. The Onshape Administrator should enable these settings:
-
(Recommended) In Enterprise Settings > Numbering Schemes enable the Drawing can reuse part number from an assembly or part in the release setting.
-
In Enterprise Settings > Release Management:
-
(Recommended) Check Enable managed workflows. See Setting up Release Management and Release management for more information.
-
(Required) Select the Onshape Arena release workflow as the default workflow.
-
(Recommended) Under Watermarks, check Show watermark for unreleased drawings if you want unreleased drawings to display a watermark. The watermark also displays on the PDF drawing that is sent to Arena upon submission of a release candidate. See Setting up Release Management: Watermarks for more information.
-
(Required) Under Obsoletion, check Automatically obsolete previous released revisions to make Onshape mimic the Arena behavior that automatically supersedes (obsoletes in Onshape) previous revisions when a new revision is released. See Setting up Release Management: Obsoletion for more information.
-
-
In Enterprise Settings > Arena > General sync settings (see Arena for more information on each setting):
-
(Required) Check Sync Onshape release management with Arena changes.
-
(Recommended) Check Match release candidate name with Arena change.
-
(Recommended) Check Sync release notes with Arena properties.
-
The following configurations are required to enable synchronizing releases between an Onshape release and an Arena Change. The Arena Administrator should enable these Workspace settings:
-
(Recommended) Under Changes > Edit Configuration, enable Use Change Management for all stages. This results in a change being required to create a new revision of Items being promoted from Preliminary to In Design and In Design to In Production. For each stage, click the Select Behavior button and configure the routings to your specifications.
-
(Required) Under Summary > Edit Settings > Files, set the Corrections to Files Allowed option to Yes, and allow removal of original content. This allows automatic updates (file corrections) of the Drawing's PDF file after the Change is approved in Arena. Once approved, the PDF is generated in Onshape, and the corresponding Item file attachment in Arena is automatically updated.
-
(Recommended) Under Categories > Files, create 2 new Categories used for the 3D STEP files and 2D PDF drawings added to Items in the Arena Change:
-
CAD Data
-
Drawing
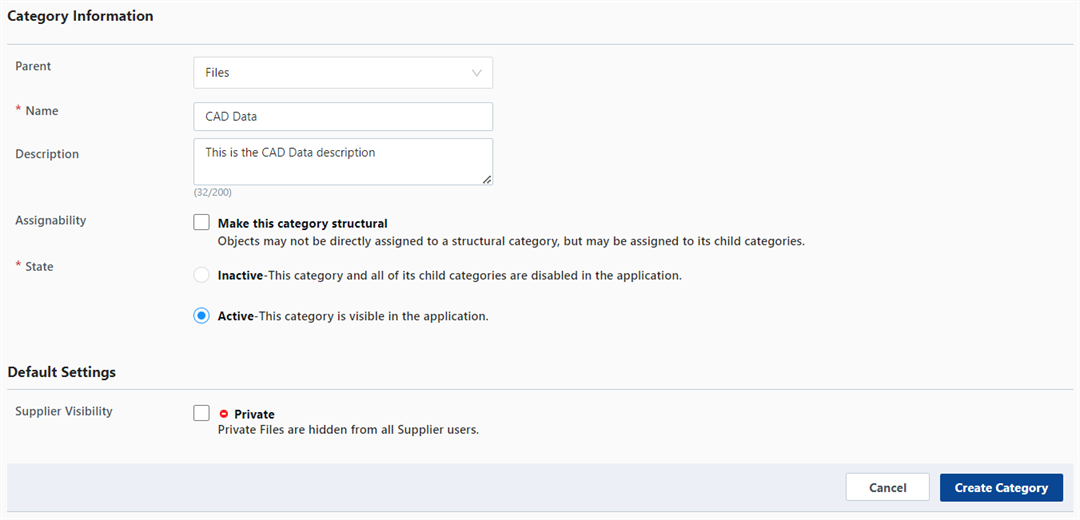
To create a category:
-
Click the Add Category button (
 ).
). -
Select a Parent.
-
Enter CAD Data or Drawing for the name.
-
(Optional) Add a Description.
-
Click the Active-This category is visible in the application radio button.
-
Click Create Category.
If these Categories are not created, associated file attachments are displayed as <uncategorized>.
-
-
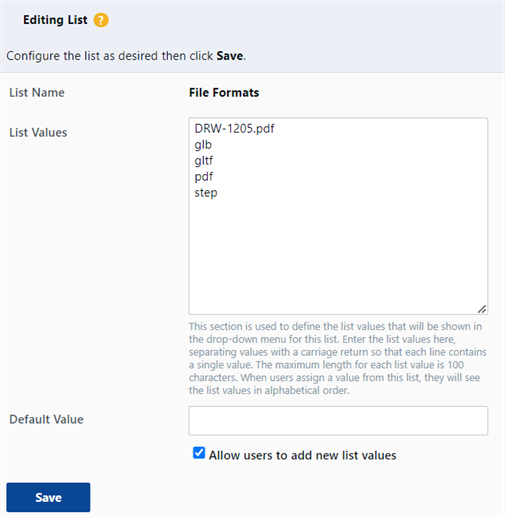
Define Arena File Formats for STEP and PDF files
-
(Recommended) Under Lists, click the File Formats dropdown link. Create 2 new File Formats used for the 3D STEP and 2D PDF Drawing files associated with the Item Revision on a Change:
-
step
-
pdf
If these file formats already exist, they do not need to be created.
To create a file format:
-
Click the Edit File Formats List button (
 ).
). -
In the List Values field, enter step and pdf, each on their own separate line.
-
Click the Save button.
-
The Onshape administrator can control which users have permission to sync to Arena through the Sync to Arena global permission:
-
Navigate to Enterprise settings > Global permissions.

-
Scroll to the bottom of the page, and double-click on Sync to Arena to open the Configure permission "Sync to Arena" dialog:
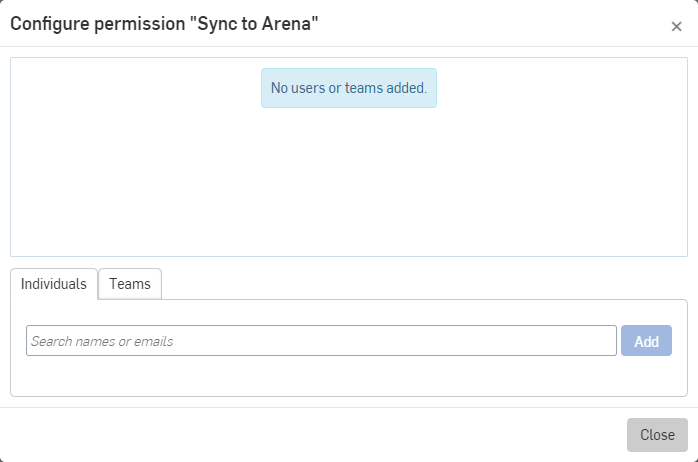
-
Specify Individuals (through email addresses) and/or Teams (already defined in your Onshape enterprise) to which to grant permission to Sync to Arena.
-
Click Add, then Close.