 尺寸
尺寸
![]()
![]()
![]()
可用于:草图
快捷键:d
向草图几何图元添加以及在草图几何图元和平面之间添加水平、竖直、最短距离、角度、直径、弧长或径向尺寸。您可以将尺寸指定为联动(参照)或驱动。
您可以使用测量工具测量图形区域中的任何对象。
某些工具允许您随着绘制草图标注尺寸。
您也可以使用草图的环境菜单中的“显示尺寸”命令(单击鼠标右键)来查看现有尺寸。
尺寸是定义草图图元的可靠方法。有两种方法可用于向草图添加尺寸。第一种方法涉及在创建草图时添加尺寸,而第二种方法涉及先创建草图几何图元然后添加尺寸。
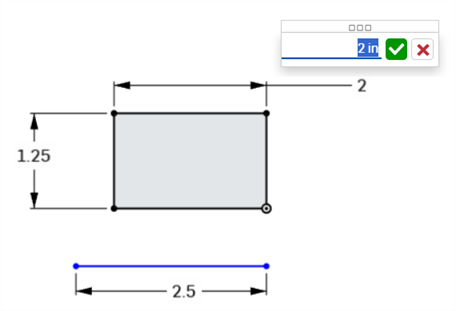
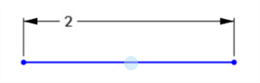
若要在草绘时添加尺寸,请键入一个数字,然后在草绘几何图元后按 Enter 键。例如,放置一条线。选择第二个端点后,将出现一个显示直线长度的白框。输入一个值并按 Enter 键来指定一个尺寸。这种方法适用于几乎所有的草图工具。
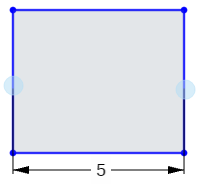
定义涉及两个尺寸的几何图元(例如矩形)时,首先输入水平尺寸,然后按 Enter 键。输入将自动切换到垂直尺寸。
添加尺寸的第二种方法是在草图几何图元完成后添加尺寸。选择尺寸工具或使用快捷方式 D。左键单击一个或多个图元以应用尺寸。移动光标并左键单击以放置尺寸。输入尺寸值并按 Enter 键。草图会自动缩放以匹配放置的第一个尺寸。
Onshape 的草图尺寸可以直观地响应所选图元的类型。这使得对圆弧或圆的外部或内部进行无缝标注。左键单击靠近圆弧或圆的外侧以向外侧标注尺寸。左键单击靠近圆弧或圆内侧的位置来调整内部尺寸。遵循同样的直观主题,尺寸工具在标注两条非平行线时会自动放置角度尺寸。
若要编辑尺寸,请在图形中双击该尺寸。键入新值并按 Enter 键接受。从图形区域中选择尺寸以删除尺寸,然后按键盘上的 Delete 键。您也可以使用尺寸来显示由其他尺寸和关系驱动的值。从动尺寸在草图中显示为灰色,而驱动尺寸为黑色。如果新尺寸的放置会过度定义草图,Onshape 会自动将其切换为驱动尺寸。在右键单击菜单中手动切换尺寸的驱动状态。
- 单击
 或按 D 键。
 - 选择要标注尺寸的图元(或图元对),并确定尺寸的位置。
所选图元将在浏览器中亮显,同时尺寸上下文对话会在尺寸放置位置打开。请参见“尺寸上下文对话”了解更多信息。
- 输入一个值并按 Enter键 以接受该值。您还可以为尺寸使用变量,只需以如下形式输入“=#”和变量名称即可:=#d。
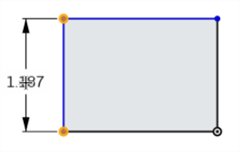
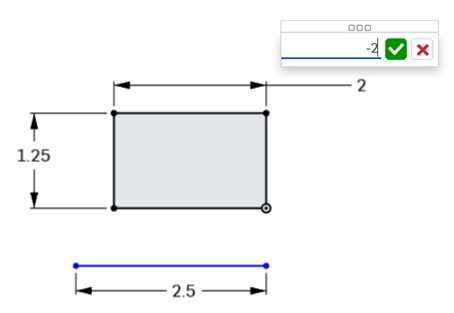
您可以为尺寸(长度、线性距离和角度)输入负值来反转图元的方向。
下图显示的是正尺寸;注意矩形相对于底部水平线的位置:
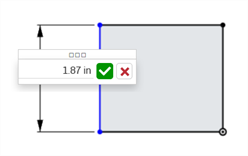
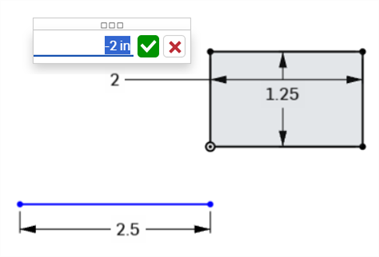
下图显示了在活动输入框中键入的负尺寸值:
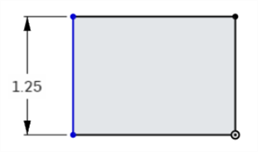
当该值被接受时,矩形会反转方向:
- 单击“尺寸”工具(
 )。
)。 - 单击第一条线
- 单击第二条线
- 拖动以定位线性距离尺寸
- 单击可同时放置尺寸并打开其数值输入框。
-
(可选)输入新的尺寸值。
-
按 Enter 键接受尺寸值。
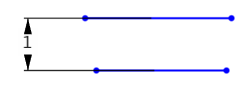
当标注两条线之间的尺寸时,这意味着没有视觉平行约束的并行性。
- 单击“尺寸”工具()。
- 单击第一个角点
- 单击与第一个角点成对角线的第二个角点。
- 以一定角度拖动以定位对角线距离尺寸
- 单击可同时放置尺寸并打开其数值输入框。
-
(可选)输入新的尺寸值。
-
按 Enter 键接受尺寸值。
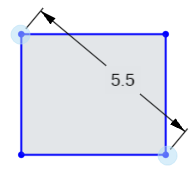
这表示了 2 个点之间的最短距离。
- 单击“尺寸”工具()。
- 单击第一条线的端点
- 单击第二条线的端点。
- 以一定角度拖动以定位直线距离尺寸。
- 单击可同时放置尺寸并打开其数值输入框。
-
(可选)输入新的尺寸值。
-
按 Enter 键接受尺寸值。
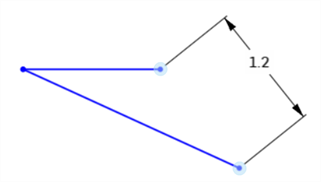
这将测量 2 点之间的线性距离。
- 单击“尺寸”工具()。
- 单击第一条线的端点
- 单击第二条线的端点。
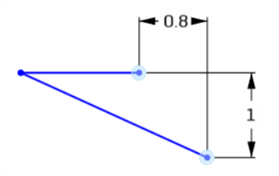
- 直接向上/向下或向左/向右拖动以定位线性距离尺寸。
- 单击可同时放置尺寸并打开其数值输入框。
-
(可选)输入新的尺寸值。
-
按 Enter 键接受尺寸值。
- 单击“尺寸”工具()。
- 单击圆的边。
- 拖入或远离圆以定位直径尺寸。
- 单击可同时放置尺寸并打开其数值输入框。
-
(可选)输入新的尺寸值。
-
按 Enter 键接受尺寸值。

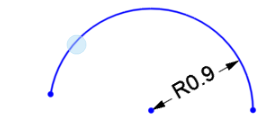
- 单击“尺寸”工具()。
- 单击圆弧。
- 拖入或远离圆弧以定位半径尺寸。
- 单击可同时放置尺寸并打开其数值输入框。
-
(可选)输入新的尺寸值。
-
按 Enter 键接受尺寸值。
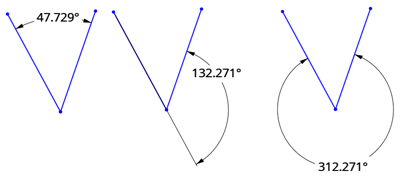
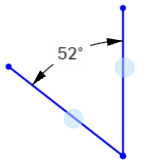
- 单击“尺寸”工具()。
- 单击第一条线。
- 单击第二条直线,与第一条线成一定角度。
- 向内或向外拖动以定位角度尺寸。
您也可以将尺寸拖动到要为其定义角度的象限:
- 单击可同时放置尺寸并打开其数值输入框。
-
(可选)输入新的尺寸值。
-
按 Enter 键接受尺寸值。
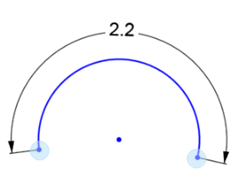
- 单击“尺寸”工具()。
-
单击圆弧的第一个端点。
-
单击圆弧的第二个端点。
-
单击圆弧。
-
拖动以定位圆弧长度尺寸。
-
单击可同时放置尺寸并打开其数值输入框。
-
(可选)输入新的尺寸值。
-
按 Enter 键接受尺寸值。
它标注样条或样条点上的 2 个点与任何其他草图点之间的距离。
-
单击“尺寸”工具(
)。 -
单击第一个样条点。
-
单击第二个样条点(或任何其他草图点)。
-
拖动以定位距离尺寸。
-
单击可同时放置尺寸并打开其数值输入框。
-
(可选)输入新的尺寸值。
-
按 Enter 键接受尺寸值。
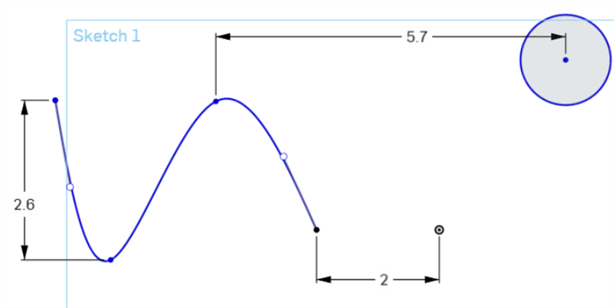
如果以一定角度拖动光标来定位直接距离尺寸,也可以获得样条曲线或样条点上的两点与任何其他草图点之间的直接距离。请参见直接距离。
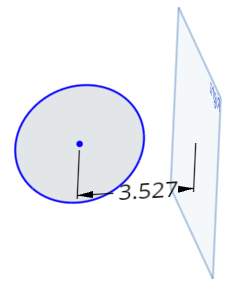
它标注了平面与任何其他草图点之间的距离。
-
单击“尺寸”工具(
)。 -
单击草图点。
-
单击平面。
-
拖动以定位距离尺寸。
-
单击可同时放置尺寸并打开其数值输入框。
-
(可选)输入新的尺寸值。
如果输入新的尺寸值,草图何图元会移动,同时平面保持原位。
-
按 Enter 键接受尺寸值。
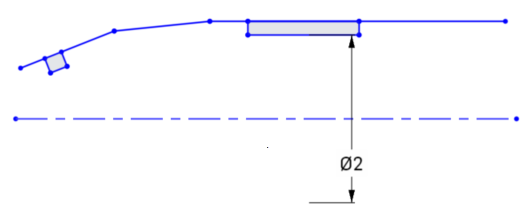
创建圆、点或非构造线与构造线之间的中心线尺寸。例如,为旋转操作标注零件的尺寸。先创建其中一个草图图元与构造线之间的距离尺寸,然后将鼠标移至构造线的对面。将鼠标移过构造线会在距离尺寸和中心线尺寸之间切换状态:
-
单击“尺寸”工具(
)。 -
单击圆或草图点。
-
单击“构造线”。这会导致 2 条线之间的距离尺寸:

- 拖动到构造线的另一侧,可以同时将状态切换到中心线尺寸并定位中心线尺寸。
- 单击可同时放置尺寸并打开其数值输入框。
-
(可选)输入新的尺寸值。
-
按 Enter 键接受尺寸值。
联动尺寸对于保持设计意图很有用,例如确保间隙或壁厚度高于一定的值。
- 默认情况下,尺寸是驱动尺寸。右键单击尺寸值,从环境菜单中选择“更改为驱动/联动尺寸”:
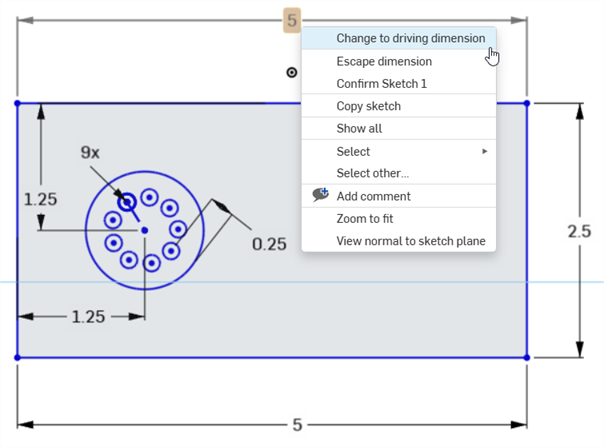
- 驱动尺寸显示为黑色,可以编辑。
- 联动尺寸显示为浅灰色,无法编辑(如有必要,请先将其切换到“驱动”尺寸,然后再进行编辑)。
- 如果添加到草图的某个尺寸过度定义了草图,会自动将该尺寸设为“联动”。
- 您可以在能够添加驱动尺寸的任何位置添加联动尺寸。
- 联动尺寸反映隐式尺寸的值,它不会更改几何图元。
- 当尺寸从联动切换到驱动时,会更改几何图元。如果将联动尺寸更改为驱动尺寸会导致草图过约束,红色的指示器会像往常一样显示。
Onshape 允许用户为某些尺寸输入负值,但并不是全部。要了解哪些尺寸接受负值,请参见下文。
Onshape 允许为以下输入负值:
- 距离尺寸
- 角度尺寸
- 直线长度
- 样条尺寸
Onshape 不允许为以下输入负值:
- 圆弧尺寸
- 半径或直径尺寸