Understanding Teams
![]()
![]()
![]()
Only available for
Users need permission to create teams and assign other users to teams. Specifically, a user needs the Manage users and teams global permission in order to create teams and assign other users to a team. In Professional and Standard subscriptions, by contrast, anyone is able to create teams.
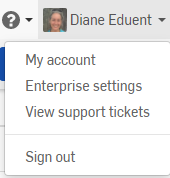
Teams may be found under Enterprise settings on the Account user menu. At the creation of an Enterprise, all members of the enterprise are automatically added to the All enterprise users team.
You can create teams in order to group users together for the purpose of sharing documents more efficiently. Once the team is created, you can select the team name instead of entering many users' individual email addresses during a Share operation.
It is not required that the members of a team have anything in common, just that they are part of the same enterprise.
Any user with the Manage users and teams global permission can create a team and adds other users to it. Team members receive notification emails when they are added and removed from a team, and users may belong to more than one team at a time.
Any user can share a document with a enterprise-owned team, even if they are not a member of the team. However, in order to share a document with a team external to the enterprise, the user must be a member of that team.
Sharing a document with a team does not give any team member additional permissions on the document other than those the owner/creator of the document allows during the Share operation.
At any point, any user with the proper permissions may remove any member from the team, thereby removing any Share permissions previously made through the team (but not Share permissions made on an individual basis).
When a user is removed from a team, any document shared with that user through the team becomes unshared and removed from their Documents list.
Any user with the proper permission may delete the team at any time. Upon deletion of the team, all documents shared with the team become unshared from the team members and removed from their Documents lists.
As with all sharing operations, the following permissions are able to be assigned during the Share operation:
- Owner - Full permission to the document including: Edit, Share, Comment, and Transfer ownership
- Can edit - Permission to edit the document and comment on it.
- Can view - Permission to only view the document (read-only).
Keep in mind that Edit and View permissions include Comment permission. Use the individual check boxes below the email address field to include any of the following permissions:
- Copy - Ability to make a copy of the document
- Link document - Ability to link to this document from another document (via inserting an assembly, part, image, drawing, etc)
- Export - Ability to export the document
- Share - Ability to reshare the document with another user
- Comment - Ability to make comments within the document
All permissions allow users to collaborate in the same workspace. A user with view only permission may be in the same workspace as a user with edit permission. The view only user is unable to edit the workspace but they are able to see any changes made to workspace in real time.
Following are instructions for:
- Creating teams and adding members
- Removing members and admins
- Deleting a team
- Additionally, see information about Sharing and assigning permissions to documents
- Expand the menu under your user name in the top right corner of the page and select Enterprise settings:

- On the page that appears, select Teams from the left panel.
-
In the top left corner, click the Create team button
 .
.
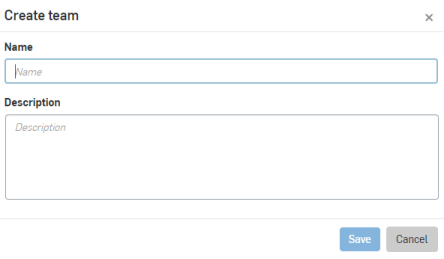
- Enter a name for the team, and a description, or statement of purpose:

- Click Save. The team is created and you are automatically added as the first member.
-
To add the other members of your new team, click Add users.
- Add members by entering individual email addresses (or copy/paste a comma-separated list of addresses) and click
Add:

- When finished adding team members and assigning roles, click Teams to the left of the specific team name you just created (at the top of the page) to return to the list of teams.
You see the new team listed on the Teams page.
Creating a team also adds a filter for that team in each member's Documents filters on their Documents page. These filters list all documents shared with a particular team.
Each team is assigned a Team ID that can be used in a customized release or obsoletion workflow. Edit the team details to see this ID and copy it to the clipboard for use in a custom workflow. For more information on customizing release and obsoletion workflows, see Creating a Customized Release Workflow.
Only users with the proper permission (Manage users and teams global permission) can remove themselves or a member from a team, as long as they are not the only user with that permission left on the team. Users removed from a team receive an email notification and are removed from the Share list of any document shared with the team. Those documents are removed from the user's Documents page.
- Expand the menu under the user name in the top-right corner of the page and select Enterprise settings:

- Select Teams in the left panel to access the list of teams.
- Select the team in the list from which you wish to remove yourself or another member.
- Right-click on a user name and select Remove user.
Any member of the team with the proper permission can delete the team at any time. This immediately removes the share permissions for all documents shared with the team and removes the documents from each member's Documents list. Right-click on the team name and select Delete or click the Delete
![]() button in the top left corner.
button in the top left corner.
iOS and Android support for Teams is limited to viewing only. Teams can only be created and edited on the desktop (browser) platform.