Designing Release Management Processes
Onshape provides generic release management workflows that you can start using immediately. This process is described in Typical Release Workflow. In addition to this generic workflow, Onshape provides you with the ability to design and create your own custom release management work flow, and then publish that workflow for your entire organization to use. You can even create multiple workflows, to cover specific release management needs within your organization.
In order to access this capability you must be assigned the administrator role of your Onshape enterprise.
Onshape provides many options that govern the release management behavior. Depending on your business processes, these settings can be defined as the default rules for how releases behave, what are the conditions for release and what revision schema can be used, for example. These options can be set through the Release management page of the Company/Enterprise Settings in your Onshape subscription.
In many cases, when multiple release processes are implemented in an organization, the various processes might require disparate release settings. The default settings, that are defined in the Release management settings page, can be overridden on a per-release process basis through implementation of customized release processes that can also override the defaults on a per process basis.
Read on to learn the process of creating your own custom release management workflows, and how to implement them in Onshape.
What is involved in creating a custom workflow
Basically, Onshape uses a JSON file to define the layout and behavior of the workflow for both release and obsoletion workflows.
- Download the basic Onshape JSON file
- Customize the file following the JSON syntax provided in this topic
- Upload the customized JSON file back into an Onshape document
- Publish the customized workflow to your organization
These steps are explained in detail below.
Download the JSON file
You can find a basic JSON file within your organization's Onshape domain:
- Sign in to your Onshape account.
- Navigate to your Company/Enterprise settings > Release management page.
- Under the Workflows heading, select the type of workflow you want to create: Release workflow or Obsoletion workflow.
- Select Onshape default ... in the drop down.
- Click the View in document link next to the dropdown:

Since the JSON file format is a text format, it is on one hand fairly easy to understand but on the other hand, it can become quite complex, specifically as our workflows get more complex. While Onshape will inform you of some mistakes in the syntax and formatting of the document, it isn’t fool-proof and many options while legal, can still cause your workflow to fail.
For detailed instructions on how to set up and use multiple Onshape workflows, please see the Creating a Customized Release Workflow topic.
Customize the JSON for your organizational needs
First, let’s understand what JSON is. JSON stands for JavaScript Object Notation. It is a lightweight format for storing and transporting data. JSON is often used to send data to and from a server and a web page. The JSON format is "self-describing" and easy to understand.
JSON is built on two structures:
- A collection of name/value pairs. In various languages, this is realized as an object, record, structures, dictionary, hash table, keyed list, or associative array.
- An ordered list of values. In most languages, this is realized as an array, vector, list, or sequence.
These are universal data structures. Virtually all modern programming languages support them in one form or another. It makes sense that a data format that is interchangeable with programming languages also be based on these structures.
In JSON, the structures take on these forms:
An object is an unordered set of name/value pairs. An object begins with { left brace and ends with } right brace. Each name is followed by a : colon and the name/value pairs are separated by a , comma.
The following is representative of what you will see in the Onshape Workflow JSON. This example defines an employees object: an array of 3 employee records (objects):
{"employees":[
{"firstName":"John", "lastName":"Doe"},{"firstName":"Anna", "lastName":"Smith"},{"firstName":"Peter", "lastName":"Jones"}]
}
The Onshape JSON format
In Onshape there are 4 objects in the JSON file, as follows:
- Options - Define Release settings
- Properties - Set Attribute definitions
- States - Control Node definitions
- Transitions - Specify Link definitions
Release Settings is a group of 10 possible settings related to the behavior of the release of a document. All of these settings can be found in the Release Management page of the Company/Enterprise settings; however, definitions in a JSON workflow file override any corresponding Release Management settings defined in Company/Enterprise settings.
Attribute Definitions are attributes that appear in the Release Candidate dialog. These attributes can be assigned to one or more nodes in the workflow and may be of different types, mandatory, or optional, and can contain default values, for example; “Part Number”.
Node definitions define the type of nodes that are contained in the workflow and which attributes are assigned to the node. For example, “Pending" or "Released.”
Link definitions are automated actions that can occur during the transition. They not only connect the nodes together, but also define which attributes appear on the release candidate at this specific transition. For example, sending an email notification to users assigned to the next action.
The following section details the various sections in the Onshape workflow document and all the possible options for the various attributes.
Defining the Workflow JSON
The first section of the JSON file enables workflows to have unique settings that govern the conditions for a release. All of these settings can be found on the Company/Enterprise Settings -→ Release Management page. Remember, settings defined in the JSON workflow override whatever is defined on the Release Management page.
The following “options” object defines all the possible name/value pairs, however, any of these is optional. If not defined, then the values defined on the Release management settings page are used by default. For example:
"options": {"revisionSchemeId": "5851740138fa98150a8f953e",
"requireApprover": true,
"requireAllApprovers": true,
"disallowCreatorAsApprover": true,
"requireNote": true,
"autoObsolete": false,
"errorOnFeatureListErrors": true,
"errorOnRolledBack": false,
"errorOnAssemblyErrors": false,
"errorOnDrawingOutOfDate": true,
"errorOnAssemblyRefsOutOfDate": true,
}
The following details each of these options.
revisionSchemeId
A unique ID obtained from the Release management page of the Company/Enterprise settings. Select a revision scheme type in the dropdown, copy the subsequent Revision scheme ID and insert into this field in the JSON.
Onshape offers different types of revision schemes. These can be:
- Alphabetical
- Numeric
- Custom
Many organizations will use a numeric scheme in pre-production workflows and then transition to an alpha-based scheme for post-engineering release and change processes. Checking this option will enable the workflow to override the defaults defined in the Release settings and use either a numeric or alpha based revision scheme.

Click the Copy to clipboard button so you can use the appropriate Revision scheme ID in your JSON workflow.
requireApprover
When set to “true” this option makes the Approver field on the Release Candidate dialog mandatory. This option is directly related to the “Require Approver in the Release dialog” option in the Release management settings.
requireAllApprovers
In many workflows, parallel approvals might be required by different groups or people in the organization. Setting this option to “true” requires all groups or people named as approvers to approve the workflow before it can move on to the next node.
If the workflow is rejected by any approver then it moves to a Rejected state immediately.
If this option is set to “false” it is enough that one of the defined groups or people accepts the release for it to move on to the next node. In this case only one approval is required.
disallowCreatorAsApprover
In many organizations the person who initiates the release process cannot be the person who also approves it. When set to “true”, this option enforces this policy and prevents a release candidate from being approved by the creator of the release candidate.
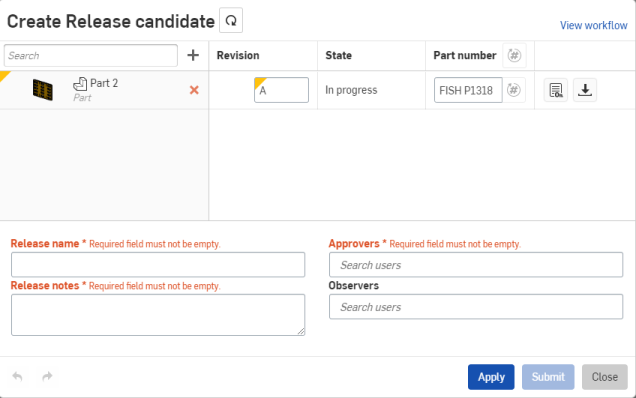
requireNote
When set to “true” this option enforces the policy that the “Note” field must be filled in at every stage of the workflow. This means that the initiator of the workflow must enter a Release note, and each person who approves (or rejects) it must enter a comment. The Release note field becomes required in the dialog, as shown in the image above.
autoObsolete
Setting this option to “true” causes previous revisions of a given item to be made obsolete immediately upon releasing a new one. Onshape allows multiple releases to be active at once, but some organizations require only one release of a part, assembly or drawing to be active at any given time.
The following four options are related to errors with the document being released. For each of these options, when the corresponding condition is met on a release item, setting the option to “true” creates an error on the item and prevents the release candidate from being submitted. If the option is set to false, there will still be a warning on the item, but the release can still be submitted.
Setting these options to “true” will prevent the release candidate from being submitted. These settings override the default behaviours defined in the Company/Enterprise Settings → release management page.
errorOnFeatureListErrors
This option prevents the release of a part if there are any errors in the Feature list.
errorOnRolledBack
This option prevents the release of a part if the rollback bar in its Part Studio is not at the end of the Feature list.
errorOnAssemblyErrors
This option prevents the release of an assembly if the assembly contains any errors.
errorOnDrawingOutOfDate
This option prevents the release of a drawing if it is not up to date.
Properties are attributes that can be added to the Release candidate dialog. These attributes can be of different types, have default values and can be made to be mandatory or optional.
The following is an example of different attributes defined in the properties object of the Onshape Workflow JSON file.
"properties": [
{"name": "Compliance Approval",
"propertyId": "comp_app",
"valueType": "USER",
"defaultValue": [
"5e5d30bbc7dcaf1000b61484"
]
},
{"name": "Observers",
"propertyId": "observers",
"valueType": "USER"
},
{"name": "Rejection Reason",
"propertyId": "rejres",
"valueType": "STRING"
},
{"name": "ECR",
"propertyId": "ecr",
"valueType": "STRING",
"defaultValue": ""
},
]
This section details the various attributes and their values available for the properties object.
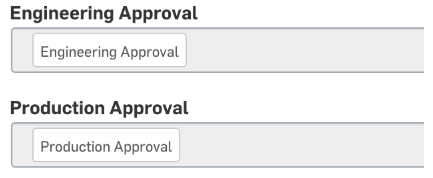
name
The value for the name attribute can be any string. This property is displayed above the respective field in the Release candidate dialog as shown here:
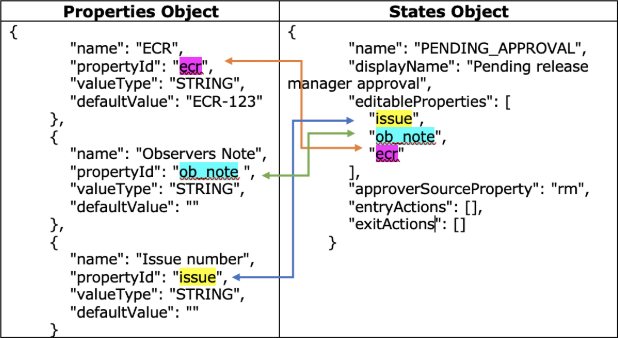
propertyId
The propertyId value can be defined as a unique string within the context of the JSON. This value is used in other objects to define which attributes will be made available at which stage in the workflow.
It is advisable to define a property Id that makes sense to you so that it can easily be referenced later on; for instance make the property ID self explanatory such as “rejection_reason” or “Engineering_approver”.
Property IDs must be unique (and not match Onshape's hard-coded Name, Description, or Comment property ID).
valueType
The value of this attribute defines the type of field to be displayed in the Release candidate dialog. The types of values that can be used here are:
- USER - Creates a field where you can select users, teams, and roles. A default value for this type of property must be an array of user, team, or role IDs.
- STRING - A normal text field.
- INT - An integer value (whole number).
- DOUBLE - A decimal value.
- DATE - Provides a date selection control.
- ENUM - Provides a Select control, pre-populated with defined values from which the user can select one. A property using this type must also provide a list of values for the field. The following is an example of the ENUM format:
{"name": "Inventory Disposition: (Scrap, Return to Supplier (RTS), Rework, Use As Is)",
"propertyId": "disposition",
"valueType": "ENUM",
"enumValues": [
{"value": "Scrap"
},
{"value": "Return to Supplier (RTS)"
},
{"value": "Rework"
},
{"value": "Use As Is"
}
],
"defaultValue": "Use As Is"
},
defaultValue
The defaultValue provides a value with which to pre-populate the field that is being defined. The value defined here must match the type of field selected in the valueType attribute.
For USER-type properties, the default value must be a list of user/team/role IDs, as shown below. For all other types, it is a single value (either a number or string).
“valueType”: “USER”,
"defaultValue": [
"5e5d30bbc7dcaf1000b61484",
"5e5d30bbc7dcaf99634a82219"
]
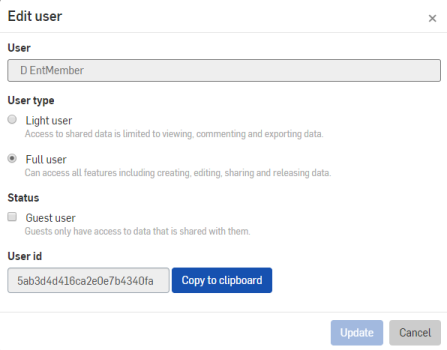
User and team IDs can be found on the Users or Teams pages in the Company/Enterprise settings. Right-click on the user or team and select the “Edit” option from the context menu, then use the “Copy to clipboard” button next to the ID field to copy the value.
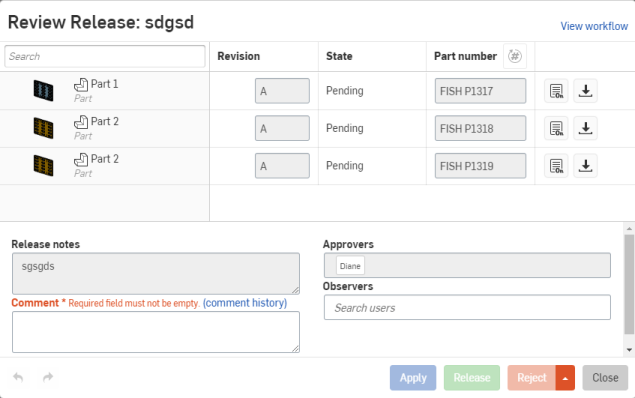
States define the actual nodes in the workflow, the state of the release package as it moves through the release process. As a package reaches these state nodes, it is assigned the state defined in the “Name” attribute, as shown here:
The following is an example of some states:
"states": [
{"name": "IN_PROGRESS",
"displayName": "Create Engineering Release",
"entryActions": [],
"exitActions": []
},
{"name": "PENDING",
"displayName": "Project Admin Approval ",
"approverSourceProperty": "pr_appr",
"editableProperties": [
"pr_appr"
],
"entryActions": [
{"name": "markItemsPending"
}
],
"exitActions": []
}
]
name
This attribute acts as a unique identifier for the state node. It may be any string, as long as it is unique within the workflow.
displayName
The displayName attribute value is the name that is shown on the workflow diagram. It can be any string that describes what that node is. Depending on the complexity of the workflow, multiple states may have the same display name even though their names (IDs) are different.
approverSourceProperty
This attribute tells which (if any) of the properties defined in the Properties object will act as the Approvers for a state. The value of this attribute must be the propertyId of a USER-type property. Users and teams in that property are notified of the release’s progress and must approve the release before it can move out of the state.
| Property | State |
{"name": "Compliance Approval", "propertyId": "comp_app", "valueType": "USER" } |
{"name": "PENDING", "displayName": "Compliance Approval", "approverSourceProperty": "comp_app" } |
notifierSourceProperty
Similarly to approverSourceProperty, this attribute is the propertyId of a USER-type property, and defines who is notified (if anyone) when the workflow reaches this state. This is the same as users, or groups of users, who could be following the release but not necessarily participating in it.
entryActionsand
exitActions
The Onshape workflow enables some predefined actions to occur at certain points in the workflow. These actions may update items’ metadata or send notifications to stakeholders. State entry and exit actions occur when a release enters or exits a state.
Actions are detailed in the The Actions section of this document.
editableProperties
This attribute allows a list of properties to be defined that can be edited at this stage in the workflow. The value of this attribute must be a list of propertyIds from properties defined in the workflow.
requiredProperties
This attribute defines a list of attribute values that are mandatory and must be filled in before the release can exit this state. Like editableProperties, the value of this attribute is a list of propertyIds.
If a propertyId is marked required, it is automatically made editable.
requiredItemProperties
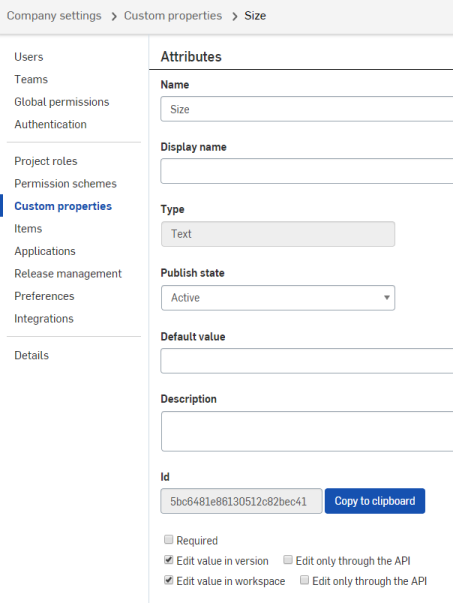
This attribute is a list of metadata property ids - from the “Custom properties” page of Company/Enterprise settings, not workflow properties - which must be filled in on each item in the release candidate before it can move on. To get the property id, double-click on a property on the Custom properties page and use the “Copy to clipboard” button next to the Id field. You must be a company admin to do this.
The following is an example of a state object consuming custom properties:
{"name": "PENDING",
"displayName": "Project Admin Approval ",
"approverSourceProperty": "pr_appr",
"editableProperties": [
"pr_appr"
],
"entryActions": [
{"name": "markItemsPending"
}
],
"exitActions": [],
"requiredItemProperties" : [
"5d655b8dbce891151cf7d9d9",
"5d0be2b3374eae12dd6eda1c"
]
}
Transitions are what connect the states together. They handle interactions between states and what happens when a user clicks a button like “Submit” or “Approve” in the release dialog.
The following is an example of a transition object.
{"name": "ADVANCE_TO_QA_APPROVAL",
"displayName": "Advance",
"type": "APPROVE",
"uiHint": "success",
"sourceState": "PENDING_OPERATIONS_APPROVAL",
"targetState": "PENDING_QA_APPROVAL",
"actions": [
{"name": "sendUserNotifications"
},
{"name": "sendEmailNotifications"
}
]
}
Graphically represented as:

The following details the options available within a Transition object and shows how a transition relates to states.
name
This should be a unique descriptive name that enables you to easily identify the purpose of this transition object without having to look at where it originates and where it ends. In more complex flows there will be a lot of transitions and even more states – this makes for a very long and possibly confusing JSON. By using descriptive names you can simplify the JSON and help eliminate errors.
displayName
The displayName is a value that is displayed on the workflow diagram. As shown above, the transition display name is defined as “Advance”. There are no specific rules for this other than this should be descriptive and representative of the transition.
type
This defines the type of the transition between states. There are three possible types as follows:
- SUBMIT
- APPROVE
- REJECT
Always, the first transition will be one of type SUBMIT, following this the subsequent transitions should be of type APPROVE or REJECT.
The following details each type option:
- Submit
- Performs various “initialization” on the release as it goes out of set up and into the workflow, such as kicking off thumbnail generation for configured parts in the release, connecting linked document/version IDs, etc.
- Only the release creator has the ability to execute SUBMIT transitions.
- Transitions out of the initial state should be Submits.
- A Submit that isn’t an initial transition does not have any special abilities.
- Approve
- Marks the user as having approved a release candidate (turns the token green in the release dialog).
- If company policies are set to REQUIRE ALL APPROVERS, the transition will not be performed until all approvers have approved.
- Generates assembly/drawing content references for items.
- Only one transition of this type is allowed out of a state.
- Only an approver of the current state (or an admin) has the ability to approve.
- Reject
- Marks the user as having rejected a release candidate (turns the token red in the release dialog).
- Only an approver of the current state (or an admin) has the ability to reject.
uiHint
This defines the color of the next node in the graphical display, as well as its corresponding button in the Release dialog. There are currently three values available for this attribute, which are Bootstrap UI styles:
- "primary” – blue
- “success” – green
- “danger” - red
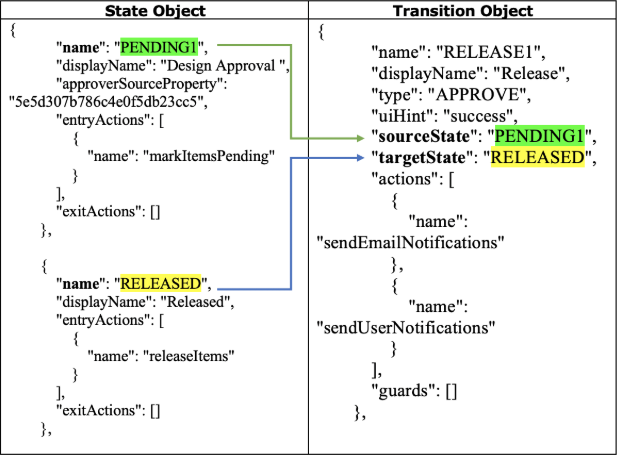
sourceState&
targetState
The sourceState attribute is the name of the state object that this transition is initiated from. The targetState attribute is the name of the state object it goes to.
Naming is very important in order to provide coherence and reduce possible errors; for this reason, it is highly advised to use descriptive names for the state objects. With larger workflows, this can quickly become complex and error prone. The following diagram shows the mapping between the state object and the source and target state attributes.
actions
Like states, transitions can have actions performed in addition to simply moving the release candidate to the next state. This attribute defines a list of actions in the same fashion as the entryActions and exitActions attributes on states. A transition’s actions are executed before the source state’s exitActions and the target state’s entryActions.
This section details actions that can be assigned to States and Transitions. While most of these actions are common to both, some of them do have restrictions both on ordering and where they can be placed.
Actions are represented as a JSON object with a single attribute: “name”.
The following is an example of a state with entry or exit actions:
{"name": "PENDING_ENGINEERING_APPROVAL",
"displayName": "Pending engineering approval",
"approverSourceProperty": "engineers",
"entryActions": [
{"name": "markItemsPending"
}
],
"exitActions": []
}
Within a transition, they can be defined as follows:
"actions": [
{"name": "sendUserNotifications"
},
{"name": "sendEmailNotifications"
}
]
These are the actions that are currently available:
- markItemsPending - Change the metadata state of all items in the release to Pending. This action is not allowed on Obsoletion workflows and can’t be used after the markItemsRejected or the releaseItems actions.
- markItemsRejected - Change the metadata state of all items in the release to Rejected. This option is not allowed on Obsoletion workflows and can’t be used after the markItemsRejected action or before the releaseItems action.
- releaseItems - Change the metadata state of all items in the release to Released and create revisions for them (auto-obsoleting other revisions if specified in company policy or the workflow specific options). This option is not available for Obsoletion workflows.
- obsoleteItems - Change the metadata state of all items in the package to Obsolete and obsolete their corresponding revisions. This option is not available for release workflows.
- sendUserNotifications - Send a message in the Onshape notifications panel that a transition has occurred, including a link to open the release candidate. This action is only allowed on transitions.
- sendEmailNotifications -Send an email notification containing a link to open the release candidate in Onshape. This action is only allowed on transitions.
Both of the above notification actions send notifications to the creator of the release candidate, as well as the approvers and notifiers of the source and target states (if any), as specified in those states’ approverSourcePropery and notifierSourceProperty attributes. For approvers, the notifications will contain a call to action to approve the release candidate.
Tips and Tricks
The Onshape Workflow designer can help
If you edit the JSON in Onshape you will see the workflow represented as a graph with nodes (states) and edges (transitions), updating in real time as you change the JSON. The editor will highlight JSON formatting errors.
If you have a preferred editor you can edit the JSON in that program and then upload to Onshape. The graphical designer will still highlight any errors.
The Onshape workflow designer will catch JSON formatting errors and certain types of construction mistakes, like an invalid ID. However, it won’t tell you, for instance, that you used the wrong transition type - that’s why testing is important!
Use descriptive names and IDs
As the workflow gets more complex it will be difficult to keep track of the IDs you used for various objects – such as properties. This can become specifically complex when connecting state objects with the transition objects sourceState and targetState attribute values.
By using descriptive and always unique names, you can simplify the JSON and eliminate many possible errors.
Spelling and case matter
In the JSON, the object names and the attribute names, as well as some of the values, are hardcoded and are case sensitive. For example, the attribute “sourceState” is not the same as “sourcestate”. Typos like this will cause the workflow to fail.
This topic uses the correct syntax throughout and you should either copy and paste these keywords from here or from one of Onshape’s provided example workflows.
Test your workflow
Before using in production, run your workflow on a test part and make sure that it works. Make sure that the release preferences you used in your workflow provide the expected behavior.
Have groups assigned to the various stages in the workflow accept the release.
Creating Obsoletion workflows
This topic shows how to create Release workflows. The process for creating an Obsoletion workflow is the same, however it has no releaseItems action, instead it has an obsoleteItems entry action on a state object. When publishing the workflow, select the “Obsoletion Workflow” radio button option instead of the “Release workflow” option in the Publish dialog. These workflows will appear under the “Obsoletion Workflow” tab in the release settings.
Within an obsoletion workflow, you can mark an item to be re-released with this syntax:
{"name": "Mark revision as re-releasable",
"propertyId": "os-mark-rereleasable",
"valueType": "BOOL"
}
Deleting workflows
Currently, even if you delete an Onshape document containing a workflow JSON document, the workflow will remain in the list of available workflows in the Release settings - you can uncheck the workflow so that it won’t be available for selection when creating a Release candidate. While this is not optimal, there is a best practice for creating test workflows and then updating them to a release version.
A Document containing a workflow JSON file behaves exactly the same as any Onshape document. This means that the document can only be edited while you are in the Workspace (usually Main). You can publish a workflow document from the workspace and this will create a version of the document. When publishing you have the ability to overwrite the existing workflow.
This methodology enables you to experiment with different options and workflows before publishing (releasing) a workflow that meets your organizations needs.